In order to reduce heat loss through building structures, they are equipped with a layer of thermal insulation. Almost all types of insulation need to be protected from the penetration of atmospheric water from the outside and household fumes from the inside.
The construction of a vapor barrier cannot be neglected, because this component of the insulation system plays no less a role than waterproofing.
It is especially important to know how a vapor barrier is constructed for a ceiling in a wooden floor, since materials that are extremely sensitive to excess water are used in its construction.
Types of vapor barrier materials
Waterproofing floor slabs is significantly different from vapor barrier. For the average person, these terms sound almost the same, but at the same time they are different things. Ordinary plastic film is quite capable of coping with excess moisture, which it does not let through at all. But in this case, the moisture does not come out, but condenses on the film itself. Drops flowing onto the finishing material have a destructive effect. Cold rooms allow the use of such films.
Properly executed ceiling vapor barrier is the ability of materials to allow vapor to pass through, but in certain quantities. Controlled release will protect the attic floors and walls of the building from the negative effects of moisture. For houses this is the most optimal solution.
Modern materials allow you to achieve the desired effect. The choice here is quite wide. As a rule, waterproofing is performed at the same time as vapor barrier. The protective equipment used has similar characteristics and in some cases can be interchanged.
The following types of materials are used:
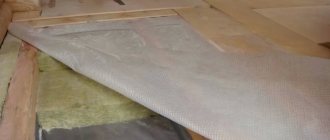
- Polyethylene. Typically used to protect the ceiling of a cold attic. Reinforced films are also produced, which have a long service life and are less susceptible to damage by rodents. Foil film materials can also act as thermal insulation, since when laid down with a metallized layer they reflect heat well.
- Polypropylene. This material is characterized by high mechanical strength due to a layer of cellulose and viscose fibers, which also serves as waterproofing. This layer absorbs moisture without allowing it to pass into the insulation. This option can be used when construction has been delayed and the building has been outdoors for more than a year.
- Glassine. This is quite thick cardboard, which is impregnated with a bitumen composition. It has been used in construction for decades. It is used to vaporize the attic floor in a sauna or bathhouse.
- Membranes. There are one-sided and two-sided. The former are cheaper, but only allow moisture to pass in one direction. The latter effectively work on both sides. “Smart” membranes that are able to absorb liquid and regulate humidity have proven themselves very well. At the same time it can act as waterproofing.
Possible difficulties and errors in the process
The main difficulty is the incorrect placement of the two-layer hydro- and vapor barrier. What else you should pay attention to:
- The connecting seams of a water barrier or vapor barrier must be connected carefully, without gaps. Any penetration of moisture into the insulation will have a detrimental effect on its properties.
- It is encouraged to overlap steam and waterproofing on walls with a depth of 10-15 cm, so that the corners do not allow vapor and moisture to pass through.
- The vapor barrier is laid on top of the subfloor. It should not be locked inside the layers. The material itself must be tensioned and not sag.
- Before starting work, the subfloor is prepared, debris is removed, and the surface is cleaned. If there are cracks, they need to be repaired.
Errors when laying vapor barriers are discussed in the video:
Step-by-step guide to creating a vapor barrier
As in the case of a roof, the ceiling structure is a multi-layer “pie”, each layer of which performs an important task:
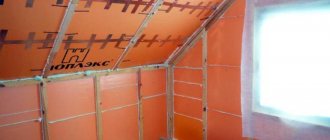
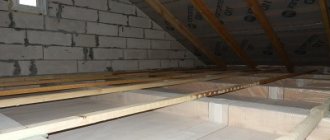
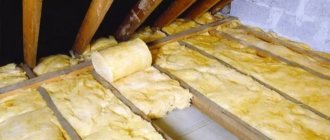
The top layer is the attic floor. It protects the structure from dust and dirt, allowing you to move freely around the attic without the danger of damaging the heat-insulating layer. The attic floor is laid across the floor beams on counter beams laid along the beams. These bars press a layer of vapor barrier against the beams. As a result, a ventilation gap is formed between the floor and the film. A layer of heat-insulating material is laid between the floor beams. For this, slab or roll insulation is used: polystyrene foam, polystyrene foam, stone, basalt or mineral wool. Board materials are preferable because they do not wrinkle over time, and polystyrene foam and polystyrene foam practically do not absorb moisture. True, they are flammable, so it is also not advisable to use them. Thus, the most effective and safest are slab materials - stone or basalt wool
You should pay attention to their density and thickness. At winter temperatures below -250 °C, a material with a bulk density of at least 500 kg/m3 should be used. Rough ceiling boards are attached to the floor beams below
They are the basis for subsequent finishing of the underlying premises. A layer of vapor barrier is attached to the sub-ceiling. The vapor barrier layer is pressed against the rough ceiling using lathing, which is made from wooden blocks or metal profiles (if the ceiling is finished with plasterboard). The bottom layer of the ceiling is the finishing of the ceiling, which is made from any materials - wooden slats, lining, wood boards, plasterboard, etc.
The rough ceiling boards are attached to the floor beams below. They are the basis for subsequent finishing of the underlying premises. A layer of vapor barrier is attached to the sub-ceiling. The vapor barrier layer is pressed against the rough ceiling using lathing, which is made from wooden blocks or metal profiles (if the ceiling is finished with plasterboard). The bottom layer of the ceiling is the finishing of the ceiling, which is made from any materials - wooden slats, lining, wood boards, plasterboard, etc.
The structure of an insulated ceiling of a wooden house
Vapor barrier layout diagram
Vapor barrier layout diagram
The main function of the vapor barrier film is to protect the wooden floor of the log house and insulation from the penetration of steam and condensation. In this regard, the vapor barrier must be located between the insulation layer and the finished floor.
As a rule, two layers of vapor barrier are laid, the second layer is placed between the heat insulator and the subfloor. The bottom layer prevents moisture from the soil from penetrating into the structure. Often, instead of a second layer of vapor barrier, a waterproofing film is laid.
A lower vapor barrier must be done when the subfloor is located in close proximity to the ground or is located above a damp basement.
Wooden attic floors pose problems for vapor barriers
In winter, heated air containing moisture tends to escape through the wooden ceiling to the outside. Stopping this movement of moisture by completely blocking the ceiling and walls is a bad decision. You can't do that!
Then, which vapor barrier is better for the ceiling of a wooden house? It is recommended and has long been proven in practice that moist air must be passed through the ceiling in doses. The fact is that a small amount of moisture will not harm people’s health if it is an attic. Even after penetrating through the ceiling, moisture will evaporate after some time in a ventilated attic space. It simply creates a barrier with partial passage of moist air: one part leaves through the vapor barrier, and the second goes through the ventilation, or simply evaporates inside the room.
That is why our ancestors did not bother with arranging a solid vapor barrier, but used a vapor barrier for the ceiling in a wooden house made of natural materials. A layer of dry sawdust mixed with clay allowed some of the wet steam to pass through, and the moisture evaporated faster than it could have accumulated there. This vapor barrier remained dry. In addition, it also served as insulation.
Vapor barriers are generally not required in climates where temperatures are above freezing. It is enough to insulate the ceiling and walls, then cover it with plasterboard slabs, stick on moisture-resistant wallpaper or paint with acrylic paints. There will be no problems with the formation of condensation from the penetration of moist air into wooden structures and insulation, because the air temperature in the room is almost the same as the temperature of the insulation, external walls and attic floor.
For condensation to form, there needs to be a temperature difference between the inside of the building and the insulation. In climate zones with positive temperatures, the requirements for vapor barrier of the ceiling in a wooden house are not so strict. An exception is rooms with high humidity: laundry, bathroom, bathhouse. For such rooms, the vapor barrier is replaced with moisture-resistant latex paints, which allow the walls to breathe without completely clogging them.
Now there is no need to use old vapor barrier techniques for the ceiling in a wooden house. It uses materials and insulation that are easy and quick to install.
According to the principle of operation, they disperse moist air and pass through the membrane structure only a small part of the moisture, which, before it has time to accumulate, quickly evaporates, and the insulation remains dry. To avoid problems with choosing a vapor barrier for a wooden ceiling and which side to lay it on, instructions are given on the packaging or the seller provides such information.
For example, a three-layer foil PVC film should be with the aluminum side facing the room and create a barrier between the vapor barrier and the insulation of the attic floor in the following sequence, if you look at the ceiling while lying on the sofa:
- Finishing material (paint, wallpaper, decorative sound-absorbing tiles, etc.).
- Finish ceiling (GVK sheets, chipboard, OSB, lining).
- Air gap 10-20 mm.
- Foil or other vapor barrier film.
- Subfloor (board, sheet material).
- Thermal insulation.
- Air gap.
- Floorboard or sheet underlay for laminate flooring.
- Soundproofing underlay for laminate flooring as a flooring option for an attic.
This is what a layer cake should look like. And this is a diagram of a somewhat simplified version of a vapor barrier for the ceiling in a wooden house. Here, at the bottom of the joist there is no block, but the finished ceiling is immediately lined (OSB, chipboard, moisture-resistant plywood). The vapor barrier is attached to the joists with staples.
Whether or not to install a vapor-permeable moisture-proofing membrane depends on the attic space: if there is a possibility of water spilling on the floor, then it is necessary. The membrane is designed in such a way that it retains water but allows air to pass through, you just need to lay it out correctly. There are instructions on which side, relative to the movement of air flow, to lay the membrane film.
Advice. The ideal option is the presence of air gaps, the cheapest way to create additional thermal insulation and disperse moist air for faster evaporation.
Always find a way to ventilate the room. This will also help remove moist air quickly. If you find that mold or mildew is forming on wooden structures, treat the disease immediately. Call a specialist or determine the cause yourself, but you must act immediately.
Waterproofing walls and ceilings
In the bathroom of a wooden house, no less attention is paid to waterproofing the walls and ceiling than to treating the floor. Protection from moisture is required not only in places exposed to water, but also in areas relatively remote from its sources
Do not forget that the bathroom produces steam, which will certainly condense on any surfaces.
To reduce the amount of condensation, it is recommended to choose a room for the bathroom that is surrounded by other rooms, where no wall is a side wall of the building. If this is not possible, then maximum thermal insulation of the external walls must be ensured.
Before installing waterproofing, it is necessary to complete the installation of water supply and sewerage pipes. Wooden walls and ceilings are sheathed with rolled waterproof material.
Work begins with cleaning the surface; it must be dry and clean. The ceiling and walls are coated with primer. Next, sheets of waterproofing material are glued overlapping, the joints are secured with construction tape, and the coating is allowed to dry.
Instead of rolled materials, you can use special moisture-resistant mastics for wood. They are easy to work with, they do not require preliminary priming, you just need to apply an even layer of the composition and let it dry.
After a few days, you can move on to interior decoration. The choice of material depends entirely on the wishes of the owners. You can use lining, you can use the usual tiles, the interior looks great in which wood and tiles complement each other.
Production
In recent years, many methods have been tried for making concrete supports for sleepers. There are 4 methods of technology used in the world for the production of reinforced concrete products. They provide reliable and proven products that meet the requirements of international standardization.
Carousel type with delayed release of molds
The finished solution is poured into cassette molds, in which the product is compacted. The technology involves the use of cassette forms consisting of 6 elements. The prepared mixture is poured into cassettes, where it is then compacted. To obtain the required adhesion and provide prestress, a reinforcement cage is installed in the solution. The finished product is removed from the fixtures after reaching the highest strength indicators. After completion of the production cycle, the molds freed from the structures are sent for the next batch of products.
Linear type
For this type, a conveyor is used, on which forms for pouring concrete are installed in turn, their length is 100 meters. The side parts of the devices are covered with special devices that transmit mechanical stress to the metal frame. As the mixture matures, stress is distributed over the entire concrete surface.
Mold dismantling method with the following voltage
This technology involves the use of special shapes and embedded templates that mark the location of the reinforcement cage. The forms are filled with concrete mortar, which is compacted. When the mixture sets, steel rods are fixed into it. After the concrete has matured, the finished sleeper is removed from the mold and template. The production of products occurs continuously.
Installation of floor heating systems
The design of underfloor heating involves the installation of heating mats or infrared roll-out floor heating systems under:
- finishing coating laid using a floating method (parquet boards, laminate);
- floor tiles or porcelain stoneware laid in wet areas.
Laying tiles on an infrared floor heating system.
Manufacturers recommend installing a heat-steam-hydrobarrier with the reflective side facing the heating element. However, here you can successfully use ordinary foil-coated isolon or EPS, the cost of which is 2-5 times less than its membrane competitor.
Installation of a bathroom ceiling in a wooden house
When constructing an interfloor ceiling, several layers are used (from top to bottom):
- finishing and subfloor of the attic or upper floor;
- vapor barrier layer;
- floor beams serve as load-bearing structures;
- thermal insulation material protects the room from below from heat loss and impact noise from above (the insulation is placed between the beams);
- a layer of waterproofing to protect against moisture rising from below;
- wooden ceiling in the bathroom or other type of finishing of the ceiling surface.
To protect against rot, mold and insect damage, load-bearing wooden floor structures must be treated
It is important to know how to treat wooden beams. Antiseptic impregnations are used to protect against rot and mold, and fire retardants are used to reduce the flammability of the material.
Materials for vapor and waterproofing
There are the following types of vapor barrier materials:
- polypropylene films;
- foil products;
- reinforced perforated films made of polyethylene;
- multilayer membranes;
- coating materials (suitable for concrete and brick structures).
Polypropylene and polyethylene films are the cheapest vapor barrier for ceilings in wooden floors; the price of the material starts from $0.5 per linear meter. For strength, such films are reinforced with fabric or mesh. Their advantage is high strength and UV resistance. Reinforced films come in single-layer and multi-layer foil films. The latest products are better because they additionally reflect heat back into the room. Polypropylene films absorb moisture and allow steam to pass through.
A foil vapor barrier consists of several layers and performs the following functions: it protects against water vapor, reduces heat loss and reduces impact noise. It is usually produced in the form of the following roll materials:
- With one-sided foil coating and a fiberglass mesh base (suitable for rooms with high humidity and temperature).
- Three-layer material based on fiberglass mesh with two-layer foil (most often used for attic spaces, but also suitable for wooden floors).
- A one-sided foil product with a self-adhesive base (not used for installation on uneven surfaces).
- Three-layer vapor barrier based on kraft paper and molten polyethylene with a one-sided foil coating.
- Products based on foamed polyethylene coated with aluminum film (there are single-sided, double-sided and adhesive-based).
Diffuse membranes are classified as breathable materials. They are considered the most expensive vapor barriers
One-sided membranes allow steam to pass in one direction, so it is important which side they are mounted to the insulation. Double-sided membranes allow steam to pass in two directions, so there are no problems choosing which side to install
These products are also divided into single-layer and multi-layer. The latter accumulate moisture inside the panel and gradually release it. “Intelligent” membranes absorb steam and regulate the humidity of materials. At the same time, they act as a water barrier. These are the best, but also the most expensive materials for vapor and waterproofing of floors.
What material to choose for a bathroom in a wooden house?
Now let’s figure out which vapor barrier is better for the ceiling of a wooden house. In wooden buildings, experts recommend using only modern materials to protect against moisture and condensation. Only high-quality vapor barrier will protect wood from mold and rot.
To protect the bathroom ceiling in a wooden house from moisture, professionals advise using the following products:
- Alucraft is a three-layer material consisting of a thermo-reflective foil layer, a base of polyethylene film and kraft paper. It protects the ceiling in the bathroom and kitchen well from moisture, and is also suitable for use in public saunas.
- Izospan B is a two-layer vapor barrier, which is laid before installing the heat-insulating layer. The product retains condensation well and then evaporates it.
- Penofol is distinguished by its unique characteristics. It simultaneously performs the functions of a heat, steam and waterproofing layer. There are products on sale with one or two foil coatings, as well as a vapor barrier on a self-adhesive base. Penofol A with a foil layer on one side is suitable for home use. This material is easy to work with. They are reasonably priced.
Tips from the professionals
If this is your first time installing a vapor barrier yourself, follow the recommendations below:
- laying the insulator overlapping involves inserting the edges of adjacent pieces by 10 cm;
- The joints must be covered with tape. The best option is to use double-sided adhesive tape;
- if screws or nails are used as fasteners, choose galvanized elements;
- when heating pipes or water pipes pass next to the vapor barrier layer, the vapor barrier is wrapped around the pipe and securely fixed;
- if there is a layer of foil on one side of the vapor barrier film, then the vapor barrier is laid with the foil side down.
The basic rule that must be observed during the installation process is reliable waterproofing. If the seal is broken, the effect of the vapor barrier will be minimal.
If you work efficiently and follow all stages of installation, follow the instructions, you will be able to provide high-quality vapor barrier for the ceiling in a wooden house, which will reliably protect the insulation and the internal structure of the ceiling surface.
Vapor barrier membranes
Diffuse (breathable) membranes are classified as the most effective and expensive vapor barriers. This group of products contains both single-sided and double-sided materials
The former allow steam to pass through only in one direction, so during installation it is extremely important not to confuse which side to lay the fabric towards the insulation and which to the load-bearing surface. Double-sided ones work in both directions, so there are no problems with them
Vapor barrier membrane
Vapor barrier membranes can be single-layer or multi-layer. The first ones have an affordable price. Multilayer ones have the function of accumulating moisture inside the canvas and gradually releasing it.
A special group of products in this category are “smart” membranes. They are able not only to absorb vapors, but also to regulate the level of humidity of surrounding materials, while simultaneously acting as a water barrier. These membranes are the best choice. But their cost is beyond the means of most private home owners.
Vapor barrier membranes "TechnoNIKOL"
The undoubted leader in this category of materials is TechnoNikol membranes. For vapor barrier of wooden ceilings, the “Optima” brand is recommended for use. This hydrophobic polypropylene membrane consists of three layers:
- upper and lower polypropylene;
- medium – high-tech functional vapor-permeable film.
Specifications:
- weight 80 g/m2;
- thickness 0.3 mm;
- vapor permeability 5 g/m2x24 hours.
The TechnoNIKOL Optima membrane is produced in rolls. The width of the canvas (roll height) is 1.5 m. The length is 50 m. This material is optimal for vapor barrier of any type of ceiling, intended for installation indoors and on external surfaces of buildings.
Superdiffuse reinforced membrane
Superdiffuse membrane
Diffusion membrane films "TechnoNikol"
Rules for installing a vapor barrier for a wooden ceiling
Step 1. The membrane is laid directly on the insulation so that the smooth side is directed inside the room.
Step 2. It is possible to lay the strips in different directions: parallel or perpendicular to each other.
Step 3. During installation, an overlap of at least 10 cm must be observed.
Step 4. To attach the membrane to a wooden floor without insulation, use galvanized screws with wide heads or staples with an anti-corrosion coating.
Step 5. The joints of the canvases are sealed using self-adhesive mounting tape.
Use foil tape, width 50 mm, length 30 lm.
Step 6. When laying on a floor with insulation, it is necessary to bring the edges of the panels onto the wall by 15-20 cm and secure them with suitable materials (slats or metal profiles).
Step 7. Mounting tape is glued along the perimeter of the vapor barrier layer.
Step 8. Between the membrane and the material with which the wooden floor will be lined, leave a ventilation gap 3-4 cm wide.
Step 9. Particular attention is required to the places where the vapor barrier comes into contact with the structural elements of the floor and the building: beams, chimneys, ventilation ducts.
Ceiling vapor barrier in wooden floors
During installation of the vapor barrier, it is necessary to ensure that the film is laid evenly, without folds or sagging. A guideline for correct installation can be a colored stripe, which is the center line along the entire length of the canvas.
Video - Ceiling vapor barrier
An equally good choice are multilayer vapor barrier membranes of other brands: Dorken Delta REFLEX/REFLEX PLUS and Dorken Delta LUXX. The first is a four-layer material, is particularly durable and can provide 100% waterproofing of a wooden floor. The second has limited vapor permeability, ensuring gradual and uniform removal of moisture from the living space.
Review of offers from vapor barrier manufacturers
Izospan
Trusted manufacturer
A domestic manufacturer offering a wide selection of hydro, wind and vapor barrier films. The vapor barrier segment is represented by the following materials: Izospan RS, Izospan FS, Izospan B, Izospan B fix. Izospan materials are of excellent quality.
Izospan B and Izospan B fix (with adhesive tapes) – a two-layer polypropylene sheet that is smooth on one side and rough on the other. During installation, the smooth side is located towards the insulation, the rough side - inside the room. Temperature range from – 60 to + 80 °C. The width of the rolls is 1.6 m. Price is 18 rubles/m2.
Izospan RS is made of polypropylene and additionally reinforced with reinforcing mesh. Application temperature from – 60 to + 80 °C. Can also be used as waterproofing. Width 1.6 m. Cost – 56 rubles/m2.
Izospan FS differs from Izospan B by having a metallized layer applied on one side, which reflects heat (infrared radiation) into the room. Suitable for use in ordinary rooms at temperatures from – 60 to + 80 °C. Cost 37 rub/m2.
Vapor barrier for wooden houses Tyvek (DuPont)
Premium segment
Tyvek AirGuard® SD5 is a two-layer polyolefin membrane with the highest price in the selection at RUB 113/m2. The material is intended for internal use at temperatures from – 40 to + 80 ° C. During installation, the material is placed with an inscription inside the room. Material width 1.5 m.
The manufacturer’s line also includes the AirGuard® Reflective product, which consists of four layers and has increased vapor resistance.
Isover
High quality material
Two-layer vapor barrier from a well-known manufacturer of insulating materials. Temperature range from – 60 to + 80 °C. Width 1.5 m. Cost 26 rubles/m2.
TechnoNIKOL vapor barrier film
Proven quality
Another well-known domestic manufacturer that produces high-quality roofing and facade materials. Its vapor protection is represented by three films.
TechnoNIKOL Alfabarrier 2.0 is a two-layer film for use in insulated pitched roofs, attics and walls. Limits steam from entering the insulation. Able to accumulate excess moisture and then remove it. Film width 1.5 m.
TechnoNIKOL Alfabarrier 3.0 is a three-layer translucent material reinforced with reinforcing mesh. Has increased vapor permeability. Material width 1.5 m.
TechnoNIKOL Alphabarrier 4.0 - consists of four layers, including a layer of foil to reflect IR radiation back into the room. Absolutely no steam leaks. Roll width 1.5 m.
Vapor barrier for roofing Yutafol
Vapor barrier films Yutafol N 110 Standard and Yutafol N 110 Special consist of three layers: external polyethylene, internal - polyethylene reinforcing mesh. In the production of Special film, a self-extinguishing reagent is used. The film is sold in rolls 1.5 m wide.
Yutafol Thermo reflective film is produced for baths and saunas.
Vapor barrier membrane Ondutis (Ondutis)
Professional polypropylene vapor barrier films for the protection of insulated walls, ceilings and roofs. The material is mounted with the smooth side to the insulation. The width of the rolls is 1.5 m.
Ondutis B passes less than 10 g of steam per m2 per day. Operates at temperatures from -40 to + 80 °C. Price 17 rub/m2.
Ondutis Smart B is distinguished by the presence of adhesive strips applied to it to seal the joints, which simplifies installation. Cost 19 rub/m2.
Polinet
Polinet Lux 2x50 is a three-layer reinforced transparent film made of high-pressure polyethylene. Application temperature from -40 to + 80 °C. The roll width is 2 m to speed up installation. Price 21 rub/m2.
Vapor barrier Izobond
The vapor barrier from this manufacturer is similar in markings and technical characteristics to Izospan. For ordinary rooms, you can use material with the index “B”.
For the bathhouse, Izobond FB 1x12 is offered - this is a vapor barrier based on kraft paper with aluminum foil. Temperature from -10 to + 140 °C. Cost 41 rub/m2.
Vapor barrier for bath Isobox (Isobox)
Isobox Thermo 70 is also more suitable for use in steam rooms, due to its high heat resistance from -40 to + 130 ° C. However, thanks to the standard roll width of 1.5 m, it can be conveniently used in any room. The material consists of three layers with a polypropylene base and reflective foil. Cost 26 rub/m2.
TDStels (TDStels)
Reinforced three-layer high-pressure polyethylene film 2 m wide with a temperature range of use -40 to + 80 °C. Cost 28 rub/m2.
Kolotek
Vapor barrier film at an extremely low price - only from 8 rubles/m2. Judging by the information on the packaging, the manufacturer’s films are similar in labeling and purpose to Izospan.
Unispun (Unispan)
For vapor barrier, the manufacturer offers polymer material Unispun B. The width of the rolls is 1.6 m. The cost starts from 10 rubles/m2.
Technohaut
The materials are mainly represented by three-layer reinforced vapor-waterproofing films: Technohaut B70, Technohaut C90, Technohaut D90, Technohaut H110. The price starts from 17 rubles/m2.
There is also a material with a reflective layer Technohaut FS150, which can also be used in a bathhouse.
At the end of the review, we note that when choosing vapor barrier films, it is better to give preference to trusted manufacturers, whose products have been used on the market for a long time and have proven themselves positively.
The use of films and membranes with a reflective metal layer will reduce heating costs, since such films will reflect part of the infrared radiation back into the room, reducing heat loss.
Materials for ceiling vapor barrier
High-quality and reliable ceiling protection requires an integrated approach:
This will reduce heat loss and eliminate the possibility of condensation in the room. For vapor barriers in residential premises, roll-type materials and an innovative material - a membrane vapor barrier - are used.
Polyethylene film
Universal and, perhaps, the most popular material. The main technical feature is strength, since the film is additionally reinforced with fabric or mesh.
The range includes films with and without perforation. Perforation does not affect the main characteristics. The installation is carried out with an overlap, the joints are fixed with a special tape.
Foil vapor barrier made of polyethylene
Durable material, as one surface is reinforced with mesh. This type of vapor barrier is used when two problems need to be solved:
- prevent the formation of condensation;
- reduce heat loss.
The metallized side of the film reflects heat and does not allow it to evaporate. For maximum effect, the material is mounted with the reinforced side down so that the heat is reflected into the room.
Polypropylene film
The material contains a layer of cellulose-viscose fiber that effectively absorbs moisture. Thanks to this vapor barrier structure, moisture does not penetrate into the insulation layers. During the installation process, an air gap is left between the thermal insulation and the vapor barrier layer so that the moisture completely evaporates.
Waterproofing membrane
An innovative material that is used most often today. It has maximum vapor permeability; in addition, the membrane absorbs moisture and does not allow it to pass into the insulation layers.
Experts include varnishes and mastics as alternative protective materials.
Why is it necessary to insulate the ceiling from exposure to water vapor?
Human actions at home involve many processes in which large evaporations of moisture are formed, rising to the ceiling. This includes cooking, performing hygiene procedures in the bathroom, and operating automatic washing machines and dishwashers. All of the above factors significantly increase the humidity in the room.
Ceiling vapor barrier has the following features:
- increases the service life of materials used for the construction of roofing structures and wooden beams;
- protects the attic floor from moisture, which is a source of mold;
- prevents warm air from escaping from the rooms, acting as insulation;
- increases the fire safety of wooden materials on the ceiling.
A reliable design of a vapor barrier structure, the use of high-quality materials for its installation, and step-by-step adherence to the technological process will increase its service life, without the need for frequent repairs and maintenance.
What is ceiling vapor barrier
Vapor barrier is a necessary element when forming a ceiling in a private house. It is a non-woven material in the form of a membrane or film. Its obligatory nature is explained by the presence of humidity in the rooms where people live. Moisture rises to the ceiling and cannot leave the room due to the presence of the ceiling, so it settles on it, thereby destroying wood, insulation, metal components and even the finished ceiling. This not only affects the duration of operation, but also the microclimate inside the house: an unpleasant odor appears, traces of rot and dampness appear, and the number of pathogens in the air increases.
A vapor barrier membrane for the ceiling provides protection to the ceiling and prevents moisture from settling on its surface. Evaporation from the vapor barrier itself occurs unhindered and does not leave behind such negative consequences.
The role of vapor barrier in construction
Building structures from the inside are constantly affected by steam flows released during mandatory household work, breathing of household members, hygiene procedures, etc.
The penetration of water suspended in the air into the systems that enclose and insulate a house negatively affects their technical and operational properties.
On surfaces moistened with steam, colonies of fungi settle at a brisk pace, rendering almost all types of building materials unusable with amazing speed.
Wooden elements rot and collapse. Wet insulation loses about half of its insulating qualities, because... The water contained in it significantly increases thermal conductivity.
Warm air, saturated with water suspended in it, always rushes to where the pressure and moisture content are lower. In our northern latitudes, for most of the year, the temperature and humidity parameters inside buildings are significantly higher than outside them. This feature explains the direction of movement of steam-containing air masses moving from indoors to the external environment.
The predominant volume of evaporation, according to its own physical nature, is directed upward to “exit” into the atmosphere through the enclosing systems.
The most active air flows that include steam “attack” the ceiling, the upper segment of the walls and the roof structure. It is they who need to be strongly protected from the penetration of water in the air.
The process of air masses flowing into areas with lower pressure and water saturation is called diffusion. There is nothing particularly scary about it if no mistakes were made during the construction of building structures. Humid air simply will not penetrate the thickness of the insulating pie or move outside without causing damage to the structure.
However, if during the construction of a house with insulation systems violations of technological rules were made, water will begin to linger in the enclosing structures.
At best, the result will be increased heat loss, a feeling of eternal cold and dampness. In the worst case, destruction or damage to structures is coming, dictating mandatory major repairs.
How to mount correctly
Correct installation of the most popular vapor barrier materials:
- Izospan. Consists of two layers. One side is rough, the other is smooth. It is pressed against the wooden floor with the pile facing towards the reinforcement. It is necessary to retain condensation, preventing it from settling on attic wooden surfaces. Thermal insulation is laid on the smooth side.
- It is better to fasten the vapor barrier to the ceiling with metal brackets, but you can also use nails. Pieces of hard cardboard measuring 5x5 cm should be placed under the caps.
- Membrane materials. They work with them according to the pictogram printed on the surface.
- Penofol. Foamed polyethylene, on one side of which foil is glued. In the middle is high-strength long-fiber kraft pulp paper. Placed with foil towards the ceiling.
- Polypropylene film. Consists of two layers - rough and smooth. Mounted like isospan.
- Metallized film glued to foil. Placed with film towards the insulation.
- Microperforated membrane. This multilayer material contains polypropylene and spunbond. The marked side should face the insulation.
- Polypropylene. Its basis is a smooth laminate. The other side is wicker.
Watch the video on how to properly install a vapor barrier on the ceiling at the end of the article. It shows step-by-step work with similar materials. From the film you will learn how the tool that drives staples into a vapor barrier material works.
After completing the preparatory work, the actual installation begins. First you need to determine which side to lay the vapor barrier on the ceiling. If you plan to use a material that is not on the list, then always point the rough or fleecy side indoors.
Today, you can make a ceiling vapor barrier quickly and without extra costs. Detailed information and step-by-step instructions are mostly found on the Internet, although you can do without them.
The insulating layer is installed in accordance with the selected material. In particular, roll insulation is usually laid overlapping, not forgetting to seal the joints with adhesive tape. Insulation is placed on its smooth side.
Not all owners of country houses yet know which side the vapor barrier is laid when insulating the ceiling, although there is more information on the global network than is required. The location of the rolled strips below the required level prevents the penetration of moisture and steam into the attic. Some homeowners attach this material to pre-prepared galvanized profiles, while others prefer wooden sheathing or simply slats. The main thing to remember is that violating the integrity of the materials is completely unacceptable, otherwise all the work will be in vain. If ruptures are detected, they should be immediately sealed with tape or other adhesive tape.
Oddly enough, anyone, even an untrained person, can do a ceiling vapor barrier correctly. No experience or skills required. All you need to do is lay one sheet after another, securing them to the ceiling.
The price of a vapor barrier for a wooden ceiling can vary from several hundred to several thousand rubles. It all depends on the material itself, its weight, length, etc. However, buyers always have a choice, since manufacturers offer a fairly wide range of such products. A video will show you how to work with this or that vapor barrier for a ceiling in a wooden floor. After watching it, you can quickly insulate the floors without qualified help.
For such work you will need a minimum set of tools and auxiliary materials:
- Metallic profile.
- Wooden slats for sheathing.
- Wood saw.
- Construction stapler and staples. To save money, you can use nails.
- Self-tapping screws and galvanized screws.
- Metal scissors.
- Double-sided and regular tape.
If the family budget does not allow the use of expensive vapor barrier material with a reflective mirror surface, then you can buy a regular but reinforced polyethylene film. At a low price, it is incredibly effective.
Author - Anton Fadeev
Required materials and tools
To vapor-waterproof the ceiling you need to buy:
- vapor barrier membrane type A (AM) - needed to protect the heat-insulating layer laid on top of the ceiling in a ventilated roof;
- vapor barrier film type (B);
- vapor barrier mastic for treating concrete floors outside the room (instead of film);
- double-sided tape or adhesive tape;
- polyurethane (acrylic) glue;
- fasteners: staples, nails, strips;
- construction stapler, if the film is secured with staples;
- hammer;
- roulette;
- construction knife (scissors);
- scaffolding, trestles or a strong table.
Perforation of fabric and leather: what is it and how is it done?
- home
- Youth news
- Blogs
- Contacts
Home Youth news - Business - Health and sex - Internet - Society - Incidents - Sports and extreme sports - Photo news Blogs - Personal - Oleg is a great man - Blog about sports and a healthy lifestyle - Supergirl - Life is good - 4 C : Sports, Sex, Style, Madness - Thematic -- Auto, motorcycle - - Home, family, children - - Health and beauty - - Internet blog - - Interior, furniture - - Fashion and style - - Real estate - - Leisure and tourism —— Work, business —— Religion, unidentified —— Sports blog —— Construction, repairs —— IT technologies —— Humor —— Miscellaneous — Press releases Contacts Published: October 19, 2022 203 times
- font size decrease font size increase font size
- Email mail
Perforation is a figured slotted pattern made using a laser beam. Previously it was used for bags and shoes. Today, it is fashionable to decorate clothes with perforations: women’s dresses and skirts, tunics, vests, jackets, trousers, etc. This technique appeared in the 70s of the 20th century and then it was called guilloche. The craftsmen used an electric tool with a long thin needle, which resembled a regular soldering iron, and made lace trim on the fabric. To do this, a piece of paper with a pattern and a cloth were placed on top of the glass, and a lamp was placed below, which illuminated the pattern. Next, holes were burned into the fabric with a needle.
General installation recommendations
Ceiling vapor barrier is recommended to be done from inside the room. Exceptions are regions where air temperatures in winter can reach -32°C. In such climatic conditions, it is recommended to install a vapor barrier on both sides.
Features of ceiling vapor barrier
The method of installing a vapor barrier material depends on its type and the surface on which it is attached. But in any case, general recommendations must be followed.
Before laying the vapor barrier, all surfaces are carefully sealed
Particular attention should be paid to joints near the chimney, ventilation ducts, etc. Vapor barrier is laid between the room and the insulating layer. The material should cover the entire surface without gaps or tears. The secured material should not sag, but it should also not be pulled too tightly, since temperature changes will cause it to rupture. During operation, strips of material are laid overlapping (approximately 10 cm)
Joints in corners are unacceptable; a solid sheet is laid in them to ensure high-quality coverage of the entire surface of the corner.
The vapor barrier material must be laid with an overlap (approximately 10 cm)
The allowance around the perimeter of the ceiling must be at least 20 cm. Before installation, the ceiling surface is cleaned of dirt and dust, then thoroughly dried.
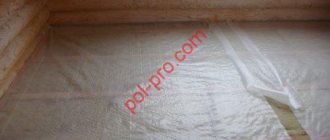
Laying of roll materials
Vapor barriers based on glassine, foil, films and membranes are mounted identically. Therefore, the methodology outlined in this section is applicable to all roll materials. She explains how to install a vapor barrier on the ceiling correctly. When laying rolled materials, the general requirement must be observed: the vapor barrier must create a closed loop around the heat insulator on all sides without gaps or gaps. Therefore, when insulating the ceiling, proceed as follows:
- A 25 mm thick edged board is sewn onto the underside of the floor beams. The distance between the beams should be taken based on the width of the insulation used. Typically this value is 600mm.
- Insulation is placed in the resulting “boxes” in several layers. When the thickness of the insulation slab is 50mm, there can be from two to four or more such layers, depending on the climatic conditions of the area. In this case, the joints of the layers should not coincide with each other.
- It should be taken into account that for proper operation, the vapor barrier layer and the insulation must have a gap of 50mm between each other. The boards according to claim 1 have a thickness of 25mm. Therefore, it is necessary to move the bottom layer of rolled material away from the insulation by another 25mm. Perpendicular to the boards and, accordingly, parallel to the beams with the same interval of 600 mm, we sew a 25 mm thick batten. We fasten the boards and slats to the beams with nails or self-tapping screws of suitable length.
- It is more convenient to install a vapor barrier on the ceiling with two people, if possible three. This way the work is done faster and more correctly. One worker holds the edge of the rolled material, the second unrolls the roll, and the third attaches the material to the slats using a construction stapler.
- The material is laid with an overlap of panels of 150-200mm. The joints are taped with special tape. It is usually offered to be purchased along with film or foil.
When laying, special attention should be paid to which side to lay the material towards the insulation. Typically this point is indicated on the accompanying label of each roll.
If such a hint could not be found, then you can follow the general rules: • glassine is laid with cardboard to the insulation; • foil vapor barrier - foil into the room; • films, as a rule, have one smooth surface - it should be towards the insulation, the other - fleecy - this one - into the room.
After filing the ceiling from below, we move on to the upper part of the ceiling, which faces the cold attic. The vapor barrier is installed here in the manner described earlier. It is also necessary to maintain a distance of 50mm from the insulation to the insulation. If the height of the beams is not enough, it is increased with a lath and rolled material is laid on top of the lath.
If the attic space is intended to be used for storing something, although fire safety standards do not encourage such use, it is necessary to lay a solid floor made of 35mm thick edged boards on top of the vapor barrier. To prevent the floorboard from coming into contact with the vapor barrier, it should be laid through a counter-batten sewn onto the beams on top of the insulating material. If the size of the attic does not imply economic use, it is not necessary to lay a solid floor. You can use a 35-50mm thick board to lay a passage along the roof ridge.
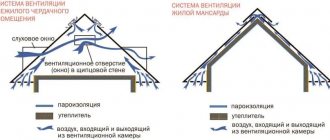
Where vapor insulation is absolutely necessary: the roof and more
Warm air, carrying with it a considerable amount of steam, always rises, so the first place where you need to organize the protection of materials from its effects is the roof.
In low-rise construction, its frame is always formed from wooden beams, and extremely rarely from rolled metal. The space of the frame is filled with insulating material, which is most often mineral-based wool.
All these materials are of organic origin and therefore subject to corrosion when exposed to moist air. And first of all, due to its low density, the insulation suffers, which loses its thermal efficiency when wet.
Roof insulation made of mineral wool
Use of polystyrene foam
The vapor barrier is attached from the inside
The order of placing the layers of the roofing pie
The use of polymer-based materials (the same polystyrene foam) that are insensitive to moisture instead of mineral wool makes the problem somewhat easier, but does not solve it completely (and such a roof breathes much worse). After all, there are still wooden structures that are also vulnerable and need protection. Therefore, the presence of a vapor barrier in the roof pie, which is attached to the side of the room, is mandatory.
Roof insulation with mineral wool involves the use of hydro- and vapor barriers
Floors and walls
The next structure in which the presence of a vapor barrier is required is beam floors, since insulation in them also forms the main part of the structure. This is especially true when it comes to basement and attic floors, on different sides of which there may be a temperature difference.
Flooring on wooden beams
Since steam rises from bottom to top, the vapor barrier is attached to the bottom surface, directly under the ceiling lining. If there are living spaces with the same temperature on both sides of the ceiling, sometimes a vapor barrier is not installed, believing that since there is no temperature difference, there will be no condensation. And indeed, there is no condensation. But you can’t escape the fumes!
Option without vapor barrier
A vapor barrier need not be installed only if all materials mounted on the ceiling, including the floor covering of the upper room, allow steam to pass through well. For example, wooden flooring, parquet. If the floor above is, say, tiled, or laminate on a polyethylene backing, then the steam entering the ceiling will not be able to pass through, but will accumulate in the insulation and on wooden structures.
That is, steam should either not enter at all, or be able to penetrate freely. The same principle is used when finishing external walls made of materials with a high degree of vapor permeability. These include cellular concrete blocks - foam and aerated concrete, as well as construction wood that needs exterior finishing.
Vapor barrier in the facade of a wooden house
To ensure that steam and condensate can be removed without hindrance, the facades are faced using a frame scheme, with the obligatory arrangement of a ventilated gap. If the decision is made to plaster or paint the outside, the materials used in the process must be vapor-permeable.
When facing such walls with brick without a ventilation gap, or ceramic tiles with adhesive, a material for interior decoration must be used that is impermeable to vapor, or a vapor barrier must be installed underneath it. All this is relevant - and even primarily for frame-type houses, which in their structure resemble the same roof.
As in the case of the roof, the vapor barrier film is installed from the inside of the room, under the finishing. However, no vapor barrier provides 100% protection, and in small quantities, through joints or damage to the film, steam still penetrates into the insulation. He must have the opportunity to go outside, which is why a ventilation gap is installed.
The principle of operation of vapor barrier on walls
Using the same principle, films are mounted on the roof.
Dear partners and customers
We are glad to see you on our website!
We draw your attention to the fact that recently there have been more frequent cases of counterfeit products appearing on the market, as well as fake Izospan materials that clone the appearance, symbols and use similar names. Deceived by the external similarity of products, buyers purchase low-quality goods, and as a result, problems arise with its use
Deceived by the external similarity of the products, buyers purchase low-quality goods, and as a result, problems arise with its use.
Hexa Nonwoven Materials LLC, a manufacturer of materials, has been working in the Russian construction market for 17 years, constantly developing its product range, improving technologies and equipment. We carefully control every stage of creating films and membranes so that the quality of our materials always remains at a high level, allowing us to create and maintain an atmosphere of comfort and coziness in your home.
Please be careful when choosing and purchasing materials! Remember that the joy of a low price quickly gives way to disappointment from a low-quality product.
How to spot a fake can be found here...
A post about my jamb and a couple of questions for you.
My head was spinning from all these steam-wind-hydro-thermal insulations. I decided to load you up a little too. It so happened that in our team, at the same time, three people (including myself) are building (or completing construction) wooden houses. And at the same time, all three had the same problem. Water leaked from the ceiling. It’s different for everyone, but according to the same principle. The first one had a tub of water pour out when the vapor barrier was pierced. The second one was screwing a self-tapping screw into the ceiling and it started dripping. The third one (that is, me) has only a little bit of dampness so far.
We all made the same mistake. We made this pie.
I also wrapped the beams. Well, there’s no other way for me, the ceiling of the first floor is already finished.
Then one hundred rocklights.
And everything was wrapped in vapor barrier.
Well, at least I didn’t have time to nail the board.
Three weeks have passed.
First, the first colleague reported the leak. I didn't pay any attention to it.
And a couple of days ago, the second one announced drops from a self-tapping screw screwed into the ceiling. After that, I sounded the alarm. Together we went to my construction site of the century, threw back the boards, pulled back the film
And they found drops of condensation.
Actually, after reading more than one volume of various forums and scrolling through all my work in my head, I came to some conclusions and even more questions.
1. Didn’t make a ventilation gap between the cotton wool and the top layer of film. I'll do it. 2. It was in vain to wrap the beams on top.
They will smell from the steam rising from the first floor. It is not clear what to do with this. After all, the ceiling has already been finished and painted.
3. It was impossible to put a vapor barrier on top of the cotton wool, this is understandable. Question
.
Does the second layer have to be a two- or three-layer membrane, or can you add a windscreen, it seems to allow steam to pass through?
The materials available are: mega-isol D, which was precisely stretched as a vapor barrier. And megaisol A, which I want to use as the top layer.
Yes, an addition. The second floor will be heated, but not soon. Now the task is to launch the first floor. But also lay out the subfloor of the second floor so that you can walk on it and, preferably, not open it in the future.
Is there a need for an air gap at the membrane?
You should always leave it on. A special gap is created on the bottom side of the films, up to 50mm wide. This will prevent condensation from appearing on the walls, floors and insulation.
It is important to avoid contact of surface cladding with the membrane. By using diffusion film for the floor, walls or ceiling, you save yourself from many problems, since its fixation can be done directly on the thermal insulation, OSB or moisture-resistant plywood
A ventilation layer will be required on the outside of the membrane. In the version with an antioxidant component, the air gap should be within 40..60mm on both sides.
If everything is clear with the walls and floor, then with the roof and ceiling the situation is different. When creating a ventilation gap, additional installation of a counter-lattice based on wooden blocks will be required. When organizing a ventilated facade, a gap is left during the construction of horizontal profiles and racks located perpendicular to the wall and film.
Installation features
The floor pie is made of several layers, including logs, a layer of waterproofing material, a subfloor, a layer of insulation, a vapor barrier layer, a layer of soundproofing material and a finishing coating. Before installing a vapor barrier, it is necessary to prepare the surface. If the structure is being built from scratch, then there will be no problems with installing this layer. The subfloor boards are simply treated with antiseptic preparations, leveled, and a vapor barrier material is laid on top of them. It is also recommended to coat the joists with protective compounds.
Floor insulation with mineral wool
If the house has already been built and is undergoing a major renovation, then first it is important to remove the old flooring and other previously used materials. Next, it is important to check the strength of the logs and the rough foundation - if they sag or rot, they will have to be dismantled and replaced with new ones
All debris is removed before further work, the smallest specks are removed using a vacuum cleaner.
The vapor barrier layer must be laid on a flat base without protruding nails. Otherwise it may be damaged
Immediately before installation, it is important to determine which side the vapor barrier material will be mounted. As for ordinary polyethylene film, there is no need to determine the side
If Izospan is used, then it is important to look at its color on both sides. It is laid with the light side facing the insulation. If the material has pile, then this side is mounted towards the room - the pile will absorb excess moisture.
Laying vapor barrier "Izospan"
On a note! To work with vapor barriers, a material such as tape is useful. It is used to connect the joints of individual coating strips. This is necessary to improve the tightness of the vapor barrier layer. In this case, individual strips of material are laid with an overlap of 15-20 cm on each other.
Installing a vapor barrier does not require special knowledge. The material is rolled out over the surface of the prepared floor and secured to it using small nails and a construction stapler. However, the easiest way is to use special adhesive tape.
Places that are difficult to reach or have an unusual shape are best treated with a bitumen-based coating agent. The reason for these actions is that in such places it will be quite problematic to lay and properly fasten vapor barrier material.
The process of laying "Izospan"
The insulation itself will be laid directly on top of the vapor barrier if the material is used to protect it from moisture not only from the inside, but also from the outside. Foam plastic, mineral wool or expanded polystyrene can be used as an insulating layer. It should fit very tightly to the wooden joists so that cold bridges do not form.
Another layer of vapor barrier is mounted on top of the insulation layer. It will no longer allow moisture coming from inside the room to reach the insulation and be absorbed into it.
On a note! Foil film perfectly reflects infrared radiation. Therefore, it is laid with the shiny side facing the room.
Penofol and Izolon product characteristics
Representing foamed polyethylene, coated on one or both sides with foil, the material is used for indoor work.
There are several types of products:
- Marking A – insulation, supplemented with foil on one side.
- Marking B – products with double-sided foil.
- The letter C means that one side is covered with foil, the other with adhesive.
- The letters ALP indicate products with a double-sided foil layer. Moreover, one layer of foil is additionally protected by film.
- The letters R, M are products with a one-sided foil coating and a relief structure of the insulation layer.
In residential premises, the first three types of insulators are used, and A is a vapor barrier material that should be used in conjunction with other thermal insulation coatings, and product types B and C are used as independent materials.
On a note! To ensure high-quality insulation of the ceiling with Penofol from the inside, the foil layer is turned inside the room, and not vice versa. In this case, heat loss is reduced. The strips are laid end to end, without overlapping one another, the seams are secured with tape.
Experts advise additionally forming the sheathing - this increases the energy efficiency of buildings. An air cushion on both sides of the insulation reduces heat loss. The sheets are mounted on the frame, pressed on top with another lathing, and then the ceiling is sheathed with polystyrene foam or expanded polystyrene.
What are the differences between materials
Izolon is a product with closed cells used for thermal insulation and noise reduction in rooms.
Several types are offered for sale:
- self-adhesive tapes;
- products marked 100 – non-crosslinked polyethylene foam;
- products marked 300 – chemically cross-linked polyethylene foam;
- goods marked 500 – physically cross-linked polyethylene foam;
- reflective insulation - foil polyethylene foam or metallized lavsan film.
In terms of its technical parameters, Izolon differs from other products with a density of 20-100 kg/m3 and a high reflectance of UV radiation (up to 97%). In addition, the materials do not absorb water, have reduced thermal conductivity and are protected from steam penetration.
Penofol is a layered product made of polyethylene foam with different densities, thicknesses and porosities. Light and thin products are supplemented with a foil layer and are used for heat, steam and waterproofing of rooms. It is characterized by ease of installation and low cost, which makes Penofol the most popular product for doing DIY work.
The main difference between the product is only in the structural structure of the insulation: Penofol is a layered product made of polyethylene foam, and Izolon is a cellular polyethylene foam product, cross-linked physically or chemically.
Pros and cons of insulation material
The advantages of foil insulation include the following qualities:
- A light weight. The materials will not overload even thoroughly worn floor slabs.
- Small thickness. The use of products will not reduce the usable area of the room.
- Flexibility, elasticity. This property makes it easy to install on any surface.
- Multifunctionality, versatility. There is no need to buy additional waterproofing or carefully level the ceilings.
- Efficiency of covering areas of different sizes. The work will not take much time.
- Ease of processing. Materials can be easily cut with a sharp knife.
- Resistant to water. Foil insulation does not absorb moisture, which means it can be laid out in bathrooms and on open verandas. In addition, the layer protects the base and structures from mold, rot, and corrosion.
The only downside is flammability. Foamed polyethylene burns itself and spreads combustion, so products need additional protection.
TechnoNikol
An international company offering products with extended service life. The vapor barrier guarantee is several decades. The range includes the following products:
- Universal vapor barrier film. Suitable for interior work. Can be installed on any surface, be it walls, ceiling or roof.
- Diffusion membrane. Designed to protect under-roof insulation. It is protected on both sides by polypropylene sheeting. Breathes, thereby providing good ventilation.
- Non-perforated vapor barrier film. A specialized material designed to protect the roof. Features reinforced mesh fabric for added durability.
Choose any of the brands presented in accordance with your current tasks, and the building structures of your home will be reliable and durable, and your living will be comfortable.
Polyethylene and glassine
These insulating agents create a barrier that is impermeable to moisture. However, they not only prevent water from getting into the insulating layer or getting on cold floor structures, but also prevent air circulation. Therefore, in a room with polyethylene or glassine as insulation from moisture on the ceiling, it is necessary to install a ventilation system to ensure normal air exchange.
There are not too many advantages of such insulators, but to be precise, there is only one thing - price. Both polyethylene and glassine are very inexpensive. At the same time, polyethylene lasts quite a long time, while glassine is characterized by fragility and rapid wear.