You will probably agree that when thinking about a roof, the first thing that comes to mind is a wooden rafter system on which tiles, corrugated sheets or other roofing covering is laid. If there is an attic under the roof, then insulation is inserted between the rafters. And if the attic is cold and not habitable, then the insulation is not in the roofing pie, but in the attic floor. We intuitively understand that the roof covering protects the roof elements and the house as a whole from atmospheric moisture and destruction.
However, when imagining the design of a future roof or ceiling, rarely does anyone immediately think that they must be protected from moisture penetration not only from the outside, but also from the inside of the house. Moisture coming in the form of steam from residential premises is no less destructive than rain or snow. But protecting your home from this harmful phenomenon is much easier and cheaper than from precipitation - you just need to buy the right vapor barrier.
Why is roof vapor barrier needed in wooden houses, and how to protect the ceiling (floor) from vapor, we describe below.
Installation Tips
The design of the vapor barrier film depends on the direction of use of the room, the type of surface of the fences and the type of material used.
There are quite a lot of vapor barrier and vapor-permeable films; in addition, their names are tricky; sometimes it is difficult to understand for what purpose this or that film was created. However, a vapor barrier film differs from a vapor-permeable film in terms of vapor permeability. So, carefully look at the symbols on the packaging and read the instructions. The package with vapor barrier material usually indicates how and which side to mount it on. Key rules to follow when installing a vapor barrier:
- the film must be laid on the warm side of the room;
- It is forbidden to cover the thermal protection with a vapor barrier on both sides, since it is necessary to create conditions for the volatilization of steam penetrating into the heat insulator from the inside;
- the steam barrier is mounted tightly, without slack;
- the mating points are overlapped by approximately 10 centimeters and glued with 2-sided tape;
- A small gap should be left between the film and the lining.
When insulating a heated room, when the heat insulator is located deep in structures lined with thin sheets, this layer is mandatory:
- for the roof of used attics and attics;
- to protect the attic floors of the “cold” roof from the passage of water vapor;
- to protect the roof with slopes and walls of a frame structure from the passage of water vapor;
- to protect indoor pools, baths, steam rooms from the passage of water vapor;
- to protect against the passage of water vapor of a heated loggia while thermally insulating all surfaces of the fences - external cladding, floor and ceiling;
- for steam and anti-filtration waterproofing of floors of the lower floor in a house made of brick and wood.
When installing protection against steam penetration using a polyethylene film, it does not matter which side it is laid on; steam does not pass through equally in any direction.
Films with an anti-condensation surface have a rough inner layer, which is capable of retaining excess moisture until conditions for its weathering arise. Films with a reflective surface can return some of the heat, which makes it possible to save on heating costs. On a note! In order to correctly install such materials, it is necessary to leave an interval of 40-60 millimeters between them and the final cladding. If this is not done, the vapor barrier will remain, but specific functions will not be performed.
The film is fixed from the inside in a vertical, horizontal or inclined position to the wooden parts of the wall frame, to the floor beams and floor joists, to the rafters or additional roof sheathing. The width of the canvas is overlapped by at least 150 millimeters. In the case of increasing the length, the overlap is similar, and the seam must be fixed on the load-bearing component of the frame.
All seams and joints must be taped with construction tape. The use of sealants and adhesives for vapor barrier films based on silicone, polyurethane or acrylic resins is prohibited. The protection of all surfaces of the fences must be a continuous layer. Installation to structural elements made of wood is carried out using zinc-coated nails with a large head or staples. A block is stuffed on top of the fixation points - it “covers” the holes, forms the required interval for the correct functioning of the specialized surface and serves as a lathing for fixing the final cladding.
On a note! Specific conditions for a water vapor barrier for timber beam ceilings. The film should be installed at the bottom of the beams in order to completely protect all structural components from getting wet. All diagrams and technical solutions that film manufacturers indicate in their instructions are advisory in nature.
To find out whether polyethylene can be used as a vapor barrier, see the following video.
Insulation technology
Wooden interfloor ceilings are the most common option in individual housing construction. Their design is the same in both a wooden and aerated concrete house. It is a plane with stiffening ribs, between which the material used for insulation is placed. The floor plan of the house is shown in the figure below (Fig. 6).
rice. 6
When installing attic and basement floors, the beams are usually left uncovered on one side, which makes adjustments to the technology of the work performed - to insulate the floor with bulk and slab materials (expanded clay, mineral wool), an additional raised floor is required between the beams. But you are free to choose the type of material yourself, based on knowledge of their properties.
Floor insulation
For these works it is best to use foamed polyethylene. All work is carried out underground. A piece is cut from the roll equal to the length of the gap between the beams. It is most convenient to secure it with a construction stapler, using staples with a height equal to two thicknesses of the material. It is not advisable to use foil material - there is no source of radiant energy in the underground.
Insulation of interfloor ceilings
rice. 7
The insulation between floors should also play a role in sound insulation, so the use of foam plastics for this purpose is undesirable. The best option is mineral wool or expanded clay.
Expanded clay backfill (Fig. 7) may be too heavy. To prevent it from tearing off the ceiling material in the lower room, slats with a section of 2 by 2 cm are nailed onto the beams. Boards are laid on them, which will serve as the basis for it. Waterproofing is not required, but geotextiles (non-woven material) must be laid on top of the expanded clay to prevent dust from entering the room.
rice. 8
Mineral wool (Fig. 8) requires waterproofing both above and below (the air coming from the lower floor is saturated with moisture). As an original waterproofing solution that allows you to combine business with pleasure, foil-foamed polyethylene foam is laid between the beams, directly on the ceiling boards of the lower floor (foil side down). Mineral wool can be placed directly on it if it is a roll material. The slab is denser and heavier. Therefore, you need to do the same as in the case of expanded clay - nail down the skull blocks and lay the plank sheathing on it. Then between the penofol layer and the ceiling there will be space necessary for the foil to reflect radiant energy. Without this condition, it will not work.
The mineral wool is covered with a film on top. It plays the role of waterproofing and also prevents mechanical particles (fiberglass) and volatile substances from the impregnation from entering the room. The film can be either ordinary or membrane, allowing steam to pass in one direction. It is laid with the waterproof side up, towards the floor (Fig. 9).
rice. 9
Insulation of the attic floor
rice. 10
Insulation of the attic interfloor over wooden beams crowns all the work. The amount of fuel spent on heating largely depends on its quality - more than half of all heat leaves through these gates.
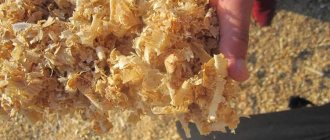
If the attic space is not heated and the floor is non-residential, then sawdust can also be used for thermal insulation (Fig. 10) - a large open area guarantees their complete drying. But it is better to use this material as an additional one, and the main one will be foam (Fig. 11).
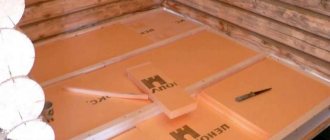
Fig.11
The first layer of foil polyethylene is laid. Foam plastic is lightweight, so there is no need to nail the cranial bars to the beams and there is no need to install additional lathing. Foam plastic slabs are placed on top of them, the joints - including those with walls - are filled with polyurethane foam, resulting in the formation of a continuous thermal insulation coating without seams. If cheap packaging foam is used (balls are visible when scrapped), then a layer of sawdust is poured on top of it, which not only increases the thermal insulation properties, but also protects the polystyrene foam from the destructive effects of sunlight. Extruded construction material - polyhedral bubbles are visible on its cut - is more resistant, but it won’t hurt to sprinkle it with sawdust.
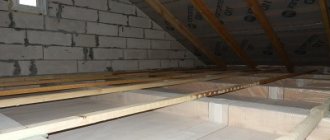
In the attic, plank ladders must be installed on top of the insulation so that you can walk without destroying the structure or trampling the heat-insulating layer.
The proposed technology for insulating floors has been tested in practice and gives good results.
Materials
To create an insulating layer, various materials with similar characteristics are used. To choose such a material correctly, let’s understand its classification.
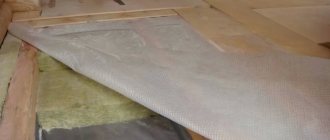
A universal material is a vapor barrier film. Since it is reinforced with fabric or mesh, it has a high level of strength. There are 2 types of such vapor barriers available: perforated and non-perforated. Moreover, this does not play a big role for operational characteristics.
The foil film has a metal surface, which allows not only protection from steam, but also saving heat. Such material should be correctly laid with the metal side down. This significantly reduces heat loss.
Polypropylene films are also in demand on the market. They have a special layer to absorb moisture. It consists of viscose and cellulose fibers. When condensation settles on the surface, the moisture is absorbed by this layer. Penetration into the thermal insulation layer is impossible.
Then, due to ventilation between the vapor barrier and the insulation, evaporation occurs. It is recommended to use this kind of film in rooms with a consistently high level of humidity.
On the other hand, film also has significant disadvantages:
- creating a greenhouse effect;
- short period of operation;
- accumulation of condensate in different places.
Glassine can also be included as a vapor barrier material. Its base is cardboard impregnated with bitumen mastic. It has weak bandwidth. After installation, it is necessary to ventilate the room. This material is in demand mainly due to its low cost.
Breathable membranes are becoming increasingly popular. This is a non-woven double material that protects structures from condensation and steam. They have high vapor permeability characteristics. Such insulation is made from a material with a special structure. In this case, the vapor transmission capacity is affected by the temperature and humidity level in the room.
Membranes can be divided into several types:
- With aluminum foil. Does not release heat from the room. Great for a bathroom or bath.
- With variable steam capacity. Allows you not to worry about fluctuations in the humidity level in the room; it works and adapts to various processes.
- With limited vapor capacity. More often used in a house where the owners do not live permanently.
An alternative protection option is a special varnish or mastic. Roofing felt and roofing felt can also be used as vapor barriers.
Vapor barrier materials can also be classified according to the following principle:
- Standard. The principle of operation of such materials is that they do not allow steam to penetrate into the insulation. The main location of such vapor barriers is inside the structure of the house.
- Insulators with a reflective layer. This includes membrane-type materials that are protected from exposure to water vapor and can still reflect heat.
- With moisture control. This option becomes relevant in a summer house, when in winter the room is not used or is used infrequently.
- Materials with variable permeability levels. This option is suitable when the floors between floors are being restored.
Steam protection of attic floors
The function of the vapor barrier film in a thermal insulation cake is to prevent water suspended in the air from penetrating into building structures. This means that it is the vapor barrier that must stop the evaporation in order to either not let through at all or reduce to minimum values what managed to pass through it.
We have already found out that in our regions, steam, along with the air flow, most often moves from buildings to the outside. Only in the summer heat is reverse current possible.
The vapor barrier layer should be the first in the path of moist air. Consequently, it is laid on the side of the used premises before thermal insulation.
The installation of a vapor barrier along the ceiling is carried out if the attic is not intended to be heated. In this case, there is no point in insulating the attic space at all, because... it will not be used at all or will be used as a cold warehouse.
True, it is still necessary to protect the materials of the sheathing of the slopes and rafter frame. Waterproofing is installed against external influences, and a ventilation system is installed against the formation of condensation occurring due to the difference in temperatures inside and outside the structure.
According to the requirements of building regulations, in winter the temperature inside a cold attic should not exceed that outside by more than 5 - 6º C.
The rules outlined in SP 17.13330.2011 state that in order to equalize the temperature and humidity parameters inside and outside the attic, it is necessary to arrange a natural type of ventilation.
This means that it is necessary to provide the roof structure with vents, dormer windows, aerators, etc. The total area of ventilation openings, regardless of their type and purpose, should be on average 1/300 of the floor area or horizontal projection of the roof. The described measure is quite sufficient to maintain the temperature and humidity balance specified by building regulations.
Laying of roll materials
Vapor barriers based on glassine, foil, films and membranes are mounted identically. Therefore, the methodology outlined in this section is applicable to all roll materials. She explains how to install a vapor barrier on the ceiling correctly. When laying rolled materials, the general requirement must be observed: the vapor barrier must create a closed loop around the heat insulator on all sides without gaps or gaps. Therefore, when insulating the ceiling, proceed as follows:
- A 25 mm thick edged board is sewn onto the underside of the floor beams. The distance between the beams should be taken based on the width of the insulation used. Typically this value is 600mm.
- Insulation is placed in the resulting “boxes” in several layers. When the thickness of the insulation slab is 50mm, there can be from two to four or more such layers, depending on the climatic conditions of the area. In this case, the joints of the layers should not coincide with each other.
- It should be taken into account that for proper operation, the vapor barrier layer and the insulation must have a gap of 50mm between each other. The boards according to claim 1 have a thickness of 25mm. Therefore, it is necessary to move the bottom layer of rolled material away from the insulation by another 25mm. Perpendicular to the boards and, accordingly, parallel to the beams with the same interval of 600 mm, we sew a 25 mm thick batten. We fasten the boards and slats to the beams with nails or self-tapping screws of suitable length.
- It is more convenient to install a vapor barrier on the ceiling with two people, if possible three. This way the work is done faster and more correctly. One worker holds the edge of the rolled material, the second unrolls the roll, and the third attaches the material to the slats using a construction stapler.
- The material is laid with an overlap of panels of 150-200mm. The joints are taped with special tape. It is usually offered to be purchased along with film or foil.
When laying, special attention should be paid to which side to lay the material towards the insulation. Typically this point is indicated on the accompanying label of each roll.
If such a hint could not be found, then you can follow the general rules: • glassine is laid with cardboard to the insulation; • foil vapor barrier - foil into the room; • films, as a rule, have one smooth surface - it should be towards the insulation, the other - fleecy - this one - into the room.
After filing the ceiling from below, we move on to the upper part of the ceiling, which faces the cold attic. The vapor barrier is installed here in the manner described earlier. It is also necessary to maintain a distance of 50mm from the insulation to the insulation. If the height of the beams is not enough, it is increased with a lath and rolled material is laid on top of the lath.
If the attic space is intended to be used for storing something, although fire safety standards do not encourage such use, it is necessary to lay a solid floor made of 35mm thick edged boards on top of the vapor barrier. To prevent the floorboard from coming into contact with the vapor barrier, it should be laid through a counter-batten sewn onto the beams on top of the insulating material. If the size of the attic does not imply economic use, it is not necessary to lay a solid floor. You can use a 35-50mm thick board to lay a passage along the roof ridge.
Cold attic design
When building the roof of a house, many people think about making a cold attic or attic underneath it? The easiest way to organize a roof is with a cold attic space. Construction of an attic will cost several times more and require more labor.
. Although, it is undeniable that the attic will significantly expand the living space.
Cold attic roofs have the following main components in their pie:
:
- Pipes for internal sewerage
How to choose a window sill?
Installation of PVC windows
- roofing;
- attic external walls (applicable for gable roofs with gables);
- insulated ceiling between the living space and the attic.
Ventilation is provided by eaves and ridge vents. The air passing through the eaves openings is called supply air, and the air leaving through the ridge is called exhaust air. Additionally, ventilation can be done through dormer windows on the gables or roof slopes. The windows are equipped with louvered grilles to allow the ventilation intensity to be adjusted.
Dormer windows are located on opposite slopes of the roof so that there are no unventilated areas.
Dormer windows can be rectangular, triangular and semicircular in shape. Their lower part should be at a height of no more than 0.8-1.0 m from the floor of the attic, and the upper part should not be lower than 1.75 m from the floor in the attic. They can also serve as an exit to the roof of the house to inspect the roof, ventilation and chimney elements.
Vapor barrier membranes
Diffuse (breathable) membranes are classified as the most effective and expensive vapor barriers. This group of products contains both single-sided and double-sided materials
The former allow steam to pass through only in one direction, so during installation it is extremely important not to confuse which side to lay the fabric towards the insulation and which to the load-bearing surface. Double-sided ones work in both directions, so there are no problems with them
Vapor barrier membrane
Vapor barrier membranes can be single-layer or multi-layer. The first ones have an affordable price. Multilayer ones have the function of accumulating moisture inside the canvas and gradually releasing it.
A special group of products in this category are “smart” membranes. They are able not only to absorb vapors, but also to regulate the level of humidity of surrounding materials, while simultaneously acting as a water barrier. These membranes are the best choice. But their cost is beyond the means of most private home owners.
Vapor barrier membranes "TechnoNIKOL"
The undoubted leader in this category of materials is TechnoNikol membranes. For vapor barrier of wooden ceilings, the “Optima” brand is recommended for use. This hydrophobic polypropylene membrane consists of three layers:
- upper and lower polypropylene;
- medium – high-tech functional vapor-permeable film.
Specifications:
- weight 80 g/m2;
- thickness 0.3 mm;
- vapor permeability 5 g/m2x24 hours.
The TechnoNIKOL Optima membrane is produced in rolls. The width of the canvas (roll height) is 1.5 m. The length is 50 m. This material is optimal for vapor barrier of any type of ceiling, intended for installation indoors and on external surfaces of buildings.
Superdiffuse reinforced membrane
Superdiffuse membrane
Diffusion membrane films "TechnoNikol"
Rules for installing a vapor barrier for a wooden ceiling
Step 1. The membrane is laid directly on the insulation so that the smooth side is directed inside the room.
Step 2. It is possible to lay the strips in different directions: parallel or perpendicular to each other.
Step 3. During installation, an overlap of at least 10 cm must be observed.
Step 4. To attach the membrane to a wooden floor without insulation, use galvanized screws with wide heads or staples with an anti-corrosion coating.
Step 5. The joints of the canvases are sealed using self-adhesive mounting tape.
Use foil tape, width 50 mm, length 30 lm.
Step 6. When laying on a floor with insulation, it is necessary to bring the edges of the panels onto the wall by 15-20 cm and secure them with suitable materials (slats or metal profiles).
Step 7. Mounting tape is glued along the perimeter of the vapor barrier layer.
Step 8. Between the membrane and the material with which the wooden floor will be lined, leave a ventilation gap 3-4 cm wide.
Step 9. Particular attention is required to the places where the vapor barrier comes into contact with the structural elements of the floor and the building: beams, chimneys, ventilation ducts.
Ceiling vapor barrier in wooden floors
During installation of the vapor barrier, it is necessary to ensure that the film is laid evenly, without folds or sagging. A guideline for correct installation can be a colored stripe, which is the center line along the entire length of the canvas.
Video - Ceiling vapor barrier
An equally good choice are multilayer vapor barrier membranes of other brands: Dorken Delta REFLEX/REFLEX PLUS and Dorken Delta LUXX. The first is a four-layer material, is particularly durable and can provide 100% waterproofing of a wooden floor. The second has limited vapor permeability, ensuring gradual and uniform removal of moisture from the living space.
conclusions
We talked about the basic principles of installing vapor barrier films and membranes in insulated wooden floors. The main approach is to protect the insulation from steam and, if water vapor gets into the ceiling, to escape. Those. do not lock the thermal insulation into two layers of vapor barrier , and this mistake is often made. And do not wrap wooden beams with vapor barrier, unless it is a film specifically designed for this purpose. Another nuance - ensure the tightness of the vapor barrier . Overlaps, joints, and junctions with walls, skylights, stove and ventilation pipes must be sealed with materials recommended by film and membrane manufacturers.
We recommend the topic Waterproofing in a cold attic, which tells you whether it is necessary to install waterproofing under the roofing.
- What does improper vapor barrier lead to: real experience and repair methods
- The correct “pies” of a frame wall, which are recommended by FORUMHOUSE users.
- The most complete instructions on the RuNet for installing a roof window with the stages of installing a vapor barrier, a moisture-proof film and a gutter for condensate drainage.
Which side of the heat insulator should I mount it on?
- The vapor barrier is usually installed on the inside of the thermal insulation. But most often a double-sided composition is created, which allows you to provide a reliable barrier between the outside of the building and the room.
- When insulating a façade, the film is placed on the outside of the heat insulator. When insulating the roof, the film is fixed on top of the mineral wool, as in a ventilated façade. When developing a cool roof, a vapor barrier is placed under the rafters.
- When insulating the top covering, when an attic space is created, the barrier is laid below the thermal insulation. When insulating the walls internally, the film is fixed on top of the heat insulator, inside the heated room.
Insulation technology
Wooden interfloor ceilings are the most common option in individual housing construction. Their design is the same in both a wooden and aerated concrete house. It is a plane with stiffening ribs, between which the material used for insulation is placed. The floor plan of the house is shown in the figure below (Fig. 6).
When installing attic and basement floors, the beams are usually left uncovered on one side, which makes adjustments to the technology of the work performed - to insulate the floor with bulk and slab materials (expanded clay, mineral wool), an additional raised floor is required between the beams. But you are free to choose the type of material yourself, based on knowledge of their properties.
Floor insulation
For these works it is best to use foamed polyethylene. All work is carried out underground. A piece is cut from the roll equal to the length of the gap between the beams. It is most convenient to secure it with a construction stapler, using staples with a height equal to two thicknesses of the material. It is not advisable to use foil material - there is no source of radiant energy in the underground.
Insulation of interfloor ceilings
The insulation between floors should also play a role in sound insulation, so the use of foam plastics for this purpose is undesirable. The best option is mineral wool or expanded clay.
Expanded clay backfill (Fig. 7) may be too heavy. To prevent it from tearing off the ceiling material in the lower room, slats with a section of 2 by 2 cm are nailed onto the beams. Boards are laid on them, which will serve as the basis for it. Waterproofing is not required, but geotextiles (non-woven material) must be laid on top of the expanded clay to prevent dust from entering the room.
Mineral wool (Fig. 8) requires waterproofing both above and below (the air coming from the lower floor is saturated with moisture). As an original waterproofing solution that allows you to combine business with pleasure, foil-foamed polyethylene foam is laid between the beams, directly on the ceiling boards of the lower floor (foil side down). Mineral wool can be placed directly on it if it is a roll material. The slab is denser and heavier. Therefore, you need to do the same as in the case of expanded clay - nail down the skull blocks and lay the plank sheathing on it. Then between the penofol layer and the ceiling there will be space necessary for the foil to reflect radiant energy. Without this condition, it will not work.
The mineral wool is covered with a film on top. It plays the role of waterproofing and also prevents mechanical particles (fiberglass) and volatile substances from the impregnation from entering the room. The film can be either ordinary or membrane, allowing steam to pass in one direction. It is laid with the waterproof side up, towards the floor (Fig. 9).
Insulation of the attic floor
Insulation of the attic interfloor over wooden beams crowns all the work. The amount of fuel spent on heating largely depends on its quality - more than half of all heat leaves through these gates.
If the attic space is not heated and the floor is non-residential, then sawdust can also be used for thermal insulation (Fig. 10) - a large open area guarantees their complete drying. But it is better to use this material as an additional one, and the main one will be foam (Fig. 11).
The first layer of foil polyethylene is laid. Foam plastic is lightweight, so there is no need to nail the cranial bars to the beams and there is no need to install additional lathing. Foam plastic slabs are placed on top of them, the joints - including those with walls - are filled with polyurethane foam, resulting in the formation of a continuous thermal insulation coating without seams. If cheap packaging foam is used (balls are visible when scrapped), then a layer of sawdust is poured on top of it, which not only increases the thermal insulation properties, but also protects the polystyrene foam from the destructive effects of sunlight. Extruded construction material - polyhedral bubbles are visible on its cut - is more resistant, but it won’t hurt to sprinkle it with sawdust.
In the attic, plank ladders must be installed on top of the insulation so that you can walk without destroying the structure or trampling the heat-insulating layer.
The proposed technology for insulating floors has been tested in practice and gives good results.
How to attach a vapor barrier to the ceiling, floor and ceilings
Correct installation of the most popular vapor barrier materials:
- Izospan. Consists of two layers. One side is rough, the other is smooth. It is pressed against the wooden floor with the pile facing towards the reinforcement. It is necessary to retain condensation, preventing it from settling on attic wooden surfaces. Thermal insulation is laid on the smooth side.
- It is better to fasten the vapor barrier to the ceiling with metal brackets, but you can also use nails. Pieces of hard cardboard measuring 5x5 cm should be placed under the caps.
- Membrane materials. They work with them according to the pictogram printed on the surface.
- Penofol. Foamed polyethylene, on one side of which foil is glued. In the middle is high-strength long-fiber kraft pulp paper. Placed with foil towards the ceiling.
- Polypropylene film. Consists of two layers - rough and smooth. Mounted like isospan.
- Metallized film glued to foil. Placed with film towards the insulation.
- Microperforated membrane. This multilayer material contains polypropylene and spunbond. The marked side should face the insulation.
- Polypropylene. Its basis is a smooth laminate. The other side is wicker.
After completing the preparatory work, the actual installation begins. First you need to determine which side to lay the vapor barrier on the ceiling. If you plan to use a material that is not on the list, then always point the rough or fleecy side indoors.
Today, you can make a ceiling vapor barrier quickly and without extra costs. Detailed information and step-by-step instructions are mostly found on the Internet, although you can do without them.
Not all owners of country houses yet know which side the vapor barrier is laid when insulating the ceiling, although there is more information on the global network than is required. The location of the rolled strips below the required level prevents the penetration of moisture and steam into the attic. Some homeowners attach this material to pre-prepared galvanized profiles, while others prefer wooden sheathing or simply slats.
Oddly enough, anyone, even an untrained person, can do a ceiling vapor barrier correctly. No experience or skills required. All you need to do is lay one sheet after another, securing them to the ceiling.
The price of a vapor barrier for a wooden ceiling can vary from several hundred to several thousand rubles. It all depends on the material itself, its weight, length, etc. However, buyers always have a choice, since manufacturers offer a fairly wide range of such products.
For such work you will need a minimum set of tools and auxiliary materials:
- Metallic profile.
- Wooden slats for sheathing.
- Wood saw.
- Construction stapler and staples. To save money, you can use nails.
- Self-tapping screws and galvanized screws.
- Metal scissors.
- Double-sided and regular tape.
If the family budget does not allow the use of expensive vapor barrier material with a reflective mirror surface, then you can buy a regular but reinforced polyethylene film. At a low price, it is incredibly effective.
Below are a few rules to consider during installation:
- vapor barrier is carried out in enclosing structures separating heated rooms and the external environment;
- always placed between the insulation and the cladding for internal finishing;
- vapor barrier and cladding for internal finishing must be separated by a ventilation gap to remove water vapor.
Installation of vapor barrier and insulation on the roof
Consumables and tools
The main consumables and tools needed in the process of arranging layers of attic covering are presented:
- Selected material for vapor barrier and waterproofing (membrane, roofing felt, foil, liquid substance “Penetron”).
- Construction adhesives and sealants, foil and regular tape.
- Primer and brushes.
- Special knife, tape measure and scissors.
- Thermal insulator (mineral wool, glass wool, bulk or polyurethane foam).
- Spray gun, pistol, laser range finder, levels.
- Technical stapler and suitable staples for it.
- Floor beams, joists, boards, plywood.
- Fastening elements (screws, nails, anchors, corners, etc.).
- Hammer, grinder, hacksaw, axe, nail puller.
- Pliers, drill, screwdriver, sandpaper or sander.
- Reinforced mesh and lathing material.
- Construction vacuum cleaner, necessary rags.
Not all tools may be useful during the installation process, but having them will speed up the process. It is also worth noting that the employee must have special clothing (robes), upper respiratory tract protection (respirator), and construction glasses.
This list is approximate and may vary slightly in each specific case. But here it is important not to forget about :
- work uniform;
- gloves;
- protective glasses;
- respirator (especially if you have to work with glass wool).
There is no need to purchase tools if the work process will be carried out by a hired team. Construction companies also have consumables in stock, the cost of which is indicated in the price list of services. Companies buy materials in bulk directly from manufacturers, so their prices can be even lower than on the market.
Installation
The vapor barrier must be done from the inside of the room along with the installation of insulation.
If in the region where the building is located, the winter air temperature is lower than -30, then it is easier to install a vapor barrier layer both above and below. This is a kind of protection of floors from steam and at the same time a way to retain heat.
Now let’s take a closer look at the installation process itself.
The folk way
In ancient times, the peoples of the north, who inhabited the territory of Finland, used a “breathing” membrane - birch bark - to protect the ceiling in the bathhouse.
Nowadays, first of all, it is better to lay the vapor barrier material simultaneously with the thermal insulation material in the sheathing. Therefore, it must be installed first. Then the ceiling frame is secured using self-tapping screws and plastic dowels. After installing the lathing, a thermal insulation layer is created, after which the ceiling vapor barrier is directly performed
Please note that each wooden element must be treated with an antiseptic solution and fire retardant
The installation procedure includes several stages:
- The vapor barrier material should not be nailed, but attached with staples to the outermost element of the sheathing. Be sure to make an allowance for the walls within 15 - 20 cm.
- It is better to unfold the film to the opposite side and cut it with the same allowance.
- The material should be fastened not only around the perimeter, but also on the intermediate slats. One strip is not enough to completely cover the ceiling, so the film must be laid overlapping in strips of 15 - 20 cm. It is recommended to fasten the edges with tape or special tape.
- To ensure a normal level of ventilation, when you install a vapor barrier, leave a gap between it and the ceiling.
The last point can easily be considered one of the most important rules for installing high-quality vapor barriers. For the same purpose, a counter-lattice needs to be installed throughout the frame. It is almost identical to the configuration of the first layer. The thickness of the slats is about 40 cm. Fastening is carried out using self-tapping screws.
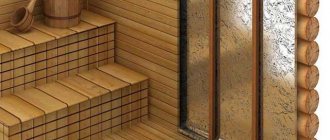
It is worth considering in more detail the vapor barrier for baths and saunas. In these rooms, the humidity is always high, and the air is solid steam. If the walls of the steam room are not protected, then sooner or later they will be subject to fungal diseases or rot.
To attach the vapor barrier you will need the following set of tools:
- the material itself (taking into account its capabilities and needs);
- stapler/stapler (for nailing staples);
- hacksaw;
- scissors for cutting metal;
- scotch;
- self-tapping screws;
- screwdriver;
- nails with a wide head;
- hammer.
We have indicated the tools that will be useful during different installation methods. And your task is to choose what is needed for a particular situation.
First mistake - wooden beams were wrapped with vapor barrier
If you study the topics on the portal about vapor barrier films and diffusion membranes, a paradoxical situation arises. The more a developer reads, the more confused he becomes. Cause? A huge amount of conflicting information from different manufacturers and builders. The situation is getting worse because... There are dozens of materials on the market with different technical characteristics.
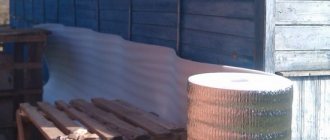
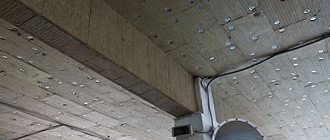
I am building a one-story house with a cold attic. The ceiling is made of wooden beams with a section of 100x250 mm. I want to leave some of the beams, about 15-20 cm, open, as in the photo below. So they look beautiful in the interior. I'm thinking of putting a vapor barrier film on the beams. Place 300 mm of mineral wool insulation on top. But after reading the portal, I doubted it. People write that if you cover the beams on top with a vapor barrier, then at the point of contact with the film, the wood will not “breathe.” This will lead to moisture accumulation. Is it so? Or is it better to lay plasterboard on completely exposed beams, then a vapor barrier, and only then lay mineral wool?
By the way, I found one picture. Tell me, wooden beams can be wrapped with a vapor barrier, provided that part remains visible in the interior. In my opinion, the film prevents water vapor from escaping from the wooden floor. Or, am I misunderstanding something?
Questions are answered by a member of the Dragofol portal, who professionally installs roofing and vapor and waterproofing films. First, the “pie” of the attic floor, which he recommends to vasoo:
- Exposed wooden beams visible in the interior.
- Wooden flooring.
- Vapor barrier, with gluing of overlaps and junctions to walls.
- Insulation on the frame.
- On top of the insulation is a dust- and windproof material that releases water vapor. Moreover, there is no need to chase expensive branded films. It is enough to use inexpensive domestic nonwoven materials.
- Wooden platforms on a frame for free movement around the attic and preventive inspection of the under-roof space.
Now the answer to the second question is vasoo. Wooden beams can only be “wrapped” with a vapor barrier with variable vapor permeability , the so-called. a film with adaptive properties, which, when air humidity increases, allows water vapor to pass through.
Important! If the vapor barrier is ordinary, then you cannot bend the beams with this film , because it will “lock in” the steam, which will lead to moisture accumulation and rotting of the wood.
Insulation materials
What is the best way to insulate a cold ceiling? The main thermal insulation materials used for insulating ceilings can be divided into the following categories:
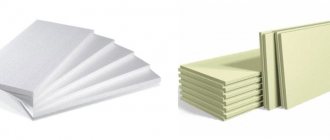
- Solid. Such materials consist of foamed plastics, are little susceptible to moisture, and are easy to install.
- Fibrous. Mats or rolls are formed from compressed fibers. Inexpensive, have good thermal insulation. Sensitive to moisture, when wet they lose their thermal insulation properties.
- Bulk. Traditional bulk materials - sawdust, expanded clay, etc. The cheapest ones have the weakest thermal insulation. Ecowool stands out separately - an expensive, but extremely effective material.
- Sprayable. Modern coatings made of foamed plastics. They are sprayed locally and do not form joints or seams. The best thermal insulation, very expensive equipment.
How to insulate the ceiling, everyone decides for themselves, based on their needs and capabilities.
Mineral wool
Rolled mineral wool The most popular type of fibrous materials. Produced from several types of raw materials:
- Basalt wool from volcanic rocks. High strength and density, short hard fibers. High moisture resistance.
- Glass wool from recycled glass. Low strength, light and elastic, long elastic fibers.
- Slag from blast furnace waste. Low thermal insulation properties, low cost. Not applicable for residential buildings.
To insulate with mineral wool, no special equipment is required; the installation process is simple and quite fast. It is produced both in rolls and in slabs with insulation thickness up to 150 mm.
Mineral wool is harmful to health; during installation you must use a respirator, protective gloves and goggles.
An important feature of mineral wool that must be taken into account when designing and installing is the large number of joints and junctions. They need to be done so that the gap is minimal, the slabs are laid against the guides and apart from each other
Half-centimeter gaps between slabs can reduce the effectiveness of the coating by a third.
Correct and incorrect installation of insulation
The thermal insulation properties of mineral wool are reduced until they are lost when the material gets wet. Therefore, it is necessary to ensure the removal of vapors and condensate.
Monolithic
The most suitable and popular material for thermal insulation of ceilings is polystyrene foam. It is produced in the form of 1200*600mm panels equipped with tongue and groove. This allows you to make high-quality joints during installation. In addition, cracks and gaps are sealed with polyurethane foam. The material is resistant to moisture and temperature fluctuations. Works great when insulating ceilings both outside and inside
We suggest you familiarize yourself with: Table of copper wire cross-section by power
Its disadvantage is low fire resistance. When burned, it releases substances harmful to health.
Insulation with polyurethane foam
Application of extruded polystyrene foam
Polystyrene foam (expanded polystyrene) is a loose material, so it is used when it is necessary to insulate a floor made of joists and beams. For thermal insulation of slabs, extruded polystyrene foam is used, which is denser than conventional foam.
Before laying it, the surface of the base is leveled. On the warm side of the floor, vapor barrier is not needed, since concrete slabs have virtually no vapor permeability. A vapor barrier film is laid out on the prepared base. Then slabs of extruded insulation are laid out in a checkerboard pattern. Polyurethane foam is blown into the joints.
What is the difference between vapor barrier and waterproofing
Vapor barrier films
Now this is an interesting question. In essence, in both cases we are talking about the effect of moisture, it’s just that in the first case an increased temperature is added to it. Therefore, it would be correct to use these concepts and related materials something like this:
- vapor barrier is done from the inside of the room so that water vapor that arises inside does not turn into condensation when faced with the cold of the external environment;
- waterproofing is done primarily to protect against moisture coming from outside, and it can be in the form of water vapor or precipitation.
When it comes to ceiling insulation, vapor barrier is the bottom layer, waterproofing is the top layer. However, if the bathhouse has a second floor with a residential attic, then the term “waterproofing” becomes somewhat arbitrary, because protection is carried out from the same vapors, only found in the insulation.
Hence, probably, the constant confusion that can often be found in descriptions.
Everything is clear with the roof: the layer located directly under the roofing material is waterproofing, because precipitation can seep into it, and the layer that is made from the inside on top of the insulation is a vapor barrier. See the article When is it necessary to insulate the roof of a bathhouse and when is there no point? Roof thermal insulation technology
REMEMBER! There is also a purely mechanical difference between the materials used for vapor and waterproofing. The vapor barrier does not “breathe” at all; it is designed not to let anything pass through it at all - neither air, nor steam, nor liquid. And waterproofing is preferably “breathable”, that is, capable of releasing water vapor in one direction, and in the opposite direction - preventing their penetration.
If you take this into account, do not make any mistakes either when steam or waterproofing the ceiling in the bathhouse. Here’s another video that will reinforce what has been said (advertising, of course, but you don’t have to watch it to the end):
Features of the design
A cold attic includes the surface of a gable roof with roofing material and an insulated ceiling that separates the living space from the attic. To ensure ventilation, the attic is equipped with dormer windows, without which the air exchange in the attic will be disrupted, which will lead to the formation of condensation on the roof.
The floor of the attic is the ceiling, which also serves as the ceiling of the living space. When street temperatures drop, the ceiling becomes susceptible to condensation, the formation of which is caused by the temperature difference between its lower and upper parts. To prevent droplets of condensation from penetrating into the ceiling, the top is covered with special materials that do not allow water to pass through.
In addition to protecting the base from moisture, the material performs an important thermal insulation function, preventing warm, moist air from rising upward. This technology significantly reduces heat loss in a living space and allows significant savings on heating. Vapor barrier must be performed on all types of foundations, including concrete and wooden floors. Isover slabs, glass wool or bulk materials can be used as insulation.