Wet grass underfoot, foggy windows, droplets on the walls of a damp basement - all this is the result of condensation of water vapor from the atmospheric air. Everyone has encountered this, but not everyone was interested in how to determine the dew point. Most often, this task has to be solved by architects, builders and designers, and people far from this area are hardly familiar with this concept.
How to determine dew point
The nature of the appearance of dew
Water condensation on various surfaces occurs as follows. Atmospheric air is always saturated with water vapor to one degree or another. Water changes from a gaseous state to a liquid state when its temperature decreases. This occurs when atmospheric air comes into contact with colder surfaces and subsequent heat loss. The result is the appearance of water droplets.
Morning dew is easily explained by the laws of physics
The temperature at which water vapor from the air passes into a liquid state is called dew point .
The higher the content of water vapor in the air (or other mixture of gases), the higher the condensation temperature of water, or dew point. So, with a relative air humidity of 100%, the dew point exactly coincides with its temperature. And vice versa: the lower the relative air humidity, the lower the dew point. This means that for condensation to fall out, you will have to cool the air more.
Studying the dew point in construction
Determining the location of condensation
In order to perform the calculation you need to know:
- thermal resistance coefficients of the wall and insulation, λ1 and λ2, W/(m•K);
- wall and insulation thickness, h1 and h2, m;
- air temperature inside the house, t1, °C;
- air humidity, %;
- dew point, °C;
- temperature outside the building, t2, °C.
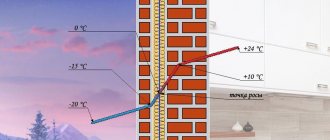
Before proceeding with the calculation, we assume that the temperature change across the thickness of all layers will be linear. It is necessary to find the temperature at the point of contact between the wall and the insulation. After this, you will need to construct a graph showing the change in temperature along the thickness of the wall. The constructed graph will help you find the desired point.
To do this, you need to find the ratio of the thermal resistance of the wall and the insulation. Using a special formula, it will be possible to find the temperature at the layer boundary. Knowing the temperature on one and the other side of the layer, it will not be difficult to construct a linear graph. It will be possible to track the temperature change throughout the entire thickness of the wall in order to understand exactly where condensation will form.
Scope of the concept
This term is widely used in industrial and civil construction. The need to determine this value arises when insulating the walls of a room. If you neglect to calculate this indicator, problems will appear after insulation work. One option is damage to the wall finish due to settling moisture. If the finish is tolerant of water, but drops of condensation will fall on the walls, there is nothing good about it either. A humid environment promotes the development of pathogenic microorganisms and mold.
In aviation, dew point is also calculated. During the flight, condensation occurs on some parts of the aircraft. In this case, the condensate freezes and parts of the aircraft become icy.
Ignoring the dew point can lead to a plane crash.
This value is also used in forestry. Forest fire protection specialists use the dew point to calculate the fire hazard class, which characterizes the possibility of forest fires. Based on this, protective measures are designed.
Dew point is used in calculations for planning fire prevention measures
In agriculture, knowing the dew point, the probability of damage to crops by non-infectious diseases (damage caused by weather conditions) is determined. At the same time, one of the tasks of breeding is to develop varieties of cultivated plants capable of condensing moisture from the air on their vegetative organs. This will allow successful farming in conditions of low rainfall.
Dew point placement
Comfortable values for a person
For most people, conditions with a point value in the range of +10…+15℃ are optimal. If the indicator increases, then the person feels discomfort. When the point value is less than +10℃, the environment becomes dry, and from +15℃ humidity begins to be felt. If the indicator is above +20℃, it becomes stuffy. People with heart and respiratory problems are more susceptible to environmental parameters than others.
The dew point temperature determines the comfort level of living in the house
How to calculate dew point
According to the mathematical formula
Carrying out calculations manually using a formula is a fairly accurate method. However, to use the formula, you must first determine several other indicators. The formula looks like this:
Formula for calculating dew point
As can be seen from the figure, a and b are constant quantities. T – air temperature. Rh – relative air humidity. This calculation method will give results with an error of 0.5ºС.
Using an online calculator
Since manual calculation using a formula is not suitable for everyone (due to insufficient knowledge in mathematics or lack of time), online calculators are publicly available on the Internet that calculate the dew point based on the entered information. Using them is absolutely simple: you just need to enter the initial data (ambient air temperature and relative humidity). The result of the calculations will appear on the screen.
Calculator programs
Not everyone can relate the dew point indicator and the expected consequences of improper insulation. This requires specific knowledge in physics and construction. Therefore, in addition to conventional calculators that calculate this value, programs with advanced capabilities have been created. They are also freely available and can be used online.
Such programs take into account many parameters when calculating:
- The locality in which the building was built (is under construction). Statistics of average monthly temperatures, relative humidity, and pressure in this region immediately appear.
- Type of room. Obviously, the air humidity in the bathroom will be higher than in the room, and this in turn affects the type of permissible insulation.
- Construction type. Here you can choose from a wall, ceiling, attic floor and other positions.
- Layers of construction. Here it is taken into account what is located behind the insulated wall - another room or street.
- Floor or wall material.
- Temperature and relative humidity of indoor and outdoor air.
After filling in all the required fields, the program will create a dew point graph.
Dew point determination table
If you need to quickly obtain the dew point value, tables are used. The table data is very inaccurate and gives approximate results. But they are easy and quick to use: you just need to find the desired cell at the intersection of the column and row with the desired temperature and relative humidity.
Table 1. Determination of dew point by two indicators.
Determination of dew point by two indicators
Special tools
In meteorology, special tools have been invented to determine the dew point. However, even to calculate using a mathematical formula or any other method described above, you need your own tools.
Temperature is measured with a thermometer, humidity with a hygrometer. For convenience, in this case, a tool capable of measuring both temperature and air humidity is suitable - a digital thermohygrometer.
This instrument combines the functions of a thermometer and a hygrometer.
In addition, there are devices that combine several functions: measuring temperature, humidity, calculating dew point and storing information.
In most cases, working with such a device looks like this.
- Turn on the device. Pay attention to the battery charge.
This is what one of the popular devices looks like - Place the tip of the sensor at a right angle to the surface under study.
The correct position of the device will ensure accurate measurements - To hold the measurement data, press the Hold button in the menu. This way you can view the results in a comfortable position of the device.
Recording does not mean saving - To save the data, click the Save button.
The ability to save eliminates the need to write data in a notepad - If you need to transfer information to a computer, connect the device to the network via USB.
Connecting a dew point meter to a computer is no more difficult than a mobile phone - Copy the data to your computer.
Computer – reliable data storage
Working with devices for measuring dew point is simple even for a person without special training. The interface is intuitive, and if you have any questions, please refer to the instructions.
Toilet finishing options: finishing with tiles, wallpaper, panels, photos
The decoration of the toilet should not only be beautiful, but also practical. It is advisable to choose decorative coatings that do not absorb odors and are easy to clean. The most popular are wall panels, tiles and, oddly enough, wallpaper.
Plastic panels are an economical and convenient way to decorate a toilet with your own hands. The cost of one square meter does not exceed $7, and the richness of the color palette is also pleasing. The consumer today is free to choose between classic plain panels, bright samples with abstract patterns and designs, as well as sheets that imitate one or another texture (marble, wood, malachite, etc.). The length of one PVC sheet is 2.5-3 meters, this is enough to cover the entire length of the wall.
Finishing the toilet with plastic panels is possible not only on the walls, but also on the ceiling. True, unlike PVC wall sheets, the width of which is usually 30 cm, for finishing the ceiling it is better to use plastic about 20 cm wide. In this case, the decorative coating will look more harmonious and neat.
Ceramic tiles are a classic of the genre. Materials of different sizes are suitable for tiling a toilet. As a rule, rectangular elements measuring 20x30 cm are laid on the walls. In order to visually expand the interior space of the restroom, it is recommended to choose tiles coated with a glossy glaze.
The tiles on the floor also feel good. However, in this case, tiling the toilet is best done using a material with a matte surface. The rough coating will protect you from falls and injuries.
Wallpaper for the toilet is a rare but possible finishing option
When choosing wallpaper, pay attention to its properties. It is desirable that the canvas be moisture resistant and have an oilcloth surface
Vinyl wallpaper is also suitable. The latest fashion hit is the so-called liquid wallpaper in the toilet, photos of which can be viewed in our gallery.
The importance of determining dew point
If you do not take into account the position of the dew point in the wall, a series of negative events will follow.
The insulation material quickly becomes unusable, and the service life of the wall material itself is reduced. Due to regular wetting, the finish will not hold up: the wallpaper gradually peels off, the plaster crumbles, and the paint peels off. Due to excess humidity in the room, mold, mildew and other pathogenic microorganisms develop in a short period of time on walls, ventilation systems, ceilings and other surfaces.
Ignoring the physical nature of condensation can lead to unsanitary conditions in the room
How does dew behave on uninsulated walls?
With uninsulated walls, there are several variations in the behavior of the dew point. In some situations, it is located in the inner space of the wall - closer to the street or closer to the room. In the second case, with a strong decrease in temperature, the place of steam condensation will shift to the inner surface of the wall. Then drops of condensation will certainly form on its surface.
Uninsulated walls often get wet
In some cases (cold building frame material), the dew point can be located indoors all year round, that is, on the inner surface of the wall. Then it is necessary to make applied calculations and take care of the insulation of the wall, taking into account the climatic characteristics of the locality in which the building is located.
In general, the location of the dew point in a ceiling or wall is interconnected with a number of physical factors:
- humidity of outdoor air and indoor air;
- outdoor and indoor air temperatures;
- thickness of the ceiling or wall.
Experts' opinion
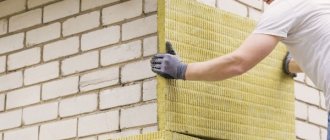
Experts believe that the best thermal insulation option is mineral wool. If installed correctly, the material will not cause harm and will last a long time. The main thing is to avoid high humidity. To do this, the cotton wool is additionally covered with a film that limits the access of moisture.
Another option is to install breathable materials on both sides of the insulation that will release liquid to the outside. It is recommended to lay polystyrene foam or expanded polystyrene in combination with materials that do not allow water vapor to pass through and prevent moisture condensation.
Dew point in externally insulated walls
With the correct selection of material and correctly calculated thickness of the insulating layer, the dew point will always be in the insulation and will never move towards the inner surface. The walls are dry all year round. Only the insulation is damaged by weather conditions; the wear of the walls slows down.
External insulation is the surest protection against condensation in the apartment
If the thickness of the insulation is less than required, or the thermal conductivity of the material has not been taken into account, the dew point will behave in the same way as in an uninsulated wall, that is, moisture will continue to accumulate in the room if it accumulated before insulation. If this happens, there is only one way out - to increase the thickness of the insulating material. This can be done by adding another layer of thermal insulation or replacing the old material with a new one of suitable thickness.
If the insulating layer is excessively thick, the dew point will not go beyond its limits throughout the year. This will not entail any negative consequences: the wall will be dry all year round. However, calculations are made in order to avoid unreasonable financial expenses. After all, if you can escape moisture and retain heat with less insulation, then why spend more?
Should I insulate the walls inside or outside?
Dew point in internally insulated walls
Insulating walls only from the inside inevitably leads to a shift in the dew point towards the room. This happens because the thermal insulation material retains heat in the room, thereby making the wall colder. And, as you know, the colder the surface, the more likely it is that air moisture will condense on it.
If at normal temperatures for a given region the dew point is located close to the inner surface of the wall and does not cause any inconvenience, then on particularly cold days it can move into the room, that is, onto the inner surface of the wall. Then the wall will get wet under the insulation.
If moisture constantly accumulates on an uninsulated wall, then after work on the internal insulation of the room, the wall will continue to get wet under the insulation throughout the cold season. This will lead to gradual deterioration of all layers of building materials located on the inside of the wall, including the finishing.
Internal insulation does not protect against getting wet
In some cases, after internal insulation of a normal wall, the dew point changes location to the insulation. Then, throughout the winter, not only the wall will be wet, but also the thermal insulation material itself.
One way or another, in order to avoid damage to the finish and internal insulation layers, you need to remember one simple rule: insulation of the inner surface of the wall is carried out only after its external insulation.
Possible consequences
Improper installation of thermal insulation can lead to unpleasant consequences. The material is applied only to the facade, since additional insulation from the inside is considered impractical for the following reasons:
- Living space is decreasing.
- The wall freezes because the heat from the room does not reach the ceiling. As a result, condensation penetrates inside the thermal insulation. The wall is wet and subject to corrosion.
Poor installation results in wall destruction. If the surface under the insulation is uneven and old, it will have to be reapplied, after making repairs. If the insulation on the outside is not additionally covered, then in one season it will become wet, become unusable and begin to move away from the walls. The thermal layer must be protected from the external environment.
Video: Removing the dew point from the wall
About the dew point in plastic windows
When it comes to the dew point in double-glazed windows, many people imagine some specific mysterious place. In reality, the dew point cannot be seen, as we have already found out. Let us repeat: dew point refers to the temperature at which, when cooled, the vapor in the air becomes saturated and condenses. There are special tables that allow you to calculate the dew point at relative humidity and a specific temperature. One such table is shown below.
Dew point at relative humidity
On a note! Let’s say the air humidity is 50% and the temperature is +21 degrees. Under such circumstances, the dew point will be +10.2. What does it mean? If the temperature of any surface in the apartment drops to +10.2 degrees, then condensation will begin to appear on it (the surface). As a rule, the coldest surfaces in the apartment are plastic windows, and therefore it is on them that in most cases excess moisture falls.
People often experience condensation on double-glazed windows. Based on everything said above, we can conclude that condensation can be dealt with in two ways - by increasing the temperature of the glass and reducing the humidity in the apartment. Thus, comfortable humidity can be achieved by ensuring normal air exchange. All excess moisture comes from washing, boiling pots, etc. – should leave the room and not accumulate in it. First of all, the apartment should be regularly ventilated. The frequency of ventilation is determined individually, but we recommend doing this for at least 10 minutes twice a day. Don’t forget about special supply ventilation valves.

