Traditional technology involves laying floor heating elements in a concrete screed. However, due to the specifics of the material, it is not possible to implement it using a wood base as an example. However, today there is an alternative way to install heated floors on a wooden floor. Let's look at what such a heating system is, what its features are, the principle of operation and what a number of mandatory requirements are imposed on it, as well as how to properly prepare the foundation, what types of systems there are and what are the features of their installation technology.
Installation of a heated floor system on a wooden base Source ytimg.com
Warm floors - what is it, how does it work, features
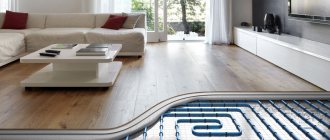
The underfloor heating system is a structure of heating elements mounted in the surface layer of the ceiling. Heat from the circuits heated to the optimal temperature is transferred to special metal elements, which in turn release it to the floor surface. The latter evenly heats the air throughout the room.
Main features of the system:
- Uniform heating of the floor surface.
- Formation of microclimatic areas that are optimal for health – when warm air accumulates at the bottom and cold air at the top.
- The absence of vortex circulation flows characteristic of heating radiators, leading to the accumulation of dust.
- Minimum maintenance procedures for the entire operational period.
Construction of a heated floor system on a wooden base Source otoplenieblog.ru
There is another important feature of a heated water floor on a wooden floor. If in the traditional case the installation of the system is carried out in a concrete screed, since the reinforced concrete floor is quite capable of withstanding the resulting load, then on a wooden base this approach is prohibited. The reasons are excessive weight and inconsistency in the properties of the contacting materials. Therefore, installation is most often carried out using an alternative method - flooring.
Among the main advantages of the flooring system are the following:
- The minimum acceptable weight that can withstand even the ceiling of a frame structure.
- Simple installation technology.
- Short installation time - there is no need to wait for the coating to harden, as in the case of pouring a concrete screed, in addition, you can immediately begin finishing.
- Possibility to carry out repairs and replacement of elements if necessary.
- Large variability of schemes and equipment models.
Installation of heated floors using the flooring method Source strojdvor.ru
Floor heating coatings are not without a drawback - this is low inertia. Although this allows the floor to heat up quickly, it also cools down just as quickly. Analogues poured into concrete screeds do not have this. In them, the concrete mass itself serves as a heat accumulator, and after switching off it warms the room for a long time.
Note! Due to the fact that wood conducts heat rather poorly and is also subject to significant deformation when heated, when installing heated floors using new technologies, heating elements are placed in special heat-conducting circuits. From them, heat is transferred upward to the floor covering.
A properly organized heated floor creates maximum comfort in the room Source onduline.ru
Selection of materials
Before laying heating water circuits in a wooden house, it is necessary to insulate the floors. Therefore, you will have to choose 3 groups of components:
- type of insulation;
- pipe material;
- plate material.
Among the common and affordable insulation materials, mineral (basalt) wool is best suited for thermal insulation of wooden structures. It is permeable to water vapor, due to which it combines well with wood, gives it the ability to “breathe” and does not cause rot. Another thing is that when laying mineral wool, it is necessary to ensure the release and removal of these vapors, otherwise it will get wet through and stop serving as a heat insulator.
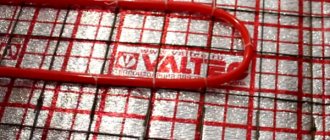
Mineral wool and shaped polystyrene foam boards
Advice. To insulate the covering of the first floor, it is better to use basalt fiber with a density of 40-80 kg/m³ and a thickness of at least 150 mm, and in the northern regions - 200 mm or more. Mineral wool with a thickness of 50-100 mm will be used for the interfloor ceiling. Its task is not to allow heat intended for the upper rooms to pass into the premises of the first floor and to serve as sound insulation.
Polymer insulation - foam plastic, foamed polyethylene and extruded polystyrene foam - practically do not allow moisture to pass through. Therefore, they must be used wisely, otherwise the wood in places of contact with the polymer will turn black and rot. The minimum thickness of materials for thermal insulation of the floors of the first floor is 100 mm; it is enough to put 20-30 mm in the ceiling.
For heated floors without screed, installed on wooden joists, the following types of pipes with a diameter of 16 and 20 mm are used:
- made of cross-linked polyethylene with an anti-diffusion layer that does not allow oxygen to pass through;
- metal-plastic;
- copper.
The most popular pipes for heated floors are polymer
High-quality polyethylene pipes (for example, from the Rehau brand) are no cheaper than metal-plastic and are not inferior to it in terms of performance properties. Hence the conclusion: there is no fundamental difference between these types of polymer pipelines; they are equally good for heated floors.
Copper pipes are much more expensive than plastic ones, and installing them is more difficult and takes longer. But, from the point of view of heat transfer, copper has no equal, and therefore is successfully used for underfloor heating of any buildings. An important point: do not use copper heating circuits together with aluminum heat distribution plates; these metals are absolutely not friendly with each other.
Since the thermal conductivity of aluminum is higher than that of steel, plates made of this material are more preferable (excluding copper piping). But keep in mind that high-quality aluminum distributors are 1.5–4 times more expensive than galvanized ones.
Note. Prices for aluminum and galvanized plates from different manufacturers vary widely and cannot be compared because they are made from metals of different thicknesses. Hence the advice: try to purchase thick-walled products, they are able to accumulate and transmit more thermal energy.
Corrugated stainless steel is also an excellent option.
Of recently emerged materials, flexible corrugated stainless steel pipes are of interest. They are durable, can be installed without welding or soldering, transfer heat well and can be used in lightweight flooring systems.
Calculation of the pipe length in each circuit, laying pitch and surface temperature is presented in a separate publication. Familiarize yourself with the methodology in order to accurately determine the amount of materials.
Installation using Uponor technology
The technique has become widespread as the simplest and most affordable. Mineral wool serves as a thermal insulation material; you can use pipes and plates at your discretion and financial capabilities. The essence of the method is to lay wooden boards 20 mm thick on logs at intervals of 2 cm for the further installation of a water-heated floor, as shown in the diagram:
A ventilation gap is created between the thermal insulation and the base boards (not visible on the diagram)
Note. A similar scheme can be used in any residential buildings where wooden floors are laid on joists, including on top of concrete foundations.
To make heated floors using this technology with your own hands, you will need the usual set of plumbing and carpentry tools, as well as special scissors for cutting polymer pipes. When installing underfloor heating on the ceiling of the first floor (above the ground or an unheated basement), perform the work in this order:
- Nail cranial bars with a cross section of 25 x 25 mm flush with the bottom edge of the beams. Lay subfloors made of 20 mm thick boards on top of them, as shown in the drawing below.
- Cover the subfloor and joists with waterproofing membrane (technically called diffusion membrane), waterproof side down. Maintain an overlap between the panels of at least 10 cm and carefully seal the joints with double-sided tape.
- Place mineral wool slabs on top of the waterproofing so that they do not wrinkle, otherwise the basalt fiber will partially lose its thermal insulation properties. The thickness of the insulation should be at least 5 cm less than the height of the log in order to provide a ventilation gap between the surface of the wool and the future wooden flooring to remove moisture.
- Place vapor barrier film over the joists. The polyethylene must be pulled up and secured to the wood with a stapler so that it does not sag in the gaps between the beams.
- Nail 2 cm thick boards across the joists, 30 mm away from the wall. Depending on the pipe laying pitch (15 or 20 cm), leave 20 mm wide gaps between the boards for heat distribution plates.
- Insert metal plates into the slots and arrange the heating circuit pipes over them, placing them in the Ω-shaped grooves. To rotate the pipe, shorten the ends of the boards by 10-15 cm in this place.
- Run the ends of the pipes along the walls to the heated floor comb, connect them and check the tightness of the system. Lay the final floor covering.
Please note: when installing an insulated floor, the membrane and vapor barrier are swapped - the polyethylene film is laid from below.
The method of laying a water-heated floor over wooden joists is shown in detail in the video:
Work on the interfloor floors is carried out in the same order, only the subfloor boards can be nailed directly to the joists from below. By the way, instead of wood, you can use OSB boards here, while simultaneously hemming the ceiling of the first floor.
Important! Do not confuse the diffusion membrane with the vapor barrier film, otherwise the mineral wool will become saturated with water and cease to be an insulator. The waterproofing at the bottom of the “pie” protects the cotton wool from getting wet from the outside, and the top film prevents water vapor from penetrating. In floors, everything is the other way around - the vapor barrier is laid from below, the membrane - from above. To remove moisture from the insulation, use a 5 cm ventilation opening and vents made in the walls of a wooden house.
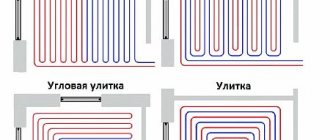
Along with its simplicity and low cost, this method of installing water heated floors has one drawback - the pipes can only be laid in a “snake” pattern, which is why the rooms of a wooden house have to be divided into several heating circuits in order to achieve uniform heating.
Installation Guide for Polystyrene System
This method of laying underfloor heating circuits allows you to complete the work much faster and easier, since it involves the use of two-layer polystyrene foam boards with guides in the form of protruding bosses. Polystyrene of different densities is used to make the plates - the top layer is more durable, the bottom layer is soft.
It is quite simple to make piping for heating floors according to this scheme
The technique is suitable for any floors with a flat surface, for example, made of OSB plywood (as in houses made of SIP panels). Warm water floors on a flat wooden surface are made using the following technology:
- Cover the joists with OSB sheets and fasten them with galvanized self-tapping screws. If work is carried out on a wooden floor of the first floor, then mineral wool insulation should be laid between the beams, as described in the previous section. The thickness of the polystyrene system is not enough to fully insulate the building from below.
- Attach damper tape to the walls around the perimeter of the room.
- Place polystyrene foam boards on the finished surface, fastening them together with locks.
- Install the dissipative plates in accordance with the layout and spacing of the pipelines, fixing them between the bosses. Unwinding the pipe from the coil, insert it into the recesses of the plates.
- Cover the heating circuits with plastic film, overlapping and gluing the sheets.
- Mount the base of the floor from gypsum fiber sheets (GVL), where you will subsequently lay the finishing coating (a popular option is laminate).
Details of the work are shown in the video from the Russian manufacturer of polystyrene foam systems -:
Advice. Before laying the finishing coating, connect the main lines from the circuits to the manifold of the distribution and mixing unit and conduct a leak test (pressure test) with a pressure of 4 bar.
The advantages of shaped insulation for warm water floors are obvious - simplicity and speed of installation work, the ability to lay out pipes not only in a “snake”, but also in a snail. There are also disadvantages:
- high price;
- the material can bend under heavy mechanical loads;
- Due to the gaps between the bosses, a small part of the heat is wasted on useless heating of the air under the floor covering.
Other pipe laying methods
Other products can serve as the basis for heating loops, into which metal plates can be inserted:
- expanded polystyrene boards with ready-made grooves;
- factory kits made of wooden products with cutouts for laying pipelines;
- polystyrene sheets with a density of 35 kg/m³, where the recesses are cut out with your own hands using a special thermal knife.
In addition to polystyrene foam with bosses, polymer slabs with ready-made recesses are also available in the retail chain. This option is suitable both for installation on a flat surface and inside the ceiling flush with the joists, as shown in the diagram:
Thermal insulation boards can be placed in the gaps between the joists
Note. The disadvantages of this option are the need to cut grooves in the joists for the passage of tubes and fastening the polymer at the corners so that it does not adhere to the wood. Therefore, it is better to place slabs with recesses on a base made of OSB plywood or leveled boards.
A set of wooden elements (left) and polystyrene foam with grooves for pipes (right)
A big plus of wooden sets for water underfloor heating is the ability of the coating to carry a large load from bulky furniture without deformation. Products with cutouts for plates are mounted on beams along with insulation, as described above (Uponor brand technology). A stacked wooden heated floor has only one drawback - the high price of materials.
Homeowners with time can save money on a polystyrene system by purchasing a thermal groove cutter and regular high-density foam. The technology is simple: insulation boards are laid out on a leveled surface, after which you need to burn out the pipeline route in them in accordance with the diagram. All that remains is to install heat distributors and insert pipes into them.
Burning grooves in polystyrene with a thermal knife
Requirements for heated floors on a wooden base
In order for the operation of a heated floor laid without a screed on a wooden floor in a wooden house to be safe and durable, the following series of requirements are imposed on the system installation procedure:
- Wood floors, both as part of a structure and as an independent structure, exhibit natural shrinkage, which is most pronounced during the 1st year after construction. Therefore, the installation of all elements of the heating system must be carried out in compliance with the required technological clearances.
- Wood is most quickly exposed to microclimatic changes indoors. If it is too dry, it shrinks, cracks, warps, and if it is too wet, it rots and is subject to the development of mold and fungi. In both cases, the service life of structures is rapidly reduced.
Structure of a heated floor in a wooden structure Source pinimg.com
- The susceptibility of wood to fire requires choosing a method of laying heating elements so that neither the heating parts themselves, nor the conductors, nor their connections are in direct contact with the wooden floor elements. For this purpose, boxes and other protective devices made of non-combustible materials are used, as well as pre-treatment of surfaces with fire retardants.
On a note! To avoid the development of an emergency situation, it is necessary, first of all, to comply with building codes and regulations regarding the permissible level of heating of the system as part of wooden structures. According to SNiP, the temperature of the heated floor should not be higher than 27-30 °C. It is best to install a temperature sensor for the most accurate control.
About the pros and cons of “dry” floor systems
In conclusion, I would like to note the advantages of a heated floor without screed, which can attract owners of private wooden houses:
- The design is lightweight, reliable and efficient at the same time.
- Unlike heating circuits embedded in screeds, in such a system it is easy to detect a leak and eliminate it.
- The thickness of the “pie” protruding above the upper cut of the log is from 20 to 50 mm.
- Water floors with dissipative plates made of steel or aluminum are not able to accumulate heat and are practically devoid of inertia. Accordingly, they quickly warm up rooms and quickly respond to automation commands and changes in coolant flow in the loops.
- Speed of installation due to the absence of “wet” processes and hardening of the solution. How lightweight heated floors are installed in a short time is shown in the next video:
For reference. On various Internet resources there is conflicting information about the reduced heat transfer of a flooring system compared to a monolithic one. Theoretically this is true, but in practice the difference is small, and it is quite difficult to compare.
The only drawback that forces home inventors to play tricks with aluminum foil is the price of steel products, especially when combined with shaped polystyrene foam. You can get around this nuance like this: install warm floors in all rooms one by one, depending on the availability of financial opportunities. First you need to insulate the ceiling and install a comb, and then gradually install the pipework, starting with the rooms where residents live permanently.
Varieties
Based on the type of energy resource used, heated floors that can be installed on wooden joists are divided into two types:
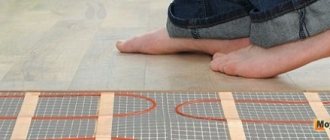
- Electrical.
The system is based on wired heating elements - cables and coatings. Their main advantages:
- Small dimensions and weight.
- Possibility of installation on any base, including old ones.
- Fast heating.
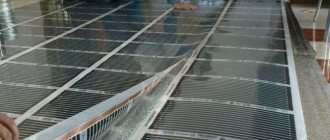
Film-type electric heated floor Source teplopol74.ru
See also: Catalog of companies that specialize in engineering systems (heating, water supply, sewerage and others) and related work
- Convenient selection of heating level - depending on the microclimatic requirements for a particular room.
- Microzoning - setting your own mode in each room.
- Service life with proper operation is at least 50 years.
However, the installation of electrical systems is associated with the risk of fire - with low-quality components, overheating, violation of operating conditions and other reasons, there is a high risk of a short circuit. In addition, with high power, such heating will consume quite a lot of electricity. You also need to make sure that the wiring can withstand the load created by the heating system.
- Mermen.
It is based on a pipeline network through which heated coolant circulates. The system is powered either from an individual heating boiler or from a centralized mains.
Water heated floors are more preferable from a fire safety point of view. However, they also have specific disadvantages. The first of these is the risk of leakage. Sooner or later, all connections leak, and the system piping is no exception. The second disadvantage is lower power than electric analogues.
Pipeline for water heated floor Source stroyvms.ru
Types of electric heated floors
If a water heated floor can be installed directly under a wooden floor, that is, under a plank floor, then an electric floor can only be installed under a coating made of relatively non-combustible materials. There are 3 main types of electric heating coatings of the type in question, each of which has its own power and type of finish:
- Heating cable. The operating power range varies between 120-180 W/m2. It is recommended to choose porcelain stoneware or ceramic slabs as the finishing coating.
- Mats. They are an analogue of the above modification, however, with the difference that the heating conductor is fixed on the substrate. Therefore, in addition to the power of the heater itself, products are characterized by the pitch of its location on the substrate. The best option for the final coating is ceramic or granite-based tiles.
- IR emitting film. The working surface of the material emits thermal energy on the principle of sunlight and heats surrounding objects. Its power varies widely - from 150 to 220 W per m2. Fits under parquet boards, linoleum and laminate.
Electric film heated floors are easy to install Source saucyintruder.org
Reference! Installation of a classic heated floor - with concreting in the screed - is also possible on a wooden floor. However, for this, wood structures need to be provided with reliable waterproofing with a ventilation gap and antiseptic protection, provided also that they are designed for the final weight of the poured concrete pad, equipment and finishing. It is recommended that the screed itself be made on the basis of ready-made mixtures with minimal setting time.
Conclusion
Warm floors with dry screed using Finnish technology are a basic option that can be tailored to specific conditions and needs. All the subtleties and nuances are in the topic of heated plasterboard floors. In the article about heating a private home, the most economical heating method is selected. And in the video about engineered heating equipment - expert advice on choosing.
Subscribe to our Telegram channelExclusive posts every week
Preparatory work - assessment of the condition of the ceiling, renovation, insulation
Before deciding which modification of heated floors is best suited for a particular wooden floor, it is necessary to make a correct assessment of its current condition, as well as the need for its renewal, replacement, repair and insulation. To do this, the following series of procedures are performed in relation to the main parts of the structure (boards, joists and other load-bearing elements):
- Visual inspection of the surface for defects.
- Feeling, scraping, drilling into the material to assess the condition of its structure.
- Replacement of elements with obvious damage - cracks, sagging, rot.
Laying heated floors requires careful preparation of the wooden base. Source sovet-ingenera.com
Two structures could serve as support for the lag
- Special support beams that were placed in nests arranged in the stone foundation of the house or rested on the lower crown (if the house was wooden).
- Brick columns, which were installed in the underground space and could serve as both a base for support beams and a support directly for the logs.
Nowadays, when there is a wide choice of building materials, including concrete, a concrete slab or pad is often used as the base of the ground floor.
And, if the slab is mounted directly on the foundation, then the cushion is poured inside it and distributes the load directly onto the soil located inside the foundation contour.
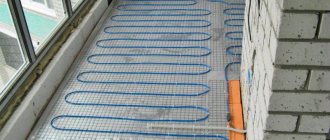
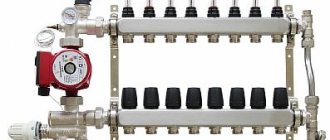
Installation of a water heated floor system
The most common way to install a domestic floor heating system on a wooden floor is to lay a pipeline circuit with a circulating coolant liquid. In this case, there are several options for how the latter will be heated - these are:
- Individual heating unit.
- Centralized heating system.
- Thermal accumulator.
The technology for installing equipment and materials consists of the following main stages:
- Drawing up a project - diagram of pipe laying, connection points, calculation of parameters, quantity and type of finishing and base materials used.
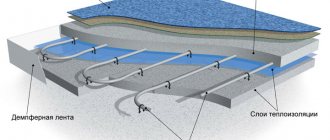
- Formation of the base - creation of a subfloor, insulation, steam and waterproofing.
- Laying the pipeline, depending on the chosen method - pouring into a screed, fixing it on special mats or in grooves on a wooden flooring.
- Connecting the system to the heating circuit and checking its functionality.
- Preparing the base for finishing.
- Installation of finishing floor covering.
Scheme for uniform laying of a heated floor on a wooden base Source roomester.ru
The final layer of finishing for a water heated floor can be created from four main materials - ceramic tiles, parquet boards, laminate and wooden boards. In this case, there are 3 popular options for laying heated floors on a wooden floor:
- Application of a ready-made solution. This is a set specially manufactured by a specific manufacturer, similar to a construction set, which includes pipes, a substrate, and fasteners. Plus - quick and easy assembly. Disadvantages - high cost, the need for careful preparation of the base, elimination of the slightest differences, priming, etc.
- Performing flooring on joists. The method is used when pipes need to be laid with large pitches.
- Installation along guides. Guides are laid on the subfloor in accordance with the diagram, between which pipes are then placed.
The structure of a thermal water floor under laminate Source 1c-bitrix-cdn.ru
Important! The main mistake in organizing a warm water floor system is the lack of waterproofing protection. Sooner or later this will lead to the formation of condensation and the accumulation of dampness in the wood. As a result, the service life of structures will be significantly reduced.
Variations on a theme
In our country, based on Finnish technology, which facilitates the design and allows one to abandon monolithic casting, its variations have appeared - the principle remains, but the materials have been increased:
- Gypsum fiber sheets (GVL) - compared to plasterboard, they are denser, more resistant to bending and deformation, and contain cellulose fibers and other additives that increase their technical characteristics. For wet rooms, a moisture-resistant variety (GVLV) is used;
ТishinForumHouse Member
In such a floor, instead of plasterboard, it is better to use gypsum fiber sheets (GVL). I myself am now considering a dry screed for implementation in my home, I will only replace the bottom layer with OSB. I will assemble the middle part from two layers of gypsum fiber board.
- Chipboard, OSB, plywood - in terms of heat transfer, this design is worse, since wood and its derivatives act as an insulator. Ready-made sets of heated floors on a dry screed made of chipboard sheets, with grooves selected for hinges, are sold, but not everyone can handle their cost.
boatmasterFORUMHOUSE Member
Logs, with a pitch of 60 cm, plus insulation - 35 cm, OSB base, then a 20 mm pipe, plus a 5 mm clip, it turns out 25 mm, three layers of GVLV between the pipes 12x3 = 26 mm.
- Cement particle board (CSP);
- EPPS - pipes are laid directly into the insulation, and the voids are covered with glue. To increase the heat transfer of the elements, foil or similar material is used;
The thickness of the sheets for the middle layer with the main is selected based on the diameter of the pipe, so that after filling with glue, a flat surface is obtained, and the final layer does not put pressure on the pipe. As an option, two sheets are glued together if the thickness of one is not enough.
Forum users are actively organizing their underfloor heating systems on wooden floors.
Serg177FORUMHOUSE Member
If something happens to the pipe (today, tomorrow or in 25 years), you won’t have to break the screed. I will buy 50 sheets of plywood, 18 mm thick, for 200 m², cut it into strips, 16 mm pipe in between, and cover 200 sheets of ten sheets with laminate on top.
One of the options for making a dry screed with your own hands is laying pipes in special aluminum plates with grooves. They fit the pipes tightly and increase heat transfer. The disadvantage of this configuration is the high cost of these metal gaskets; their use increases the cost of the entire system.
Vladimir TallinForumHouse Member
There are not enough special aluminum sheets that are placed under the pipe and remove heat to the top. I have them, they “hug” the pipe, the size is about 30 cm per meter, there is a groove for the pipe with rare spikes to hold the pipe.
Sheets on a gypsum base are one of the most popular, as an optimal material in all respects.
- Reasonably priced;
- Easily cut into segments;
- Eco-friendly (does not contain synthetic binders like wood-filled boards) and suitable for home use;
- Non-flammable;
Video description
Video example of installing a heated floor on a wooden floor:
- Installation of support bars is in progress.
- Next, material is placed on the free surface between them to reflect thermal radiation.
- A special substrate for the heating cable – galvanized mesh – is laid on top of this coating.
- Then a heating conductor is lined on it.
- All loose elements are fixed.
The choice of base and finishing materials, as well as basic devices, should be made taking into account the following features:
- To avoid overheating of wooden structures, the maximum temperature of heating elements should not exceed 400C.
- The thermal conductor is distributed over the surface as evenly as possible - with the exception of places where furniture and interior items are installed - there should be no heating elements under them.
- The thickness of the finishing coating directly depends on the type of material and thermal conductivity characteristics. For wood, the value of this indicator is 2-2.5 cm.
Heating mat
Fiberglass heating mats, which are equipped with a heating cable system, are also popular among consumers. The advantage of such products is their ease of installation, because their installation does not require such a labor-intensive procedure as additional pouring of concrete. The system is fixed in a layer of adhesive composition designed to fix the tiles. Thanks to this, the final layer of screed does not exceed three centimeters.
Heating mat
The devices are sold in rolls, which makes installation of the system easier. The technical characteristics of such products are exactly the same as in the case of prefabricated heating cable systems.
Video description
Video on how to make a warm floor on a wooden floor under tiles:
Recommendation! When using parquet boards as a finishing coating, the base must be strong enough. This is especially true when the distance between the joists is large and they will sag on a soft floor, but thick wooden boards will make the warm floor ineffective. Therefore, it is better to lay parquet on plywood on top of screed or frequently located supports.
Main or additional heat sources for a country house
Electric floor heating can be performed specifically on a dilapidated floor: on ceramic tiles or parquet.
In this case, it is most ergonomic to use heating mats. They make it possible to easily improve thermal comfort in a room that is already in use, without raising the floor level significantly and creating additional load on the ceiling.
When planning the installation of electric underfloor heating in a dilapidated building, you should not forget that as the main source of heat it can only be justified in buildings with good thermal insulation. If the total heat loss through the outer walls, floor and roof is enormous, in other words, exceeds thermal standards, underfloor heating alone will not be enough to heat the room to the required temperature.
In this case, electric underfloor heating can only serve as an addition to a second type of heating, for example a system with radiators. Here we are not talking about reducing electricity consumption but about floor temperature. It cannot be larger than the defined values. Otherwise, the floor must provide no more than pleasant warmth, neutral from a physiological point of view.
It is generally accepted that in rooms such as the living room or kitchen, the floor temperature should be a maximum of 29°C, and in the bathroom - 34°C. In areas under the windows, along the outer walls, the floor temperature can be as high as 35°C. But this is often not enough to compensate for heat losses at home and ensure a comfortable temperature in the room during frosts reaching -15-20°C (calculated temperature taken depending on the region of the state).
Video description
Video review on laying film heated floors:
- After this, the thermal film is fragmented along the cutting lines and laid in accordance with the plan.
- Installation of thermal film is carried out so that the fragments are located 20-30 cm from the edge of the wall and do not overlap each other. In this case, the copper-plated elements should be facing down.
- The heating material must be laid strictly according to the plan - so that it does not fall under the place where furniture and other heavy objects will stand.
- Upon completion of laying the thermal film, the finishing coating is installed.
Advice! As a finishing material for a film electric heated floor laid on a wooden floor, you can use both tiles and linoleum with laminate. In this case, the substrate for the finishing coating is a mounting mesh and sheets of plywood.
General principles for arranging wooden floors
If you are planning to install floors made of natural materials in your country house, plan the work for the end of spring
This is important because during this period the tree will absorb less moisture. If the assembly of floors in a cottage or house cannot be postponed until the recommended time and the work needs to be done in the summer, choose a dry, hot period, without heavy rains and dew.
Regardless of the method used to install floors, it is extremely important to pay maximum attention to the quality of the lumber. Wood must be treated with special agents against rotting, moisture, insects, as well as a fire retardant composition
Briefly about the main thing
A warm floor is a system of heating elements mounted directly under the floor covering. The heating parts of the system transfer heat to the surface, which in turn heats the room. Among the main features of this heating are:
- Uniform heating of the room.
- Creation of an optimal microclimate.
- No dust accumulation.
- Minimal maintenance.
When deciding whether it is possible to make a warm floor on a wooden base, the main obstacles are the features characteristic of the traditional method - the large weight of the concrete structure. Therefore, the plank flooring method is used. Its advantages are minimal load, simple installation, low labor and time costs, maintainability and variability.
Heated floors can be classic water or electric. Each type has its own characteristics, materials, equipment and installation technology. At the same time, the installation procedure, methods and components used must comply with special fire safety requirements and long-term operating conditions.
Features of installing products with your own hands
If you are undertaking the installation of an electric floor system in a country house or country house with your own hands, then first you must carefully study the installation instructions, which are attached to the products and contain all the necessary information regarding installation, features of operational use and general safety.
Film placement diagram
A list of several rules will help avoid such problems:
- Be sure to calculate the area that needs heating and choose the system rationally.
- You cannot lay the cable under pieces of furniture that do not have high legs, and the infrared film must be placed only in an open space free of furniture.
- The base must be thoroughly leveled and dried.
- Under no circumstances should you shorten or lengthen the cable, cut it or perform other manipulations.
- Turning on the system is allowed only after the screed layer has completely hardened and dried. This usually takes from 28 days to a month, at least.
If you plan to use tile products as flooring, then it is best to choose a cable-based device, since this option is the most budget-friendly and suitable for this case.
Range of film products
First of all, you should prepare a place to place the temperature regulator, form a groove where the electrical wiring and temperature sensor tubes will be hidden. The output of the mounting ends will also be located in this area.
After this, the base is leveled, cleaned of dust and debris and covered with a layer of primer. Then the heat-insulating material is laid, and the corresponding sections of the mounting tape are glued according to the laying diagram.
Material cutting
Key points that should not be forgotten:
It is necessary to check the electrical resistance in the network. The cable should be taut during installation, but without much effort. It is necessary to take into account the minimum permissible bend. On straight sections you need to use special couplings. Do not allow the cable turns to intersect or touch.
Next, the temperature regulator is installed and connected to the electrical network. When installing a temperature sensor, a corrugated tube is used, which, for ease of repair work, should be placed between the turns of the cable.
After all connections are made, the system is checked for damage, resistance measurements are taken on the sections and the sensor and checked against the numbers in the documents. When the screed is completely dry, the device can be turned on.