Polystyrene foam is an inexpensive material from which craftsmen make a wide variety of products. It is very popular not only because of its low cost, but also because of its ease of processing. Not everyone knows that foam plastic does not have to be cut with a regular knife. In this case, it will crumble very much and it will be simply impossible to make an even cut.
But this material melts very well, and at a relatively low temperature. That is why the most convenient way to work with polystyrene foam is to cut it using special cutters that rely on high temperature. But cutting foam plastic with your own hands is also possible in other ways, which we will definitely consider.
What is polystyrene foam and what is it used for?
Foam Sheets
Foam is a white material that consists almost entirely of air. It is used for packaging equipment, food, as a heat-insulating and sound-proofing material, as a basis for the manufacture of household items, logos and many other things. One of the main advantages of polystyrene foam is its low cost . Many people buy it in order to make some product from this material and sell it profitably. But even for an ordinary person, polystyrene foam will be very useful, because you can make a lot of things for your home from it. The main thing is to be able to work with the material correctly, as well as choose it for specific purposes.
What material to choose for cutting
Before we start working with the material, we need to find out what kind of foam there is, what type of foam is best used for cutting at home.
Polystyrene unpressed
This is the most common and familiar polystyrene foam, which is familiar to us from technology packaging. The material consists of many small white balls that are tightly connected to each other, but can become separated from mechanical stress. It is very widespread and is most often used in the manufacture of products at home.
Polystyrene pressed
This is a similar type of foam, which is simply additionally pressed. Because of this, it has a much denser structure, it is more difficult to crumble, but such material also costs much more than its non-pressed counterpart. Due to the high price, pressed polystyrene foam is not widely used, but for some products it can definitely be used, since its structure is quite smooth.
Polystyrene extruded foam
Polyvinyl chloride foam
The rarest and most unused type of this material, which has one interesting property - the ability to extinguish on its own when ignited. It does not emit hazardous substances, but if it does catch fire, the smoke from it is very dangerous and can pose a health hazard.
Prices for foam plastic
Styrofoam
How to cut foam without special equipment
The first common question is what to do if you need to cut foam, but building a special cutter is too difficult, expensive and useless. There is a way out, even several.
Methods for cutting foam plastic
Wood hacksaw
The large teeth of the hacksaw allow it to grab onto the foam granules and cut it quite effectively. To implement this method, you do not need to modify anything yourself; you just need to purchase or take a ready-made hacksaw for wood. In the same way, cutting can be done using a jigsaw; in this case, it will be important to choose the right file for it.
Wood saw
But this method is not widely used, since when using it, the foam will crumble in any case, and it will not be possible to achieve a perfectly even cut. Also, if you use the tool carelessly, the plate may crack and all the work will go down the drain. Therefore, the following methods are almost always used to cut such capricious material.
We use a thermal knife
Cutting polystyrene foam with your own hands using a thermal knife is justified for slab thicknesses up to 50 mm. To cut a piece of polystyrene, the hot knife is advanced at medium speed, which ensures a quality cut without tearing out fragments or melting the edges.
Purchasing a longer blade for this device is not entirely beneficial. When cutting by hand, it is impossible to cut strictly perpendicular to the surface. The end of the sheet will have a bevel, which is extremely inconvenient during installation. In order to better cut a thick sheet, it is necessary to cut on both sides, deepening the hot knife to half the thickness or a little more.
Cutting material using a hot tool
To cut a sheet of foam plastic, you can use the most ordinary knife, if you first prepare it for this procedure:
- You need to make sure that the length of the knife is greater than the thickness of the sheet that will need to be cut.
- Next, you need to mark the lines on the sheet along which it will need to be cut.
- The next step is to heat the knife using a gas stove or a special gas burner. Carefully draw a hot knife along the intended line; the foam will begin to melt and cut clearly along the line.
It is important to consider that it is not possible to achieve a perfectly even cut using this method, and it is also only suitable for cutting small pieces of material. The fact is that even slightly shaking hands will not allow you to achieve a straight line, and a constantly cooling knife will not allow you to make a neat and long cut.
But if your goal is to cut off a small piece, then a hot knife will allow you to do this very quickly and without wasting extra money and time. Please note that after cutting, the knife should never be used in the kitchen or at home, as the foam contains toxic substances.
Knife
A simple soldering iron cutter
If you need to make quite a lot of foam blanks, but don’t want to make an overly complex cutter, then you can use its simple analogue, which works on the basis of a regular soldering iron.
It is important to choose a soldering iron that is not too powerful, since its temperature is excessive for normal sheet cutting. If the power is too high, the foam will smoke a lot, smoke, and be difficult to cut.
The next step will be to select and install a nozzle on the tip of the soldering iron, since the standard tip is in no way intended for these purposes. We need to find or make our own long and flat tip, which will look like a small knife blade, but less sharp. Copper wire folded several times is good for making such an item. Another option is to simply take out the tip of the soldering iron and shape it into the desired shape.
Next, the tip is tightly fixed to the tip of the soldering iron and you can start cutting.
The soldering iron is inserted into a socket, heats up and cuts the foam using a similar principle to a hot knife. The main advantage of this method is that there is no need to constantly heat the knife; cutting can continue continuously.
Soldering iron cutter
Features of work
While learning how to make a manual foam cutter yourself, it is also necessary to consider the operating features of such equipment. As mentioned above, such an instrument has a string. It heats up and melts the surface of the foam.
This material reacts quite poorly to heat.
Therefore, it is important to maintain the technology of the entire process. Cutting using a hot thread is done quickly. This allows you to achieve high quality cuts.
It's easy to check the string's heating level. To do this, a test is carried out on a test piece of polystyrene foam. If, when immersing the thread, long pieces of material remain on it, it has not yet warmed up enough.
If there is no foam on the string at all, then the temperature is too high. In this case, you will have to cool the instrument a little. With proper heating, you can perform fast, accurate cutting.
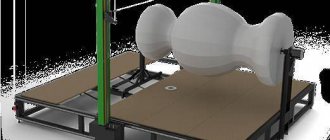
Special cutter for cutting foam plastic
If you want to make foam products on a regular basis, and so that they turn out really smooth and good, then you will have to make a special cutting machine that will allow you to do all this.
Prices for a special cutter for foam plastic
Foam cutter
On the Internet you can find many variants of this design, which differ in size and appearance, but they have the same essence. We will analyze one of the most popular and simple designs, which has proven itself well.
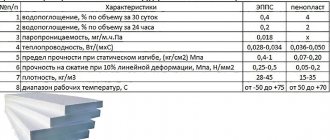
Table 1. Main methods of cutting foam:
| Cutting methods | Advantages | Flaws |
| Wood saw | Simplicity and accessibility | Can't get a perfect cut |
| With a hot knife | Availability | The knife cools down quickly |
| Soldering iron cutter | Will not cool down, so you can make long cuts | It takes time to create |
| Homemade machine | Allows you to make perfectly straight cuts | Complexity |
Multitool equipment
In the kit you will find:
And most importantly: the manufacturer does not limit the buyer only to this configuration. You can purchase other attachments of different shapes. All of them allow you to carry out truly jewelry work with high precision and very carefully.
Please note: the multitool runs on 4 AA batteries, which are not included. They must be purchased separately. You can also use AA batteries if you plan to use the tool frequently and do not want to regularly buy new batteries.
Naturally, you can separately buy a cutter for foam plastic, buy a battery-powered soldering iron and a burner. But you will have to spend an order of magnitude more, the ease of use is extremely questionable, and the quality is not always at a high level. Here you can purchase first-class products at an affordable price from a world-famous manufacturer.
Step-by-step instructions for making a cutter
First we need to decide on the tools and materials that we will need to create the cutter. The list of required materials includes:
- A sheet of chipboard or other dense base, approximately 600 by 400 millimeters . The size can be changed, it will depend on the size of the sheets you are going to work with.
- A flat wooden strip, about a meter long.
- Material for legs: 4 caps from plastic bottles, a piece of lath or other material.
- Nichrome wire, approximately 0.4 mm . You need about half a meter, but it is better to buy with a reserve.
- Tension spring. It is for tension, not compression. Such a spring cannot be found everywhere.
- 10-15 screws.
- Wires, crocodiles for fastening them.
- Computer power supplies and cable for it.
Now let's move on to the tools that we will need to manufacture and assemble the structure. These include:
- Drill or screwdriver;
- Jigsaw or hacksaw for wood;
- Screwdriver;
- Pliers;
- Drill for screw diameter.
Prices for popular drill models
Drill
Stages of creation
Since linear cutting is the most common, let's look at this option in more detail:
- Cutting part. To do this you will need nichrome wire, approximately a spiral with a diameter of 0.6 mm. It can be taken from old electric stoves or other heating electrical appliances. The length of such a wire should be 14 cm (its resistance will be 2 ohms).
- Transformer application. For everything to be correct, the first step is to calculate the voltage and current for heating the cutting part. This can be done using the formula - Ohm's law I=U/R. Thus, you can determine the power of the power transformer.
- Making a cutter. The base can be made of any metal, but its length must be at least 11 cm. Next, an insulator - a PCB plate - must be attached to the end. Now fasten the contact groups along the edges of the plate; they can be removed from the electrical outlet. It is into these contacts that it will be possible to attach spirals of different shapes.
- How does the cutter work? After the cutter is plugged in, the wire will heat up and become slightly reddish in color. This is exactly what matters, since a heated cutter will make it possible to easily and quickly cut the foam, which will not peel off.
Video - How to make a foam cutting machine with your own hands
Where to get nichrome wire
Rolls of nichrome wire
Nichrome wire is an integral part of the cutter, but not everyone knows what it is, and most importantly, where to get it. Nichrome wire differs from ordinary wire in its strength and very high melting point. That is why it is most convenient to use to create a foam cutter.
This wire is used in irons, boilers and some other heating devices. In addition, it can be bought in electronics stores and markets.
Prices for nichrome wire
Nichrome wire
Power supply, its connection and configuration
Our cutter will operate from a regular computer power supply, which almost everyone has, but if you don’t have one, you can buy it at any computer store; it’s inexpensive.
The power cord must be plugged into a power outlet and the device turned on. But the power supply will not turn on due to the nature of its operation. In order for it to turn on you need:
- Find the largest connector that is designed for the motherboard.
- Prepare a small piece of regular wire or find a hairpin.
- Find the green wire there, there will be only one.
- Now, using a hairpin, you need to connect the green wire with one of the black wires, and it doesn’t matter which one.
After these simple manipulations, the power supply will work.
Computer power supply
All that remains is to somehow obtain the voltage we need using a power supply. To do this, you need to find a Molex connector, which is a connector with four holes, to which wires of different colors go.
In the holes with the yellow and black wires, you need to connect the wiring wires, which will power the entire cutter. With this all manipulations with the power supply are completed, you can move on to building the cutter itself.
Selecting wire length
Before you start making the foam cutting machine itself, you need to calculate the length of nichrome wire, which will be sufficient for normal cutting of the material. To do this you need:
- Take a long strip and screw it on both sides.
- It is necessary to attach a tension spring to one of the screws, which we will also use in the future.
- Pull the nichrome wire to the maximum possible length. One end of it will be connected through a spring.
- Now you need to connect one wire from the power supply to the very end of the wire that does not have a spring.
- There is no need to secure the second wire tightly; we will move it. Depending on the position of the wire, the temperature of the wire will increase. The closer the two ends are, the hotter it is. Thus, you need to find a position at which the wire temperature will be sufficient to cut the foam. Please note that if the wires are placed too close, the foam will burn, which will negatively affect the final quality of the product.
Next, you need to measure the distance between the wires and remember it. This is exactly how much wire will be used to cut the foam.
Now the entire structure needs to be disassembled and the manufacture of the main part of the cutter can begin.
Selecting wire length
Base
The first thing you need to do is take a board for the base and screw 4 legs prepared in advance to it. The easiest way to do this is to take 4 caps from plastic bottles and secure them to the back of the board using regular screws. It is important that the screws do not come out from the back of the board. This can happen if the fastener is too long.
Next, you need to find the flattest side of the base and attach there the structure to which the wire will be screwed.
Chipboard for cutter base
Wire holder
The wire fastener in our design consists of two twisted pieces of lath that are tightly attached to the base. It is important to assemble everything so that an angle of 90 degrees is formed and nothing wobbles.
The first step is to fasten the two slats together. The length of the first should be equal to the length of the wire that is suitable for cutting. The length of the second staff will express the distance from the edge of the cutter to the wire. It must be selected based on the size of the workpiece you are going to process.
Now the resulting angle of slats needs to be screwed to the base using corners. It is important to do this in such a way that the structure does not wobble.
Now you need to drill a through hole in the base where the fishing line will go. To do this, you need to screw a screw to the center of the rail and tie a thread to it. When the thread goes down, you need to put a point in the place with which it comes into contact. This is where you need to drill.
On the back side of the base, next to the hole, you need to screw a small screw. It should be as close to the hole as possible.
Wire installation
Wire fastening
Now you need to start attaching the wire. The first step is to secure the spring to the screw located on the rail. A nichrome wire is wound to the end of the spring, and the spring needs to be stretched by about half.
The other end of the wire must be tightly wound around the screw, which was screwed onto the back side of the base. The wire should be well tensioned, and the spring should not be in its original position. Nichrome wire can be quite uneven due to the fact that it very readily takes the shape that it is given. To make it as even as possible, you need to stretch it and move a piece of wood along it until it visually becomes smooth. It is unlikely that you will be able to make the wire perfect, but minor irregularities will not greatly interfere with cutting.
The last step will be setting up the cutter. The fact is that the screwed rail does not create a right angle with the base of the cutter. To fix this, you need to take a square and apply it to the rail. Now, using a screwdriver or screwdriver, you need to turn the screw a little until an even angle is formed.
This completes the process of creating a homemade foam cutter. All that remains is to connect the power.
Wire tension through a spring
Power connection
In order for the cutter to start working, it must be connected to power from the block that we made in the previous steps. For ease of fastening, you can buy special crocodile clips that will help secure the wire in a couple of movements. If there are no crocodiles, then the wire can simply be tied in the right places.
Step-by-step production of a thermal cutter from improvised materials
When making electric tools for cutting foam, you can use a variety of elements and devices. For example, a thermal knife can be made from a soldering iron, a burner and/or an old (unnecessary) jigsaw. Let's look at the five main steps required to do this:
- First you need to make a bushing - a basic and complex element in its structure. The taken plate needs to be bent and turned, then carefully drill a hole into which the thread will be inserted.
- After this, you need to remove the wire leading to the hole, and then find suitable connectors and carefully solder them into the gap area. It is important that all further work using the finished cutter is carried out with insulated wires.
- After that, we connect the thermal cutter. The old jigsaw needs to be cut into two parts. In its upper part we install a claw plate on the screws, which had to be prepared in advance. And using self-tapping screws we connect the lower part to the base.
- Insert the sleeve into the foot. We mark the point under the hole of the sleeve from the hole using a square (or a plumb line). We make a hole in the base with a diameter of 5 mm.
- Straighten the nichrome wire. First, turn on the burner at full power and touch the nichrome wire with its wires. It is important that the distance between the wires is equal to the height of the device. At the same time, if the device hums or makes strange sounds, and the thread does not heat up (this is a consequence of insufficient resistance), then you should find a wire of thinner thickness.
Video: Do-it-yourself foam cutting machine
The first end of the wire needs to be connected to the back of the base, to the screw that we screwed there. The second end must be placed on the nichrome wire itself, under the spring. If you lower the wire a little, the temperature will increase and the cutter will be more powerful.
If you need a full-fledged power regulator, here are brief instructions on how to make one:
- You need to take a piece of nichrome wire that is left and wind it around a regular ballpoint pen so that you get something similar to a spring.
- You need to bend the hooks at the ends of the spring.
- Now, in a random place on the cutter frame, you need to screw in two screws at a distance approximately equal to the length of the resulting spring. The wire must be secured to these screws.
- Next, you need to connect the end of the spring to the beginning of the nichrome wire of the cutter itself.
- The first wire from the power supply must be connected to the same screw that is located under the base, and the second wire must be secured to one of the turns of wire. Depending on the chosen turn, the resistance in the circuit will change, and therefore the power of our device.
Power regulator
Application area
Of course, first of all, this is a tool for a hobby, but the manufacturers have made sure that the tool can also be used more widely. This is a great buy for advertising producers at the moment.
The multitool can be used to make:
- Promotional materials made of foam plastic - volumetric letters and 3D objects; Bright and memorable signs; Advertising stands.
It is also used for original decoration of interiors and facades, creating dummies and letters, impact-resistant packaging and the like. The scope of operation is limited only by your imagination and type of activity. An excellent purchase for your money for everyone who is used to creating something new with their own hands and cannot imagine their life without it.
Foam cutting process
In order to cut foam plastic, you need:
- Turn on the power supply.
- Make high-quality markings on the foam sheet so that you can see where the cut line should be.
- Take a metal ruler and apply it to the cut line. Without a ruler it will be very difficult to cut.
- Cutting complex geometric shapes on such a machine is also possible, but for this you definitely need to practice on simple products.
Guide board
To make it easier to cut simple products and shapes, you can screw any flat board to the base of the cutter and use it as a guide. To do this you need:
- Find a flat board and place it on the base of the foam cutter.
- Drill a through hole at one end of the board. At the other end you need to make a slot in which the screw should move freely.
- Now all that remains is to set the desired size and screw both screws to the cutter itself. Thus, the board will serve as a guide against which the workpiece must be pressed. With its help you can cut products with a perfectly smooth edge.
Material cutting process