Everyone wants the floors in their home to be warm and comfortable. But, unfortunately, this phenomenon is not present in every home by itself. Much depends on the coating, how the house is built, and a number of other factors. That is why many, in a situation with a cold base, resort to the technology of installing underfloor heating systems so that it is always warm under their feet. Warm flooring under linoleum can also be laid on a wooden floor. If the rough base is made of wood, and the owners want to finish the floor with linoleum, then both electric and water heating systems will come to the rescue.
Installation of heated floors under linoleum on a wooden floor
Why do you need a heated floor?
Just a few years ago, heated floors were considered a sign of luxury - underfloor heating systems were quite expensive, and not everyone could afford them. Many believed that it was easier to move around the house in slippers and warm socks than to install heated floors in your home. However, now the situation has changed - these systems have become more accessible and are now quite widespread.
Warm floor
Underfloor heating systems will help provide comfort and warmth in your home. Thanks to clearly adjusted thermostat settings, they help maintain a certain floor temperature throughout the day, as well as heat the floors in the house when the owners arrive if they are not at home most of the time. Also, heated floors will help to additionally warm up the apartment, and in some cases they can partially replace central heating, unless we are talking about those regions where the cold in winter can be very severe. The floors are also good in the autumn-spring period, when the heating is not yet turned on, but it is already cool outside the window. In this case, they are also able to keep the house warm and cozy.
Warm floor on a wooden base
Prices for heated floors Caleo
heated floors Caleo
Warm floors and linoleum with a wooden base
As far as we know, linoleum is in most cases a synthetic material, made from a number of chemicals that, when heated, can emit toxic fumes. That is why those who plan to lay linoleum often abandon the idea of installing floor heating systems. The matter can also be complicated by the fact that the floors in the house are wooden, and no one is going to replace them with a concrete screed.
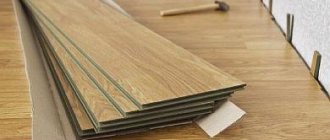
Structure of semi-commercial linoleum
However, even in such situations, you can still install a heating system. Of course, it is not so easy to install, and the same properties of linoleum often discourage apartment owners from installing heated floors. But if you approach this problem with all attention, then you can always find a way out of the situation and make warm floors. First you need to decide what kind of heating system can be installed in a house with a wooden base.
Linoleum laid on a plywood base
Possible mistakes
The film floor should be heated evenly. If there is no heat or some areas are colder or hotter than others, it means the installation was done incorrectly. Possible errors should be found and eliminated. Problems usually arise with the following violations:
- Laying film strips overlapping. This position of the heating material is unacceptable.
- Cutting the film too close to the copper bar. This may cause insulation failure. Complete or partial lack of insulation is one of the most common causes of underfloor heating failure.
- Using mastics to fix linoleum. All these compounds are sources of harmful compounds. In addition, during uneven heating they will form swelling on the surface. Removing such defects is difficult and often impossible.
Selecting a heating system
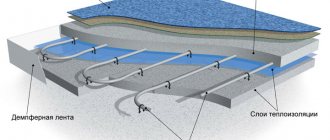
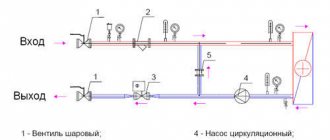
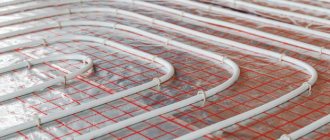
So, floor heating systems can be divided into water and electric. In the first case, heating occurs due to circulating heated water through pipes laid in the floor pie. Typically, the installation of the pipe system is carried out directly during the pouring of the screed. Water is heated by heating boilers, and underfloor heating pipes can be connected to the central heating system, but only in certain situations - if the house has a communications system designed to connect underfloor heating.
Warm floor from central heating
Unfortunately, an apartment is not a place for water floors for several reasons:
- risk of flooding of rooms located below;
- in most cases, there is no possibility of connecting to a central heating system;
- the need to fill the screed, which increases the weight of the floors;
- inability to control the temperature if the pipes are connected to a central heating system, and in this case the linoleum may overheat;
- complexity of installation.
Water heated floor
It is best to install a water system In this case, it is possible to connect it to your own heating boiler, and there is no risk of flooding your neighbors. And it is prohibited to install such floors in an ordinary apartment without the permission of utility services.
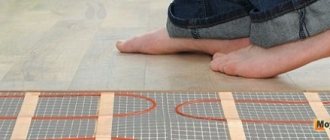
Electric systems heat floors, as you might guess, using electricity. To install them, you do not need to purchase generators - you can connect to the general power grid. Such systems can be made either in the form of a cable laid inside the screed, or in the form of mats and films that are mounted directly under the floor covering.
Types of electric heated floors
On a note! Infrared film floors are classified as electric heating systems. They are the best option that is suitable for installing heating in the presence of materials such as wood and linoleum.
Film infrared floor
The ideal option for installing a floor heating system in conditions of a wooden floor and linoleum as a finishing coating is just an infrared film floor. It has many advantages:
- possibility of installation without installing a new screed;
- absence of EMR (electromagnetic radiation);
- uniform heating of the surface;
- ease of installation;
- possibility of laying under some types of linoleum;
- no additional load on the floor;
- no need to dismantle the wooden floor;
- ease of temperature control.
Installation and recommended floor coverings for different types of heated floors
On a note! Infrared heated floors are perfect for heating a room of less than 30 m2. And they can also maintain the temperature optimal for linoleum - less than +27-30 degrees.
Popular types of plywood used for renovation
Sheets produced by industry are classified according to various criteria:
- wood used;
- presence and method of impregnation;
- variety;
- number of layers;
- surface treatment;
- moisture resistance.
| Brand | Moisture resistance level |
| FSF, FSF-TV | increased |
| FSB, BFS, BFV-1 | high |
| BP-A, BP-V, BS-1 | above average |
| FBA, FC | small |
For repair work, when the part of the structure made of plywood will be hidden from view, it is recommended to use moisture-resistant plywood of grade II or III. The sheet must be at least 10 mm thick, but the recommended value is 14-22 mm. A thinner one will not cope with the load, and a too thick one will be inconvenient to work with.
Plywood thickness and ply
The number of layers is not of fundamental importance. If possible, you should purchase sheets sanded on both sides.
- If possible, the plywood should be dried for 2-3 weeks before starting work. The sheets are dried vertically, at a temperature slightly above room temperature.
We bring plywood into the room
You can increase the strength of plywood using several layers of acrylic varnish
48 hours before the start of work, the material must be brought into the room where it will be installed and laid horizontally. There are two ways to lay plywood.
Choice of linoleum
This aspect must be treated with full attention precisely because linoleum, when heated, can release toxic substances into the environment. And then you can use the floors only at your own peril and risk to your health.
How to choose the right linoleum
Table. Types of linoleum.
| View | Description |
| Polyvinyl chloride | This is the cheapest, and therefore the most common option. It is based on ordinary PVC, which is heat sensitive. This material is distinguished by a wide variety of color variations, can have different thicknesses, and also have a base in the form of insulating material. Unfortunately, when laid on heated floors, this particular material not only begins to release toxic substances into the air, but also shrinks and begins to smell unpleasant. |
| Marmoleum | This is a natural type of coating that is of high quality and high price. It is not afraid of fire, does not become electrified, and when heated, almost does not release toxic substances into the air. It contains natural dyes, wood and cork flour, pine resin, and linseed oil. It is also usually based on jute fabric. This linoleum is easy to clean, does not fade in the sun and does not lose its appearance for many years. The only thing he doesn't like is washing with alkali-containing substances. Under the influence of alkali it will begin to collapse. |
| Relin | This linoleum contains bitumen, rubber, rubber. It does not tolerate heat and therefore, in general, is extremely rarely installed in houses and apartments; more often it can be seen in a number of industrial premises. When heated, it releases substances that are quite dangerous to humans. It is strictly prohibited to use it with a floor heating system. |
| Nitrocellulose | This material is also called colloxylin. It is not afraid of water, elastic, thin, but does not like heat. So it cannot be used with a heating system. |
| Alkyd | Also called glyphthalic. A synthetic material that is also fabric based. It’s worth saying right away that, like the previous options, it does not like heating. But it can be used in combination with heated floors, since it does not emit excessive amounts of hazardous substances. |
The process of laying linoleum
According to the information in the table, marmoleum or PVC material can be installed on wooden floors with heating systems. However, experts note that both options can be laid on water floors, but it’s better to put marmoleum on film floors.
Important! When choosing linoleum, you should take into account its thermal conductivity. If this indicator is very low, then there is no point in laying it on top of a warm floor - the material simply will not heat up and heating will be pointless. The thermal conductivity of a material depends on what it is made of.
Table with a list of linoleum characteristics
Why is it important to pay attention to the structure of the plywood itself?
When making the final choice of insulation, you should also take into account what kind of plywood is planned for it.
This component is divided into popular brands:
- FSF has an extremely high degree of moisture resistance, so during installation it requires the use of toxic types of glue. The best options for such coverage are considered to be non-residential premises (garages, warehouses, offices). The basis is a reliable concrete screed that is not afraid of high humidity;
- FC is a material that contains special urea resins that are completely harmless to humans in terms of toxicity. For this type of plywood, wood obtained by processing coniferous or deciduous plants can be used as a base for the flooring.
Taking this into account, floor insulation is selected for the specific environment in which it will serve. And a lot depends on the type of plywood itself!
Temperature
It is important to understand that in any case, linoleum cannot be placed on overly powerful systems. Thus, the recommended floor power parameter should not exceed 150-180 W/m2. Only under such conditions will the heating temperature not exceed the permissible 27-28 degrees, which means that the linoleum will not deform and will not begin to release toxic substances into the air.
What kind of linoleum can be laid on an infrared film floor
If you neglect these parameters, there is a risk that:
- linoleum will change color;
- the material is deformed;
- phenol will be released into the air;
- delamination of the coating will occur.
Deformation of linoleum
It is important to understand that at temperatures of 27-28 degrees, floors may seem somewhat cool . But you can’t heat linoleum any higher. If the specified floor temperature does not suit the home owners, then they should abandon the idea of using linoleum as a finishing material and choose some other coating.
Plywood advantages and disadvantages of the material
Pressed sheets are an excellent material for rough and primary work. They are inexpensive, easy to transport, easy to install and are good at eliminating small differences in floor level. Often they prefer to lay linoleum, parquet boards or laminate on plywood, since it has the following advantages:
- laying sheets significantly reduces the time of preparatory work before installing the final finishing floor covering;
- prevents rotting of the underside of floor coverings due to good ventilation between the material and the concrete screed;
- a floor lined with plywood prevents premature wear or deformation of linoleum or carpet, extending the life of the decorative coating;
- provides a smooth subfloor;
- plywood sheets are light, hard, durable, resistant to stress and abrasion;
- plywood is flexible enough and does not break during installation;
- has no pungent odor;
- has good sound and heat insulation properties;
- due to the large size of the sheets, the number of joints is minimal;
- high-quality factory grinding prevents slipping of the sheet and materials placed on it.
Features of a wooden base
The ideal base for installing a heating system is concrete. It has optimal thermal conductivity and is ideal for laying heated floors. In addition, it is able to retain heat, which means it will save energy on heating.
Wooden floor
But in some cases, heating systems are installed on a wooden floor. In such a situation, the following advantages can be noted:
- no need to install a heavy cement screed;
- there is no need to dismantle old floors, provided that they are level and in good condition;
- you can reduce the time spent on work;
- there is no need to wait a certain time - the floors can be used immediately;
- additional loads on the floors are eliminated;
- the floor pie will remain almost unchanged in height.
A wooden base has its pros and cons
But even if all these factors are taken into account, one cannot help but think that a wooden floor has worse thermal conductivity than a concrete one. This means that it will heat up worse. Moreover, not every heating system can be installed on wooden floors, especially if they are old enough and require repair. In the latter case, the easiest way is to dismantle them and lay the heating directly on the concrete.
Also, on a wooden floor it will not be possible to build even a thin cement screed, which is almost always necessary when installing a water or electric cable floor. This is precisely what complicates the possibility of installing a heating system on a wooden base.
Wooden floors are not the best option for heated floors
Preparing a Wooden Floor
However, despite all the nuances, it is quite possible to install heated floors made of wood with linoleum finishing. First of all, you should take care of preparing the wooden base itself for further work.
First, it’s worth assessing the condition of the wooden floor. It should be smooth and durable, the boards should not “walk”. All rotten and damaged boards should be replaced with new ones, and all cracks and gaps should be eliminated. If you neglect to seal the cracks, the heat will partially go under the floor and be lost, which means that the energy consumption for heating the base will increase. The nail heads need to be recessed into the wooden base so that they do not stick out. It is recommended to fill small holes with putty.
Wooden floors need to be properly prepared
Important! Linoleum, like the infrared flooring system, should only be laid on a very level base.
If necessary, the base can be leveled by laying sheets of plywood or other material on top and securing them. It is also recommended to treat wooden floors with an antiseptic and fire-resistant compound, just in case. And the outside of the boards themselves, if necessary, are polished using special equipment.
Leveling a wooden floor with plywood
Which glue to buy
How to glue tiles to plywood? This issue deserves detailed consideration, because you will have to glue the tiles to a base made of wood material, which is characterized by its instability.
Therefore, when choosing an adhesive composition, it is necessary to take into account some nuances:
- A sheet of plywood is made up of thin layers of brittle veneer, and if the bond is broken, the plywood will delaminate and will no longer be strong. This feature of the material is a good reason to choose an adhesive that does not penetrate deeply into the structure of the material.
- No matter how strong the base is, it can still bend slightly under load. In this case, the cement-based adhesive will not hold the tile, and it will easily come away from the plywood. Therefore, only elastic adhesive mixtures should be used.
The composition of such mixtures includes highly elastic components:
- microfiber;
- fiberglass;
- silicone;
- silane and other modifying additives.
It is important! When purchasing glue, make sure that the list of listed materials for which it is intended to work includes plywood.
How to make heated floors with a wooden base and linoleum installation
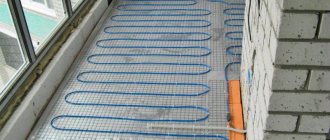
The best option in this situation would be to install a film heating system. It is a roll of film that has special carbon elements that heat up under the influence of electric current. Heat enters space due to infrared rays.
IR film for heated floors
Infrared flooring is easy to install and is perfect for laying under linoleum, as it does not heat up to critical temperatures and does not necessarily require a screed. That is why we will consider this option for arranging a heated floor.
Step 1. It is required to prepare the base according to the recommendations written above. Also at this stage you need to decide where the thermal film will be laid. The fact is that it should not be located under pieces of furniture - there is no benefit from it, but the system will overheat and increase energy consumption. So you should immediately decide where very large interior elements will be located. These places will not be equipped with a heating system.
First the base is prepared
Step 2. Next, you need to choose a location to install the thermostat. It will be mounted on the wall, and all the necessary wires will go from it to the heating system.
The location for installing the thermostat is selected in advance
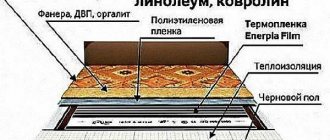
Step 3. The prepared floors need to be covered with thermal insulation material, which will help direct the heat inside the room and prevent it from being wasted. Typically, thermal insulation is presented in rolls. The roll needs to be rolled out from one wall to another, then a piece of canvas needs to be cut to the required size and then a second piece should be laid parallel to it, and so on. Individual sheets should not overlap each other.
Laying roll insulation
Step 4. Separate canvases can be connected to each other by gluing with tape.
The joints are taped
Step 5. It is best to attach the thermal insulation sheet to the wooden base using a furniture or construction stapler. You can also glue them to the base using pieces of double-sided tape.
Fixing thermal insulation with a stapler
Step 6. Next, you can lay the heating film itself directly. It is laid on the previously laid material with a copper strip down in those areas where large-sized furniture will not be located.
Next, the film is laid
Step 7. If necessary, the film can be cut into the required size elements. The cut is made with ordinary scissors, but only in the area of special markings - exactly where the scissors are drawn, the cut can be made.
Correct film cutting
Step 8. Thus, you need to lay the film over the entire surface of the floor, excluding the locations of large interior items.
Film installation completed
Step 9. Now you can carry out work on connecting the system. First, you need to insulate with bitumen tape the cut areas of the film that will not be used during the connection and operation of the floors. Insulation must be carried out on both sides in the area of the copper busbar. It should cover all the silver contacts along the entire cut.
Insulating the film cut area
Step 10. In those areas where the wires will be connected and individual sections of the film will be connected, you need to install contact clamps. They are installed in the area of the copper bus so that one part is inside the film and the other outside. Next, you need to tighten the clamps using pliers.
Using Terminal Terminals
Clamps installed
Step 11. The film strips need to be glued together using tape. And it is best to do the gluing so that the middle part of the tape sticks just to the base. This way the film will be fixed to the base.
Film strips are glued together with tape
Step 12. Now you can assemble the system. The wires for connecting individual strips of film and connecting the thermostat must be inserted into clips and clamped with pliers. The ends of the wires should first be cleared of insulation. You need to connect individual strips of thermal film and connect the thermostat according to the diagram.
The end of the wire is placed in a clip
The clip is clamped
Step 13. The wire connection points must be insulated with bitumen tape, using two pieces of insulation for each place, top and bottom.
A piece of bitumen tape is placed underneath
Pieces of electrical tape are glued together
Step 14. Now, not far from the thermostat, you need to install a temperature sensor, which will record the temperature of its heating during system operation. The sensor must be fixed on the underside of the film on a graphite strip using bitumen insulation.
Next, install the temperature sensor
Fixing the temperature sensor
Step 15. Recesses need to be cut in the heat-reflecting material to accommodate the temperature sensor and insulated areas of the system. This is necessary so that the floor surface is not lumpy, but becomes uniform and even. Otherwise, the bumps will be visible on the linoleum laid afterwards.
A hole was cut for the temperature sensor
As a result, the surface will be smooth
Step 16. It is recommended to make cutouts for the wires, which, after placing them there, can be taped with tape for better fixation.
Cutouts for wires
Step 17. Now you need to install the thermostat at the selected location on the wall and connect it. Both wires from the heating system and wires from the temperature sensor are connected to it. It will need to be adjusted to 30 degrees. As soon as the operating system heats up to this temperature, the thermostat will automatically turn it off. After connecting all electrical components, you need to check the functionality of the system by turning it on.
Installing a thermostat
Step 18. Now you need to lay plastic film on top of the installed heating system. It can be laid overlapping, connecting individual sections with tape. You can also replace it with a substrate.
Laying polyethylene film
Video - Installation of a heating system
Water heated floor
Installation instructions
Now we invite you to familiarize yourself with the technology of laying infrared heated floors under linoleum with your own hands. All work consists of several important stages.
First of all, you need to determine the future location of the thermostat, its height and installation method. If you already have a ready-made project, then doing this work will be easy. It is also necessary to carefully prepare the subfloor. There should be no dirt on it. If the floor has significant unevenness or defects, it should be leveled with appropriate mixtures.
Heat-reflecting material is laid on the prepared floor over the entire floor area. All canvases are connected to each other with tape. After this, you need to cut the infrared film into strips of the required length.
Important! The film can only be cut in the indicated places.
The size of the strip can reach up to 8 meters, and the minimum length is not less than 20 cm. As already mentioned, plan the installation so that you have as long and continuous strips as possible. The thermal film itself is laid on the heat-reflecting layer with the copper strips down.
It is important to ensure that there is no air space between the infrared heated floor film and the substrate. Thanks to this, the heating of the floor will be as uniform as possible.
After this, take the contact clamp and install it on the conductive copper strip. Use pliers to tighten the clamp tightly. Remember that these clips are disposable, so do it right. Each connection must be insulated with bitumen insulation. The silver contacts are also insulated with such insulation, with the help of which the copper busbar is connected to the graphite heating strips.
Advice! To ensure that the laid film does not move out of place during installation work, secure it to the floor with tape.
Now install the thermostat on the wall. It is worth noting that the production of grooves is carried out at the very beginning of work. If there are children at home, then place the thermostat so that they cannot reach it. The wire in the grooves is placed in a special corrugation. If the wire is laid outside, it is disguised in a special plastic box.
Connect the wires coming from the film to the thermostat and make the connection according to the specified connection diagram from the manufacturer. Don't forget to install a temperature sensor near the heating element. Finally, all you have to do is connect the thermostat to the electrical network.
At this point, the installation of a warm infrared floor under linoleum can be considered complete. However, before laying linoleum, the system must be tested for performance. So, for testing, turn on the infrared heated floor system. It is important to make sure that the degree of heating of each strip is the same. It is also worth checking all the insulation places with an indicator screwdriver. There should be no current in these places. If any shortcomings are found, then all these flaws should be eliminated immediately, for example, improving the quality of insulation and the like.
After testing, place a layer of vapor barrier film on top of the film. When doing this work, you must act carefully so as not to damage the heating circuit. The vapor barrier is connected together with tape.
Installation of linoleum
After the heating system has been installed, you can begin to lay linoleum. The technology is no different from laying linoleum under normal conditions. The main thing is to first spread the material on the floor surface and let it rest. By the way, if you turn on the heating system, the linoleum will level out faster.
What are the sizes of linoleum
The edges of the linoleum sheet are fixed using skirting boards. This is the best option for small spaces. Unfortunately, it will not be possible to additionally fix the coating on the base, since you should not glue linoleum to the warmest floor or on top of the film that covers it.
On a note! Only if the heated floor is under some material (for example, as is the case with a water floor, which will still be covered by something), linoleum can be glued to its surface.
Laying linoleum over a heated floor
Installation of electrical transformer under linoleum covering
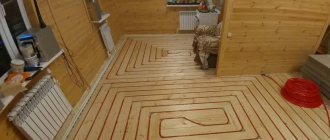
The cable is supplied in coils. It is laid on the insulated base of the floor in zigzags, then attached to a special mesh and covered with a screed.
Step-by-step installation instructions
- Clear the floor of debris and repair cracks and uneven areas.
- Pre-calculate the power of the TP and buy the appropriate cable length and thermostat.
- Make a cable layout diagram. Consider the standard distances: between coils - from 75 mm, to furniture - 100 mm, to heating devices - 200 mm. Decide where you will place the thermostat.
- Cover the base with polyethylene. Cover the contact points between the wall and the screed with damper tape.
- Lay a layer of thermal insulation material. If the floor is insulated with something else, cover it with foam material.
- If you insulated the floor with penoplex and the surface turned out to be smooth, put foil on it and only then the cable. If the floor is insulated with foam plastic and there are uneven surfaces, cover it with a rough reinforced screed and after it dries, lay a layer of foil, and only then the cable.
Foil for TP
- Install the cable according to the diagram provided. Make sure its curves are smooth. Secure the cable with mounting tape.
- Install a thermostat on the wall, about one meter from the floor. To do this, make grooves in the wall for the electrical supply wires, grounding wires and for the thermostat cable located in a corrugated plastic pipe.
- Mount the corrugation with the thermostat so that there is a meter distance between the sensor and the wall.
- Connect heating and power cables with special couplings. Connect the finished system to the ground loop.
- Once installation is complete, check that all connections are correct.
- Make the screed at least 30 mm thick.
- Lay the linoleum on the dried screed.
Dry screed