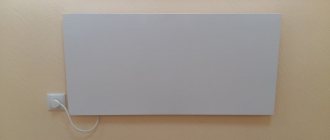
Heating a home with electricity is considered the most expensive, but if other types of fuel are not available, it is worth considering the most popular types of heaters powered from an outlet. Infrared ones are considered the most economical. Their efficiency is much higher due to a different operating principle. Unlike conventional electric reflectors or radiators, infrared ones heat not the air, but the surrounding objects: the floor, walls, furniture, people. Heated objects release heat evenly, creating a feeling of comfort and dryness.
Design and principle of operation of an infrared heater
The steel body of the device contains a reflector and a heating element or emitter. When plugged into the network, the emitter heats up and emits infrared waves, which are perceived by humans as heat. The heating element can be made in the form of a heating element - a tubular heater, an open or closed spiral, or a carbon coating in film heaters.
The reflector serves for directional heating and protection of the device itself from overheating. Infrared waves are completely safe for humans and animals, except for possible overheating. To prevent it, heaters are equipped with thermostats and sensors. With their help, you can set the heating temperature and turn off the device when it is reached.
Nature of IR radiation
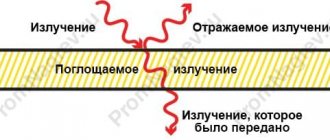
Infrared is called electromagnetic radiation with a wavelength from 0.76 microns to 1 mm. This range lies between visible red light and microwave radiation. Infrared radiation is not detected by our eyes, but we can feel it tactilely because it carries thermal energy. It is on this feature that the operation of the IR heater is based.
Range of infrared radiation in the general spectrum of electromagnetic radiation
IR waves can be considered the most common radiation. They are generated by any object that has a temperature above absolute zero. With increasing temperature, the intensity and frequency of radiation increase, and these parameters also depend on the material of the emitter. In modern IR heaters, materials such as carbon, tungsten, ceramics, quartz, etc. are heated to generate radiant heat.
Types of infrared heaters
Based on mounting methods, these devices can be divided into:
- ceiling;
- wall;
- floor
Ceiling models are very popular. They only take up space on the ceiling, which is almost always uncritical. It is impossible to accidentally touch them and get burned or accidentally lean against a flammable object.
A correctly installed and directed device will evenly heat the entire area, the sleeping, dining or relaxation area located underneath it. And finally, modern models look so neat and aesthetically pleasing that they only decorate the interior. It should be noted that the ceiling height must be sufficient, at least 2.5 meters.
Work technology
Warm ceilings, reviews of which are important to read before purchasing a product, must be installed in a certain order. To begin with, a plan is drawn up that will allow you to understand in what pattern the film will be placed. It is important to determine the area of the site where you plan to install the system. If heating is the main one, then the area of the film should be approximately 70% of the ceiling area.
Electrical wiring that will pass along the surface should not be located closer than 50 mm from the film. The wires must be separated by thermal insulation material, which will fill the hollow space of the ceiling. The master will have to calculate the power of the heating system, determine the power potential of the electrical network and calculate the number of thermostats.
The current strength must be determined in order to select the wire cross-section. This work is necessary to determine the suitability of electrical wiring for power loads. You will also need to choose a suitable thermostat model. For example, if the wire cross-section is 1.5 mm2, the permissible current for the copper wire will be 16A. For aluminum this value is 10A. For a cross section that is equivalent to 2.5 mm2, the permissible current will be 25A. If the cross section reaches 4 mm2, then the corresponding value is 32 A.
Infrared film for the ceiling
Even more interesting is a new product among heaters – infrared film. It is a polyethylene film, inside of which conductive and heating carbon elements are sealed. The film is much more convenient than a conventional heater. It can be:
- attach to any flat place - floor, ceiling or wall under the window;
- cut into pieces of the required size along special lines;
- hide under a suspended or suspended ceiling.
Compared to a heater, the film does not heat up as much. To warm up the room well, especially during the cold season, you will have to cover a fairly large area with it. But this product is absolutely fireproof. It is also lightweight and comes in rolls that are easy to transport.
Installation of the PLEN system
To achieve maximum effect, cover at least 80% of the ceiling or wall area.
Usually the film installed on the ceiling is hidden with decorative finishing, but the presence of metal parts in it is not allowed. Type of Heating PLEN can be installed indoors, assigning it the role of the main source of heating, or using it as an additional heating device. The main generally accepted location is the ceiling, but the film can also be installed on the walls, floor, it all depends on the design of the room and the preferences of the owner.
Factors to consider during installation
- Thermal insulation of the external walls of the building must be carried out in accordance with SNiP standards;
- the surface of the ceiling is leveled, all foreign objects, chandeliers, lamps are removed from it;
- Before installation, be sure to attach a layer of insulator to the surface, which contains a foil reflector to return infrared rays into the room;
- After installation, the film coating with resistors should not be subjected to impacts that could compromise its integrity, or to aggressive chemical fumes;
- during installation, you cannot change the dimensions of the film, trim it or disassemble the edges;
- a rolled roll of film that is not installed and not connected according to the rules cannot be connected to the network;
- to begin installing the PLEN on the ceiling, you need to turn off the power to the network in the required area of the house;
- to install the thermostat, you need to wrap a wooden block with a layer of foil and place it above the floor surface at a height of no more than 2 m on an internal wall or partition;
- to connect an infrared radiation system, the power of which is not higher than 5 kW, use one phase. In other cases, a three-phase input is needed.
Thermostats and thermostats
These devices are produced in compact volumes and simple in design. They are needed to constantly monitor the temperature in the room and issue commands to stop or start the operation of infrared heating devices.
They have built-in sensitive microelements that respond to even small changes in heat. The external differences between these devices appear only due to design requirements, and their internal structure differs little from each other. They contain a temperature sensor that measures the temperature and sends a signal to the system to turn off or a new stage of operation.
To ensure effective operation, installation and connection requirements must be observed The first thing you need to do is find out the calculated load that is allowed for the thermostat. If such a load in a room exceeds the designated limit of 10 or 16A, then the use of a modular contactor is necessary.
Thermostats are placed on open walls, not cluttered with furniture. The place should not be exposed to direct sunlight and not be exposed to drafts and blowing when opening door and window openings. Do not install thermostats close to other heating devices.
Advantages and disadvantages of infrared warm ceiling
Compared to other types of heating systems, a warm ceiling has many advantages:
- the greatest efficiency compared to conventional radiators and reflectors;
- the natural level of humidity is maintained in the room;
- simple installation and absence of labor-intensive operations;
- simple automatic control will allow you to forget about temperature changes;
- possibility of installation in buildings of any type, including wooden ones;
- wide selection of final ceiling finishes.
The only significant drawback is the limitation in ceiling heights, but even in this case you can get out of the situation. For example, when installing thermal film, go around those places where people are constantly: above the head of the bed or above the workplace.
Reviews on the principle of operation of infrared ceiling systems
Users like that the design is quite thin, so it saves space. Warm ceilings work according to a certain principle. First, the material is heated to the state required for the propagation of thermal radiation. At the next stage, heat is transferred to objects and structures in the room. Radiation begins to emit from heated solid surfaces, which is evenly distributed throughout the air. According to buyers, as a result of the infrared heater, the temperatures of the floor and ceiling become the same, which significantly reduces energy consumption.
How to make a warm ceiling in a house with your own hands?
Installation of infrared film on the ceiling occurs in several stages:
- ceiling insulation;
- calculation of film area;
- installation of film, thermostat and sensor;
- connecting to the network and checking functionality.
Before installing the thermal film, it is necessary to complete all construction and finishing work on the ceiling, excluding finishing work. Also carry out all work on laying communications and lighting wires.
Now let's look at the stages of installing a warm ceiling in more detail.
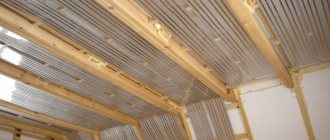
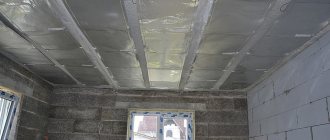
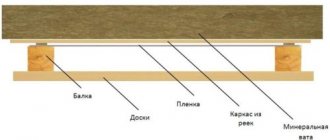
Ceiling insulation
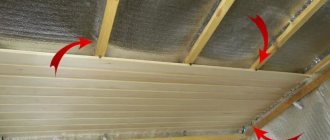
It is necessary in order not to heat the attic or neighbors on the floor above. A properly insulated ceiling will return all the heat to the room, thus increasing the efficiency of the device and reducing energy costs. Thermal insulation with a reflective layer is attached to the entire surface of the ceiling and extends a few centimeters onto the walls. This will prevent heat loss through the gaps between the ceiling and the wall. The joints in the thermal insulation material are sealed with tape. The material itself must have a thickness of at least 5 mm.
How to calculate the area of infrared film?
To correctly calculate the required area, you need to consider the following:
- how well the building itself is thermally insulated. For a brick house or a light frame building, these data will vary;
- whether you plan to live in the house in the winter, permanently or on short visits;
- volume of heated area. This can be either the entire room or part of it;
- whether infrared heating will be primary or additional.
If a warm ceiling is planned as the main type of heating, it should occupy at least 70% of the area of the entire ceiling. As an additional option, this figure can be reduced according to the power of the main heating system. The average film power is approximately 0.2 kW per 1 square meter. By dividing the power of the thermostat by this number, you can find out the area of the film that can be connected to it.
Installation of thermal equipment
Thermal film can only be cut along the special lines marked on it. Each type of film has its own maximum cut length. This information can be found in the attached documentation or asked from the seller. There should be no gaps or air gaps between the film and the ceiling insulation.
Next, you need to connect the copper contacts of the busbar with the electrical wires using contact clips. One half of the clip should be located on the copper busbar, and the other half should be located inside the heater. After this, the ends of the film are insulated on both sides with bitumen tape.
The sensor is attached to the cutout of the thermal insulation and connected to the regulator and heating elements.
Electrical connection
The thermal film should be connected to the network through the regulator in parallel. If the warm ceiling has more power, it is better to connect it through a separate circuit breaker.
When turned on, a correctly installed warm ceiling should emit comfortable, uniform heat, not overheat anywhere, and turn off in a timely manner when the set temperature is reached.
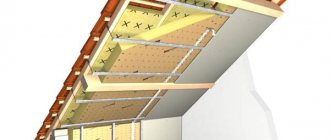
Finishing
Next, the final finishing of the ceilings is carried out. This can be a suspended ceiling with special micro-perforation. It transmits infrared waves perfectly. In this case, the suspended ceiling is mounted along the edges of the wall, without affecting the ceiling itself.
You can also cover the structure with a suspended ceiling: plasterboard sheets, clapboard or plastic panels. A small gap should be left between the suspended or suspended ceiling and the infrared heating system. For finishing the ceiling, you should choose waterproof materials with a thickness of no more than 16 mm.
The infrared heating system for ceilings is the most modern, safe and efficient of all electric heating options. If installed correctly, it will last a long time, filling the house with warmth and comfort while remaining completely invisible.
Feedback on design features
If you are interested in warm ceilings based on infrared film, then you should take a closer look at the design features. The heating elements in such systems have the form of a polymer film, the thickness of which is equal to one micron. It is responsible for the propagation of infrared radiation.
According to buyers, the film is covered with carbon paste, to which thin carbon threads are fixed. A rather important element of such a heater are the electrical contacts; they are made of copper foil. The film is protected on both sides by laminated polyester. The latter has electrical insulating, fire-resistant properties. The radiation temperature can vary from 30 to 110 °C, while the heater power does not exceed 500 W.