Installation of frame system
Attic rafter system.
The frame structure is attached to the upper beam of the wall (both the house and the bathhouse made of timber usually have height differences along the upper perimeter, which must be included in the calculation).
At the top point we attach the bars with an overlap, connecting them with self-tapping screws.
The length of the slope was 4.5 meters, the block was sawn, from the remains on the upper beam of the wall (the pitch between the rafters is 50 cm) we fix the block (15-20 cm long) so that it protrudes outward from behind the wall by 6-7 cm, we will attach the lower part of the rafter to it.
When ready, we raise the first two rafters (they are already sawn off at the top point and fastened end-to-end with nails), fix the bottom to the protruding part of the beam, forming the frame of the future roof.
First, we install the outermost rafters with our own hands to avoid temporary fastenings; an assistant is needed here.
Insulation of the attic.
Next, we connect the upper parts of the rafters from below with a longitudinal beam - this will be the base of the ridge. We set up and secure the remaining rafters. We check the frame for strength and cover the entire structure with impregnation.
Then, on the outside of the upper part, we fasten two boards from the top down longitudinally to each slope - the frame is completed with a ridge. We make the lathing from the board from top to bottom, retreating from the edge of the previous board by 25-27 cm.
The length of the roof is 5 m, but we make the sheathing longer, leaving it to protrude beyond the gable by 20 cm on each side.
Attention! One of the sheathing boards on each slope must be placed so that the lower side is 3-4 cm below the level of the upper beam of the wall. We attach a longitudinal beam 5 m long to the lower ends of the rafters, the calculation is to visually close the lower part of the roof
We attach a longitudinal beam 5 m long to the lower ends of the rafters, the calculation is to visually close the lower part of the roof.
When finished, cover the entire frame with plywood on top, carefully adjusting the edges to obtain a continuous surface. We treat with impregnation.
The sheathing boards (discussed above) are laid so that the frame can be closed from the street. Otherwise, there will be a hole outside (the thickness of the rafters) of 50 mm. We take a board, mark the cutting locations and cut out grooves for the bars.
The insulation is laid between the frame beams.
Calculate the locations and depth of the cutouts so that the board from the inside is pressed tightly against the board of the outer sheathing, and the rafters fit tightly into the grooves. So we close the hole to the outside and isolate the frame from the street by securing this board to the wall beam. When they cover a house with a roof, they make lining on the outside, but the house is not a bathhouse, we’ll do it differently.
We will cover the lower part of the rafters of the already sheathed roof with decorative elements so that the rafters do not stick out. This is our board. We cut the required number of boards to size, choose a side that is more even, go through it with a planer and lightly sand it. After this, we will fasten it from the bottom edge towards the wall. Everything is ready to cover the roof with metal tiles.
We lay waterproofing and sheets of metal tiles on the base
It is better not to do this operation with your own hands, but to entrust it to specialists - the material is very demanding in terms of careful handling of the surface
You can order metal tiles in size, having decided on the color, texture and price, check with the seller how long it will take to complete the order, but we will order only when the roof is sheathed and we know exactly the size of the slopes and the length of the ridge. The house requires the installation of drains, but in practice the bathhouse does without them.
All that remains is to lay out a vapor barrier from the inside with your own hands; the film must be attached with an overlap, with an overlap of 5-10 cm, gluing with adhesive tape. The result was “trays” with a width of 500 mm and a depth of 50 mm. This is a plate of insulation, which we lay in it, securing it with adhesive tape. We secure the adhesive tape to the rafters with staples using a stapler.
Selection of material for repair: finishing + insulation
Designing from scratch or converting from an attic requires mandatory insulation. Considering that the floor is located under the roof itself, it is necessary to create an additional layer of thermal insulation. Otherwise, it will simply be impossible to stay here during the cold or hot seasons.
The following is used as external cladding:
- siding;
- block house;
- imitation timber.
Suitable for interior lining:
- drywall;
- wooden or plastic lining;
- plywood;
- OSB boards;
- Fiberboard.
With this approach, the roof itself is best done with bitumen tiles or slate. But you will have to abandon metal sheets, as they will create discomfort in cold, heat and rain. Ruberoid is also not the best solution for covering. In the warm season, it quickly heats up and emits a specific odor.
For thermal insulation you will need:
- vapor barrier film;
- Styrofoam;
- natural wool fiber;
- mineral wool;
- basalt wool.
Wooden boards or laminate are used as flooring.
You will also need the following building material for repairs:
- wooden rafters for the construction of rafters (section 50*180 cm);
- wooden boards for sheathing;
- screws, nails and metal corners for fastening roofing elements.
The design and finishing of the under-roof area depend on the overall design of the house and the design of the building. The bearing capacity of the foundation, the location of windows and the presence of communications are taken into account.
Note: The success of the project depends entirely on the correct calculation of the changed load and the material for finishing and waterproofing.
Specialists will quickly and efficiently carry out work and repair the attic of a house or cottage
By cooperating with us you receive a Guarantee of meeting deadlines
- Delivery of the project is always on time
- In case of delay, we incur a penalty of 3% per day
Transparent, fixed estimate
- No hidden extra work
- You pay only for what you need, and you choose what you need yourself!
Daily photo and video reports
Thermal insulation work
The most affordable thermal insulation material is polystyrene foam. Foam sheets are usually laid from the inside of the attic, leaving a gap of 5 mm between them. The gaps between the plates are foamed after installation of the material.
This approach to organizing thermal insulation is due to the natural shrinkage of the roof covering. If you lay sheets of foam plastic close together, then under the influence of the weight of the roof they will begin to press on each other and become deformed. Thanks to polyurethane foam, this process is reduced to zero, and cold bridges do not form. Among the disadvantages of polystyrene foam, it is worth noting its sensitivity to moisture. The material easily becomes damp, and mold and mildew develop on its surface. Therefore, in humid regions the use of polystyrene foam is not advisable.
Another popular thermal insulation material is mineral wool. It has low thermal conductivity, provides high-quality sound insulation, and is resistant to moisture and fire. The material is laid in the same way as foam boards. However, additional layers of vapor and waterproofing will extend the service life of the material.
Insulating the attic with polyurethane foam has been practiced more and more recently. The structure of this material resembles polyurethane foam, and its properties after drying are similar to mineral wool. However, no additional layers are required for its application, since the material is water-resistant and has good vapor barrier.
Polyurethane foam is applied very quickly using a special sprayer, having previously protected the face and body with thick clothing and a mask.
Installation of natural ventilation
A natural ventilation system is created during roof installation. To implement air exchange, you will need to install special elements responsible for air exchange under the roof. For air flow, soffits are used, which are installed around the perimeter of the building. The perforated surface allows air to enter the attic. To remove exhaust air, point or continuous aerators are used, which are installed on the slope of the roof.
Aerators can be installed on the roof
Special aerators are mounted on the ridge. It is thanks to ridge aerators that the efficiency of all natural ventilation increases, because the area of the outlet surfaces of the elements is much larger than that of conventional ones. The number of aerators is calculated individually and depends on the total roof area. For 100 m2 of area to be ventilated, 2 aerators are installed.
Features of the event
Usually in a cold attic only the ceiling is insulated. Then the roof truss system is left open so that it can be freely inspected and problems that arise can be corrected. If you insulate the roof with mineral wool, it becomes an attic, which can be used for a different purpose than the attic.
It is very important that the insulation is done correctly, otherwise condensation will form. Accumulating on the ceiling, moisture will seep through the ceilings. Mold and mildew may appear
And the rafters will rot from the inside
Mold and mildew may appear. And the rafters will rot from the inside.
When using mineral wool as insulation, consider its weight. The ceiling and floors must withstand the expected load with a margin, the structure must be reliable.
Instructions for insulating the attic floor with mineral wool on the video:
When planning your work, make calculations: how much material do you need to purchase? Its quantity depends on the area on which the material will be laid and the number of layers. The thickness of the thermal insulation layer depends on the climate of the region.
Step by step instructions
First, prepare the “territory”, clear the ceiling of possible debris and thyrsus. Metal roofing elements should be painted with oil paint to prevent condensation from accumulating on them.
Then a lining material is laid on the ceiling as a vapor barrier layer. If it is not there, the mineral wool will absorb all the moisture from the warm, humid air that rises from the living rooms.
Over time, it will lose its thermal insulation qualities. A budget option is to use glassine; a vapor barrier film will cost more. It needs to be laid with a slight overlap, the joints should be fixed (glued with tape or secured with wooden slats).
Place mineral wool between the joists tightly, without gaps or cracks. The joints of the material also need to be taped.
Place clean, dry, even boards on top of the joists. They will be the floor in the attic. And the mineral wool will be ventilated, “breathe” under them, and will dry out in case of moisture.
This installation is sufficient if waterproofing material is laid under the roof and there are no gaps in the attic.
If there is no waterproofing material under the roof, then it is worth covering the thermal insulating mineral insulation with a vapor barrier. The easiest way is to attach the plastic film with thin cross bars.
Mineral wool is ideal for insulating wooden floors. You can use any type: in rolls or in slabs. Choose a material of the desired density, follow the installation instructions, then the room will be warm and comfortable for a long time.
Window calculation
According to SNiP, the area of all windows must be at least 10% of the total floor area. When dividing the attic into several rooms, each of them must have a window.
Sloping windows
The easiest way is to do inclined installation with your own hands. But such windows will serve as part of the roof, so care must be taken to seal the abutment joints. Like roofing, windows will be subject to significant precipitation in the form of snow. To prevent them from failing, it is necessary to install reinforced double-glazed windows and reinforced frames.
Installing inclined windows has some advantages:
- there are no sharp transitions between shadow boundaries, which increases the amount of light penetration into the room;
- the relief of the roofing remains unchanged;
- ease of installation allows you to do everything yourself.
When calculating inclined windows, you need to know that their area increases with the angle of inclination. You can adjust the area by the height of the window, reducing it on steeper slopes.
When deciding on the size of the windows, you need to take into account that they will have to be fastened with your own hands between the rafters. In order for the frame to fit well, its width must be at least 40 mm less than the pitch of the rafter legs. Otherwise, you will need to install a reinforced beam. Such a violation of the frame structure requires additional calculations. If you want to install a large window, then it is better to mount 2 smaller ones side by side. The effect will be the same, but less work.
Dormer windows
A vertical window, recessed into the roof or installed at the end, is called a dormer. Building a roof with recessed windows with your own hands is difficult. The assembly of the rafter system and the laying of the roofing becomes more complicated, as an additional valley appears on the sides and top. In snowy regions, snow guards must be installed above recessed windows, otherwise they may be demolished when a large mass of snow melts.
Recessed windows have one advantage, which is expressed by standing near them at full height. This design is most often installed when creating an exit to a balcony with your own hands.
If we consider the minuses, then there are much more of them:
- less light transmission than from inclined structures;
- deep shadows tire your eyesight;
- The roof topography becomes more complex, which increases the difficulty of do-it-yourself installation.
Project
It is customary to start building an attic with your own hands by drawing up a project. The most obvious solution was to raise the pitched roof a couple of meters relative to its original position, but that was not the case:
- From the point of view of housing legislation, an insulated room with solid side walls automatically turned from a cold attic into a full-fledged residential floor and required registration - lengthy and expensive;
- The second floor would completely block the skylights in the wall of one of the adjacent houses.
That is why it was decided to build an attic with a gable roof. The roof ridge was oriented along the long side of the house.
A few details of the project.
The roof was supposed to be sloping
The sloping attic roof has an important advantage: with a minimum ridge height, it allows you to obtain the maximum attic area with an acceptable ceiling height; Mansard roof
Thanks to the bend of the slopes, the owner receives maximum usable area with a minimum ridge height
Mansard roof. Thanks to the bend of the slopes, the owner receives maximum usable area with a minimum ridge height.
- Gutters were needed to drain rainwater. The roof slopes had to move away from the adjacent walls of neighboring houses. The free space was occupied by gutters made of galvanized steel sheet sealed with bitumen mastic;
- A corrugated sheet was chosen as the roofing covering. Yes, it is noticeably noisy in the rain, but it is not afraid of impacts from slate torn from neighboring roofs (strong winds are typical for Sevastopol in winter), it is lightweight and easy to install;
- I decided to turn the gables of the attic into panoramic windows. This decision was favored by a beautiful view of the sea;
This is how Sevastopol Bay looks from my balcony.
- The attic received its own entrance from the attached balcony. In a slab floor, you cannot simply cut an opening for an internal staircase: support columns must be placed under the slab with a cutout, which would significantly increase costs. How things stand with the family budget after the move - I think it’s clear without my explanation.
The balcony attached to the house quickly turned into a relaxation area for guests and owners.
Forced attic ventilation
When installing forced air exchange, a fan is installed in the ventilation duct. It is especially necessary to install the device in the presence of short ventilation ducts that are not capable of providing high-quality draft. When installing a fan in a country house, the air flow is installed in the same way as with a natural system. The roof fan is installed from the outside at a distance of more than 8 m from the supply openings
It is also very important that the fan is not installed close to windows, as exhaust air may be sucked into them.
Scheme of forced ventilation of the building, including the attic
The performance of a roof-mounted fan depends on:
- impeller dimensions: larger diameter – higher productivity;
- blade bend angle: the larger it is, the greater the amount of air will be processed;
- electric motor power.
The best way to improve performance is to install multiple fans. Using a powerful cooler is impractical.
The attic ventilation system is a very important element in creating comfortable conditions in the house. It must be installed in accordance with the regulatory requirements of the construction industry. As a rule, the ventilation system is developed at the design stage of the building itself and installed at the time the roof is erected.
Mistakes of novice builders
Installing attic ventilation at random is not a tricky business
The difficulty lies in the approach, since it is important to take into account a number of factors:
- site calculation;
- humidity level;
- material;
- tool;
- Preparation;
- plan.
At the stage of drawing up a diagram, it is clear how responsibly a person approaches the matter. Experts give advice regarding the location of the structure.
When selecting ventilation, the instructions from the manufacturer are considered separately. In some cases, it is not possible to securely fix the element. In fact, this is not a manufacturer's fault. During selection, many incidents also occur:
- selection of short tubes;
- small diameter;
- models without deflector.
The use of narrow ventilation in the attic is ineffective. The recommended parameter is 5 cm. Products up to 4 cm, first of all, do not allow the use of additional equipment. It is not possible to select a fan or filter for the system. The second point lies in the quality of exhaust air removal. In such houses, ventilation is used, but the room still looks damp.
Finishing is an important factor. The work is completed and a sufficient amount of sealant has been applied. Installing plumbs on the roof is a good solution. Aerators are selected from additional equipment. With their help, you can not only provide a flow of fresh air, but also repel insects so that they do not fly into the room.
Combined insulation technology
In addition to the usual combined attic insulation, where two types of insulation are used to combine their qualities, we also want to tell you how to insulate an attic in a more cunning way - with additional heating.
One of the most atypical ways to heat an attic is to install an infrared heater directly on the pitched walls. The thin film is easily installed under the skin and releases valuable thermal energy. This, in turn, heats the objects in the room, and they also give off additional heat.
Infrared floor heating is based on the well-known principle of heating through current. The current flows through the resistive foil and generates heat up to 45C, which is emitted by infrared invisible rays 9.5 microns long. This warmth is comfortable, and the temperature difference between the floor and ceiling is only 1-3C.
A modern film infrared ceiling heater works for only 15 minutes every hour. A fairly economical option in which the air itself does not heat up, and therefore the heat does not escape through the ridge.
Installing infrared film is also simple and safe, as you can see from the step-by-step photos:
Just keep in mind that each manufacturer has its own subtleties of installing such films, for which you must read the attached instructions. But the principle is the same: spread it out, secure it and connect it.
Frame house with attic
A 6 by 6 frame house with an attic is an excellent option for a summer cottage, which is easy to construct and has low financial costs. The construction of such a structure should begin with the arrangement of the foundation.
Bottom frame of a pile-grillage foundation.
Since the entire structure is lightweight, you can use ordinary, non-reinforced foundations with a columnar or strip base. Such a foundation does not require large financial investments.
Installation of a frame with an attic
As soon as the foundation work is completed, you can begin the direct installation of the frame
Please note that parts of the frame can be made of wood or metal; this information should definitely be included in the project of a future frame house with an attic
The layout of a frame house with an attic of metal floors is a more reliable option, but its implementation will cost more than using wooden beams. If the construction is carried out with your own hands, then wooden boards with a section of 150 by 50 millimeters should be used as a frame.
Special jibs will help strengthen the wooden frame. From the street, a frame house is sheathed with boards or clapboards; the choice of material depends on what is specified in the design of a 6x8 frame house with an attic. You should not attach the boards too close to each other; take into account the fact that over time they can swell and compromise the integrity of the structure.
Before installing the logs, roofing felt is laid on the foundation. In order for the work to be carried out correctly, it is necessary to use a level. Insulation is laid in the gaps between the joists and the subfloor.
Fundamental differences
The main feature of the heating system under consideration is the presence of a pump. It receives the coolant and sends it further along the circuit to the heating devices. The physical principle of natural fluid movement due to temperature differences does not play a role here - the coolant moves in the required direction forcibly with the given speed, temperature and pressure without loss of heat. The standard heating system includes the following components:
- boiler;
- pump;
- expansion tank;
- radiators;
- pipes;
- connecting fittings;
- air vents;
- ball and plug valves;
- filters;
- check valves.
Advice. When choosing equipment for operating a heating system in a particular one-story house, it is necessary to take into account three important factors: the power of the boiler used, the length of the pipeline, and the planned speed of movement of the coolant.
There are two schemes of a heating system with a forced circulation type: one-pipe and two-pipe.
Installation of heated floors
The use of a “heated floor” system makes it possible to provide very comfortable conditions for a person, when the difference in air temperature between the lower and upper parts of the room is no more than 2-3?. At the moment, there are a considerable number of different SHADOWS that can be laid both under tiles or decorative stone, and under wood coverings.
a warm “floor powered by electricity” is considered a self-sufficient source of heating and is capable of warming up a room so much that there is no need to recreate radiators in the attic. It can be laid on any type of floor covering. At the same time, cable or film TENS warm up the room equally, reducing the level of heat loss. Basically, equipment of this kind can be used for about fifty years.
Before installation of the “heated floor”, thermal insulation material is placed between the wooden blocks, on top of which a mesh is placed to fix the TENS. Where the wire will pass through the wood blocks, holes are cut into them and insulated with aluminum foil. After laying the heating cable, the final coating is installed.
If the heated floor in the heating system of a house with an attic is provided by a hydraulic circuit, its operation requires the installation of a boiler that will heat the coolant. In this case, polymer pipes can be used - they can withstand the temperature of the coolant, are comfortable to install and have a long service life.
When the concrete has completely dried, a vapor barrier membrane fabric and a final coating are laid on it. 20 days after pouring the concrete, you can perform a test run of hot water.
A warm hydraulic floor can be created in an additional way - by placing a metal plate with gutters for laying polymer pipes. In this case, the substrate and final coating can be laid directly on top of the plate without pouring a concrete screed on top of it. The heat coming from the hot pipes is shared equally throughout the room. In most cases, this option is used as a backup heat source.
Single-pipe heating system for one-story and two-story private houses
A comfortable home for many people is a large area of beautifully renovated rooms, modernly furnished with furniture and appliances. For practical people, comfort in the home is also determined by warmth. It is worth making a choice regarding the type, option and class of the heating system with special attention. A single-pipe heating system will help provide a beautiful modern cottage with complete warmth.
Today, in houses you can most often find a two-pipe or one-pipe heating scheme. The schemes are developed with bottom water supply. It is carried out using a highway in the basement. In our country, most houses are equipped with a single-pipe heating system.
We calculate the heat: what will be in the attic?
And now - about the important points. As you know, heat always moves upward. Therefore, if you don’t want the attic to become too hot and stuffy, and the rooms on the floors below to become colder, block off this heat access. How? To begin with, be sure to install doors between the first and second floors, if there are any. Next, think carefully: will you somehow heat the attic? If not, then the heat that will come from the floor below will be enough for her (provided that there is no door above the stairs). If so, then the attic floor will need to be insulated in the same way as the pitched walls, thereby creating a barrier for heat from below. The room below will become warmer, and the attic will now have its own personal microclimate, which can be regulated.
But why, for example, make the attic colder than the living rooms? This is a completely rational solution if you are going to organize a library or a personal mini-gym in it, which do not need either excess heat or excess water vapor from below.
Dormer windows
When planning an attic, you should take into account the recommendations of SNiP. They recommend making the window area no less than 10% of the floor area. So if the attic is divided into several rooms, each should have a window.
Installation of skylights in the roof
Of all the methods shown in the photo for installing skylights with an attic, inclined installation is the easiest to implement. In this case, it is necessary to ensure the proper degree of waterproofing of the junction, and also to use special models with reinforced frames and reinforced glass - the load on the surface can be significant.
Advantages of a sloping roof window:
- more light, less sharp boundaries of light and shadow;
- the roof surface remains flat, its relief is not complicated;
- relatively easy installation.
The steeper the slope relative to the floor, the smaller the window height should be.
The width of the window frame should be 4-6 cm less than the pitch between the rafters. Then it can be easily installed without disturbing the structure of the frame. If the window is wider, it is necessary to make a reinforced beam above it and calculate the load.
If you need to have a larger window, it is easier to place two narrow ones side by side. They look no worse than one big one, and there will be fewer problems.
Two windows side by side look no worse than one wide one
When installing a dormer window, the roof geometry becomes more complicated: a valley appears on top and on the sides. Because of this, the rafter system becomes more complex both during planning and during assembly. The complexity of laying the roof covering also increases. All valleys are the places where leaks are most likely to occur. Therefore, everything needs to be done very carefully. In regions with a lot of snow, it is advisable to install snow guards over such windows so that they are not blown away in the event of a sudden meltdown.
Installation of a vertical dormer window in an attic roof
The advantage of such a window is that you can stand next to it at full height. But they let in less light, the terrain becomes more complex and the roof becomes more problematic.
A recessed window is usually used if there is access to a balcony through it. In other cases, this method of arrangement is not the best option: little light gets in, the shadows turn out to be very deep, which is tiring for the eye, the geometry also becomes more complex, although not to the same extent as in the previous version.
The easiest way is to make a window at the end of the attic. In this case, a reinforced frame or reinforced glass is not needed. Just high-quality glass is quite enough. It is this option that can most often be seen in country attics: this is the most inexpensive option that can easily be implemented with your own hands.
Air exchange in a cold attic
In most cases, the shape of the attic room does not follow the shape of the base of the sloping roof, because it will not be easy to equip such a non-standard room and make it comfortable. After covering the vertical posts of the rafter frame and crossbars from the inside, there are always triangles separated from the usable area.
Organization of regular air exchange is necessary not only for attics, but also for cold attics that are not equipped for permanent or temporary residence
Solving the problem is not difficult: it is enough to install ventilation grilles, dormer windows, inlets or facade ventilation outlets on each gable so that air can penetrate through each cold triangle.
Don’t let heat loss bother you: it will be minimal, but you will prevent the appearance of mold and musty smell on the walls and ceiling of the attic, not to mention the safety of the roof and ceilings.
How to choose what to cover the ventilation holes of the cold triangles above and on the sides of the attic? Ventilation supply and exhaust valves are rarely used in this case: they are more expensive and their area is relatively small, and there is no need for sound absorption here.
Facade ventilation outlets are distinguished by the presence of a canopy that reliably protects from snow and slanting rain. The check valves from them need to be removed or perforated so that when the wind changes, the supply and exhaust openings can change roles.
Ventilation grilles and dormer windows essentially differ only in size and shape. The ability to adjust the opening of blinds and swing doors is of no use here.
Advantages of a frame attic
Among the most significant advantages of a frame attic are, in addition to the advantages already described above, the following advantages:
- Light weight of constructed structures and building parts. The load on the foundation from the frame attic increases slightly. This factor is especially important when it is not new construction, but an addition to an existing building.
- Quick construction of an attic. A serious advantage, which results in obtaining additional usable space without a significant increase in construction time.
- High level of amenities and comfort. Frame buildings are deservedly considered not only energy efficient, but also comfortable. As a result, the attic floor is practically not inferior to full-fledged housing.
- Excellent performance characteristics. Frame buildings, erected in compliance with technology, are not inferior in many respects to traditional buildings made of brick or other classical building materials. At the same time they cost much less.
- Affordable price. The cost of constructing an attic using frame technology is much lower than any alternative options. In modern domestic conditions, this becomes a strong argument in favor of choosing this method of construction.
The advantages of a frame attic are not limited to the above advantages. Do not forget, for example, about the possibility of creating any layout on a newly constructed floor. An additional and very serious advantage is the variety of finishing options, both external and internal, that the technology in question allows. Such a long and impressive list of advantages is the best explanation for the popularity of the frame attic.
Attic construction
- Roof.
- A sheathing made of wooden boards on which the roofing and insulating materials are attached.
- Ridge purlin is the top of the rafter structure.
- Rafters for the attic roof are stiffening ribs, layered or hanging. In the attic, layered rafters are usually made.
- Mauerlat are beams that are laid along the perimeter of external walls and connected to the walls with special fasteners. A rafter structure is attached to the Mauerlat.
- Diagonal connections (bevels) for the reliability and strength of the attic; they are used to connect rafters, longitudinal beams and vertical posts.
- Internal supports give the attic stability, if the attic area is large, they support the ridge girder and rafters.
- An insulating layer consisting of waterproofing, insulation, sound and vapor insulators. Provides temperature conditions and moisture exchange between the main walls and roof.
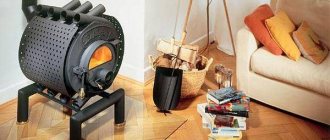
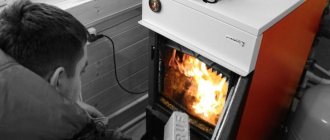
Installing a fireplace to heat the attic
It should be noted that the arrangement of a fireplace involves specific difficulties and characteristics. First of all, if the house design did not include a fireplace, it is necessary to direct efforts to strengthen the floor
The thing is that the mass of a brick fireplace will be quite significant, and during kindling, a mass of fuel will also be added to it. Therefore, for the attic it is better to choose either a lightweight version of the fireplace with light pipes, or opt for an electric appliance. It must be emphasized that an electric fireplace is easier and better to use, and in addition it is much safer.
https://youtube.com/watch?v=Ey11k3Of1TU
Ventilation methods
There are two such ways:
- single layer;
- two-layer.
The main difference between the methods is the layout system and the type of waterproofing material.
In the first method, the waterproofing material is laid on a layer of insulation. But in this case, a waterproofing agent based on membrane fabric is used. In this case, the membranes should pass no more than 100 g. moisture per 1 sq.m. per day.
In the second case, the waterproofing material is laid on both sides of the insulation without touching it. The advantage of this method is that moisture coming from living rooms condenses on the surface of the film and flows down, and moisture coming from above will be dried on it by the air flow.
Design
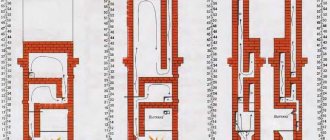
A shed roof is a lightweight roofing structure consisting of only one slope. It consists of a wooden rafter frame, sheathing, pediment and covering material. The construction of a pitched roof attached to a house differs from a free-standing one in that one side of it is attached to the load-bearing wall of the structure. A rafter frame of this design consists of the following elements:
- Mauerlat. This term refers to the timber that serves as a support for the rafters of a pitched roof. It is made from hardwood and treated with an antiseptic composition. The weight of the roofing covering is transferred to the Mauerlat, which it evenly distributes and transfers to the load-bearing walls and foundation. To make a roof for an extension with your own hands, one mauerlat beam is fixed to the wall of the main house, and the other is laid on support pillars.
- Rafter legs. These elements of the rafter system are made from boards measuring 50x150 mm or 100x150 mm. Cuts are made at both ends of the rafters in order to secure them to the Mauerlat. They carry the weight of the roofing material, distributing the load evenly and transferring it to the support beam.
- Strut. A strut is an additional element of the rafter system, which serves to strengthen the structure in cases where the slope has a length exceeding 4 m. The struts rest one side on the mauerlat, and the other on the middle of the rafter leg.
- Lathing. Sheathing refers to boards with a cross-section of 40x150 mm, which are laid on the rafters to make a stable base for laying roofing material. If soft types of roofing are used to cover the extension, a continuous sheathing is constructed from sheets of moisture-resistant plywood.
Types and characteristics
The material is obtained from molten blast furnace slag, stone (rocks) or glass. The structure of these fibers is thin, randomly arranged villi, ranging from 2 to 60 mm in length. This insulation is produced in the form of mats or slabs. In order for the fibers to better adhere to each other, the slabs are additionally impregnated with special oil (to repel moisture) and phenol alcohol.
Depending on the origin, they differ:
- Glass wool. It is made from a molten mixture of broken glass, sand, limestone, and soda. The fibers are 15-50 mm long and their thickness is 5-15 microns. The material is chemically resistant, difficult to ignite (withstands up to +500 o C).
Stone wool. To make it, gabbro-basalt rocks are melted. The thickness of the fibers is 4-12 microns, and their length is up to 16 mm. It heats up to 300 o C without igniting.
Instructions for installing a boiler in the attic of a bathhouse
The installation is carried out as follows:
- We prepare the floor for installation. To do this, cover the location of the device with non-flammable material. When installing a solid or liquid fuel appliance, we place a sheet of galvanized steel in front of the firebox.
- If you plan to install an electric boiler, then we lay the wiring from a separate machine on the distribution panel. We install a separate outlet. If the finishing of the room is made of flammable materials, then we carry out external installation. When facing the attic with fire-resistant materials, we run the cable inside.
- To install a gas boiler, we install a pipeline from a cylinder or a general natural gas supply system to the attic.
- We install the device. A liquid or solid fuel boiler should be placed at a distance of more than 0.5 meters from the wall. An electric or gas appliance is mounted on the wall using dowels or fixed to the floor.
Please note that a device designed for natural circulation can be equipped with a pump and operate on forced circulation. If the device was originally made to work with a circulation pump, then it will not be possible to equip it with natural circulation.
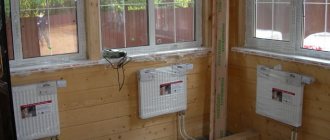
Devices
Their list is also significant, but in relation to the attic it is better to focus on convectors (gas or electric) and IR heaters. You can install these devices yourself if you understand the features of their installation and connection. The main thing is to correctly calculate the power and draw up the optimal layout of the heaters.
You can learn more about the most popular models and their prices on the following pages:
- convectors;
- infrared heaters.
Choosing a boiler for heating the attic of a bathhouse
- Gas
. They are connected to natural gas mains. They can also run on liquefied bottled fuel. - Liquid fuel
. Such devices mainly run on diesel fuel. - Solid fuel
. They use coal, coke, and firewood to operate. - Electrical
. Such devices are the easiest to operate, environmentally friendly and do not require additional chimney equipment. - Universal
. The most functional are boilers that operate on all major types of fuel. They have two chambers: one is for solid fuel, the second is for liquid fuel and gas. In this case, the device is equipped with a special heating element.
22
Ventilation outlet through the roof
This is exactly the solution that heating engineers recommend. And not at all because they want to get more money from you. The fact is that each horizontal section of pipe reduces natural draft, and therefore the efficiency of ventilation.
It is better to entrust the design of the ventilation shaft of a private house and its access to the roof to builders: not only the cross-sectional area and height above the roof are important here. The area and type of premises, the material and shape of the duct, the type of ventilation, pipe insulation, temperature in the attic, weather conditions and other factors are important.
To fully ventilate the attic, it is necessary to provide air exchange within the room and remove moisture from the roofing pie
A vertical pipe leading to the roof will save the house owner from problems with condensation in the attic and on the facade, and a deflector or roof fan installed on the top of the pipe will provide the necessary level of draft.
Arranging a passage through an already assembled roof is a difficult, costly and thankless task, so it is better to provide a ventilation outlet on the roof at the stage of its construction.
Natural air exchange
Exhaust ventilation in a wooden house with your own hands is a labor-intensive process that requires certain knowledge. There are several types of ventilation. One of them is natural. Air is supposed to enter the home through cracks in the window and door systems. In order for air to escape effectively, it is necessary to take care of its exit routes. To do this, install air ducts. Modern construction technologies significantly complicate the process of natural air flow into a building. To create conditions for free circulation of air flows in the premises of the house, holes (decorated with grilles) are made in the door leaf. Strong suction is ensured by the long channel length.
Installation of natural ventilation
With natural ventilation, the warmest masses rise upward through special channels located vertically. How to make ventilation with your own hands? Equipping a natural system is the cheapest yet most effective task that you can easily do yourself.
The work begins in the basement, because that's where the fresh air from outside comes in. During construction, the walls of the house are equipped with special small holes to ensure air flow.
To ensure better draft, fresh air is supplied from the north side. The inlet to the power channel is designed at the level of the first floor.
Device
Complete natural ventilation in a wooden house with your own hands inside the premises is ensured by gaps specially left under the internal door, equal to 1.5-2 cm. Or installing ventilation grilles in the door. Warm air is randomly directed into the exhaust pipes. In each room, make an air duct in the ceiling area and mask the holes in the wall with decorative grilles.
Exhaust ducts must be installed above the roof. Air ducts must be equipped with special plugs or dampers to regulate the air exchange rate.
To avoid the backdraft effect during strong gusts of wind, ventilation in a wooden house involves installing separate ventilation ducts for each room. This means that the kitchen, bedroom and bathroom should have their own ventilation ducts to prevent unpleasant odors from entering the living areas. The attic space should also be equipped with the same type of ductwork to ensure proper ventilation. Non-residential attics are ventilated through openings in the roof.
Traction force in the ventilation system of a wooden house
Ventilation in a private wooden house and its draft depend not only on the wind, but also on other factors:
- Exhaust ventilation duct above the roof ridge.
- The cross-sectional area of the inner part of the channel.
- Number of curves and turns.
- The quality of the system's thermal insulation.
The best effect is achieved with a minimum number of obstacles in the form of: unevenness, kinks, kinks, etc.
During hot periods in a log house, the traction force is close to zero due to small temperature differences in the lower and upper layers of the ventilation duct. In such conditions, the best solution for ventilating the room is to use forced ventilation or simply open the windows.
Materials
Small wooden houses do not need brick finishing of the shafts, since the surface of the internal channel will have unnecessary roughness, where dust will begin to accumulate. In a small private house, it is recommended to use channel blocks made of smooth metal or plastic.
Advantages and disadvantages
Behind:
- cheap;
- Self-installation is possible.
Flaws:
- low productivity;
- The need for additional air exhaust from the kitchen and sanitary premises;
- heat loss during the cold season;
- sound insulation is reduced;
- Dust and insects enter the air flow;
- Dependence on weather conditions;
- inability to regulate power.