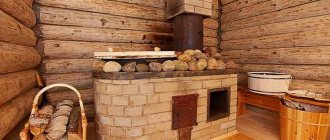
A brick stove is the main functional element of any Russian steam room, which is traditionally made of heat-resistant red brick. The construction market offers a wide range of ready-made stove designs, but bathhouse owners decide to build a Russian stove with their own hands.
A classic brick stove for a bathhouse with a heater, built with one’s own hands, makes it possible to safely heat the room, maintain optimal temperature conditions, produce clean and thick steam, and is a decorative interior element.
A little history
Contrary to popular belief, brick kilns did not first appear in Russia. They were brought here already during the reign of Peter I, who personally brought several speeches from Holland and invited experienced craftsmen to share their experience in building such structures.
The reason for this action was not simple curiosity - the number of fires that occurred in the country due to the lighting of black baths was enormous. Since the cities were made of wood, one fire could burn out the entire city (and this often happened).
Peter I issued a decree by which he prohibited the lighting of the bathhouse in the black way. Since then, the tradition of using brick kilns began. The new product quickly gained popularity because it turned out to be relatively safe and quite simple and easy to use. Since then, brick stoves have become the basic method of heating a bathhouse, successfully competing with light metal structures.
Today, brick ovens are used on a par with any other types; they are preferred by a large number of users.
Installation of a chimney pipe
How to fold a stove with a chimney after completing the construction of brick walls? The furnace construction manual provides for the preliminary selection of a pipe, which in type and functional features must correspond to the design of the future furnace. For a lightweight design, it is recommended to choose a small pipe made of lightweight and heat-resistant material.
When choosing, you should take into account the appropriate wall thickness of the chimney pipe, which cannot be less than ½ the thickness of the brick. The diameter of the passages for the chimney pipe should be of a similar size.
The length of the upper part of the pipe, located above the roof, should not be less than 55 cm. To equip the smoke exhaust duct, a connecting mortar based on cement or lime is used. The clay-sand mixture is not suitable for such work, since under the influence of precipitation it will quickly wash out and form condensation on the inner walls of the pipe.
The chimney pipe with a minimum number of bends must have a total length of at least 5 meters. The finished design can be equipped with a special gate valve.
Design Features
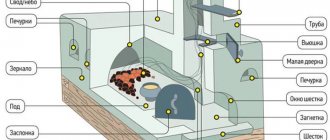
A brick oven is a structure consisting of several elements:
Firebox
This is the main unit of the furnace, made in the form of a chamber for burning fuel;
Chimney
This is a pipe for removing gases and particles formed during the combustion process;
grate
This is a cast iron or brick platform on which fuel is placed;
Ash pan
A chamber located under the firebox and connected to it by narrow slots for the flow of ash from burnt fuel.
Only required elements are listed.
However, most furnaces are equipped with additional components:
Kamenka
This is a pile of stones collected in the immediate vicinity of the firebox, used to create the necessary microclimate in the steam room;
Water tank
This element is found in most stoves, as it allows you to solve the problem of supplying hot water when heating the room.
This is a fairly general structure; in practice there are quite complex structures. In addition, there are special rules and requirements that ensure the efficiency, safety and durability of the structure.
However, if desired, you can build a brick stove for a bathhouse yourself. To assemble the stove, special ordering diagrams are used, which describe in detail the process of laying each row. Referring to this diagram, it is not difficult to build a stove with your own hands, even without experience.
Basic principles for creating a safe sauna stove design
When starting to review information on the arrangement and construction of a sauna stove, you need to study the basics of safety rules and regulations in order to avoid further unpleasant consequences that their violation may lead to.
- According to traditional rules, the construction of the stove is carried out near the wall, which is opposite to the shelves in the steam room. The furnace design is created in such a way that a distance of about 30-40 centimeters is maintained between the heating parts of the finished furnace and the raw materials that form the combustion. If special protection from asbestos sheet is provided, then this distance can be reduced to 15-20 centimeters.
- A gap must be left between the chimney and the roof covering in contact with it, which is filled with fireproof material. Asbestos cord is often used for this purpose. The above-mentioned gap with asbestos insulation must be closed with a metal figured overlay.
- To provide additional protection, the floor in front of the furnace is covered with a sheet of metal, the thickness of which must be at least 10 mm. This sheet will provide additional protection against fire of the floor covering if embers accidentally fall out of the firebox.
Only after studying the basic safety rules can you proceed to preparing materials and appropriate tools.
Advantages and disadvantages
The advantages of a brick sauna stove include:
- the ability to accumulate and release heat for a long time;
- uniform and stable heating of the room;
- attractive and neat appearance
- comfort and ease of use.
The disadvantages of a brick kiln are:
- stationary installation option, inability to move the oven even a few centimeters;
- large weight and size, the need to create your own base (foundation);
- heating the room takes longer than when using metal stoves;
- If used incorrectly, there is a risk of carbon monoxide poisoning.
Expert opinion
Lovkachev Boris Petrovich
Bath master who knows everything about steaming
The advantages and disadvantages of brick kilns have been known for a long time. Users prefer brick baths for uniform and stable heating, safety and ease of use.
If you accidentally touch it, it is more difficult to get a severe burn on a brick oven than when you touch it on the hot body of a metal structure. In addition, the cooling of a brick structure takes much longer - the bathhouse maintains operating mode for several hours.
Photo
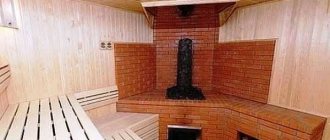
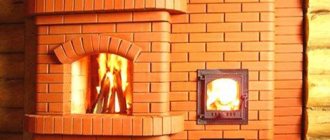
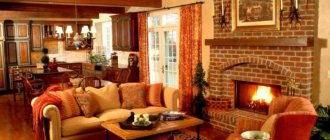
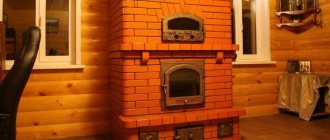
The most popular models combine the functions of a sauna stove, equipped with a heater and water tank, and the function of a fireplace. In this case, you can light the fireplace and stove at the same time.
The facade of the Kuznetsov stove for the bath is shown in the photo
In addition to the main function of heating the bath room, the stove is equipped with additional structural elements that help organize the most comfortable temperature and humidity conditions in the steam room.
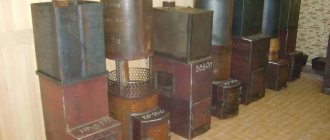
The photo shows a view of a brick stove from the side of the steam room (on the left is a stove with a built-in heater, on the right is a stove with a built-in steam generator)
Kuznetsov’s bell-type stove for a bathhouse, thanks to its unique device for movement and removal of gases, warms up the room most efficiently and quickly, and also retains heat for a long time.
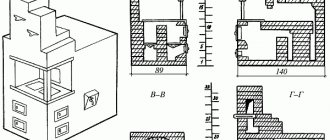
The picture shows a version of a brick kiln designed by Kuznetsov
Requirements for construction work
Construction rules (SNiP and SP) require stoves weighing more than 700 kg to build their own foundation. It is necessary to build it separately from the base of the bathhouse, therefore, it is most convenient to build the stove in parallel with the construction of the room itself.
Creating a foundation is the very first stage of furnace construction, which determines the success of further work. Various design options can be used here, from screw piles to a full-fledged poured concrete slab (the most preferred type of foundation).
The stove itself is built from two types of bricks. A special material is used for the firebox - fireproof (fireclay) brick.
You cannot use an ordinary ordinary block - from strong heating it will lose strength and begin to crumble.
An important point is that a rigid connection between the combustion chamber and the outer walls of the furnace cannot be made - thermal expansion of the inner part can cause destruction of the outer walls.
In addition, bricklaying is done using clay, and not using ordinary cement-sand mortar. This is an important point, since clay and fireclay bricks are sintered into a monolith from exposure to high temperatures.
This allows you to maintain the tightness of the firebox even when the external seams begin to crumble - this is an inevitable process that requires constant attention.
If such defects are detected, the defective seam is opened and re-filled with a clay composition.
Selecting material for constructing a furnace
Currently, there are many available schemes for constructing a furnace, but a novice master is recommended to choose the simplest drawing.
What kind of brick should a stove be built from? Choosing the right building material is not easy. If you have limited financial resources, you can choose red brick of dubious quality.
However, the dimensions of such material rarely correspond to accepted standards; for this reason, quite wide seams can be obtained - up to 11 mm, which is absolutely unacceptable when constructing a stove.
Often, a sauna stove is built from fireclay brick, which consists of 75% heat-resistant clay. This material is resistant to overheating and high humidity, cracking and deformation. In terms of technical and operational characteristics, fireclay bricks are superior to all existing analogues, but the price is much higher.
The firebox is built from fireclay bricks, and it is better to build a chimney from fire-resistant red bricks.
For construction work you will need clay, which you can get yourself or purchase at a specialized point along with bricks.
To build a brick stove, you need to prepare the following materials:
- fireclay;
- heat-resistant brick;
- coarse clay and sand;
- a grate, a door for the ash pit and combustion chamber, cleaning wells, a cast-iron stove and a grate;
- asbestos cord;
- heating tank;
- zinc wire;
- corner;
- roofing felt
These materials are enough to build a simple brick oven with your own hands.
Frequently asked questions
The process of building a furnace is quite complex, raising a lot of questions. Some of them appear for all users. To save time, you need to answer them in advance.
How accurate are the ordering diagrams from the network, are there any errors in them?
Errors are possible in any case, regardless of the source. In order to be on the safe side, you can try to look for ready-made diagrams on specialized forums where there are experienced specialists. They will give accurate diagrams and help with useful advice if something seems unclear.
Is it possible to use screw piles with a channel frame as a base?
Screw piles are a completely acceptable foundation option, especially on heaving or unstable soils. You just need to correctly calculate the load-bearing capacity and immerse them to the required depth. At the same time, the grillage must be made strong enough and a concrete slab must be laid on top of it.
How to choose the oven size?
The size of the stove firebox correlates with the size of the heated room in the range from 1:50 to 1:70. Take into account the size of the steam room and washing compartment. Since the bath heating mode is quite harsh, it is recommended to select a lower value (1:50).
Is it possible to use facing bricks?
To build the furnace, ordinary ordinary brick is used. If you need to finish the stove, you can use clinker tiles - they imitate brickwork as realistically as possible and have a suitable size - only 2-2.5 cm thick.
What to prefer, a brick pipe or a modern sandwich?
The sandwich is lighter. If the stove is small, it is better to choose it and thereby reduce the load on the main structure. However, for large massive ovens you can build brick pipes and save on buying a sandwich.
Arrangement of the foundation
Laying brick stoves begins with laying out the foundation, which is the basis for any heating structure, ensuring its strength, reliability and durability.
According to the finished bathhouse design, markings are made at the construction site and a foundation pit up to 65 cm deep is dug. Its width should exceed the dimensions of the stove by 10 cm.
A layer of sand 18 cm thick is laid on the bottom of the pit and moistened with water, then covered with crushed stone, stones and broken bricks. All layers are thoroughly wetted and compacted. The pillow is kept for some time to shrink.
After complete shrinkage of the sand layer, removable formwork is installed, reinforced with an armored belt made of thin reinforcement.
Important! A technological gap of 12 cm must be left between the walls of the formwork and the earthen edges of the pit.
The formwork is filled with concrete mixture to the boundary level, which is 17 cm below the soil surface. The mixture is prepared in proportions - 1: 3 (three parts sand to one part cement) with the addition of the required amount of water.
After the concrete has completely hardened, the formwork is removed, and the existing voids are filled with fine gravel.
Folded roofing felt is used as a waterproofing layer for the foundation. The material is laid on a concrete base layer strictly according to the size of the site.
Drawings of a metal sauna stove, building a stove with your own hands
In order to make an iron stove for a bath from metal, you will need to first design it. First of all, you need to create a layout, indicating all the required dimensions in the drawing.
A sketch is a graphic image made to a certain scale. Stoves can be of any shape, size and made from different materials. There are a lot of stove designs and each of them differs in its functionality.
It’s better to start with the firebox, because the firebox is the first element in production. The dimensions of the firebox must be determined independently, based on the size of the steam room. The main thing to remember is that the height and width must be the same.
In almost all sketches the firebox consists of 2 parts. In the first part, wood is burned, and the second serves as a ash pit. Stones are placed on the top of the firebox; it needs to be made from a grate. On some layouts you can see ready-made elements that you can buy instead of boiling and cutting, these are: doors, handles, grilles.
How do you like the article?
Alexey Petrovich
Ask a Question
The best manufacturers
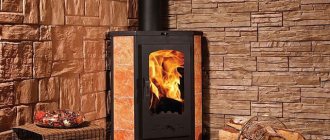
There are many metal stoves on sale that run on different types of fuel:
- wood;
- electrical;
- gas;
- combined.
Each owner chooses, according to his capabilities, the layout of the premises.
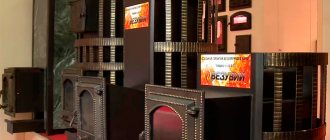
Let's list the most popular manufacturers.
Vesuvius
The company is represented on the market with a wide range of sauna stoves with cast iron fireboxes. In terms of power, the units are capable of heating rooms with an area of 6–30 cubic meters. m.
Attention is paid to the appearance of the stove. Closed versions with a solid door and forged elements are available for sale.
For those who like to watch a live flame, models with a door made of heat-resistant glass have been developed.
Troika
Domestic manufacturing company. Production is located in Tver.
The designs are excellent for use in Russian baths.
Among the features of the ovens:
- Material – low alloy steel. Thickness – from 10 mm.
- Logs up to 80 cm long can be heated inside, which is very rare for stove fireboxes.
- The grates and doors are made of cast iron. No risk of deformation.
- Hot steam flows are regulated by special windows in the housing.
- In some models, the volume of stone laying is up to 250 kg.
- In a stove with a water tank, the container is removable, which simplifies its maintenance.
- Quick heating of a room of any size.
The stoves have good power. If desired, they can be lined with bricks on the outside. Such designs turn out to be very beautiful.
Teplodar
On sale are:
- boilers with a steam generator built inside;
- mesh ovens;
- convectors;
- stoves with a water tank.
There are products with a closed combustion door and with a panoramic one made of heat-resistant glass.
In addition, design development and custom manufacturing are possible. Official representative offices provide installation and maintenance services for equipment.
Termofor
Another name is TMF. Production facilities are located in Novosibirsk. The main specialization is the production of wood-burning stoves for baths. But in recent years, a line of gas and electric devices has been added.
Based on material, products are divided into 2 groups:
- Made from stainless steel. The model name contains the word INOX.
- Made from structural steel. Budget equipment. Marked with CARBON marking.
All units are produced in 2 versions:
- Top class. Made of thickened metal, with a design thought out to the smallest detail.
- Budget. The quality of the metal remains unchanged. The design is as simple as possible.
Breneran
The German company appeared on the Russian market in 1993. Until 2005, the product was called Bulleryan, then it changed to Breneran.
The stoves do not burn out because the grates are made of cast iron. No maintenance required. The entire product line is covered by a manufacturer's warranty of 2.5 years.
Spent fuel model
We’ll now figure out how to make a mini-potbelly stove with your own hands using waste fuel. It will be more difficult to assemble such a stove. Its advantage is that fuel is practically free for it. The heating element in it is the evaporation of boiling old oil, which rises through the pipe.
A homemade mini-boiler during testing looks like this
The design consists of two tanks connected by a pipe. The diameter of the pipe should be 100 mm, the length should be 4 times greater. Small holes are drilled in this pipe, of which there should be many. Stands are welded to the lower tank for a stable position during operation. A pipe with holes is welded to the lower chamber of the device, and the upper tank, in turn, is welded to it. In the oil filling compartment, it is necessary to drill a hole through which the tank will be refilled.
Layer-by-layer diagram of a small furnace in development for creating with your own hands
For such a potbelly stove, the length of the chimney should not be less than four meters. Since the fuel will be liquid, all connections must be sealed. This is the difficulty of manufacturing waste oil furnaces.
Video: instructions for making a mini-stove
The main disadvantage of all potbelly stoves is their fire hazard. There should be no flammable objects near the operating device. It is strictly forbidden to use gasoline, acetone and similar substances in such heating devices.
About the chimney
The heating device can have a completely brick chimney or pipe. Usually they use a combined version: a brick goes up to the ceiling, and then an asbestos pipe. Laying a brick chimney begins with laying out a row covering the firebox area. At first there are two air channels, but later they converge into one. The exhaust area gradually narrows and moves to the side. One or two valves regulate the width of the chimney and the speed of hot air exit.
When doing the work yourself, it is important to make the chimney without cracks and correctly calculate the cross-section of the exhaust pipe. Violation of these parameters will lead to condensation accumulation and excessive cooling of the furnace during operation.
You can immediately feel the poor quality of the assembly by the soot on the walls of the bathhouse.
The removal of the pipe from the bath can be done in two directions:
- up, through roofing sheets;
- towards the wall.
For the external version, the horizontal section of the pipe should not be longer than a meter, otherwise the draft will be very weak. The chimney pipe at the bathhouse should be removed from other structures that can ignite by at least half a meter. It is not advisable to secure the pipe rigidly to the roof. Among other things, it should be noted that there should be no joints in the ceiling area for fire safety reasons.
How to heat a stove with wood
Before heating the stove, it is necessary to close the heater channel and open the direct flue damper. This will significantly increase traction. Then firewood is placed in the firebox and afterburning is done using paper or rags soaked in kerosene or barbecue liquid.
It is best to burn the stove with hardwood wood
After the firewood has ignited, it is necessary to open the valve of the channel that connects the firebox to the heater and close the direct gas duct. At this time, the stones should be covered with a lid.
The stove is heated until the temperature in the steam room rises above 60°C. After the firewood has completely burned out with a poker, be sure to check whether there is any unburnt wood in the corners of the firebox. If such pieces of logs are found, then you need to throw them away, otherwise they will smoke. The heat must be checked for the presence of blue flames. If they are, then you still can’t take a steam bath, because you might get burned.
Burning coals are thrown away in the same way as unburnt wood. After this, water is poured onto the heater, which will remove soot from its surface, and the walls and shelves of the bathhouse are washed from soot.
Types of fireboxes
Stoves are distinguished by how the firebox is folded. The method of using the device and the quality of the steam depend on this.
In black
Vintage version of the equipment. There is no chimney. Our ancestors built stoves this way.
The design is classified as having a high fire hazard.
Most stove makers have abandoned this method of laying the firebox.
In gray
In the gray version of the device, the stove is equipped with a chimney. But it is built in such a way that part of the combustion waste (soot, soot) settles inside the brick walls of the chimney. Therefore, there is always a risk of a fire inside the stove and the flame spreading to the room.
In white
There is a full-fledged chimney through which all the smoke goes outside without entering the room.
In such ovens, the stones are covered with a dense metal lid or door (optional). They are opened only after all the wood has burned out.
There are products where stones are separated from flue gases by a hob. The stove operates continuously (heating is performed to take a bath) or periodically (thorough one-time heating before taking a bath).
It is recommended to use hardwood firewood for heating sauna heaters. They do not emit a tarry burn after burning. A wood stove is easier to regulate and maintain its temperature at the same level.
Important to know: “How to clean a chimney”
Masonry schemes
If you have never built a heater before, then it is recommended not to start drawing up the drawing yourself, but to find a ready-made plan and use it.
Currently, various masonry schemes are used, the most complex of which are chosen by professionals, and the simpler ones by amateurs. In both cases, the result is satisfactory and the oven operates efficiently. In addition to traditional masonry methods, the order of Kuznetsov’s bell-shaped sauna stoves is also distinguished. This design takes up significantly less space. The ordering always starts from the foundation of the furnace, the so-called zero row. At this level, the installation is continuous, but a half-window is usually left on the side to create additional draft and clean the chimney shaft. At the next level, dressing is carried out - this means that the row is shifted by 30-50% to make the structure stable. If you need halves or quarters of bricks, it is recommended to use a grinder with a diamond blade. It must be remembered that such elements cannot be located in chimneys, the shafts of which are always assembled from solid brick, but only inside the structure.
At the third level, a damper usually appears, and the installation of the ash door begins. The fourth row indicates the appearance of the soot sampling door. At the sixth stage, as a rule, the shaft is divided into two parts using a jumper, one of which will become the slab shaft. On the twelfth row, one of the shafts will be laid, and one main one will remain. Usually at the twenty-fifth and twenty-sixth stage the masonry of the main structure ends, and then the masonry of the chimney begins.