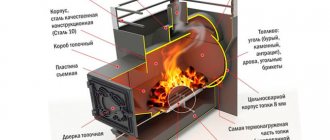
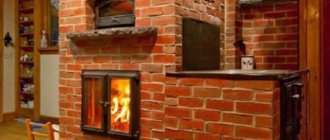
When it comes to the heating system of a private home, many owners first of all remember such a traditional heat source as a Russian stove. This is a universal structure that does not require an electrical connection and performs the function of heating the house.
The hob, coupled with the crucible, completely replaces the stove and oven, therefore, it is also an excellent alternative to kitchen equipment for cooking. Let us dwell in more detail on the features and types of Russian stoves.
Construction of a Russian stove
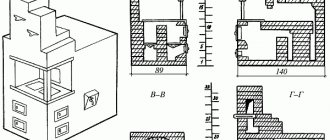
The Russian stove does not have a very complicated structure, but it has quite a lot of elements that perform different functions. The diagram below shows the components of a Russian stove:
- The over-pipe is the place where the flue gas is collected, and after this stage it is sent into the chimney.
- Shestok is a place located in front of the mouth of the Russian stove.
- Cutting is a place located at ceiling level, intended for fire safety.
- The valve is an iron sheet that closes the passage into the furnace.
- Epancha is a covering located on top of the stove mouth.
- The valve is a metal plate that regulates draft.
- The hog is the location that leads the pipe to the end area.
- A view is a steel plate with a hole that is closed with a lid and a blinker.
- The chimney is the path through which smoke can enter the street.
- The roof is the last brick layer.
- A bed is a place intended for sleeping and lying down.
- The crucible is a place in which fuel or firewood is first prepared in order to subsequently cook food.
- The vault, the palate, is a place located at the very top of the crucible region.
- Stoves are recesses in the stove that help improve heat transfer.
- The mirror is the wall of the stove, which helps keep the house warm.
- The chimney is the outer part of the stove.
- Furnaces are recesses that store coals.
- The bottom, the ridge, is the lowest layer of the “trough”, which ensures the strength of the installation, and is built from pre-hewn brick along a cylindrical surface.
- The hearth is the place located on top of the baking area on the inside of the hearth.
- The threshold is a place that traps gases escaping from the firebox.
- The cheek is the outer wall of the furnace.
- The mouth is the place that makes up the distance between the cheeks.
- The choke is an area where coals are collected for later use, helping to save firewood.
- Baking - the distance from the stove to the wall.
- Guardianship - the base of the stove.
- A stove is a recess designed for drying clothes.
- The understool is where kitchen tools are stored.
- Podpechek, podpechek - a room for storing firewood.
- The half-door is a door for cleaning out soot at any time.
- Hailo is a well through which the gas released after the smoke comes out into the chimney.
- The throat is a hole located on top of the hearth.
Description [edit | edit code ]
A distinctive feature is the combustion chamber (crucible) deepened in the furnace body with a solid hearth and a vaulted ceiling.
The air temperature in the crucible prepared for baking bread reaches 200 °C [8]. After finishing the fire, the oven maintains a high temperature for a long time, which makes it possible to cook products such as baked milk and oatmeal.
The Russian stove is designed in such a way that it only heats the space of the room located above the hearth (80-90 cm from the floor level) [1] [9]. The overall efficiency, as previously thought, “by eye” efficiency is 25-30%, of which 7% is spent on cooking and baking bread, and 18-23% is spent on heating the room [10]. Studies of the thermal efficiency of Russian stoves in the 1940s gave a result of 68%. Improved designs of I.S. were created. Podgorodnikov, the efficiency of which reached 80%, which is unattainable for other types of furnaces.
- The structure of a Russian stove
1. Podpeche
- the space in the lower part of the stove where firewood for the next fire and various items were stacked.
Pets could also be kept there. 2. Wooden flooring
.
3. Podshestok
- a cold stove under a pole, most often some of the dishes were stored there.
4. Pole
- a working platform in front of the mouth, on which dishes with food that have been removed or prepared for installation in the crucible are placed.
In place of the hearth, there may be a cast-iron stove, heated from below by an additional combustion chamber, called a flood chamber
.
5. Pole window
.
6. The mouth
or forehead is the entrance to the crucible.
7. Threshold
- the upper part of the mouth, holding hot gases under the arch for more complete absorption of heat and combustion of combustion products.
8. Overpipe
, which turns into
a hailo
and then into
a chimney
.
9. View
.
10. Gate valve
.
11. Pipe
.
12. Sand filling over the vault
.
13. The vault
is the upper arched part of the furnace.
14. Crucible
- combustion chamber of the furnace.
15. Roof
- the topmost layer of brick, located above the massif or backfill;
A couch was usually placed on the roof. 16. Under
- the bottom layer of the furnace (fuel tank) of the furnace.
17. Backfilling under the floor
.
18. Ash pan
or frame.
19. Cheeks
or cheekbones - the front wall of the furnace [11].
Other parts: Opeche
- a wooden frame on which the stove was installed.
Stoves
(gornushki, garnushki) are shallow niches in the stove body that serve to increase the heat-transfer surface.
They also place various items for drying: clothes, shoes, dishes, mushrooms, herbs and others. Hog
is a horizontal (or inclined [12]) part of the chimney (about a meter or more long), located in the attic in front of the chimney.
Protects against atmospheric precipitation entering the furnace through the pipe, ensures better heat retention by weakening draft, and prevents the release of sparks onto the roof [13]. The chimney
is the final vertical part of the chimney.
Smoke
stoves (fired black) did not have pipes.
Dimensions of different modifications
There are several types of Russian stoves, but the main ones can be divided into 3 types:
- With a bed;
- Without a stove bench;
- Mini.
Their sizes are:
- With a bed, example dimensions: 1220 x 2120 x 1510 mm;
- With hob without bench: 1585 x 1725 x 2463 mm;
- Mini Russian oven: 1500 x 1000 x1 990 mm.
Since the Russian stove has several types, it is worth examining the diagrams of each of them.
Scheme of a Russian stove with a stove bench
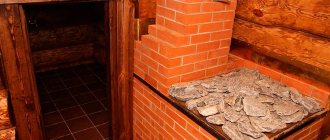
Since there are many types, their designs are different. One of them has a bed. This is one of the oldest types of Russian stoves. The bed is designed for sleeping and lying in this place during the cold season.
Russian stove with stove bench
Device
Scheme of a Russian stove without a stove bench
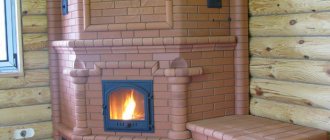
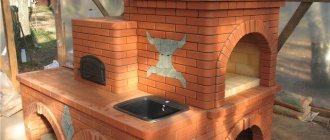
Without a bench - a stove with a hob. The cooking chamber is most often a cast iron stove with burners (standard - two). In such ovens, cooked food retains its heat for a long time.
Russian stove with hob without a stove bench
Scheme of a Russian mini-oven
Please note that there are two types of mini-furnaces: with and without a water-heating pipe. Therefore, it is advisable to choose in advance which one you want. After all, it is the first 10 rows that differ when laying. They are the ones who model the entire body. Changes cannot be made later unless you destroy it and start again. And after the 10th row in the building, the two types are the same. This type is also called the “Economy” stove, since it is small in size and requires a small amount of materials.
Mini Russian oven
History [edit | edit code]
In the 8th-13th centuries, several types of stoves were common in East Slavic and Finno-Ugric [3] territories [4]. In Northern Rus', stone stoves predominated, built dry from stones without a fastening mortar. In Staraya Ladoga, the bases of stone ovens reached 1.5 m in diameter [5]. Clay ovens built on a stone foundation are also known in Izborsk - a hollow clay dome about 1 m high was built on a stone platform about 1 × 1 m in size [6]. Ovens made of stone and clay are known. They were most common on the Upper Don, in Poochie and in the Middle Dnieper region. The bases of such ovens reached 1.5×2 m. Clay ovens were more widespread in the Upper and Middle Dnieper regions. Their dimensions reached 1.5 m in diameter and up to 1.2 m in height [7].
During this period, the huts did not have devices for removing smoke, and it came out through the doors and small windows in the walls (heating “in black”, smoking hut). At the turn of the 15th and 16th centuries, a device for removing smoke appeared. Initially it was a wooden box. With the advent of refractory brick, stoves acquired pipes, and by the beginning of the 18th century they themselves gradually acquired the appearance that is now known as the “Russian stove.”
Notes
- ↑ 1 2 Kovalevsky I.I.
Russian stoves // Furnace works. - M.: Higher School, 1983. - P. -56. — 208 p. - Shkolnik A.E.
Stove heating of low-rise buildings. - M.: Higher School, 1991. - P. 105-106. — 161 p. - Ryabinin E.A.
Finno-Ugric tribes within Ancient Rus': On the history of Slavic-Finnish ethnocultural relations: Historical and archaeological essays. - St. Petersburg: St. Petersburg University Publishing House, 1997. - 260 p. — ISBN 5-288-01635-6. - Smilenko, A. T.
To the study of local features of the culture of the unions of East Slavic tribes in the 8th-10th centuries. // Ancient Slavs and Kievan Rus. - Kyiv, 1989. - P. 106. - Sedov V.V.
Dwellings of the Slovenian-Krivichi region of the 8th-10th centuries.
// KSIA
. - 1986. - V. 183. - P. 11. - Sedov V.V.
Izborsk in the early Middle Ages. - M., 2007. - P. 62. - Rappoport, P. A.
Ancient Russian dwelling. - M., 1975. - Schoolboy, 1988.
- Shepelev, 1987, p. 139-140.
- Heating // Technical encyclopedia. Volume 15. - M.: Soviet Encyclopedia, 1931. - Stb. 379
- Shepelev, 1987.
- Pluzhnikov V.I.
Borov // Terms of Russian architectural heritage: Architectural Dictionary. - M.: Art-XXI century, 2011. - P. 47. - 424 p. - Russian hut, 2004.
- ↑ 12
Russian hut, 2004, p. 49. - Shangina, 2003.
- History and traditions of the Russian bath: a brief outline // Article on the “Russian Faith” website.
- Bath // Encyclopedic Dictionary of Brockhaus and Efron: in 86 volumes (82 volumes and 4 additional). - St. Petersburg, 1890-1907.
- A. Summer resident.
Bathhouse. Essays on ethnography and medicine / Part 1 // St. Petersburg, 2015. 234 p. (pp. 167-169) - Russian hut, 2004, Pomelo, p. 284.
Conclusions and useful video on the topic
Video #1. A video to help independent stove makers, the material presents a visual arrangement of a heating stove:
Video #2. A detailed guide to the construction of a heating and cooking unit according to ready-made procedures, but with some changes from the contractor:
When choosing a design for your own construction of a stove for a summer residence, you need to take into account your own capabilities and skills. It is possible that someone will consider the options we have proposed to be too complex or simple. In any case, the information presented will help you get an idea of the stove structures in order to use it yourself or monitor the actions of hired stove workers.
If you had to build a brick stove for your dacha yourself, please share photos of your own designs.
Perhaps you know some subtleties that we did not take into account in our article? Tell our readers about them - leave comments in the block below. Date: September 25, 2022
Subtleties of preparing masonry mortar
Unlike regular mortar, masonry mortar for furnace work is much more difficult to prepare. Of course, you can buy a ready-made mixture at a hardware store - you can find one if you look hard enough. But, if the goal is to make the stove yourself, we will also prepare the solution with our own hands.
Masonry mortars for stoves are selected depending on the brick used:
- If solid brick of grade M150 or more is used for masonry, a clay-sand mortar is used in a clay-to-sand ratio of approximately 1:2. It is also used for lining the stove with ceramic tiles.
- For laying refractory bricks, mortars based on refractory clay with the addition of sand are used.
- When using fireclay bricks, solutions of refractory (kaolin, bentonite) clay and fireclay powder are used in a ratio of approximately 1:3–4.
- Brick pipes in the attic space are laid using cement-sand mortar.
Clay is a soft, non-metallic rock, and, as everyone knows, it can be used to sculpt sculptures, dishes, produce tiles, etc. The difficulty lies in the optimal selection of raw materials - in nature, clay occurs in different forms, and can be “lean”, normal or “oily”. The skill of the stove maker lies in selecting the optimal ratio of clay and sand in order to obtain the ideal masonry mortar.
To check the quality of a clay solution, many methods have been used for a long time. The simplest of them is to “knead” clay dough, roll out a thin flagellum and try to bend it. The smaller the bending radius at which the flagellum begins to crack, the better the solution.
Another, very accurate way: roll the prepared “dough” into a ball and carefully squeeze it between two boards. When compressed by a third of its diameter, normal clay will begin to develop fine cracks. If the ball crumbled even earlier, the solution is too “thin”. If cracks appear when a lump of clay is compressed by half its diameter, the solution is greasy. In any case, it is better to get a fattier solution than a lean one.
Kiln masonry
The main requirement for stove masonry is tightness. Therefore, only whole bricks without cracks are used for the stove, and the seams are made thin - no more than 5 mm. You cannot achieve airtightness by coating the inside of the furnace walls with clay - this reduces thermal conductivity and increases soot and soot deposits. In addition, the clay can flake off and clog the channels inside the oven, which can be difficult to clean. Laying methods used:
- “in a brick” - that is, the wall thickness is equal to the length of the brick;
- “half a brick” - the brick is laid flat along the wall;
- “in a quarter” - the brick is laid on its edge.
Bandaging the seams is done by using alternately bonded and spooned masonry in the corners (the brick is laid flat, and the next row is laid with the butt facing outward) or partial-size material. If ceramic bricks are used, they must be pre-soaked because they “pull” moisture out of the mortar. When laying, be sure to remove excess mixture, especially from the inside of the stove. The outer walls of the furnace are laid “in brick”, the inner walls are usually “in half a brick”.
Deciding on culinary functionality
Most modern ovens are multifunctional devices. What your oven can do determines how much you can realize your culinary potential.
Heating modes
Cooking different foods requires different temperatures and different heating rates. It follows from this that the more heating modes an oven has, the more varied the list of dishes that you can cook in it will be, the more opportunities you will have for various culinary experiments. Budget electric ovens, as a rule, have top, bottom and combined (top + bottom) heating, as well as a grill mode.
In more expensive models, convection modes are added to the classic heating modes. On the back wall of such ovens there is a fan around which a ring heating element is placed. The fan promotes rapid and uniform distribution of heated air throughout the working chamber.
Additional modes
Electronically controlled ovens often have a number of additional modes that significantly expand the functionality of the device. The presence of a convection fan allows you to implement a gentle defrosting mode of food: the heating elements do not turn on in this mode, and the fan circulates air at room temperature throughout the chamber. The “Stewing” and “Simmering” programs are designed for slow cooking of products at relatively low temperatures, which helps to maximize the preservation of nutrients in them. The “Fermentation” mode can be used to prepare yogurt at home, rise yeast dough, etc.
Steamer function
Some modern oven models have a steam mode. In most cases, this is not steaming, but rather a symbiosis of steam and heat treatment of products. However, there are ovens on sale with a special steam generator design - these can be used as classic steamers.
Microwave module
An electric oven can be equipped with a built-in microwave module. As a result, you get two appliances in one, which can be used as both an oven and a microwave. Moreover, if you wish, you can combine conventional heating with microwave heating, which can significantly reduce cooking time.
Automatic programs
Automatic programs built into the memory of an electronically controlled oven will help to significantly simplify the process of preparing various dishes. The user just needs to indicate the type of product (meat, fish, vegetables, etc.), select one of the types of dishes offered to him to choose from that can be prepared from this product, and enter the weight of the product.
Then the oven operates on its own: based on the algorithms stored in its memory, it selects the temperature mode and determines the process time, and after some time you get a ready-made dinner. The number of preinstalled automatic programs varies from model to model, but can reach several dozen. Some modern premium ovens allow the user to update the software by loading new auto programs in addition to existing ones, as well as save their own cooking algorithms.
Skewer
If you often bake whole poultry or large pieces of meat as the main course of a holiday dinner, a spit will come in handy. A spit rotating from a specially designed electric drive will help to heat the product evenly, making your signature dish even more tasty and attractive.
However, if your oven has a convection heating mode, then you can refuse the grill. A fan will also do an excellent job of its function: in this case, it is not the food that will rotate in the hot air, but the hot air around the food - the effect will be the same, which means that the meat on the grill will be cooked no worse than on a spit.
Temperature probe
When baking large pieces of meat, it can be difficult to assess how much the temperature inside the piece differs from the air temperature in the cooking chamber, and therefore to make an assumption about the degree of readiness of the product. A temperature probe will come to your aid - a thermometer that measures the temperature inside the product being prepared. When the required temperature is reached, the temperature probe will “notify” the control system about this, and it, in turn, will notify the user about this or perform an automatic shutdown.
Prison
This is the oldest Russian cold soup, which the poor ate in pagan times, and right up to the 20th century. - water, kvass or milk, bread crumbles, preferably in the form of crackers. If there was butter and onions, some spices, then they were added. To modern people, such food would seem like slop - it’s difficult for us to understand why people added bread to liquid, if you can just eat it and wash it down.
The recipe is extremely simple, but variable: Essentially, tyurya is salted cold water with pieces of bread and chopped onions. Finely chopped vegetables and roots (turnips, for example), herbs and herbs, and yogurt were added to it. Let us remember that it was prison that Tolstoy’s hero Konstantin Levin ate with pleasure in the middle of the summer mowing. We also hope that summer will soon return to normal, and in the midst of your dacha worries you will use the following recipe.
For a liter of water you will need two 2 tablespoons of small rye bread crackers, 1 finely chopped onion, 1 tablespoon of finely chopped plantain, the same amount of finely chopped quinoa, salt. Place plantain and quinoa in boiling salted water, quickly bring to a boil, immediately remove from heat and cool to room temperature. Add remaining ingredients before serving.
Homemade design
If you have no experience, you can choose a simplified design of several bricks and a bent pipe. If you have the skills to operate a welding machine, create a furnace from a square profile and sheet metal.
Furnace drawing and dimensions
The presented option can be adjusted taking into account the volume of the room, other personal requirements and preferences. The developers recommend setting the diameter of the riser channel in the range from 65 to 105 mm. The dimensions of the shell are changed accordingly.
Drawing with explanations for assembly
To accumulate thermal energy, adobe was chosen. This material is not heat resistant, so the temperature must be reduced to a safe level. Additional recommendations:
- the drum can be made from a standard 50-liter cylinder;
- provide perfect sealing of the smoke exhaust system to prevent soot from penetrating into the porous adobe;
- To remove residual mechanical impurities, a second ash pan is installed.
Step-by-step instruction
Homemade wood burning stove rocket
You can create a wood-burning jet stove with your own hands using the following algorithm:
- To produce a mixture of the main heat-insulating layer (5b), crushed stone from chamotte brand ShL is used.
- The support frame for the stove is assembled from wooden logs (100 x 100) with cells no more than 600 mm; the distance under the deck can be increased.
- Mineral cardboard and tongue and groove boards are used for cladding.
- Wooden blanks are pre-treated with impregnation with biocidal additives.
- The area under the main part of the structure is covered with a metal sheet.
- After placing the structure at the planned location, formwork is installed and adobe is poured.
- A drum is made from a gas cylinder of suitable size.
- To create reliable welded joints, electrodes with a diameter of 2 mm and a direct current of 60-70A are used.
- The sealing seal is made from asbestos cord and fixed with heat-resistant glue.
- A riser is assembled from prepared steel blanks.
- A bottom layer of insulation is installed; plywood (20 mm) or boards are used for formwork.
- Filling with construction mixture is carried out to level B according to the drawing. It takes 1-2 days for this part to dry completely at room temperature.
- Install the firebox, controlling the accuracy of the vertical position.
- Part of the blower will protrude outward, so at the final stage the wall is leveled with adobe.
- After filling with the mixture to level G, it is recommended to speed up drying with a regular incandescent light bulb with a power of 60-75 W (placed under the riser).
- An ash pan made from a steel sheet 0.8-1 mm thick is installed.
- The drum tube is mounted, forming a wedge-shaped slope towards the outlet in the inner part (with mixture 5b).
- A lining is created with layer-by-layer filling (5g), the plug is made of clay.
- Continue assembly according to the diagram, install the corrugation, drum covers and ash pan.
- After drying is complete (2-25 weeks), the formwork is removed, the surface is formed, and visible metal parts are painted.
Explanations for the composition of building mixtures (5):
- a – adobe made of clay and straw, the consistency of thick dough;
- b – medium-fat clay with chamotte crushed stone;
- c – fireclay sand with clay in proportions of one to one;
- d – river sand without washing with a fixed granule size (2.5-3 mm);
- e – oven clay of medium fat content.
Related utensils [ edit | edit code]
Grab ( stag)
) is necessary for installing and removing cast iron from the oven, used instead of pans.
A chapelnik ( frying pan
) is used to move frying pans without handles (chapels), a wooden shovel (
gardener
) is used to move bread and pastries, a poker is used to move and rake out coals and firewood in a melted oven.
Cast iron - heat-resistant, usually cast iron, less often aluminum cookware. Frying pans - chapels were most often used - frying pans without a handle, held by chapels. Other utensils for cooking: pots, krinkas, ducklings, casserole dishes, baking sheets, etc.
A broom is an object for cleaning the hearth from coals and ash before planting bread or washing people. It is a long stalk with pine or juniper branches, straw, sponge or rag attached to the end [16].
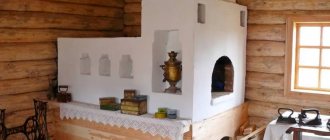
Our culture has always had a special, reverent attitude towards the Russian stove. How does it differ from other stove designs, how to build a real Russian stove - let's try to figure it out.
The Russian stove is a multifunctional device. This includes heating the premises in the winter cold, and hot, very tasty and healthy food prepared according to ancient traditions, and the ability to preserve the harvest thanks to drying, and household amenities in the form of hot water.
Of course, it cannot be said that the Russian stove is an ideal device that does not have its weaknesses. To successfully cook food in it, the housewife must have considerable dexterity - not every modern lady can handle the handle and pots. The stove needs to be lit every morning, which means someone needs to chop the wood. The disadvantage of a stove as a heating device is that the heat is released at a level above the hearth, that is, almost a meter from the floor. Modern types of stoves are designed in such a way that smoke circulation channels are located in the lower part, and such a stove is heated to its entire height. The design may include a cast iron stove for cooking.
DIY house layout
Watch another master class. From it you will learn how to make a house inside and outside, as well as a platform for it.
The model of the hut is made of cardboard. For the roof, cut out two rectangles and glue them at the top with a strip of the same length. You will get a gable roof. It can be painted to resemble tiles. Make the frame of the house from a wide strip of cardboard, from which you need to create a square. First, you will paint the outside of it so that it is clear that it is a log house.
Glue wallpaper inside so that it also resembles wood. Place your creation on the prepared platform, onto which a green leaf is glued. Make a canopy over the entrance from cardboard. We will also make a Christmas tree from this material. You can paint light cardboard green or take material that is already that color. Also make a tree and attach it here.
To make a well, use the same material. Make logs out of painted cardboard and assemble them. Take two sushi chopsticks. Saw off a piece from one. Connect these two sticks using a metal chain to form a crane well. You can also place fruit trees here.
Now look at what the layout of the hut looks like inside. It’s interesting to create it with your own hands. Cover the floors with wood-look film, make the stove out of cardboard. Make a mat out of brown cardboard that needs to be glued to a horizontal surface.
See what the layout of the house and yard looks like from above. You can paint the path so that it is brown or glue paper of that color. Glue several fruits cut out of colored paper onto the apple tree.
Make the house more comfortable. Glue curtains or tulle to the windows. You can also fence off the stove area in the living room. Make a bed out of cardboard and place bedding here. Examine the table. Place a samovar, and the child can mold plates and food from plasticine, like a chest, and small household items.
If you need the most reliable model of a hut, then make a canopy here, which was a kind of corridor at the entrance to the house. Make a wall out of cardboard, cover it with self-adhesive film, cut out doors that will open.
Here's how to make a mock-up of a hut. See how others do this kind of work.
You can make it out of paper, as the heroine of the next video does.
Related article: How to make a model of a village and city
Literature
- Baranov D.A., Baranova O.G.
and others. Russian stove // Russian hut: Illustrated encyclopedia. - St. Petersburg: Art-SPB, 2004. - P. 48-54. — 376 p. - Bezhkovich A.S., Zhegalova S.K.
etc. Furnaces. Pipes // Economy and life of Russian peasants. - M.: Soviet Russia, 1959. - P. 139-142. — 257 p. - Kozlov A.A.
Russian stoves of improved designs. Once again about the Russian stove // History of stove heating in Russia. - M.: Anko; S-P.: Exclusive Style, 2022. - pp. 78-83, 148-149. — 164 p. - Mainicheva A.Yu.
Furnaces of the old-timers of the Siberians of the Upper Ob region: design features and semantics // Electronic magazine “Sibirskaya Zaimka”. - 1999. - October 12. - Protopopov V.P.
Furnace business. - M.-L.: Gosstroyizdat, 1934. - P. 176-186. — 280 s. - Furnace / Toporkov A.L. // Slavic antiquities: Ethnolinguistic dictionary: in 5 volumes / under general. ed. N. I. Tolstoy; Institute of Slavic Studies RAS. — M.: Intl. relations, 2009. - T. 4: P (Crossing the water) - S (Sieve). — pp. 39–44. — ISBN 5-7133-0703-4, 978-5-7133-1312-8.
- Fedotov G.Ya.
Russian stove. - M.: Eksmo, 2003. - 280 p. - Shangina I.I.
Russian stove (oven) // Russian traditional life: Encyclopedic dictionary. - St. Petersburg: ABC-classics, 2003. - P. 430-434. — 688 p. - Shepelev A.M.
Russian stoves // Laying stoves with your own hands. - M.: Rosselkhozizdat, 1987. - P. 139-191. — 318 p. - Shkolnik A.E.
Russian stove of the 20th century (Russian) // Science and life: magazine. - 1988. - No. 1. - P. 97-98. - Kovalev V.M., Mogilny N.P.
“Professions” of the Russian stove // Russian cuisine: traditions and customs. - M.: Soviet Russia, 1990. - P. 63-66. — 256 p.
How to mix clay mortar
To lay a Russian stove you will need approximately 3.5 m 3 of mortar. Accordingly, the required amount of ingredients is taken in the ratio specified above and diluted with water in an amount of 1/4 of the volume of clay taken. For example: 1.1 m 3 clay, 2.2 m 3 sand and 0.27 m 3 water.
An iron barrel or a tin-lined box is used as a container; the clay is soaked in water for a couple of days. After this, sand is added and the entire solution is mixed with feet (you will have to stock up on high boots) until the mixture becomes homogeneous.
Important: since the width of masonry joints is no more than 3 mm for fireclay bricks and 5 mm for regular bricks, all large lumps and pebbles must be removed from the mortar.