Brick kitchen slabs
Based on their design, kitchen stoves can be divided into simple, medium and complex.
A simple kitchen stove has a combustion and blower doors, a grate and a smoke valve. It is the simplest of all household stoves.
Kitchen stoves of average complexity have, in addition to the above-mentioned stove appliances, an oven, and complex ones also have a hot water box. Ovens are made of black steel with a thickness of at least 1 mm, and hot water boxes are made of galvanized steel. The casing of the water heating box is made of black steel with a thickness of at least 1 mm. The thicker the steel, the more durable the devices.
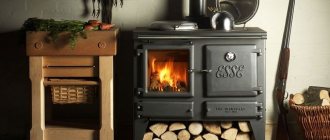
Stove with two-burner stove and oven
In a simple cookstove, hot flue gases from the firebox are directed under the cast iron stove and then discharged through an opening under the chimney into the chimney.
In other kitchen stoves, hot flue gases are directed under the cast-iron stove and then, descending, heat the walls of the oven or one wall of the water-heating box, and then are discharged into the pipe, while heating the bottom wall of the oven, the bottom and the other wall of the water-heating box.
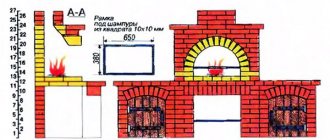
The above-mentioned kitchen stoves do not have a cooking chamber, therefore, during cooking, steam and odor are released into the room, which negatively affects the microclimate of the room. This article provides drawings of sections and ordering of a kitchen stove of an improved design, which has a cooking chamber connected to a pipe using a ventilation duct closed by a ventilation valve.
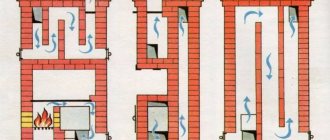
Types of Swedes
The Swedish stove has several varieties. The following can be distinguished:
- In appearance it resembles a fireplace. A hob is indispensable in the kitchen. You can install a stove in the living room. There are a huge number of finishing options, so it can fit into any interior and room design.
- With a sunbed. The design attracts with its functionality. It is often used in severe frosts. The stove functions as a heated bed.
- Multifunctionality. Users will be able not only to warm up the space, but also to cook food. The room is heated through the rear wall of the structure. The cooking surface can be placed in the kitchen.
Advice! When choosing, you need to familiarize yourself with all the parameters and choose the right place.
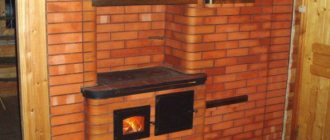
Oven equipped with a stove bench
Simple kitchen stove
A simple kitchen stove has dimensions, mm: 1160x510x630 (without foundation, i.e. without two rows of brickwork on the floor).
To lay a kitchen stove, the following materials are required:
- red brick - 120 pcs.;
- red clay - 50 kg;
- sand - 40 kg;
- grate - 28x25 cm;
- fire door - 25×21 cm;
- blower door - 25×14 cm;
- cast iron stove for two burners - 70x40 cm;
- slab binding (angle 30x30x4 mm) -3.5 m;
- pre-furnace sheet made of roofing steel - 500×700 mm;
- roofing steel sheet under the slab - 1160×510 mm;
- construction felt - 1 kg;
- smoke valve - 130×130 mm;
- metal box for collecting ash in the ash chamber - 350x230x100 mm.
One stove maker can build a simple kitchen stove within 3 hours (not counting the laying of the chimney); in addition, it takes 1.5 hours to carry the material and prepare the clay-sand solution. To erect a chimney, additional time is required: depending on its height, you need to calculate the time from calculation of half an hour per 1 m of pipe laying (when laying a pipe in a quarter of a brick).
The heat output of a simple kitchen stove when cooking food twice a day is about 0.7-0.8 kW (660-700 kcal/h).
The figure below shows vertical and horizontal sections of a simple kitchen stove. Next, masonry drawings will be given in rows (orders). From the sections and drawings of the masonry along the rows it is clear that the masonry of a simple kitchen stove does not present any difficulties.
Sections of a simple kitchen stove: a - facade; b - section A-A (longitudinal vertical section of the furnace); c — section B-B (transverse vertical section). Designations: 1—firebox; 2 - ash chamber; 3 - grate; 4 - smoke valve; 5 - cast iron plate (flooring).
Before you start laying a simple kitchen stove, you should purchase the necessary stove equipment.
Having prepared the clay-sand mortar, proceed to laying a simple kitchen stove. If the slab is placed on a foundation, then level it upward. When laying a slab on a wooden floor, it is necessary to cut a sheet of roofing steel to fit the size of the slab. Put a layer of sheet asbestos on the floor, and if it is not available, two layers of construction felt, well soaked in a clay-sand solution, cover everything with a sheet of roofing steel and nail it to the floor. Then a platform is made from a whole brick in two rows of masonry on clay-sand mortar. After this, they begin laying the slabs from the first row strictly in order.
The first row is laid, following the rules for bandaging the seams from selected whole bricks, as indicated in the figure below. The completed masonry is checked for squareness.
First row of a simple kitchen stove
During the laying of the second row , a blower is installed, a blower door is installed, which is attached to the masonry using furnace wire. Temporarily, the blower door at the front can be supported by bricks, which are stacked on the floor in front of the blower door. The bottom of the ash chamber is 380×250 mm.
Second row of kitchen stove
The third row is similar to the previous one, but the seams should be tied well.
Third row
The fourth row covers the ash door, leaving only the opening of the ash chamber measuring 250x250 mm, on which the grate is laid. If possible, it is advisable to lay the fourth row using refractory bricks, as shown in the figure below.
Laying the fourth row. The shaded bricks are fireproof. The arrows indicate the direction of movement of hot flue gases in the heating furnace.
The fifth row forms a firebox measuring 510×250 mm. The brick adjacent to the back of the grate is cut off to form an inclined plane along which the fuel will roll onto the grate (see section B-B along A-A). When laying this row, you need to install a firebox door, having previously attached roofing steel legs to it using rivets.
Laying the fifth row of the furnace
The sixth row is laid in the same way as the previous one, but the seams should be bandaged.
Laying the sixth row of the furnace
The seventh row is placed according to the figure below. This is where a chimney is left under the stove, connecting the firebox to the chimney.
Seventh row of the oven
The eighth row is made strictly horizontally; this row covers the fire door. A cast iron slab is laid on the eighth row laid out using a thin layer of clay-sand mortar. Factory-made cast iron slabs have protrusions or stiffeners on the bottom side that extend 15 mm from the edges of the slabs.
Eighth row of the oven
The internal dimensions of the eighth row of masonry must be such that the slab fits freely there with its ribs and has a gap on all sides of at least 5 mm, intended for the expansion of the metal when it is heated. If you do not comply with this, the cast iron stove, expanding, will destroy the stove masonry. To ensure that the masonry is strong, a frame made of angle steel is laid on the eighth row. It is advisable to cover the frame with fireproof varnish, which protects the steel from rust.
After laying the ninth row, a smoke damper is installed using a thin layer of clay-sand mortar. This row is the final one, followed by the laying of the chimney.
The final row of a simple kitchen stove
The kitchen stove works as follows. Flue gases from the firebox enter under the cast-iron stove, then through a hole under the pipe through a smoke valve they are discharged into the chimney. The kitchen stove does not have a cleaning hole, since the chimney can be cleaned through the hole under the pipe, where it is easy to stick your hand through the burner of the cast-iron stove.
An example of laying a hob
Firstly, in a kitchen stove the fire door is installed at the same level as the grate. In the stove, flue gases constantly maintain a high temperature in the chimney, as a result of which it is not necessary to lay thick fuel on the grate. Secondly, with this installation of the fire door, the distance from the grate to the cast iron stove will be only 280 mm, which makes it possible to quickly cook food even with low fuel consumption.
After finishing laying the furnace, it must be dried by opening the furnace and blower doors and the valve in the pipe.
The longer the oven dries, the stronger the masonry will be. The kitchen stove can be dried using small test fires, but after the test fires, the valve in the pipe and the blower door must be left open.
After complete drying, the kitchen stove is plastered with clay-sand mortar, followed by whitewashing.
It is better to carry out the exterior finishing as follows: after laying the eighth row and installing the cast iron slab, as well as before installing the corner steel frame, the kitchen slab is walled up on all sides in a case made of roofing steel (galvanized steel can be used). Pre-cut the corresponding holes according to the size of the combustion and blower doors. The case is secured to the floor using a plinth, which is nailed around the slab. The outer surface of the case is cleaned and coated with oven varnish, which can withstand high temperatures well.
In front of the combustion door, the pre-furnace sheet is nailed to the floor with nails 50 mm apart from one another. If the plinth was nailed earlier, then the pre-furnace sheet must be folded onto the plinth.
How to build a stove correctly
In the vast majority of cases, construction begins with the construction of a foundation for a future heat source. An exception may be outdoor mini-ovens, which due to their low weight are sometimes placed directly on the concrete screed of the yard. All others, regardless of location, must be built on a solid foundation. Moreover, it is not allowed for the foundation of the stove to be connected to the base of the house or placed close to it; it is necessary to leave a gap of at least 5 cm, and preferably 10.
Important. Failure to comply with this requirement may lead to the fact that after a year or two the stove may crack and even deviate from the vertical.
If the house has a good foundation in the form of a cement screed, and the total weight of the stove does not exceed 750 kg, then a foundation is not required; masonry can begin directly from the screed, having previously laid sheets of asbestos and roofing steel. The structures presented in the previous section weigh over 750 kg, and therefore it is necessary to provide a reliable foundation for them. There are 2 types of foundations for the furnace: rubble and reinforced concrete.
Regardless of the type of base, you first need to dig a hole whose dimensions exceed the area of the stove by 10 cm in each direction. The depth depends on the thickness of the upper layer of chernozem or other subsidence soil, while the base of the foundation should rest on a denser layer. In the first case, the pit is laid with rubble stone and dressing, using a solution of the following components:
- sand – 6 parts;
- cement – 1 part;
- lime mixed with water - 1 part.
All voids between the stones are also filled with this solution, and the upper part, located at a depth of 80 mm from the floor, is also leveled with it. The reinforced concrete base is poured with formwork and reinforcing mesh, having previously poured a 10 cm thick cushion of crushed stone onto the bottom of the pit.
Important. After the mortar or concrete has hardened, a waterproofing barrier made of roofing felt in 2 layers must be laid on top of the foundation.
The furnace is laid according to the procedures, observing the thickness of the joints within 3...5 mm. A few recommendations:
- After laying each row, it is necessary to control compliance with the vertical and horizontal using a plumb line and a building level.
- The mortar can be applied to the brick with a trowel or by hand; light tapping of the stone after placing it in place is allowed.
- The remaining mortar is removed from both sides of the wall, and the inside is wiped with a wet rag to create a smoother surface. This is necessary to ensure the least resistance to flue gases.
- When installing fittings and water tanks, it is important to ensure that there are no gaps between the masonry and the metal surface; the joints must be carefully filled with a solution, otherwise the stove will begin to smoke.
- Upon completion of construction, it is necessary to wait 2 days until the solution dries completely, after which you can test fire the stove, starting with a small amount of firewood.
How to build a small stove at home is described in detail in the video:
Kitchen stove with oven
The kitchen stove with oven has dimensions, mm: 1290x640x560 (without foundation, i.e. without two rows of brickwork on the floor). To lay a kitchen stove with oven, the following materials are required:
- red brick - 140 pcs.;
- red clay - 60 kg;
- sand - 50 kg;
- grate - 26x25 cm;
- fire door - 25×21 cm;
- blower door - 14×25 cm;
- cleaning doors 130×140 mm - 2 pcs.;
- cast iron stove made of five composite plates measuring 53x18 cm with two burners;
- smoke valve - 130×130 mm;
- oven - 45x31x28 cm;
- slab binding (angle 30x30x4 mm) - 4 m;
- pre-furnace sheet made of roofing steel - 500×700 mm;
- roofing steel sheet under the slab - 1290×640 mm;
- construction felt - 1.2 kg;
- metal box for collecting ash in the ash chamber - 350x230x100 mm.
One stove maker can put this stove together within 3-4 hours; in addition, it takes about 2 hours to carry the material and prepare the clay-sand solution. The heat transfer of the stove during double cooking is about 0.8 kW (770 kcal/h). The figure below shows a general view, longitudinal and cross sections of a kitchen stove with an oven. Below are the order drawings for each row. Laying a kitchen stove with an oven is also not difficult and is similar to laying a simple kitchen stove, but here you have to install an oven and cleaning doors.
Kitchen stove with oven: a - general view; b - sections A-A, B-B (vertical sections), B-C, D-G (horizontal sections). Designations: 1 - ash chamber; 2 — grate; 3 - firebox; 4 - cast iron plate; 5 - oven; 6 - smoke valve; 7 - combustion door; 8 — blower door; 9 - cleaning holes.
When laying slabs on an independent foundation, before starting work, level its top with a layer of clay-sand mortar.
When installing a slab on the floor, before starting to lay the first row, it is necessary to carry out the same work as when laying a simple kitchen stove.
The masonry of the first row is made from selected whole bricks, while strictly adhering to the rules of bandaging the seams. The length of the kitchen stove should correspond to the length of five bricks, the width to the length of 2.5 bricks. Using a cord, check the equality of the diagonals.
Laying the first row of a kitchen stove with an oven
The second row is laid out strictly following the order. Here an ash chamber measuring 380×250 mm is left, a blower door is installed and secured, and cleaning holes are left on the back wall (the width of the holes should be equal to the width of the brick, i.e. 12 cm). If possible, cleanout doors measuring 130×140 mm are installed. At the cleanout hole at the farthest from the ash chamber, a brick is laid on its edge, as shown in the masonry order. To better secure the oven, place half a brick on its edge in the middle of the installation site.
Laying the second row of the slab
The third row is similar to the previous one, but you must follow the rule of ligating the seams.
Laying the third row of the slab
The fourth row covers the blower and cleanout doors. After finishing the laying of the fourth row, an oven is installed on a thin layer of clay-sand mortar at a pre-marked place. After this, a grate is installed. With the same brick installed on the edge, the chimney into the chimney is blocked.
Laying the fourth row of the stove with oven
During the laying of the fifth row , the combustion door is installed and secured; the brick is cut off before installation behind the grate so that the fuel gradually rolls onto the grate during the combustion process.
Laying the fifth row of the slab
The sixth row is similar to the fifth.
Laying the sixth row of the slab
The seventh row is laid out in order. The resulting chimney channel from the front side is laid with three bricks, as a result of which the internal size of the resulting channel under the chimney will be 130 × 130 mm. In the image of this row near the oven, a steam pipe with a diameter of 10 mm and a length of 160 mm is visible, which connects the oven to the ascending duct. This pipe is designed to remove steam and odor.
Laying the seventh row of the stove with oven. The arrows indicate the direction of movement of hot flue gases in the heating furnace.
The eighth row is performed strictly horizontally in level. This row covers the oven and the fire door. The upper wall of the oven is coated with a layer of clay mortar up to 10-15 mm thick, which will protect the oven from rapid burning.
Laying the eighth row of a brick oven (before installing a cast iron stove)
In this case, it is necessary that the distance between the top of the clay coating and the cast iron plate is at least 70 mm. After this, a cast iron slab and lining made of angle steel are installed on a thin layer of clay-sand mortar.
Eighth row of brick oven (after installing the cast iron stove)
After laying the ninth row, only the laying of the vertical channel remains. The ninth row is placed according to the image below.
Ninth row of the oven
After laying the tenth row, a smoke damper is installed.
Tenth row of the oven
The masonry of the eleventh row begins the chimney. Further laying of the pipe does not present any difficulties.
The final row of the furnace (the masonry of the chimney is not taken into account)
A kitchen stove and oven works like this. From the firebox, flue gases are directed under the cast-iron stove, from where they, heating the oven from behind on both sides, fall under the oven and are directed to the hole under the chimney. Rising through a vertical channel, they enter the chimney through a smoke valve and are released into the atmosphere.
How can you paint a stove?
It is clear that a newly minted master will not be able to build a beautiful stove the first time due to lack of experience. But this is a fixable matter, because the outside of a brick wall can be covered with paint. Previously, they were plastered and covered with two layers of chalk or lime whitewash, but now there are simpler and more convenient means. In addition, lime is easily transferred to clothing by accidental touch and constantly needs to be renewed.
If we talk about how to paint a brick stove, here are the following options:
- organosilicon heat-resistant enamel of the KO brand, designed for high temperatures;
- silicate or acrylic paints;
- heat-resistant varnish (for example, PF-238) mixed with dye.
The most preferred option is transparent enamel KO-85, KO-174 and KO-813. It is suitable both for the stove itself and for painting metal parts, since it can withstand temperatures up to 600 °C. Silicate and acrylic paints will not last as long, but they are also cheaper. The oven can also be painted with transparent varnish PF-238 or mixed with gouache of the required color, as shown in the photo above.
In any case, the coating is applied 2 times, the second layer is applied after the first has dried. The tools used are a brush and a roller. It is advisable to pre-treat the surface with a special primer intended specifically for such purposes.
Kitchen stove with oven and hot water box
To lay a kitchen stove with an oven and a hot water box measuring 1290x640 mm, the same materials are required as for the previous stove. Additionally, you should purchase a water heating box measuring 510x280x120 mm.
The figure below shows a general view, a horizontal section along A-A and a vertical section along B-B of the slab.
Kitchen stove with oven and hot water box: a - general view; b - cuts. Definitions: 1 - firebox; 2 - cast iron plate; 3 - oven; 4 - water heating box; 5 - smoke valve; 6 - ash chamber; 7 - angle steel trim
A kitchen stove with an oven and a hot water box is placed in the same order as a kitchen stove with an oven. The only difference is that after laying the third row, instead of a brick partition, a water-heating box in a case is installed on the edge between the oven and the vertical channel. The height of the hot water box should correspond to the height of four rows of flat brickwork. The rest of the masonry is completely similar to the masonry of a kitchen stove with an oven.
The main advantages of the Swedish
Note! One of the main advantages is efficient combustion of fuel in the chamber.
The design of the unit is thought out to the smallest detail. Experts recommend using only dry fuel. If you follow all the tips, the oven will generate a large amount of heat.
If we compare other heating units, a lot of energy is spent on heating the metal. After ignition, the Swede gives off heat almost immediately.
Another important advantage is heat retention. To hold it, you need to close the valve so that there are no gaps. Other advantages can be highlighted:
- compactness;
- high level of functionality;
- economical fuel consumption;
- heating two rooms at the same time.
But this type of oven also has some disadvantages. To create a Swede, you need to pay special attention to the quality of materials. If this requirement is not taken into account, the efficiency of the heating device will decrease several times. To create a furnace, you need to have certain skills in working with metal and tools. After installation and installation, errors cannot be eliminated.
The oven is compact in size
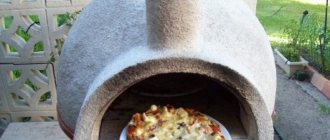
About the future design
The design of the oven for baking bread consists of the following parts:
- hearth (bottom or floor of the stove);
- vault (dome);
- entrance arch;
- chimney.
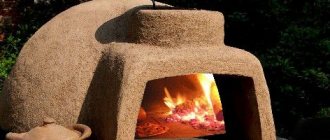
The device is installed on a special stand, which in turn rests on a foundation slab. The chimney pipe is located at the front of the structure. This position of the chimney helps to simultaneously heat the bread during baking from all sides.
This is explained by the fact that, under the influence of draft, the flames rise to the dome roof, envelop and heat the entire inner surface of the stove.
Photo of a wood-burning oven for bread
Unlike a Russian stove, this device has a less thick layer of masonry (12 cm), so it heats up faster. Bread can be baked within 45 - 60 minutes after the start of the combustion process.
General recommendations for choosing building materials
When you have experience in construction and bricklaying, you can make the structure yourself. The device has a complex design, so experiments may not bring positive results.
Users who have already made brickwork or installed a stove can use simple instructions. It is necessary to be guided by the scheme, follow the technology, and all practical recommendations. In order for the stove to serve for a long time, it is necessary to choose high-quality brick. It must be able to withstand high temperatures.
Note! It is strictly forbidden to buy white brick.
Only high quality solution should be used. To build a firebox, you need to knead using fireclay clay. It does not lose its qualities when exposed to high temperatures. You need to take smooth clay that has a medium level of fat content.
Fire brick
The strength and consistency of the solution must be checked. You need to make a small batch of clay and apply it to a vertical surface. The solution should not flow down the wall. You need to knead the mixture thoroughly so that there are no lumps in it.
The foundation deserves special attention. The stove is heavy, so the base must be powerful and strong. After laying, the concrete monolith must stand for 25 days. If you ignore this requirement, the oven may become deformed.
Important! The weak point of the Swede is considered to be the furnace door.
If you select a part from a stamped sheet, it will quickly burn out and become deformed. It is recommended to buy cast doors that are equipped with mustaches. During laying they are carefully walled up.
Options and types of doors