Any repair without the involvement of specialists is a troublesome and unpleasant task, requiring both financial expenses and time investment.
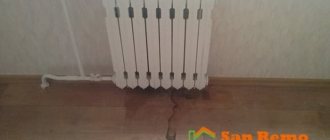
Repairing bimetallic radiators with your own hands can be done quickly and without problems if three conditions are met: adhere to the sequence of actions, have the necessary tools for this, and be able to independently determine the cause of the breakdown.
Knowing how to disassemble bimetallic radiators, the rest of the work will be easy to do. They can be soldered, cracks sealed and washed, like other sectional structures, for example, made of cast iron, steel or aluminum.
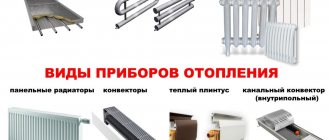
Types of heating radiators
The battery acts as a heating device and contains 2-3 sections through which water or other liquid flows.
- They are made like metal columns. Radiator parts are combined with each other using a nipple system.
- At the docking points, the batteries are sealed using rubber gaskets. In height they can range from 35 cm to 1 m.
The intensity of battery operation is entirely determined by the number of segments and how large the thermal output area is.
Heating radiators come in various types and are made from approved materials. Batteries have been produced in cast iron, aluminum, copper, brass, and there are even bimetallic options.
Selecting a heating device
The selection is made based on the following factors:
- number of floors and room location;
- the need for shut-off and control elements is determined;
- pipe material;
- temperature regime of the system;
- selection of installation scheme;
- heating system wiring;
- region of residence.
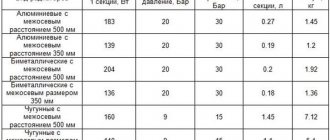
In addition, when choosing, you need to take into account the dimensions of the batteries. Having counted the number of sections, you can begin installing the heating device. The sales consultant, based on the size of the room, will suggest the required number of sections. However, you can perform such calculations yourself. If the apartment's ceiling height is no more than 3 m, then 1 section will heat 2 square meters. m. If during the calculations you get a non-integer number, round it up.
Cast iron radiator
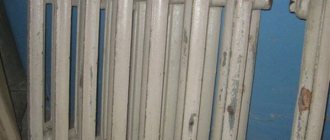
Cast iron batteries are often installed in multi-story buildings. They are powerful devices of various dimensions, they are not picky about the quality of the liquid flowing through them, and have good heat transfer.
- This material is not afraid of corrosion, which makes its service life very long.
- Possessing enormous weight, cast iron radiators have a high heat capacity.
- The same characteristics make installation and maintenance of the system difficult.
Among the disadvantages of these batteries is the rapid wear of the seals, frequent destruction of the nipples leading to radiator leaks. Sometimes a coating is created on the walls of the batteries, which largely reduces its heat transfer.
Removing radiator leaks
Most often, heating radiators can leak during the maximum peak load in winter, when they contain hot water. Water begins to leak onto the floor.
You can disconnect the battery to repair the damage in your home. In a building with many apartments, the method of repairing the gap depends on the location.
2-3 methods are practiced on how to repair heating radiators in an apartment:
- The cast iron device is leaking at the joint. To fix it, take a bandage, lubricate it with epoxy resin and wrap it tightly around the leak area. When the bandage dries, it turns out to be very durable and can be painted to match the color of the radiator.
- They stop leaks in the battery at the joints using clamps made for this situation, which can be purchased at a building materials store. This item looks like a metal ring with rubberized plates that are clamped with a pair of bolts. The clamp is applied to the leak and then the bolts are screwed in. On sale you can find products of all diameters and sizes for any device.
- If it is impossible to do the first two methods, then they resort to applying a piece of dense rubber taken from a harness or inner tube from a bicycle. However, such a clamp can only be a temporary means of restraint; later everything will need to be done thoroughly.
- A small hole in the battery can be closed using cold welding. It looks like small plates and is associated with plasticine for children. A small piece of welding is kneaded with your hands until a homogeneous substance appears. Then it is glued to the problem area on the structure. Holes on cast iron devices can be easily sealed with powder or polymer based sealants. They are designed to withstand high temperatures and will not evaporate.
All apartment owners, in order not to cause a flood to their neighbors, are advised to keep at home: a rubber band, epoxy glue, clamps of the required size, a medical bandage, cold welding to batteries, sealant. After temporary measures, a thorough adjustment will be required.
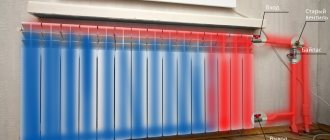
How to fix a leaking heating battery: a general guide to action
If a cast iron battery is leaking, the most likely cause of this phenomenon is wear and tear of the product. It is also necessary to take into account the materials from which the gaskets and main pipes were made, and the specifics of connecting the elements. Experts emphasize that primitively covering cracks with plaster is only a temporary measure; if you rely only on it, there is a high risk of worsening the problem.
Even if the leak is extremely small, you should not limit yourself to localizing it using a can or basin (although this should be the first step); if a significant pressure drop occurs in the network, a hole will form at the site of the crack, which is fraught with a full-fledged flood. Even small drops mean urgent elimination of the defect.
Leaks occur either due to loss of tightness of joints, or due to destruction of the material. Of particular danger are leaks that disappear from time to time - in such conditions, ordinary people hope for the material to stick, which can be a big mistake.
If the radiator is not suitable for repair, you need to drain the coolant from the system and replace the defective element. The main step here is to shut off the flow of water.
Radiators made of aluminum
Radiators made of aluminum alloy for heating have high heat transfer. They contain a small reservoir for liquid in themselves. Such batteries are convenient, because by installing them you can regulate the temperature in the room.
Symptoms of problems may include weak heating of such heating devices, airless space, various noises and any knocking. This may include the appearance of a leak on the radiator housing or the formation of plaque in the connecting nodes between parts of the whole system.
In private homes, these faults are easy to identify when the system is running at maximum. In buildings with central heating, it will not be possible to carry out repairs on your own; you will need to seek help from a specialist from the management company.
Setup process
To repair aluminum heating radiators, several methods are used:
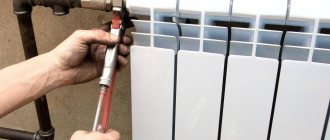
- Replace rubber seals. The first step is to remove the radiator and separate its segments. To remove leaks in this device during the heating season, you will need to replace one segment or replace the radiator. Sometimes it is not possible to do this, then they resort to cold welding;
- To seal small defects in the radiator, it is possible to resort to aluminum solder. This will only serve as a temporary measure; major repairs will be required later;
- It is possible to reliably repair a radiator using argon welding, but it requires special preparation. When repairing aluminum radiators, remember that the material is soft and should be handled carefully. If you use them correctly, you won’t have to repair them;
- Aluminum cannot be soldered, then how can you seal the battery? A flux made from rosin with iron is best suited for this purpose. It will be placed on the cleaned surface of the radiator, and then the solder is placed directly under the flux. This quick repair is suitable for minor leaks.
Dismantling of bimetallic and aluminum sectional products
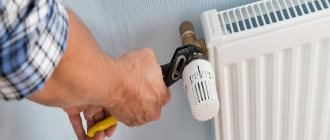
To disconnect the radiator from the system and remove it from its mounting location, you must do the following:
- Stop water circulation and relieve pressure.
- If the heating battery is hot, you need to wait until it cools down and then disconnect it from the system. To do this, you need to unscrew the connecting couplings at the inlet and outlet.
- Move the coupling away from the radiator along the pipe and remove the device from the brackets.
- Drain the remaining water and place the product in the disassembly area, face up.
- Pull out and rinse the filter immediately to prevent dirt from drying on it.
Dismantling of bimetallic and aluminum sectional products
At the next stage, the radiator is disassembled into separate sections. To avoid damage during operation, you need to figure out which way to turn the nipple nut. This element is a ring-shaped nut with an external thread and grooves inside on both sides. In this case, one nut has both right and left threads. If you unscrew it, the adjacent sections of the battery will evenly move apart, and when twisted, they will tighten.
Manufacturers usually make marks on the face of plugs and sleeves that indicate thread directions. O denotes right-hand thread, “S” denotes left-hand thread. To accurately determine the direction of movement, it is recommended to take a loose nipple nut and try to attach it to the threads in the radiator. Having decided which way it twists, it will become clear where to turn the key to separate the sections.
Important! If you turn the nipple nut in the wrong direction, you can easily break the threads on it and on the heating battery
Having decided on the direction of the thread, insert the nipple wrench into the radiator and slide it towards the desired nut. The notches on the tool will help you do this. When it is in the grooves, insert the lever into the hole on the other side. It will take force to move the nut out of place. Call an assistant to fix the radiator in one place.
Repair of bimetallic radiators
When the nut has moved half a turn, go to the other side to unscrew the second one and do the same. After making sure that both nuts rotate without applying much physical force, gradually unscrew one side or the other, moving 5-7 mm.
Gasket between radiator sections
After disconnection, take away the metal spacers that were between the sections. If they are in good condition, then they can be installed back during reassembly; if in bad condition, then use them as a sample for purchasing new ones. Silicone gaskets must be changed.
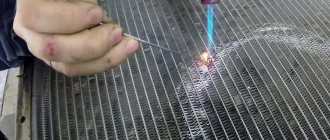
detailed instructions
- First, the plane of the radiator is prepared and iron flux with rosin is applied to its body.
- Using a heated soldering iron, rub the damaged area.
- When the rosin spreads over the damaged plane, solder made of lead and tin with iron impurities should be added.
- Old paint is removed using a special remover and sanded.
- The battery is painted with paint or heat-resistant paint.
When the battery is made up of segments, then you should first paint the spaces between the sections. The device remains cold during processing.
Thorough radiator repair
Overhaul of heating radiators involves their repair by specialists or complete replacement with new products. Often, overhauling batteries involves replacing them with new products.
When such a need arises, then you can contact the housing office or another organization responsible for maintaining the house, as well as an outside company.
- The first option will allow you to conclude an agreement and provide a guarantee that the repairs will be carried out efficiently.
- The second option is not always acceptable because a negligent performer will take a lot of money, do it poorly and disappear in an unknown direction.
Therefore, it is worth looking at people’s reviews, how long the company has been providing services, and customer advice.
What is the cost to repair a heating radiator? The cost for this type of work ranges from 1,500 rubles to 2,300 rubles.
Why is this necessary?
Dismantling is necessary in the following cases:
In case of intersectional leaks of a cast iron battery at a short distance from the connections. If there are many sections, the length of the radiator wrench is often not enough to reach the required pair of nipples on the side of the blind plugs. The only solution is to disassemble the radiator from the supply side;
Leaking between sections is a typical disease of cast iron batteries.
- In case of fistulas on the connections to the radiator. To replace the hose (on threads or welding), you need to completely remove the heating device;
- When replacing radiators with new ones (with higher thermal power or more aesthetically attractive);
- When restoring radiators by annealing them;
Cast iron sections clogged with petrified silt can be brought into working condition by heating them (for example, in a fire) and tapping them with a wooden or rubber mallet. The burnt dirt is poured out through the collectors. Of course, after annealing, the intersection gaskets must be replaced.
When renovating a room. Plastering a wall or wallpapering behind a radiator, you will agree, is quite problematic.
To wallpaper a window sill niche, it is better to remove the battery.