Where there is access to solid fuel, the good old Russian stove will always be relevant. It will warm the house, you can cook food on it, and such a unit does not depend on the presence of a centralized gas pipeline or electrical network. However, among a number of advantages, there is also a disadvantage - the complexity of constructing the structure.
Do you want to make a stove, but don’t know how to properly fold the stove and arrange the chimney? We will help you realize your plans. The article describes in detail all the stages of constructing a wood-burning stove, provides practical recommendations for choosing materials and outlines the technological nuances of masonry work.
Elaborate 19th century church
Heating stove, the diagram of which is shown in the figure
| Rice. 17. Diagram of one of the most technically sophisticated furnaces of the 19th century | |
| A. General draft valve B. First lifting well C. Parallel wells D. Cleaning door E. Direct draft suction E. Furnace door G. Grates K. Blower door L. Under fireboxes M. Afterburner chamber |
>This stove can be easily converted into a cooking and heating stove if the firebox is moved to the side of the stove, appropriately equipped with a stove, and the bottom of the smoke channels is lowered to the floor level.
A feature of this stove, apparently developed by V. A. Stroganov, is the presence of:
a) afterburning chambers; b) technically competent distribution of the direction and location of the channels, allowing for uniform heating of the entire area of the furnace smoke wells; c) calibrated direct draft suction hole; d) just one cleaning door, allowing you to easily and easily clean all wells; if necessary, through it you can get rid of the overturning of the draft in the furnace; e) grates and furnace hearth, which are arranged at thoughtful slopes, facilitating more efficient combustion of residual fuel than in stoves that have a strictly horizontal arrangement of the grate and furnace hearth. With this arrangement of chimneys, the stove will heat up evenly over its entire heat-releasing area. The draft in such furnaces is always good.
4. A heating stove with horizontal smoke wells (Fig. 18) is good because it does not require strict and clear fixed markings at the chimney outlet. In pre-revolutionary times, such markings could only be made by a senior furnace master. Marking the foundation and laying the first row was never trusted to apprentices. And not at all because it was a “matter of honor.” The reason for such strict subordination was not formality, but the possibility of making a fatal mistake.
Do-it-yourself Swedish stove with three firing modes
Swedish stoves differ from other heating and cooking stoves by the presence of a heating panel in the rear part.
This brick panel has a system of gas ducts: vertical or horizontal. The smoke passing through them heats up the structure, and from it the rooms are already heated. The system turns out to be efficient and economical: the heat that went into the chimney in a traditional Russian stove is used to heat the premises. But both shield construction systems (vertical and horizontal) have disadvantages. With a horizontal arrangement of gas ducts, the entire shield is heated evenly. But such a system requires a large number of cleaning holes and, accordingly, doors on them. Considering that furnace casting is not cheap today, these doors significantly affect the final cost.
Heating panel of a Swedish stove with horizontal and vertical flue channels
If the gas ducts in the swedish are arranged vertically, there can be only one cleaning hatch. But there is another problem: while the stove is heating, in the first channel, on the side where the hot gases from the furnace enter, the shield will be noticeably hotter than in the third - at the exit. Since the shield is usually located in two rooms, one of them will be much warmer than the other.
There is also a third type of shield device: bell-type. It combines the advantages of both systems: one cleaning window is required, the entire surface is heated evenly, and less bricks are required for construction. Moreover, with this design, the oven cools down more slowly: the warmest air stays in the tops of the hoods for a long time, and the “draft” from the doors passes only through the center.
When using the bell-type principle of constructing the shield, heat is retained longer
From all that has been said above, it follows that the most economical and effective are Swedes with shields built on the bell-type principle. They are also easier to manage: it is possible to organize “summer” and “winter” operating modes, in which only a small part of the panel is switched on (in summer) or the entire heating power is turned on: in winter. There is even a version of a Swedish stove with three combustion modes: an “autumn” mode is added, in which a little more than half of the chimney channels are involved in the smoke circulation.
Clay, sand, water and additives
In the first part of the book, I already briefly talked about a number of parameters by which you need to choose clay, sand and brick. Here I will only supplement this information with the information necessary for every stove maker.
Before packing fresh clay for transportation to the work site, you should first evaluate its quality
It is important to know that clay that is too oily and clay with even the slightest presence of stones will increase the labor intensity of preparing the stove mortar (if mixed by hand). Clay that is too thin will seriously weaken the strength of the oven seam
And clay that lies unevenly in the soil or contains admixtures of earth and foreign fractions will create inevitable problems when preparing high-quality stove mortar.
Excessively oily clay
It feels like very sticky plasticine to the touch. It is impossible to tear freshly cut plastic of such clay from a shovel either with your hands or your feet. It can only be cleaned using an additional small spatula or trowel. Such clay will give a clay to sand ratio of 1:4.5 to 1:6. The kiln mortar will be very strong after the hardening period, but in the absence of an electric clay mixer, the process of preparing a high-quality kiln mortar (manual mixing) will be extremely labor-intensive.
Excessively lean clay taken out of the ground
its properties are more reminiscent of sticky dusty sand. The stickiness of this material is very weak. However, if there is no choice, what to do? There is no need to add sand to this clay. The above two types of clay are found very rarely in central Russia.
Medium fat clay
gives (in the vast majority of cases) a clay to sand ratio of 1:1.5 and 1:2 (and very rarely 1:2.5 and 1:3).
The rules for using sand and water are described in detail in Chapter 1.
Additives
. Abroad, some stove makers traditionally add 10–15% cement to the stove mortar. Table salt is also recommended (100–200 g per 10 liters of water). However, according to my many years of observations of the processes occurring in the stove masonry, a properly tested clay-sand stove mortar does not require any special additives. It will be strong enough anyway. And if the furnace firebox and the areas adjacent to it are torn at the seams due to severe temperature changes, then what is needed is not some special additive, but a special order for laying bricks in the firebox (lining). The centuries-tested lining and proper selection of the cross-section of the smoke channels (see Chapters 15 and 28) will protect the firebox from serious ruptures in the stove seams more reliably than the use of any special additives, and even more so the wire lining of the firebox.
I also heard about some particularly complex and even “secret” additives in the most intricate compositions and proportions: ash, cement, chicken eggs, etc. But I did not consider it necessary to show interest in them.
Experience shows that the best “additive” for kiln mortars is the ability to correctly select the ratios of clay, sand and water, as well as the reasonable use of fireclay mixture and fireclay bricks in cases where technical standards and common sense require it.
Dimensions for firewood
Given the high flame trunk, experts recommend making a firebox for wood with a height of 80 cm to 1 m. If these parameters are not observed, the combustion of volatile substances will not occur, as a result of which these particles will settle in the chimney system.
Over time, a significant layer of soot will accumulate, which will lead to a decrease in the efficiency of the entire furnace. In order for the coals to roll, it is necessary to slightly bevel the corner parts of the firebox, which are in direct contact with the grate.
Laying and lining of the firebox and furnace wells
The laying and lining of the furnace should be carried out only according to accurate, pre-made calculations. Fireboxes up to 42 cm wide should be covered with a simplified triangular vault, placing the brick flat, followed by continuation of the masonry walls, which will firmly press the heels to the underlying rows of masonry. If such a vault is erected without continuing the masonry, this may cause the heels to shift due to the thrust of the vault, and then lead to its collapse.
To avoid this, the heels laid under the arch for laying the firebox must be tightened using pieces of square, rectangular, corner or T-steel connected with a wire harness. A wire bundle consists of several wires twisted together using a nail.
The harness should be located inside the masonry, in the seam. If the harness is open, it will quickly burn out. Instead of wire, you can use strip steel, firmly fixing it to the bars. In some designs, the ends of the bars may extend outward. In this case, they should be tied together with strands or round steel rods with threads and nuts at the ends, for which holes should be drilled in the ends of the bars.
Fireboxes with spans up to 38 cm can be covered by releasing bricks from the side walls of the masonry. To firmly fix the overhanging supporting bricks, the side walls of the masonry must be located at least four rows of masonry above the row to be overlapped. The more rows are laid out, the better the laying of the furnace fireboxes, this way you can avoid the ceiling tipping over inside the furnace.
In the process of laying furnace wells, it is recommended to block the combustion openings with various jumpers. It is forbidden to rest bricks on the door frame. If the width of the combustion hole is less than 250 mm, it is blocked into a lock by cutting off the brick. If the opening width is more than a brick, it is necessary to make a brick lintel.
Self-laying a brick chimney: what you need to know
In the last decade, there has been a sharp increase in the construction of dachas and country houses, for which fireplaces and stoves are used for heating. But such devices cannot work without a chimney. Previously, stoves and, accordingly, chimneys were laid by experienced stove makers, whose knowledge was passed on from generation to generation. Today, the experience of the old masters is almost completely forgotten, but thanks to the use of the latest materials and developments, the construction of a chimney does not pose any special problems, especially since a high-quality sandwich pipe can be purchased in a store. Nevertheless, many continue to build brick chimneys for fireplaces, considering them the most authentic and durable. How to build a correct and high-quality chimney for your heating equipment will be discussed in this publication.
Learning the Basics
Before you start laying a brick chimney, you should study SNiP 41-01-2003, which regulates the creation of heating systems in private houses. You should especially carefully read section 6.6 of this set of rules, which indicates all the parameters of chimneys.
Further, to build the correct chimney, you should know what this structure is, what types exist and what elements they consist of.
There are three main types of chimneys:
- Indigenous. Pipes of this type are laid on their own foundation. This is an independent structure combined with a fireplace or stove.
- Mounted. Such chimneys are mounted on the ceiling of the furnace and are its integral part.
- Wall. This type of pipe is made in the walls.
Let's look at the elements of the most common mounted chimney. It consists of:
- A mounted pipe, which is located on the ceiling of the furnace. The laying of this section of the chimney is done by tying each brick in a row with bricks of the next row. The laying of this section is done almost up to the ceiling, 5 rows short of it.
- Next comes the expansion of the masonry, without increasing the internal dimensions of the channel. This area is called "fluff". The fluff (cut) is placed with expansion from row to row until it passes through the ceiling.
- A straight chimney – a “riser” – is placed on the fluff (already in the attic). This part of the chimney reaches the roof.
- To pass through the roof, an extension of the “riser” masonry is made, which is called an “otter”. It prevents moisture from entering the attic through the roof.
- A straight section of the chimney is laid, which is called the “neck” of the chimney.
- It, again, ends with expansion. An umbrella or deflector is mounted on the head to prevent debris, precipitation, etc. from entering the channel.
The figure below shows a standard type of chimney indicating all its elements.
Smoke circulation (chimneys)
Chimneys are the channels inside the stove mass that connect the firebox to the chimney. They serve to absorb heat from combustion products. This heat is subsequently transferred to the entire furnace array, which releases it to the air in the room. Chimneys have a long, winding path with one or more turns, which is why they are often called chimneys. In order for chimneys to better suit their purpose, it is necessary to comply with the following conditions when installing them: a) smoke circulation must be of sufficient size to allow the free passage of the entire volume of flue gases. Excessive cross-sectional dimensions of chimneys are impractical, since they increase the external volume of the furnace and reduce the rate of passage of gases. Reducing the speed worsens the perception of heat by the walls.
In addition, with a large cross-section of smoke circulation, the movement of gases through them may occur unevenly. It should be borne in mind that hotter gases always tend to rise upward, like lighter ones. If the channel is too large, heated gases will flow in its upper part, and stagnation of cold air will be observed in the lower part. When gases move, we observe a phenomenon that is directly opposite to the nature of the movement of water. Water, due to its volumetric weight, always occupies the lower part of the channel when moving, as shown in Fig. 60.
Brick, mortar and necessary tools
To build a brick smoke exhaust system, you will need the required amount of bricks and a specially prepared mortar. The brick must be red, solid and fired, with a smooth surface and right angles. The use of bricks with cracks is not allowed.
Using high-quality brick with smooth edges will allow you to build a chimney with uniform and thin seams.
Mortars for laying chimneys can be simple, complex or mixed. The simple type of mortar contains a binder and an aggregate. Mixed and complex solutions contain several types of binders and fillers. The following are usually used as binding components of the solution:
- Clay.
- Lime mixture.
- Gypsum mixture.
- Cement.
Clean sifted sand is most often used as aggregates. The solution, where clay is used as the main binding component, is used for laying stoves and fireplaces and sections of chimneys up to the roof. The simplest and “time-tested” clay mortar for laying chimneys consists of sand and clay in a ratio of 1:1 or 2:1. The mass fraction of sand in the solution depends on the fat content of the clay. The volume of water should be equal to a quarter of the volume of clay used.
Determining the “fat content” of clay is quite simple: you should form a ball of clay with a diameter of about 50 cm. After complete drying (about 3 days), look at the product. If there are cracks, then the clay is oily. If when a ball falls from a meter height it does not break, then such clay can be used to prepare a solution.
The quality of the prepared clay mixture can be determined as follows: lower a trowel soaked in water into the solution (without filler). If clay sticks to it, then the composition is “greasy” and sand should be added. If the mixture pushes out water, then it is “skinny” and you need to add clay.
It is better to start making the mortar for laying the chimney in a shallow and wide container. First, soak the required amount of clay. After some time, the clay must be shoveled, breaking up the lumps. If necessary, add a little water again. When the clay is wet, you should transfer the layer to the flooring and moisten it with water. Using the blade of a shovel, cut into plates and shovel again. This procedure should be repeated 3-5 times until all lumps are completely broken and the solution turns into a plastic and homogeneous mass. If necessary, sand should be added to the solution.
Now a few lines about the instrument. To build a brick chimney you must have the following tools:
To cut the material, it is best to use a grinder with a set of cutting discs.
Materials for the Swedish stove
When creating this design, two types of bricks are used: red and fireclay (fireproof) - sometimes raw brick is used instead. Before laying, the material is soaked in water for 24 hours. The foundation of the unit is laid on cement mortar, and the structure itself is laid on clay. The durability of the “Swedish” depends on the quality of the clay solution - the higher it is, the longer the stove will last.
Whatever the arrangement of the Swedish stove, the design necessarily contains metal parts - dampers, doors, latches. Most often they are made using the cast iron method. For floors, metal corners, reinforcing mesh, tires and sheets of metal are used. Various finishing materials are often used, but the “Swedish” is usually simply painted with lime. But there are also structures decorated with decorative stone, tiles and other things.
To set up the oven you will need:
- solution container;
- metal sieve with cells of 1-2 millimeters;
- hammer;
- bayonet shovel;
- Master OK;
- plumb line;
- level.
How does the power of a stove depend on the size of the firebox?
The power of the heating device depends on many factors. Let's look at some of them:
- Constructive. The heating device must be folded so that all its component elements are in the correct relationship to each other. Consequently, only the correct design provides the required furnace power depending on the size of the firebox, the height of the pipe and the cross-section of the chimney.
- Operational. The more moisture the fuel holds, the more heat and energy must be expended to evaporate it. The same applies to fuel temperature. Only coals brought from the street will take part of the heat for heating. The combustion temperature is reduced by a large amount of air, causing incomplete combustion of the fuel. Lack of air leads to underburning of the fuel, which reduces the combustion temperature and leads to soot deposition.
The power of the heating device depends on the parameters.
The larger the firebox capacity, the more powerful it is. For 1 kg of dry fuel it is usually considered 4 kW. If the heating device places 3 kg of fuel, then it will produce 12 kW of heat.
Typically, per 10 m2 of heated room area, 1 kW of heating device power is taken.
When laying stoves, only heat-resistant materials are used that do not deform from high temperatures. It is also necessary to take into account that materials have different expansion properties. Clay and bricks are the basis of any good stove. The type of brick should be the first, and all auxiliary materials should be heat-insulating.
Oven with hob
In the simplest version, this design has small dimensions (width 2 and depth 3 bricks - 78x53 cm). However, even in such a limited area it is possible to place a single-burner stove.
Work goes smoothly when you have everything you need at hand.
Therefore, purchase the following materials and accessories in advance:
- Solid red brick – 107 pcs;
- Blower door – 1 piece;
- Grate – 1 piece;
- Single-burner cast iron stove – 1 piece;
- Fire door – 1 piece;
- Pipe valve – 1 pc.
Fire bricks are not needed for a wood burning stove. Buying it is a waste of money. But red should be chosen carefully, discarding cracked and uneven ones.
Preparation of the solution
The masonry mixture is made by mixing four parts clay with one part water and adding eight parts sifted sand. The normal consistency is determined simply: the solution easily slides off the trowel, leaving no drips on it. When laying, it should not leak out of the seams.
The volume of the mortar is determined based on the amount of brick. With an optimal seam thickness (3-5 mm), one bucket is enough for 50 pieces.
Having prepared the masonry mixture, you can begin laying the foundation. Its width is made 10 cm larger than the width of the oven. The height of the foundation is selected so that the bottom of the first row of bricks is at floor level.
If the underground is deep enough (50-60 cm), then there is no need to dig a hole for the foundation. It is enough to make formwork on the ground with a plan size of 76 x (51 + 10 cm). Two layers of roofing felt are placed on its bottom to protect it from moisture. Having laid the concrete, it is given a week to gain strength, after which they begin laying.
The dimensions of the stove with hob we are considering are 3 x 1.5 bricks (76x39 cm).
Expert advice: lay out each new tier of brick without mortar (dry). After adjusting the bricks to size, you can begin laying.
The first row is placed on a layer of clay mortar (4-5 mm). Having leveled the base, lay out the second one, leaving space for the blower door.
Before installing the door, you need to screw a soft wire to it and put its ends into the seams for better fixation.
To compensate for the thermal expansion of the metal, a gap is left between the door and the brick. Before installation, its frame is wrapped with wet asbestos cord.
The third row is laid by overlapping the seams of the second. At this level, a grate is installed in the firebox.
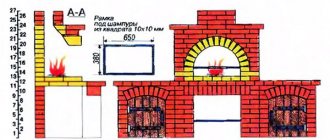
The fourth row is placed on the edge, observing the ligation of the seams, and the walls of the combustion chamber are formed. Behind it will be the first and only smoke circulation (see section A-A in diagram No. 2). To clean its bottom, a so-called knockout brick is placed in the rear wall without mortar, which is periodically removed to remove ash. Inside the chimney, two stands are made from pieces of brick to support the internal partition.
The stones of the fifth row are placed flat, leaving space for the firebox door. In the back of the stove, in order, we see the walls of two smoke channels. During work, their surface must be thoroughly cleaned with a wet cloth to remove any clay protruding from the seams. This is an important condition for ensuring good traction.
Helpful advice! When focusing on the order drawings, do not forget to look at the two sections of the stove. They will help you better imagine its design and not make mistakes when laying out the bricks.
Having raised the masonry up to the eighth row, they close the furnace door, placing wire in the seams to secure its frame. At the same level, in the back of the fuel chamber, a brick with a beveled end is placed - a smoke tooth. It improves heat output by preventing flue gases from quickly escaping into the chimney.
Having completed the ninth row, an asbestos cord is laid along it on a clay mortar. It is necessary for sealing the joints of a cast iron slab and brick. On the tenth row, the firebox is covered with a hob.
On the eleventh, a smoke valve is installed in the pipe. It is also compacted along the contour with an asbestos cord soaked in clay.
Rows 12 and 13 - formation of the pipe walls. After they are completed, a lightweight sheet metal pipe is placed on the stove, leading to the roof.
Furnace appliances
Furnace appliances - doors, water tanks, grates, dampers, views and valves - are made mainly of heat-resistant cast iron. Cast iron appliances are stronger, more durable, do not burn out or rust. The same stove appliances come in different shapes and sizes, so their exact copy is not given here - the pictures simply show which stove appliance is installed in a certain place in the stove.
When purchasing a valve, pay attention to the engine. If the engine moves very freely along the frame (there is a high gap in it), then with strong traction it will begin to rattle. If there is a special hole on the “underside” of the valve, then this valve is good, and the hole, which should be at the bottom when installed, serves to allow soot to spill out, which accumulates behind the engine in the frame.
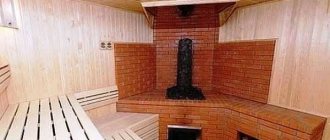
What should be the size of a brick stove for a bath?
Brick structures are more diverse in terms of volume and design. What needs to be remembered when laying such a stove is the standard size of the red brick, which has dimensions (250 x 120 x 65 mm). The base is usually laid out in 3.5 by 4 bricks (89 x 102 cm) or 4 x 5 bricks (102 x 129 cm). The height excluding the pipe is 168 or 210 cm.
Most often, the water tank is installed directly into the stove.
The simplest kitchen stove made of bricks
| Rice. 24. The simplest kitchen oven. |
| A. Valve B. Spark arresting tooth C. Stove D. Firebox D. Stove E. Side section G. Front section |
Characteristics:
a) very low height of the firebox - only 21 cm (if someone doesn’t like this size, the height of the firebox can be raised, but in this case you will need two to three times more firewood for cooking).
For firewood in a stove with a similar firebox height, it is best to use an old picket fence and unnecessary leftover lumber. Two or three old pickets will be enough to prepare a full dinner in the summer for a family of six people. However, in our time, when most rural residents use gas or electricity for cooking, a stove of such height is unlikely to find its mass user;
b) the presence of a spark-extinguishing tooth and the absence of everything unnecessary.
Practical advice on how to select the size of a sauna stove
There are several key factors to take into account.
- The most important thing is that the dimensions of the heating unit correspond to the size of the room. For a small steam room, you should give preference to a compact model, this will protect you from contact with a hot surface and protect you from burns.
- The design must be thought out in advance to make it easier to work with heating elements and to be able to regulate the temperature.
- The power should be sufficient to heat the room well and generate steam.
- To exclude the possibility of spontaneous combustion, it is imperative to comply with all fire safety rules regulated by SNiP 41-01-01.
The dimensions of the sauna stove are an important aspect that you should pay attention to. Take a responsible approach to the manufacture of this element, and your bathhouse will become a place of better relaxation.
Subscribe to our Social networks
