Infrared heated floors laid under linoleum or other floor coverings are a common way to heat rooms for various purposes for those who follow the trend in the heating system.
This synthetic film material has long been used as flooring. Most often they cover the floors in kitchens and hallways. The main advantages are low cost and ease of work. Laying it on the floor does not require much experience. An additional advantage is that such a floor is easy to clean and does not allow water to pass through.
Previously, laminate or tiles were used as a finishing coating for heated floors. But the development of technology has made it possible to produce linoleum that copes with the task perfectly. It is important to know that not every linoleum is suitable for these purposes, and you will learn which one you need to choose from this article - there are special types of linoleum suitable specifically for heated floors.
It is also necessary to take into account which particular underfloor heating system interacts with linoleum. This has its own characteristics, if carefully observed, both the warm floor and linoleum will last a long time and without complaints.
Installation stages and technology
Let's look at how to properly install film heated floors under linoleum. All work can be divided into three main stages.
Preparatory activities
First, a floor plan is drawn up, which includes the placement of furniture. In such places the film should not be laid. After this we plan to lay the film strips. The number of connections and the speed of installation will depend on the number of cuts made. For this reason, it is recommended to install along the long wall of the room. On the diagram we additionally note in which places the temperature sensor and thermostat will be located.
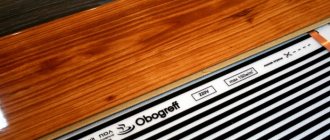
The heating system delivery set includes an infrared film and connection elements (two pieces), a sensor and a relay, and adhesive tape with a bitumen base for insulation. In addition, it is necessary to purchase additional thermal insulation material, cable, waterproofing film, and contactors.
The most complex tool that we will need for installation is a contact crimping device. If you have sufficient skills, this operation can be performed with simple pliers. In addition, you should prepare a set of screwdrivers and wire cutters, a mounting knife, a hammer, and scissors. As you can see, you can lay IR film material under linoleum using ordinary construction tools.
System installation algorithm
How is film heated flooring under linoleum installed? To begin with, the base is prepared. It should be clean and smooth. You may have to arrange a thin screed.
A layer of heat-insulating material is laid on the prepared surface. The rolled strips are butted and connected with tape. The main condition is the evenness of the installation.
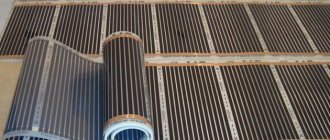
Cutting IR film into strips of the required sizes is a responsible matter. For this purpose, there are special marks on the surface of the material in the form of dotted lines, along which it is recommended to cut. The minimum size of one strip can be no narrower than 20 cm, and the longest can be up to 8 m.
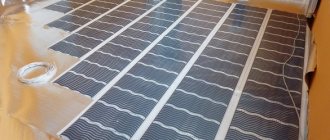
The prepared film strips are laid out according to the drawn up plan on top of the heat-insulating layer. It is necessary to ensure that the copper strips are placed upward with the side indicated by the manufacturer in the instructions. The film must fit tightly to the base; the presence of air cushions is considered unacceptable.
Let's move on to establishing contacts. The connecting clamps are installed on copper strips and crimped. In this case, one part of them should remain between the film layers, fixed on the copper bus, and the second - outside.
All connection points are hidden with insulating material; in addition, all contacts of the strips that are not connected to the wiring are insulated. The position of the entire film is fixed with tape to the floor surface so that shifts do not form during the installation of linoleum.
All that remains is to install the thermostat. As a rule, an easily accessible place on the wall is chosen for it; I connect it according to the instructions. The temperature sensor is placed on the film and connected with thermoregulatory wiring.
At this point, the installation of infrared film heated floors under linoleum can be considered completed. Before installing the flooring, all that remains is to do a test run to make sure the heating system is working.
Laying decorative flooring
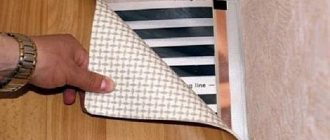
Before laying linoleum, the base must be prepared. For this purpose, polyethylene is laid on top of the infrared film material, which will perform waterproofing functions. Individual strips are laid with an overlap of ten to twenty centimeters, secured with tape
Remember that you should walk on the film carefully so as not to damage the graphite heaters
Polyethylene must be laid on the heated film floor
The next step is to create a flat surface made of fiberboard. This material will create reliable protection for the heated floor and will be an excellent basis for laying linoleum.
Since such coverings are supplied in rolls, they are first laid out for several days in a large room. But in our case there is an advantage - linoleum can be spread over fiberboard and the heated floor system can be turned on so that the material heats up. The radiated heat will cause leveling to occur much faster. In this case, the thermostat should be set to warm up to 28 degrees, since this is the temperature that is considered optimal for linoleum.
As soon as the coating acquires the desired evenness, it can be secured to the base. To perform this operation, use double-sided tape or glue. The second mounting option is used if dismantling the heating system and moving it to another location is not planned.
Flooring installation
At this point, the installation of the underfloor heating system itself can be considered complete, and the installation of the floor covering begins. It is recommended to use fiberboard as a base for linoleum. Linoleum is laid and secured on top in accordance with technology.
After this, it is recommended to set the thermostat to approximately 28 degrees and turn on the power to check the system again.
In combination with a heated floor system, it is recommended to use high-quality linoleum that is not too thick to ensure sufficiently high heating efficiency. Before laying, the material should be laid out on a flat surface and left for a day or even longer to level it.
After the film is laid and covered with a fiberboard base, linoleum is laid on it, but it is not secured first. The heated floor is turned on so that the floor covering warms up and becomes as even as possible.
This will have a positive effect on the quality of the floor covering and on the uniformity of heating.
Linoleum in combination with a warm infrared floor system is recommended to be fixed with a special mastic, and not with double-sided tape
It is not recommended to use double-sided tape to secure linoleum with a heated floor system. Adhesive mastic allows for the most reliable and uniform adhesion of the coating to the base, which means more uniform heating.
For installation on a heated floor system, it is recommended to choose linoleum with the highest thermal conductivity. Since the heating process can lead to deformation and changes in the surface of the coating, preference should be given to a material that is resistant to thermal effects.
Most often, multilayer polyvinyl chloride linoleum, which has the above characteristics, is chosen for underfloor heating systems. The color palette of this flooring is very wide; there is almost always a suitable option.
But it should be remembered that excessive heating of any linoleum during its operation is unacceptable.
How to lay heated floors on plywood
Plywood is the most versatile material. It is used in construction everywhere, from the construction of formwork when laying foundations and ending with the production of cabinet furniture for the home.
First of all, plywood is a sheet material made from natural wood, which is obtained by cross-joining sheets of wood veneer. There are three or more such sheets. Various types of wood are used: pine, beech, oak, linden and others. Moreover, it is customary to say that plywood is made from the wood veneer from which its front surfaces are made.
Plywood floor installation
Plywood floor in the interior
Raw plywood floor
This material is used in the construction of an intermediate base for heated floors. If the main floor is made of block parquet or parquet boards, which need to be secured with glue and screws, then plywood flooring is simply necessary. Experienced craftsmen recommend installing an intermediate plywood floor also for subsequent covering with laminate or linoleum. In this case, plywood will perform the important function of moisture and sound insulation.
Advantages of plywood flooring material:
- material strength,
- environmental cleanliness,
- high thermal and sound insulation properties,
- resistance to excess moisture,
- ease of installation and low labor intensity,
- low cost of materials and construction work.
Types of plywood for flooring
For apartment renovations, plywood of various grades and varieties is used. It is classified according to the degree of moisture resistance and divided into grades, from the first grade to the fifth. First grade plywood is made from birch, beech and oak; only wood without knots is taken. This first-class plywood is used to make furniture. Plywood of grades 2 and 3 is precisely used as a secondary material for heated floor coverings, such as parquet, parquet boards, laminate and linoleum.
Installation of heated floors on plywood
Unlike conventional technology for laying heated floors, installation on a plywood base is carried out without fixation. With this technology, floor sheets are connected using metal fastening brackets, and not with dowel screws. This technique allows the wood veneer to expand as air humidity increases and prevents the formation of cracks and blisters. For more details on how to lay plywood, see the photo.
Several methods of installing the intermediate plywood covering are used:
- laying on a concrete screed: 12 mm thick sheets are used,
- for wooden logs: in the presence of various communications or other interference, thicker sheets are used, 20 mm or two sheets with a total thickness of about 20 mm,
- on wooden floors: you can use plywood of any thickness.
What you need to pay attention to when choosing glue
The adhesives used are of three types: water-based, alcohol-based and two-component adhesive. Each of them has its own advantages and disadvantages. Water-based glue is odorless, but contains water; alcohol-based glue has a strong odor and is also a fire hazard. Two-component glue dries quickly and requires skill to work with it. When working with plywood flooring, choose alcohol-based and two-component adhesives.
When laying plywood, the sheets must be cut each into four parts and laid in a checkerboard pattern. This approach allows you to avoid unnecessary stress in a single sheet; the more thermal seams, the more resistant to deformation the coating is. The gap between the sheets is 5 mm, along the walls and heating devices - 1 cm.
Laying an intermediate floor under linoleum and laminate
When choosing a material, you must be guided by the following recommendations. The plywood sheet should be thicker than the face covering and sanded on one side. The plywood is laid with the treated smooth side up, and linoleum or laminate is laid on it.
For residential premises, it is better to choose an environmentally friendly brand of material with an average degree of moisture resistance - FC.
Warm floor under tiles
Tiled floors can be cold. To cope with this drawback, it is recommended to lay an intermediate plywood floor under the tiles. Before laying tiles, the surface must be cleaned and sanded.
Is it possible to lay a film floor under linoleum?
Yes you can, but be careful. Here are three common problems that can arise if you choose the wrong flooring:
- The material will shrink (simply shrink).
- The radiation power will not be enough to heat the finish coating, or more electricity will be required.
- People will smell foul and inhale pungent toxins.
Let's look at the causes of these problems.
Shrinkage
Multiple heating and cooling phases negatively affect cheap, low-quality varieties of linoleum. The material shrinks, loses its visual appeal and has to be thrown away. To prevent this from happening, you need to follow three simple rules:
- When purchasing, look for a pictogram or inscription on the label indicating that the product is compatible with a heated floor system (do not be guided by the statement that “Semi-commercial type is suitable”; purchase the product only if compatibility is indicated on it).
- During use, do not turn on the heating above 26 - 30 °C (which indicator should be indicated on the material).
- Don't go for cheap. A counterfeit product may be cheap, but reworking the repair will cost more.
The laying technology includes a layer of plywood laid between the film and linoleum. This layer may be a hassle, but it is necessary if you want to be sure that the finish will not be damaged.
Lack of heat
As already mentioned, when using linoleum there are temperature restrictions.
This means that if there is not enough heat, you cannot simply turn the thermostat knob and warm up.
This means that the linoleum must be thin enough to allow that little heat from under the floor to pass through.
Do not use material with a thick backing for the underfloor heating system. Its thermal insulation properties, in this case, will only be harmful.
Acrid fumes
Natural linoleum made from wood and cork flour does not contain any chemicals.
But if we start from economic considerations, the material costs 7,000 rubles. per m2, we will not consider.
Among other varieties of linoleum, the most “smelly” are colloxin and relin (or rubber).
The most popular PVC is less susceptible to evaporation.
Especially if the temperature regime is observed.
Smell the roll when purchasing. If a pungent smell hits your nose, it won’t go anywhere, even at home. This is low quality material, don't buy it!
Choice of linoleum
To install heated floors, special series of linoleum are produced, designed specifically for these purposes. They are indicated by a special pictogram.
IMPORTANT: all floor coverings for heated floors have their own designation. In this material, the production technology reduces sensitivity to heat, which significantly reduces the degree of temperature deformation
Additionally, heat-resistant pigments are used to apply the pattern and highly volatile fractions are excluded from the binding components. They provide a specific smell in the first months of operation of the floor covering with heated floors.
In this material, the production technology reduces sensitivity to heat, which significantly reduces the degree of temperature deformation. Additionally, heat-resistant pigments are used to apply the pattern and highly volatile fractions are excluded from the binding components. They provide a specific smell during the first months of operation of the floor covering with heated floors.
If there is no such pictogram, then you can only choose from natural linoleum or PVC-based material.
The technology for their production already provides for the use of materials that ensure normal operation at elevated temperatures.
Safety precautions
When installing heated floors under linoleum on a wooden floor, you must follow the safety rules:
- The thermostat can only be connected after a power outage.
- You should check the presence of insulation on all contacts and only then test the system.
- If there is no thermostat, it is prohibited to connect the heating.
- The heating temperature should not exceed 30°C. Otherwise, harmful substances will begin to be released, and the coating may completely deteriorate.
- Damage to the heating film must not be allowed, so if linoleum is used, then hard material (plywood) should be laid under it as a protective layer.
Based on the above material, we can conclude that it is not difficult to install and connect a heated floor under linoleum to a concrete floor. If you have experience in electrical work, you can make the connection yourself, but you should remember the safety rules.
Laying tiles on plywood. How to lay tiles on plywood
Preparing the base
The plywood needs to be sanded and cleaned. Any surface for tiles must be level. Two layers of primer are applied to a perfectly flat and smooth surface. After you apply a coat of primer, you should wait until it dries for five hours, then do the same for the second coat. If laying tiles is done in the bathroom, then before applying the primer, the plywood must be treated with a special solution for waterproofing.
You should choose an adhesive that is designed for problematic surfaces (plywood, drywall). Before purchasing it, read the instructions to make sure that this mixture is suitable for working with plywood surfaces and your type of tile. In addition to traditional tile adhesives, special two-component polyurethane adhesives can be used.
Laying tiles
Laying tiles should start from the second row, since the first row will be cut to the required size and it will be laid last. It is recommended to install the first tiles on the farthest wall of the room. The horizontality of the laid tiles must be constantly checked by a level.
For some time, until the glue has hardened, the tiles can be adjusted to achieve the desired result. To accurately align the seams, crosses are installed between the tiles. The size of the seams, as a rule, is 2-3 mm, but if the room has high humidity or constant temperature fluctuations, the seams can be increased to a size of 5 mm.
The adhesive mixture dries within 2-4 hours, so it is better to prepare small portions. To stir the glue, use a special mixer to achieve homogeneity of the glue mass. Laying tiles is also done on a small area at a time within 1 sq.m. The glue applied to the surface of plywood and tiles will begin to set within 20 minutes. Therefore, all manipulations for laying and adjusting the tiles must be done during this time.
The final stage is grouting, but in this case it is no different from the usual tile laying procedure.
Recommendations for proper use
On the thermostat, immediately set the temperature recommended by the manufacturer of the specific type of linoleum.
His testimony should not be changed anymore.
It is not at all necessary to test the material for strength by setting maximum values.
Remember, if heating to 30 °C is recommended, it is better to set it a few degrees lower - 26 - 27 °C.
Try to avoid getting the floor seriously wet. Although the polymer reliably protects the conductors, the joints can be a weak point.
All the tips presented above are collected based on mistakes and bad experiences of other users. Therefore, do not neglect any of the technological aspects and principles, then everything will work out great for you!
Underfloor heating is becoming increasingly popular, especially in private homes. Anyone can make a warm water floor with their own hands. The main thing is to know the basic rules for installing the structure.
We will discuss options for installing heated floors in the bathroom in the following material.
Laying linoleum
In the process of laying linoleum, some questions usually arise, and to solve them you should use the following recommendations:
For reliable and even laying of linoleum without harm to the heating strips, it is worth laying plywood or a similar material on the floor. Fibreboard should not be used - this material releases substances harmful to health when heated. The plywood is attached to the base using dowels or self-tapping screws in such a way as not to damage the strips of heating material. It is advisable that the plywood be thicker than 6 mm - too thin a material is more elastic, therefore, if fixed at large intervals, it will certainly begin to swell. The plywood fastening step is usually about 15 cm. It is desirable that the width of the infrared film exceed 50 cm - in this case, the fastenings will be located every 17 cm, which is quite convenient
Of course, the fastening itself is not so easy to arrange, so it is better to lay thicker material on top. When choosing a substrate, you should pay attention to materials with good thermal insulation properties so that thermal energy is directed into the room and not in the opposite direction. Linoleum is laid using standard technology, just like in any other case. When starting an infrared heated floor located under linoleum, it is worth setting the maximum temperature within 27-28 degrees to prevent negative effects.
Preparing the base
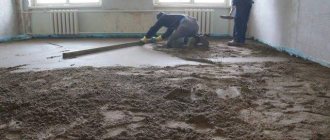
Installing a heated floor under linoleum begins with preparing the base. The easiest way is to fill in a new screed, and then proceed with the installation of the structure according to one of the classic schemes. However, when you place heated electric floors under linoleum on a wooden floor, the additional layer of concrete can have a negative impact on the stability of the entire structure. In such cases, it is necessary to use different restoration methods.
The main requirements for the base on which the rolled heated floor under linoleum is placed: evenness, cleanliness and the absence of noticeable defects. First of all, all cracks and gaps have to be eliminated. Next, the surface is treated with antiseptics and waited until completely dry. When you install an electric heated floor under linoleum on a concrete floor that you have just made, the surface will be flat by default (subject to basic construction technology). In the case of an old base, leveling will most likely be required. When installing water equipment, the requirements for this parameter are not so strict. When installing a film heated floor under linoleum, do-it-yourself installation requires the presence of an almost ideal surface. If it is unrealistic to eliminate unevenness and differences by resorting to sanding, you can lay plywood. It is important that the edges of the boards fit very tightly to each other.
Thermal insulation
Before installing a heated floor under linoleum, the base should be well insulated. If this is not done, some of the energy will flow down. If you don’t want to waste heat so inefficiently, you’ll have to spend money on purchasing insulating material. In the role of insulation, which makes floor heating under linoleum as effective as possible, you can use:
- extruded polystyrene foam;
- polypropylene plates;
- metallized lavsan film;
- cork backing.
To properly lay a heated floor under linoleum, the insulating material must be placed with the reflective surface facing up. The strips/plates are secured with construction tape or staples from a stapler. The elements should fit together as tightly as possible. For reliability, the seams should also be taped.
Laying linoleum
If linoleum was purchased in the winter or was left in a cold room for a long time, before laying it, it needs to lie in a warm room for at least a day and restore its natural elasticity. A sheet of linoleum is rolled out on the floor and the required length and width are measured, corresponding to the dimensions of the floor itself. It is necessary to add approximately 10 cm to the measured values to run under the baseboards, or, if there is a pattern on the surface of the material, you need to make a reserve for each fragment of this pattern so that the floor looks harmonious during final installation.
There are two methods for laying this material:
- On a dry floor surface.
- On glue.
If the room is small, such as a kitchen in a Khrushchev-era building or a loggia, then dry installation is allowed. This method is not suitable for large rooms. Here you need to use glue or mastic for construction work. The floor surface is coated with a roller dipped in special glue. The reverse side of linoleum is also treated with glue.
After the linoleum is spread and secured to the floor surface, the baseboards are installed, fitting the remaining part of the material under them, secured with corners and plugs.
Which linoleum is compatible with IR heating systems
When using incompatible brands of linoleum, it may become deformed. Linoleum can warp, stretch, or, conversely, shrink.
Also, when heated, some types release hazardous substances and toxins or have an insulating backing that prevents heat conduction.
When choosing linoleum for laying over an infrared heating system, special attention should be paid to its markings. It must have information about compatibility with warm electric floor systems.
Installation procedure for IR film floors
Installation of infrared heated floors under linoleum is carried out in several stages.
Preparatory activities: laying plan, marking and preparation of material
Before installing the infrared floor, you should draw a diagram. A room is drawn on a sheet of paper in compliance with the proportions, marking the placement of furniture and other large interior items. The location of the thermostat, temperature sensor, and the location of the film sheets, taking into account their sizes, should be indicated on the diagram.
The film can be laid lengthwise or across the room. It is optimal to place strips of IR film longitudinally - this will help minimize the number of connection points.
The markings will help in calculating the required amount of film, electrical cable and related materials.
When drawing up a scheme for laying infrared floors, a number of nuances should be taken into account:
- the floor is not laid under large objects;
- Thermal mats can only be cut along special lines specified by the manufacturer;
- the manufacturer does not provide for the possibility of cutting the film at an angle of more or less than 90 degrees or forming a figured fabric;
- when installing a film heated floor under linoleum, the IR sheet is laid in parallel rows;
- overlapping strips are not allowed;
- You should leave a small gap between the film and the walls;
- the strips should be laid with a side overlap, leaving a gap of about 1 cm between the copper busbars;
- to save connecting wires, connection points are planned on the side of the wall with a thermostat;
- the wiring must be planned so that the maximum number of them is laid under the baseboard;
- if you plan a large number of small pieces of film (up to 1 m), then purchase additional terminals in advance;
- All layers of the IR heating system, except for the IR film, are laid over the entire area of the room.
The second stage is the installation of heated floors under linoleum:
Installation of thermostat. It is fixed at a level of 1-1.5 m from the floor. At the marked place, a recess is drilled according to the dimensions of the thermostat (if it is built-in) and a groove is laid from it, into which a corrugated tube with a temperature sensor wire and an electrical wire will be placed.
- Laying a heat-insulating layer. Rolled heat insulation is laid on the prepared surface with the reflective side up. To prevent it from moving during further work, this layer should be secured with double-sided tape.
- Installation of IR film. According to the diagram, the cut film is laid, then it is fixed on the heat insulation layer with double-sided tape.
Installing a temperature sensor. installed at an equal distance between two strips of IR film in close proximity to the thermostat. The temperature sensor is secured with tape. To avoid the occurrence of irregularities, special notches are cut out on the substrate at the locations where the temperature sensor and contacts are located.
Fastening electrical cables. It is attached to one of the ends of the heating film using clamps. The contacts are attached in such a way as to ensure the tightest contact with the conductive conductors. The strips of IR film are then connected using contacts and wiring. All places where current-conducting contacts are installed are insulated using self-adhesive pads.
- Testing the operation of heated floors. It is necessary to turn on the current supply and wait for the system to heat up. All strips should warm up to the same temperature. All insulated wire connections must be checked with an indicator screwdriver. It is necessary to make sure that there is no voltage in these nodes. All errors must be corrected.
- Waterproofing. A polyethylene sheet with a 10-20 cm overlap is laid on the IR layer, which is fixed with tape.
Laying decorative flooring
Linoleum is a covering material that cannot be laid directly on thermal film. Experts and manufacturers recommend using sheets of plywood 1 cm thick as a backing for it.
Plywood sheets are secured with nails. They are hammered in very carefully so as not to damage the elements that conduct current. To do this, nails are driven exclusively around the perimeter of the sheet. The plywood must be dry and without visible damage.
Before you start laying linoleum, you need to test the IR floor again.
Linoleum is laid using standard technology. The covering is spread around the perimeter of the room and left for 1-2 days. Then, in rooms with small footage, the edges are secured with plinths. In large rooms, linoleum must be glued.
Required materials and tools
To install a heated floor, first of all, you will need infrared film. It is sold in the form of rolls, the unit of measurement is a linear meter. The required amount of film is calculated depending on the area of the room, as well as the layout of the heated floor.
In addition to the film, you will need the following materials and tools:
- special clamps for contact and insulation;
- thermostat (one for each room);
- electrical cable;
- thermal insulation material (infraflex, isolon, penotherm, etc.);
- regular and double-sided tape, etc.
When choosing a material that reflects heat (it is placed under the film), you should remember that in this case only a substrate with a soft base is allowed, and thermal insulation on aluminum foil is not suitable for infrared film.
Competent installation of electrical devices for STP
Careful preparation of all necessary materials for construction is an important point. When assembling a floor heating structure, it is necessary to purchase a high-quality film element. The product is laid at a distance of 50 cm from the walls.
It should be remembered that heavy objects such as large furniture and household appliances should not be placed above the film. The IR heater does not regulate temperature conditions
If large objects on top do not allow heat to pass through, then it gradually returns back to the source. As a result, the conductor may burn out or become partially deformed. The exact amount of film is determined based on the technology and installation features.
For continuous operation of the heaters, clips are required that secure the contacts (2 units per separate strip). But first you need to lay thermal insulation material with a high reflection coefficient, as well as install thermostats and prepare copper wires.
Laying thermal insulation
Laying the thermal insulation layer does not take much time, but it is a very important step. The event is mandatory, since heat without a protective barrier will go up and down. As a result, a large amount of energy is wasted irrationally.
The work is usually carried out using a roll insulator. The product is rolled out on a wooden base, with its reflective surface facing up
Each strip is attached to the base using a stapler and double-sided tape. The strips are joined together without any gaps. The joints are carefully taped with tape.
Rules for forming a film floor
The process of rolling out the infrared film is carried out over the insulator at a distance of 50 cm from the wall. In this case, the placement of the copper strip should be clearly at the bottom. If necessary, cut the material into equal strips based on the markings of the film sections.
The peculiarity of cutting infrared film is its accuracy. The product is formed into strips of the required sizes along sectional lines. This way you will avoid damage to the heating elements
Carbon based heaters must not be damaged. If you find scratches or tears on the product, then such places should be treated with bitumen-based mastic. This option is also excellent for insulating copper electrodes. The joints of the materials are securely fastened with special clamps.
The parallel connection diagram has the following sequence:
- The placement of the first contact on the surface of the electrode is carried out inside a special film. The second contact is carefully applied on top;
- a strong and reliable connection is achieved by tightly pressing the electrode with the clamp using pliers.
After detailed laying of all strips of infrared film, a common web is formed by gluing with tape.
The bare ends of the electrical wires are insulated with pliers. The contacts of the thermal film are also subject to insulation, since they are made of silver along the edge and are capable of conducting current.
High-quality gluing of the fabric around the perimeter prevents slipping.
Heating system testing
To do this, set the heating indicator on the thermostat at 20 - 25 degrees and wait a few minutes. Check with your hand whether the mounted film heaters have warmed up. Then the power is turned off completely to see how the electrical connections heat up.
We recommend: Review of the gas boiler Bosch Gaz 6000 W WBN 6000- 12 C (Bosch Gas 6000 W WBN 6000- 12 C): owner reviews, price comparison, characteristics, functions and features
Their temperature should be the same as that of the film. In the case when it is much higher, this means that the contacts are unreliable. They must be checked, and the cause of excessive heating must be identified and eliminated.
Additional equipment
If several wires from different rooms will be supplied to one thermostat, then it is important to determine the entire power consumption by adding the entire power of each heating element. As a result, the wire for connection is selected based on the result obtained. Additionally, you need to purchase a cable through which the underfloor heating system will be connected to electricity. The system must be equipped with an individual 30 mA RCD. The circuit breaker must be of category C and designed to protect a current-carrying branch of 10 A.
Design and operating principle
The system consists of thin film mats containing strips of carbon fiber connected to conductive copper bars. When connected to the mains, the strips begin to emit infrared rays, which begin to heat the room. They will not heat the air directly, but heat all objects and surfaces that come in their way.
Thus, all surfaces and furnishings in the room - the floor, sofas, tables and everything that is there - become a kind of heater. All this heats up a little and, in turn, begins to heat the air. Heat transfer is carried out by infrared rays, which is much more effective than heating the air masses directly. It is worth saying that the heating effect of all surfaces is slightly exaggerated and mainly only the decorative floor covering is heated. However, the efficiency of the system still remains at a high level.
Features of laying the cable system
If preference is still given not to the film, but to the heating cable, you will have to perform the following work:
- Make a heating cable layout plan.
- Clean the base from dirt and level it.
- Lay thermal insulation material.
- Lay out and secure the mounting grid.
- Lay the cable according to the plan.
- Install the temperature sensor.
- Connect the system to the thermostat and power supply.
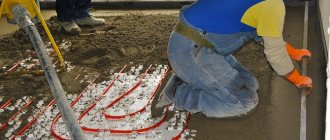
- Fill the floor with concrete screed and level it.
- Wait until the working surface dries.
- Install the floor covering.
As insulation, you can use polystyrene foam boards or a special material designed specifically for cable heated floors. It looks like a rubber mat with ridges on the surface. These protrusions are specifically designed to fix the heating cable. Then there is no need to lay the mounting grid.
A cable heated floor, which is already fixed to a reinforcing mesh, is much easier to install than a conventional heating cable, but it is a more expensive option
The temperature sensor must be laid at an equal distance from the cable; close contact with the heating element or with the concrete screed is not allowed. Therefore, to protect the temperature sensor, a piece of corrugated pipe is used as a kind of case.
An interesting video on laying electric heated floors can be viewed here: