If you are a keen hiker, then you know how important it is to be able to provide yourself with an effective and reliable source of fire on the road. Without it, you will not be able to cook food, boil water for drinking, or keep warm in bad weather.
Since ancient times, people have solved this problem by making a fire. However, this method requires quite a large amount of firewood, some skills, and is not very good from an environmental and safety point of view. Therefore, they have been replaced by modern gas and gasoline burners, which make it possible to solve all problems with cooking as comfortably as possible. However, this solution also has its drawbacks. For example, if you are going on a multi-day hike, then the weight of gas cylinders or gasoline containers can be quite significant, and no one wants to carry the extra weight. Or, for example, you are about to fly on an airplane, where, as you know, it is impossible to transport such things, so there is a need to purchase gas and gasoline on the spot, which is not always possible.
Therefore, more and more tourists are turning to wood stoves.
They combine all the advantages of a fire with the utmost simplicity and comfort of a burner. To use such a stove, you will need a minimum amount of fuel of almost any type: firewood, branches, pine cones, leaves and even dry grass. Therefore, you can use a wood stove in any area, with the possible exception of the desert and ice ridges. And most importantly, it has excellent efficiency, which allows you to boil a liter of water using just a few dry wood chips. This is explained by the special design of such a stove, which uses the phenomenon of wood pyrolysis.
If you are interested in such a device, then you can buy one of the ready-made products, for example this one. Or you can spend one hour and make a wood-burning camp stove yourself, because you only need three tin cans of different sizes and our instructions.
So, first of all, you will have to get three tin cans of different sizes. The first, largest, will serve as a shell. The second jar is smaller because it must fit freely in the first. And the last, smallest one, is useful as a burner. In addition, we will need a marker, a drill, metal scissors and a small wooden block.
Making an auxiliary device
This wooden block is not part of the stove, but serves to make it. With its help, it will be more convenient for you to drill holes and perform other operations. Insert the block into the jar and draw two lines with a marker approximately at the level of the lid.
The distance between the lines should be approximately 7–8 millimeters.
Carefully cut out a rectangular notch. The top edge of the can should fit freely into this recess.
Let's position the wooden block in such a way that it provides reliable support for the can. The upper edge should fit comfortably into the notch we made.
Heating the rocket
The rocket stove is not one of those stoves that are completely self-adjusting to fuel quality and external conditions. At the beginning of fuel combustion, the hopper lid in a small stove should be opened completely. At the moment the stove begins to hum, cover it until the sound is reduced to the maximum. Next, you need to gradually cover the access of air, you need to navigate by the sound from the oven.
If the damper slams shut for a couple of minutes, it’s okay; if you open it, the stove will light up again. For the first time, the rocket stove must be flooded with paper and fuel must be constantly supplied through the blower. In subsequent uses, it can be heated with recycled materials, including wood.
Making holes in the bottom of a large jar
First, draw a line along the bottom edge of the can. This line is needed to mark the points for the ventilation holes. In this case, a special dye is used for marking, but nothing will happen if you do it with a simple marker.
We drill holes along the line we marked. Their number and size are of great importance for the operation of the stove. If there are too few of them, there will be no traction, if there are too many, then the wood will burn out very quickly. Therefore, it is better not to overdo it here in order to be able to drill more holes after testing.
Design features of a camp stove and its advantages
A self-made camping stove is a wonderful and useful device for relaxing outside the city and in the forest. It is indispensable for fishing and camping with a tent.
If the design provides for the presence of grates, such a furnace is characterized by good draft. Consequently, the fuel will burn very quickly. Therefore, it is best to use firewood for a camp stove.
In devices without a bottom, the fuel is placed directly on the ground. Firewood or other fuel burns more slowly, and coals do not smolder for a long time. The process is resumed with a new batch of fuel loaded. This type of tourist stove provides less heat due to the lack of draft.
The camp stove, equipped with stands, is characterized by maximum traction, which speeds up the process of frying food. If you need to cook food by boiling, the stands are removed and the oven is placed on the ground. In this case, the grates overlap, oxygen enters in less quantity and the combustion process slows down. In this case, the cooking time increases.
Regardless of the design, camping stoves have many advantages:
- Wood stoves are quite economical.
- The fuel burns in any weather.
- The devices can even be used inside tents.
- The manufacture and operation of the stove is quite simple.
- Possibility of manufacturing a mini version of the stove.
- Easy transportation.
- Adjustable fire power.
- Complete security.
- High performance.
Drilling the bottom of the middle jar
We make many holes in the bottom of the jar. Their size and quantity should be such that firewood cannot fall out through them.
The result should be something like this.
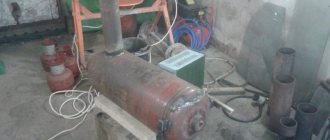
From a pipe on wood
If the trip is planned for the winter, you cannot do without a serious heating device. Any stove should not be left unattended, especially a wood stove. Purchased models of the best tent stoves are equipped with a spark arrester and an additional chamber for complete combustion of gases. It is difficult to make additional cameras in homemade structures.
If you remove the chimney not vertically, but at an angle of 30 degrees, you can increase the efficiency by 30%. A simple mesh in the chimney is used as a spark arrestor. Thanks to the installation, you won’t have to wait long for heat; the stove heats up the space instantly.
Materials and tools
When making a stove for winter fishing with your own hands you will need:
- Chimney pipe 200mm.
- Clamp for plugs 200mm – 2 pcs.
- The chimney pipe is 80mm, the length depends on the height of the tent.
- Plugs 200mm – 2 pcs.
- 80mm clamp.
- Legs from a travel chair.
- Sheet of tin.
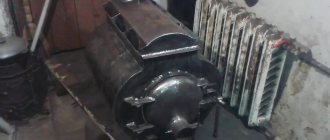
Manufacturing instructions
The diagram is quite general, but shows the principle of operation. The shape of the oven depends on the available materials and capabilities. If you don’t want to weld parts, you can use a simpler method described below in the instructions. Tourist stoves for tents should be collapsible and light in weight.
- Cut a suitable pipe length of 200mm, based on the size of the tent and the desired fuel load.
- Bend the edges of the plug slightly to allow free entry into the pipe.
- Use a grinder to cut a hole for the chimney pipe with a diameter of 80mm. Place the hole at a distance of 10-12 cm from the rear plug.
- Try on the chimney pipe, adjust the hole if necessary.
- Cut 20-30 cm from the chimney pipe, cut the edges for riveting by 5-7 cm. This will serve as a diversion.
- Insert the tube into the hole and rivet it, pressing the cuts on the outside together.
- Place a clamp on the outlet; this will hold the metal in place as it expands.
- In the second unattached plug, cut a hole for a neck with a diameter of 70 mm. From a sheet of tin, cut a piece 70 mm wide for the neck hole, and insert a twisted piece of tin into it. Drill holes.
- To regulate the blowing force, you should make a cover from an 80mm pipe. Cut a piece of pipe equal to the length of the piece of tin at the neck. Cut a circle with a diameter of 110 mm from the sheet and rivet it. Put it on the lid.
Using the lid - Place a chimney pipe of suitable length on the outlet, install the stove on the legs of a camping chair, and lead the chimney into the opening of the tent.
- Everything is ready, but due to the round shape of the oven, there is no possibility of cooking.
Operating rules
The operating rules are simple:
- The stove must not be left unattended; non-flammable materials must be placed under the structure, and the chimney pipe must be insulated from the tent. This stove will easily heat a 4*4m tent.
- After use, allow the metal to cool, pour out the ash, and disassemble the stove into parts for transportation.
- Ventilate the tent, check the draft and tightness in safe conditions before leaving.
- All openings must be precisely adjusted to prevent smoke leakage.
A stove for a winter tent is made with your own hands in a day, and lasts for several years.
Assembling the structure
We insert the middle jar into the large one.
As a result, our stove consists of two cans, rigidly inserted into one another. At the same time, a small gap remains between their walls, necessary for air movement.
Material selection
For the manufacture of wood chip stoves, acid-resistant and heat-resistant steel grades are used, because they not only tolerate high temperatures well, but are also resistant to condensation that forms during ignition.
This metal is used for the internal lining of furnaces and boilers, as well as for the manufacture of drums and internal casings of washing machines.
It is also necessary to choose the thickness of the metal correctly. After all, the thinner the part, the less rigid and durable it will be (even if it weighs less), but at the same time it is noticeably easier to process. And the thicker it is, the stronger the structure will be, but the greater its weight, and the processing will be noticeably more difficult.
Therefore, most often for home-made stoves, stainless steel with a thickness of 1–1.5 mm is used, although both thinner and thicker metal can be used.
As a basis for the manufacture of round heating devices, you can use spoon dryers of various diameters, made of food grade stainless steel.
Such dryers can be bought on AliExpress and other sites for a low price. Metal thermoses are well suited for creating pyrolysis stoves, because they are also made of stainless steel.
However, they are quite difficult to drill due to their round shape and the inability to use a drilling machine, and for complete pyrolysis, the air flow in the combustion zone should be minimal, and in the afterburning zone located above the combustion zone, maximum.
Often, various steel containers are used to make wood chips, such as:
- saucepans;
- mugs;
- pots;
- banks.
The main selection conditions are:
- heat resistance;
- acid resistance;
- compliance with the size and shape of the water container that will be installed on top.
Making a burner
The type of burner in different designs may vary slightly. In this case, the option with round holes in the side wall is used. You have already learned how to do them well from previous operations.
We cut out the bottom of a small jar with metal scissors.
The edges can be smoothed with a hammer and filed.
Option #3. DIY folding camp stove
A very effective design, the manufacture of which, however, requires more time and effort, as well as preliminary preparation. First you need to acquire the following consumables and equipment:
- roulette;
- Bulgarian;
- electric drill, as well as a set of drills for it;
- file;
- pliers;
- bicycle spokes;
- piano hinges;
- sheet of metal 1 millimeter thick.
We also note that in order to make a folding stove, you can use:
- iron sheets from the body of an old gas stove or refrigerator;
- side walls from an old computer system unit (these options can replace sheet steel).
Note! When starting to create a folding camp stove, be sure to familiarize yourself with its sketch, and also create templates for the planned structural elements based on it.
During the work, you will need to perform the following algorithm of actions.
Step 1. First, mark all structural elements on sheet metal using prepared templates, then cut out these elements using a grinder.
Step 2. Make holes in the piece that will be used to arrange the bottom.
Step 3: Next, file the edges of the holes to remove any burrs.
Step 4. Connect the side walls of the structure together using piano hinges with rivets. As a result, you should get a kind of box.
Step 5. Along the entire perimeter of the bottom, as well as on the lower edges of the side walls, special “ears” bent in one direction must be provided in advance.
Step 6. An element is placed under the formed box, which will serve as the bottom, while the “ears” of the two elements will align on each side and form a tube. Pins made from knitting needles must be inserted into this tube. This little trick allows you to make the stove more stable in its operating state. In addition, if necessary, the structure can be easily disassembled for transportation or storage.
Step 7. On the grate, make additional protrusions installed in the holes that are cut on the sides.
Step 8. There will also be another hole in the sidewall through which fuel will be loaded.
Step 9. The cutouts made in the top of the box not only increase traction, but they can also be used to place skewers.
We carry out tests
The main part of the wood stove consists of two tin cans inserted into one another. We load the middle jar with flammable material, which can be wood chips, branches, or cones. It is best to use dry branches on trees, because branches lying on the ground may be damp to one degree or another.
Set it on fire and wait for it to burn. At first, this may cause some difficulties, but after several training sessions it will be possible with one match.
When a confident, intense burning has begun, we place a burner on top, which we made from a small jar.
And then we place a kettle or pan on top.
If you watched the manufacturing process to the end and did not understand anything or it seemed too complicated to you, then check out another option. The video below demonstrates how to make such a stove without any tools other than a regular knife. It turns out, maybe not so neatly, but no less practical.
And we invite all our readers who have already used similar stoves in the field to share their impressions and advice with us.
Description of pyrolysis and gas furnaces
Pyrolysis and gas stoves are very convenient for use on hikes and vacations outside the city. They are characterized by an excellent combustion process, so they are quite suitable for quick cooking in the fresh air. But you cannot make such stoves yourself; they are purchased in specialized stores.
The pyrolysis stove is highly efficient, so the models presented from the retail chain have a fairly high price. Compared to wood stoves, this option is characterized by greater productivity. Those who decide to make such a device with their own hands must have special knowledge and materials. In addition, it should be borne in mind that a homemade stove in nature does not give the desired effect.
Among the advantages of a pyrolysis oven are safety and environmental friendliness. In such a device you can burn excess garbage and cook food; the fire in them burns constantly without failure. The pyrolysis furnace is made from steel that is resistant to high heat.
A camping gas stove is also suitable for traveling out of town or camping with a tent. In the retail chain, such devices are presented in a wide range; you can choose a stove of any color and cost. The gas oven runs on a special cartridge that requires regular replacement. However, you can cook food on such a device without difficulty.
Before going on vacation outside the city or camping with a tent, you should take care of all the necessary things, including a camp stove. For regular use, it is better to purchase a good stove for tourism in a specialized store. And for occasional and very rare trips to relax in the fresh air, you can use self-made devices that do not require spending money, effort and time.
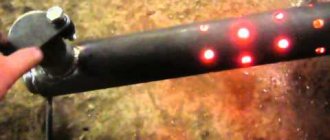
Can a candle heater be used to boil water and cook food?
The considered options for candle heaters can be used not only for heating, but also for cooking. Boiling water with this device is quite simple, using a small pot, metal mug or kettle. You can also prepare a simple dish, such as scrambled eggs or porridge. Boiling a large volume of water, for example, for washing or washing, of course, will be impossible, but it will be possible to solve minimal comfort issues.
You can easily prepare a simple dish using a DIY candle heater
Spark extinguishing
Any tent has a hole for a hot smoke pipe (chimney). In addition, the area around the stove is always protected with a fireproof mat in case of hot coals flying out. Some tent manufacturers recommend rolling back the tent base and placing the product directly on the ground.
Not only hot carbon dioxide, but also sparks rise from the stove through the chimney pipe. If the pipe is short, they can get onto the roof of the tent and cause a fire. To prevent this from happening, the chimney pipe is made long so that it is at least 2–2.5 m long. While the spark flies along this path, it will have time to go out. Consequently, the chimney acts as a spark arrestor.
Safety precautions also mean that all objects that can catch fire should be kept away from the operating stove. Another danger is carbon monoxide. It must go strictly into the chimney. And the tent itself should be designed so that clean air regularly enters it.
Precautionary measures
Oven operation can be dangerous in two cases:
- fire due to a spark hitting the roof of the tent or coal falling out of the firebox;
- poisoning by combustion products.
Preventing sunburn is simple. It is enough not to place flammable objects near the stove, make sure there is a special stand under it and block sparks due to the length of the chimney. In addition, a burning firebox should not be left unattended overnight.
The time it will take for it to cool down will be enough until the morning. This is 5–8 hours, depending on what metal it is made of. Thus, a sheet of tin will cool the fastest, while steel will cool slowly over many hours.
As for combustion products, oxygen is needed for fuel combustion. If it does not get into the pipe or there is not enough of it, then the combustion will proceed slowly. And then you need to increase traction by creating additional air flow.
It is also important to remember that you cannot cook a barbecue in a tent on a stove, like other food. The resulting smoke and carbon monoxide do not enter the chimney, as they are located inside the tent. And to get them out you need to open doors and windows. If this is not done, you can be poisoned by combustion products.
There are quite a lot of stoves for winter camping and fishing on sale. But if you don’t like the prices or quality of the products offered, then you can always make a stove with your own hands from scrap materials to provide yourself with the much-needed warmth and comfort on a winter night.
How to choose?
There are several factors to consider when purchasing such a stove.
- Weight. The differences in weight are huge, as is clear from the information above. In general, there are two large groups: backpack portable stoves and those that require a car for transportation. If you plan to transport equipment, then weight is not so important; it is better to focus on the characteristics and price.
- Pipe diameter. The diameter of this part of the structure can vary significantly. If there is already a chimney built into the tent, then you will have to select a stove according to size. The diameter is usually equivalent to the combustion power - the larger, the higher the indicator.
- Accessories. Some brands provide a long list of accessories for their stoves, but the cost of such models is much higher.
Indian candle for cooking or heating
Indian candle.
A very ancient method that was invented in ancient times by one of the Indian tribes. The colonialists saw this method and began to use it everywhere. What he really is? Take an ordinary log, hollow inside. Fuel is placed inside. You can light the way in a dense forest, cook food, and keep warm. Not all trees are suitable. Resinous ones shoot hard, a lot of sparks. Birch produces a very strong flame. Aspen is excellent and the flame from it is almost colorless.
Chop the log and remove the old contents. Then connect the frame in any way. Place birch bark or other fuel inside. Regulate the flame using birch bark. The lower you push it, the stronger the fire will be.
A hollow log is better than others, but in extreme conditions there is no choice.
Types of combustion
The combustion of the stove is based on the process of pyrolysis and the use of gases released from the fuel to maintain the fire.
At the same time, such stoves are considered economical, and in an emergency even life-saving. After all, sometimes a wood chipper is capable of producing heat during a sluggish but long burning.
With pyrolysis
Pyrolysis wood chippers that operate using the pyrolysis process, that is, with additional pressurization, are called “turbo stoves.” The wood chip pyrolysis camp stove was invented by American tourists who showed ingenuity and diligence in developing the apparatus.
The catchy slogan “turbo” was released to the masses, but travelers understand that energy dependence on a supercharging motor operating on batteries is not needed. Such additional elements break, and the pipes interfere with the rational packing of a hiking backpack and take up valuable space for a tourist heading out alone.
However, large groups, professional hunters, fishermen or tourists heading to distant places along routes of the highest degree of difficulty are not recommended to abandon turbo stoves.
The main advantages of pyrolysis stoves are:
- the ability to prepare lunch for 3 people when loading the combustion chamber with 20–30 pine cones;
- the highest temperature is concentrated along the axis of the stove, so when making the device at home, it is quite acceptable to use cans of canned food or thin galvanized metal;
- the possibility of using dry alcohol as fuel;
- after overturning, the turbo stove will continue to burn, provided that it was immediately placed on a flat surface in the same condition;
- In surface combustion mode, the stove is used for heating. Sparks do not fly through the metal walls, and the bottom does not warm up above 80 degrees, which makes it possible to use a wood chipper for a tent.
Note!
When using a pyrolysis wood chipper in a tent, you need to be vigilant and wait until the fuel burns out completely and clean it of ash. A tarpaulin or other heat-resistant material is placed under the stove, which will prevent the synthetics from melting and prevent the tent material from becoming brittle in the future. Otherwise, the tourist risks getting burned.
Partial pyrolysis
The invention of pyrolysis stoves by Americans is explained by environmental legislation, which strictly regulates the behavior of citizens in the forest. That is, American tourists are allowed to collect dead trees or cones from the ground, but breaking trees is unacceptable.
Such actions are punishable by large fines, and in some states, such violation of the law can result in imprisonment. In Russia, the laws are not so harsh and the use of natural resources is not limited to such an extent. This fact largely explains the preference of citizens to use simplified designs - with partial pyrolysis.
When the fuel partially burns and settles, pyrolysis is included in the process. That is, the remaining coal burns to the state of ash from the secondary air.
On a note!
If we compare such stoves, partial pyrolysis is inferior in terms of fuel efficiency. However, the temperature conditions inside the combustion chamber are the same and it takes equal time to prepare dinner.
Use with army bowler hat
Army bowler hats, still used to arm Russian soldiers, are popular among tourists. Foreign kettles are also available in stores.
Each of them has its own specific shape, so the pot and wood chips are selected at the same time. The manufacturer indicates on the wood chipper the recommended pot model or dimensions. They must be taken into account in order to achieve maximum effect when placing the pot over the wood chips for quick heating.
The distance between the walls of the stove and the pot should not exceed 5 mm. Otherwise, if the pot is larger in diameter than the stove, then it will take longer until the liquid boils.
If the wood chip burner itself is wider, then some of the fuel will be wasted, and the tourist will have to carry extra weight with him. As an exception, we can highlight wood chippers for an army cauldron, designed for 2 containers at once.