Infrared heaters are an innovative technology that uses short-wave infrared radiation to provide an immediate sensation of soothing warmth moments after the device is turned on. Thanks to the use of new technologies, the operation of an infrared heater can enhance the feeling of warmth even in poorly insulated, large rooms and open spaces.
Heating installations equipped with electric infrared emitters make it possible to select specified zones and surfaces in which the feeling of warmth will be several times higher than in the rest of the object.
Introduction
If a conventional battery or convector heats a room by transferring heat to the air, then infrared devices heat the surface. They work in exactly the same way as sunlight, which passes freely through the air, but heats objects (dark ones much more than light ones). This radiation has a long wavelength, so we do not see it, but we feel it with our skin, understanding where the heat source is.
Classic portable infrared heater
What are the benefits of IR heaters? The fact that a conventional battery heats the air, as a result of which the convection process starts in the room. In order for the room to warm up, the convector needs to heat the air, it rises up, warms the ceiling, and then slowly fills the entire room. The temperature difference in a classically heated room (standard height 2.6 meters) between the ceiling and floor can be about 5-7 degrees. Since we are located downstairs in the middle of the room, we have to wait quite a long time for the room to warm up.
That's not how IR heaters work. They warm up objects in front of them. You will feel warm immediately after switching on, although the room temperature will be low. Gradually, the air in it will warm up due to heat transfer from warm objects.
How did infrared radiation appear?
Infrared thermal radiation was discovered in 1800 by British astronomer William Herschel. He decided to use a thermometer to determine which color of the solar spectrum warmed his telescope the most. To this end, he decomposed the beam into seven components and was amazed at the discovery.
He saw that the highest temperature was beyond the red light beam. As a result, Herschel concluded that outside the visible spectrum there is effective radiation that heats bodies to an even greater extent.
Device and principle of operation
An IR heater is very similar to a fluorescent lamp without a top diffuser. It consists of a metal body, a reflector, a thermostat for power control and a heating element. Tens can be:
- Tubular.
- Carbon ones.
- Ceramic.
- Halogen.
Note:
Devices are divided according to the installation location into floor-mounted and wall-mounted (ceiling-mounted). Buy floor heaters with a tip-over sensor - if they fall, they turn off, which helps avoid fires.
Installation options
Based on the type of installation, IR heaters are divided into four types:
- Ceiling (suspended);
- Wall-mounted;
- Floor-standing (mobile);
- Skirting.
Each type of heater can be installed in a certain way. This depends on the features of the device and the models produced. Here is a table showing the available installation options for different types of infrared heaters:
| Type of IR heater | Ceiling | Wall mounted | Floor-standing | Skirting |
| Electrical | ||||
| Panel | + | + | — | + |
| Film | + | + | + | — |
| With open heating element | + | + | + | — |
| Micathermic | — | + | + | + |
| Combined | — | + | + | — |
| Gas | ||||
| Tubular | + | + | — | — |
| With flat element | + | + | + | — |
| Vertical compact | + | — | + | — |
| Diesel | ||||
| Direct heating | — | — | + | — |
| Indirect heating | + | — | + | — |
| With tubular emitter | + | + | + | — |
Selecting a device
Now that you understand the working principle of an infrared heater,
Let's look at the selection rules. The first step is to decide in which room it will be used and what is actually required of it.
If the device will be used for spot heating of your workplace and resting place, then it is better to purchase a classic floor-mounted version. You can easily move it around your home, including in the right places.
If you need to heat a specific place (for example, a bed or an entire room), then it is better to use ceiling devices. They take up minimal space, fit well into the interior, and can even be mounted on a suspended ceiling.
Note:
For effective cooling, the device needs free space around the perimeter. When installing the heater in tension fabrics, leave a gap of 5-6 centimeters between it and the ceiling.
Ceiling heaters warm up the room from below.
The main advantage of ceiling devices is a large angle of wave dispersion and correct focusing. They heat horizontal objects (floor, furniture) that have the maximum area, so the room quickly becomes warm. Floor and wall devices focus on vertical objects, while “catching” waves on the floor and ceiling. Heating the ceiling is generally pointless, and the floor does not receive the same dose of heat as from downward reflectors. In portable models, you can adjust the angle of the emitter, which somewhat improves the process, but you still won’t be able to achieve the same efficiency as ceiling, mobile and wall-mounted models.
Installation methods
Another significant difference between infrared heaters is their ease of installation and versatility.
They can be placed at any angle to heated surfaces and oriented differently in space.
The panels are mounted on walls, but it is possible to install them on the ceiling or floor. The direction of heating will depend on this: from below, from above and from the side. This versatility has found wide application in interior design; the required direction of thermal radiation can be taken into account at the design stage.
In order to save money, you should carefully approach the organization of heating systems and optimize them as much as possible. The correct choice of heating devices plays an important role. And it is impractical to leave aside such a technological novelty as infrared heaters. Considering all the advantages of this type of heaters, they can be used for almost any task.
What is the difference between tens
We already wrote above that heaters can have various heating elements. Let's look at how they differ and which one is better to choose for your home.
- Halogen. The emitter is a lamp with a carbon fiber or tungsten filament, which, when heated, emits radiation into the lamp tube. The main disadvantage of halogen lamps is their short wavelength, which can cause discomfort in humans. In addition, they glow with an unpleasant bright yellow light. Installation of such devices can be carried out with ceiling heights of more than 5 meters in workshops and utility rooms.
- Carbon. It is a hollow quartz tube with a carbon spiral. The air is pumped out of the tube, so it does not overheat. The advantages of the lamp include high efficiency and high “start” speed - it begins to heat a few seconds after switching on. The disadvantage is a short service life (with regular use, the lamps last approximately 20-30 months) and reddish radiation, which irritates the eyes. Such devices can only be used in an apartment for quick heating or as backup heaters.
- Ceramics. It has a durable ceramic shell, does not emit a glow, lasts 36-50 months, consumes electricity 2 times less than carbon. The disadvantage is the long start-up time and inertia ( it takes several minutes to get into operating mode ).
- Tubular. They have a durable spiral made of heat-resistant metal, consume about 800-1500 Watts, and last for at least 5 years. This is the best option for an apartment and small office. The only drawback is that during operation a slight crackling may appear, which is formed due to the imperfect design of the infrared heater: the lamp, body and reflector have different coefficients of thermal expansion.
Ceiling heaters quickly warm up the room
Types of IR heaters
Infrared heaters are divided into several main types. Depending on the energy source used, electric, gas or diesel heating devices are distinguished. The latter belong to industrial-type heating systems. They are practically not used in everyday life, so we will not consider them.
Electric infrared heaters
The largest group of devices. They are distinguished by ease of operation, compact size, and long service life. Depending on the heating element used, electric models are:
- ceramic;
- carbon or film.
The heating element of ceramic infrared devices consists of a resistive cable placed in a ceramic panel. Most often, ceramic heaters are made in the form of thin wall panels with a remote thermostat.
Carbon infrared heaters are a sealed tube, inside of which a spiral made of carbon fiber or carbon nanofiber is installed. Such devices cost a little more than their ceramic counterparts, but judging by consumer reviews, they are worth the money.
In film heaters, the heating element is a flexible resistive cable. It heats up the outer metal film. As a rule, models of this type are installed under suspended ceilings.
Gas and liquid fuel appliances
There are models of infrared heaters that use gas as fuel. They are mainly used for heating large rooms and outdoor spaces.
This procedure is possible due to the high thermal power of these heaters. Any gas is used, from natural to coke oven. To heat verandas and terraces, units made in the form of umbrellas are used.
The design of such a device includes a gas burner unit to which radiant pipes are connected. Some types of them work like simple gas burners, but they do not heat the surrounding space, but ceramic panels, which play the role of emitters.
Designs running on diesel fuel or kerosene are used on an industrial scale. With their help, construction sites are heated and used in production processes, for example, for drying material at woodworking facilities.
Features of the infrared heater:
What to consider when purchasing
So, you come to the store or read the product specifications on the manufacturer’s website. What to pay attention to and how to make the right choice?
- Check the thickness of the anode (more precisely, the working layer) in the lamp. The critical value is 25 microns. If the layer is thinner, the lamp will quickly fail (limit service life is 3 years). If the layer is more, then the device will work quietly for 5-10 years.
- Heater and housing material. Ordinary metal cannot be used in damp rooms - it will quickly become corroded and fail. Be sure to take this into account when choosing a device for a bathroom, toilet, bathhouse, or sauna.
- Thickness of the working emitter. It is recommended to choose devices with a foil thickness of more than 120 microns. A thinner one does not delay the rays, so they will go in the opposite direction, reducing efficiency and increasing the cost of heating (this parameter is especially critical when installed in suspended ceilings - the rays can simply melt through it).
Specifications
Infrared heaters have different technical characteristics . Manufacturers are trying to improve both the emitter itself and additional functions. Additional options include, first of all, active safety systems, such as automatic shutdown in the event of an emergency or overload, operating mode in a system of interconnected devices, the ability to connect a thermostat or a smart home system for remote or completely autonomous control of the device.
Some models boast an elegant design and a thin front panel that will fit perfectly into any interior.
Built-in infrared film heaters
Selecting power
It all depends on the power of your wiring and the fact whether the IR heater will work independently or as a backup device. For central Russia, the minimum power required to heat a residential premises is at least 1 kW per 10 m2.
Note:
if you are going to heat the house only with infrared rays, then make a reserve of at least 30%. Working at the limit of their capabilities, the lamps will quickly exhaust their service life.
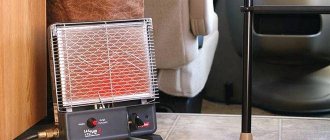
Spot mounted heater for small rooms
You should also take into account the thermal insulation of the room - if it is a walk-through room, has thin walls/ceilings, uninsulated floors and “blowing” windows, then immediately increase the margin to 50%. If radiators are used in conjunction with existing heating, then there is no need to choose overly powerful models - you can safely subtract 30-50% from the norm. In order not to make a mistake, we recommend that you contact a heating engineer - he will be able to calculate in detail the heat loss of your room, and, accordingly, the required power of the radiators.
Thanks to the unique operating principle of the IR heater, even inexpensive 300-watt devices sold in specialized stores and markets show good results. They can be used to quickly warm up small rooms - bedrooms, bathrooms, garages, cellars. They are completely safe for humans, so they are even used for spot heating of a workplace (for example, in an unheated workshop or during winter fishing).
Areas of application
Infrared heat emitters are ideal for heating use and can be used for:
- spot, zonal or general heating;
- halls, workshops, garages;
- outdoor work;
- restaurants and hotels;
- infrared saunas;
- SPA salons;
- shops and supermarkets;
- livestock farming;
- heating pools;
- winter and botanical gardens;
- heating of sports facilities and playgrounds.
Also, infrared heaters are increasingly used in everyday life and have firmly taken their place in houses and apartments. Due to their ease of operation, they are excellent for heating kindergartens, schools and other educational institutions. Often used for large-scale concerts and other outdoor events. They can be seen in the open areas of bars and restaurants - where other types of heaters are powerless.
Requirements for the isolator
The insulator is installed between the reflector and the housing. Its main task is to prevent heat from heating the case to critical temperatures. Typically, basalt wool is used as an insulator - it has good thermal insulation properties and is completely environmentally friendly (does not emit harmful substances even when heated to 100 degrees).
Note:
You should not choose heaters that use ordinary mineral wool - when heated, it can release formaldehyde. Check with the seller which insulator is used in the model you like.
Making your own infrared heater
IR heater from an old reflector
You will need:
- Soviet-made reflector;
- nichrome thread;
- steel rod;
- fireproof dielectric.
Tip: As a dielectric, you can use a plate of any diameter made of glazed ceramic.
Your actions:
- thoroughly clean the reflector reflector from dirt and dust;
- check the integrity of the power cord, plug, connection to the terminals for connecting the spiral;
- measure the length of the spiral wound onto the ceramic cone of the device;
- take a steel rod of the same length and thread a nichrome thread onto it. Winding pitch – 2 mm;
- upon completion of winding, remove the spiral from the rod;
- lay the spiral in a free state (its turns should not touch) on a fire-resistant dielectric;
- connect the current from the power outlet to the ends of the spiral;
- turn off the heated coil and place it in the groove of the ceramic heater cone;
- connect it to the power terminals.
Made from glass and foil
Necessary materials:
- glass: two pieces of the same size;
- aluminum foil;
- sealant;
- paraffin candle;
- power cord with plug;
- epoxy glue;
- cotton buds;
- clean cotton napkin;
- candle holder.
Materials for making a heater
What we do:
- remove dust, dirt, grease, traces of paint, if any, etc. from the surface of the glass;
- light the candle and smoothly move the glass plates over its flame (alternately and only on one side). As a result of this operation, a uniform layer of soot should form on the glass. It will serve as a conductor in the heater;
Tip: If the glass is cooled before processing, the layer of soot will lie more evenly on its surface.
- Using cotton swabs, we form a transparent “frame” about five millimeters wide around the perimeter of the glass;
- Cut out two rectangles from a sheet of aluminum foil. Their width should be equal to the width of the conductive layer (the same soot that you diligently deposited on the glass at the beginning of work). The foil strips in our IR will act as electrodes;
- place the glass plate with the smoked side up and apply epoxy glue to its surface;
- We place foil on the edges of the plate so that their ends extend beyond the glass;
- carefully cover the resulting structure with a second glass plate (smoky side inward) and glue the “pie” together, carefully pressing its layers together;
- We seal the perimeter of the structure;
- measure the resistance of the conductive layer;
- Using the obtained result, we calculate the heater power using the formula:
We recommend: Inverter heater for home: principle of operation, technical qualities, pros and cons
N = R x I2, where
N – power (W);
R – resistance (Ohm);
I - current strength (A).
Ready-made infrared heater made of foil and glass
If everything went well and the power did not exceed the value allowed by regulations, you can connect the homemade infrared heater to the outlet. If you don’t guess correctly, disassemble the device and start all over again.
Note: For orientation, keep in mind that the wider the soot strip, the lower the resistance. Consequently, the heating temperature of the glass will be higher.
IR based on laminated plastic
You will need:
- paper laminate with an area of 1 square. m – 2 blanks;
- epoxy glue;
- graphite;
- copper busbar for making terminals;
- wood for making a frame;
- power cord with plug.
Graphite can be “mined” from batteries that have expired.
What need to do:
Graphite for heater
- mix epoxy glue with graphite until a thick mass is obtained (this prepares a future conductor with high resistance);
- Place the plastic blank on the workbench with the rough side up;
- Apply an epoxy-graphite mixture to the surface of the plastic using zigzag strokes;
- similarly prepare the second plate;
- we place the plates on top of each other with the treated sides facing each other, and glue them together;
- We attach copper terminals on opposite sides of the graphite conductor;
- We construct a fixing wooden frame along the perimeter of the structure;
- leave the product alone until the graphite-epoxy layer has completely dried;
- we measure the conductor resistance and calculate the power (see option 2).
The resistance value of the conductor depends on the amount of graphite in the mass. If, as a result of testing, it turns out that the conductor resistance is too low, prepare a new epoxy-graphite composition by increasing the dose of graphite. Accordingly, high resistance can be reduced by reducing the amount of graphite powder in the conductor.
After you achieve a positive result, you can connect the power cord to the terminals and plug the device into the outlet. You can improve the design by installing a simple thermostat.
We have considered only a small fraction of the methods for making infrared heaters. In fact, there are a great many options, because home craftsmen tend to use different things that have served their purpose. Their diversity determines the number of inventions of homemade infrared heaters.
Next, we invite you to watch a video that presents another interesting and easy-to-implement option for creating an infrared heater.
Case requirements
The housing can be made of steel or aluminum. Aluminum options are nicer but come at a higher price, so choose your heater wisely. Iron is a cheaper material, but in damp rooms it can become corroded, especially on the inside (it is usually not painted). Rust quickly eats through thin metal and comes out, which leads to a deterioration in the aesthetic properties of the lamp.
Modern heaters look quite stylish