In the process of heating a house or apartment, the coolant is pushed by the engine along the circuit. If it is not balanced, it will heat the rooms unevenly. For example, when the house has radiators and heated floors, one of the systems may warm up more than the other. To prevent this from happening, when installing a heating system, it is necessary that the heating system be balanced correctly.
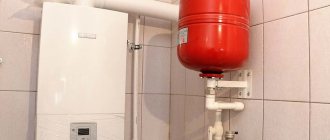
Heating system diagram Source aw-therm.com.ua
How to regulate radiators
To understand how temperature regulation occurs, let’s remember how a heating radiator works. It is a labyrinth of pipes with different types of fins to increase heat transfer. Hot water enters the radiator inlet, passing through the labyrinth, it heats the metal. This, in turn, heats the air around it. Due to the fact that modern radiators have specially shaped fins that improve air movement (convection), hot air spreads very quickly. During active heating, there is a noticeable flow of heat from the radiators.
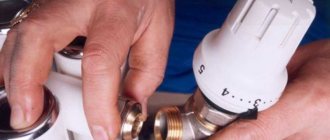
This battery is very hot. In this case, the regulator needs to be installed
From all this it follows that by changing the amount of coolant passing through the battery, you can change the temperature in the room (within certain limits). This is what the corresponding fittings do - control valves and thermostats.
Let's say right away that no regulators can increase heat transfer. They only lower it. If the room is hot, install it; if it’s cold, this is not your option.
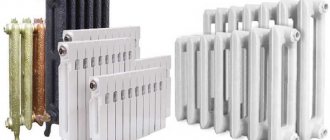
How effectively the temperature of the batteries changes depends, firstly, on how the system is designed, whether there is a reserve power of the heating devices, and secondly, on how correctly the regulators themselves are selected and installed. The inertia of the system as a whole, and the heating devices themselves, plays a significant role. For example, aluminum heats up and cools down quickly, while cast iron, which has a large mass, changes temperature very slowly. So there is no point in changing anything with cast iron: it takes too long to wait for the result.
Options for connecting and installing control valves. But to be able to repair the radiator without stopping the system, you need to install a ball valve before the regulator (click on the picture to enlarge its size)
Fans
To make the room warm up faster from radiators, you can use fans. The easiest way is to install several computer coolers under the battery. Warm air from radiators is known to rise. As it cools down, it sinks down. Coolers installed under the battery speed up this process.
Good news: the astrologer named people who will be able to lose weight by the end of April
Where did the normal screenwriters go: did the audience like “Midwife-3”
I found love on a project, but before that I was married: facts from the life of Nikita Dobrynin
Automatic adjustment
Automatic maintenance of room temperature is good because once you set the control knob to the desired position, you will get rid of the need to twist and change something for a long time. The temperature of the heating radiators is adjusted constantly and continuously. The disadvantage of such systems is their significant cost, and the more functionality, the more expensive the device will be. There are some other features and subtleties, but more on them below.
Adjusting radiators with thermostats
To maintain a constant set temperature in a room (room), thermostats or thermostats for heating radiators are used. Sometimes this device may be called a “thermostatic valve”, “thermostatic valve”, etc. There are many names, but one device is meant. To make it clearer, it is necessary to explain that the thermal valve and thermal valve are the lower part of the device, and the thermal head and thermoelement are the upper part. And the entire device is a radiator thermostat or thermostat.
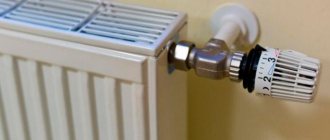
This is what the thermostat on the radiator looks like
Most of these devices do not require any power source. The exception is models with a digital screen: batteries are inserted into the thermostatic head. But their replacement period is quite long, the current consumption is low.
Structurally, the radiator thermostat consists of two parts:
- thermostatic valve (sometimes called “housing”, “thermal valve”, “thermal valve”);
- thermostatic head (also called “thermostatic element”, “thermoelement”, “thermal head”).
The valve itself (body) is made of metal, usually brass or bronze. Its design is similar to that of a manual valve. Most companies make the lower part of the radiator thermostat unified. That is, heads of any type and any manufacturer can be installed on one body. Let us clarify: you can install a manual, mechanical, or automatic thermocouple on one thermal valve. It is very comfortable. If you want to change the adjustment method, you do not need to buy the entire device. They installed another thermostatic element and that was it.
The difference between a manual radiator regulator and an automatic one is only in the installed thermal head
In automatic regulators, the principle of influencing the shut-off valve is different. In a manual regulator, its position is changed by turning the handle; in automatic models there is usually a bellows that presses on the spring-loaded mechanism. In electronic devices, everything is controlled by the processor.
The bellows is the main part of the thermal head (thermoelement). It is a small sealed cylinder containing liquid or gas. Both liquid and gas have one thing in common: their volume is highly dependent on temperature. When heated, they significantly increase their volume, stretching the bellows cylinder. It puts pressure on the spring, blocking the flow of coolant more strongly. As it cools, the volume of gas/liquid decreases, the spring rises, the coolant flow increases, and heating occurs again. This mechanism, depending on the calibration, allows you to maintain the set temperature with an accuracy of 1oC.
Watch the video to see how the thermostat works.
The radiator thermostat can be:
- with manual temperature control;
- with automatic; with built-in temperature sensor;
- with remote (wired).
Using Three-Way Valves
A three-way valve is rarely used to regulate battery temperature. He has a slightly different task. But in principle, it is possible.
By installing a three-way valve on the supply side, you can also regulate the coolant temperature
A three-way valve is installed at the junction of the bypass and the supply pipe going to the radiator. To stabilize the temperature of the coolant, it must be equipped with a thermostatic head (of the type described above). If the temperature near the head of the three-way valve rises above the set value, the flow of coolant to the radiator is blocked. It all rushes through the bypass. After cooling, the valve operates in the opposite direction and the radiator heats up again. This connection method is implemented for single-pipe systems, more often with vertical wiring.
Registers
This was a very simple and cheap solution in situations where large areas needed to be heated. Although if we talk about the heat transfer of a pipe in such a register in comparison with an aluminum radiator, the difference in efficiency is staggering. Due to the larger area of the radiator heat exchanger and the thermal conductivity of aluminum, modern equipment is undoubtedly preferable. And externally the registers looked quite rough.
However, for their time registers were acceptable due to their cheapness and simplicity. It can be noted that the welds on them were very strong, and pipe clogging did not interfere with their functioning.
What to do with a stuck ball valve
If ball valves are not rotated for years, they tend to sour and jam. In such a situation, do not try to resolve the issue physically and do not force the “butterfly” with pliers or a gas wrench. It is made of a brittle alloy and will probably break. Proceed like this:
- Unscrew the locking nut and remove the butterfly handle from the stem.
- On most of these valves, you will find a nut under the handle that clamps the plastic seal. Loosen it by turning the wrench half a turn. If there is no nut, go to the next step.
- Take an adjustable wrench or other device that allows you to securely grab the flats on the rod. Without applying much force, turn it as far as possible.
- When you feel resistance, turn the rod back all the way and forward again, trying to turn it a few more degrees. Work carefully and without haste!
- In this way, rotate the valve 90°, then tighten the gland nut and reinstall the handle.
An adjustable wrench can be used to firmly grasp the edges
Advice. If you have WD-40 spray lubricant in your household, apply it to the stem and wait 5-10 minutes before rotating.
Be doubly careful when turning off radiators with soured taps during the heating season. If you hurry too much and apply too much force, you will break off the metal rod or ball, and in the worst case, the valve body will burst. A stream of hot water can shoot out from the crack, which can burn you. While you go down to the basement and close the heating riser, the coolant will cause damage to the interior of the room, and you can roughly guess how much it costs to renovate the apartment now.
If you are not sure of your actions, call a plumber. More information on how to close a jammed ball valve in order to disconnect the radiators is described in the video:
Types of temperature controllers
According to GOST 30815-2002, thermostats are classified into 4 groups:
The advantages of built-in sensors are compactness and easy installation. Disadvantage - impact on the efficiency of surrounding objects. If the sensor on the heating pipe is standing vertically, or there is a thick curtain hanging nearby, the sensitive element quickly heats up and the valve operates prematurely.
Also, the sensor may not function correctly if, together with the radiator, it is located in a niche or near a window sill. How to properly connect a thermostat with a built-in sensor is always indicated in the manufacturer’s instructions, which must be strictly followed.
Remote sensors are not directly affected by the radiator, which leads to more accurate maintenance of the set mode. You can attach a radiator temperature sensor at a distance of up to 8-10 m to measure degrees anywhere in the room. It is connected to the thermal valve by a capillary tube, which transmits pressure from the sensitive element of the sensor to the movable rod.
How to regulate a heating battery?
How to adjust the battery? General recommendations
Perhaps you don’t know how to adjust the radiator in your apartment. Then the tips below will help you. To do this correctly, just closing/opening the control valve on the radiator is not enough. Depending on the number of radiators connected to the system, you need to open a certain number of them by a certain number of revolutions. For example, there are four batteries installed that are connected to the central heating system. To distribute the pressure over it, the first battery opens several turns, the next - three, another - four, and so on. Now you know how to adjust the radiator manually. And, as it becomes clear, this is easy to do, and your rooms in the apartment will heat up very quickly to the temperature you need.
The answer to the question of how to regulate batteries takes on a different meaning if there is an option for forced pumping of liquid. Then you have the opportunity to install three-way valves on all batteries. Then it will not be difficult to regulate the temperature in the radiators. So, in order to significantly simplify the setup, each battery should be equipped with special valves that allow you to control the flow of heat and the rational consumption of heating equipment. If the room is hot or it is closed and not in use, the valve allows you to reduce or close the flow of hot water into the battery.
How to regulate batteries using a valve
In multi-apartment buildings, valves are most often installed at the exit/input from the elevator unit of the heating system. These devices in their own housing have 2 rings made of steel, protected from corrosion. They encircle the coolant passage. Several more of these rings are located on the surface of the valve, in particular in its moving part, which is very convenient.
Next you will read how to regulate the temperature of a radiator. If the valve is located at the bottom and lowers, then it impedes the movement of liquid, and if it is moved upward, it goes beyond the circulating flow. To close it, the user must rotate the handwheel, which drives a screw-threaded rod. For hot liquids and heating systems, it is best to use a graphite valve. There is no alternative to it if the pipe diameter is over 50mm.
Recommendations for installing devices
To be able to regulate the temperature of the battery in the apartment, consider any type of valve: they can be straight or angular. The installation principle of such a device is simple; the main thing is to correctly determine its position. Thus, the direction of coolant flow is indicated on the valve body. It must correspond to the direction of water movement inside the battery.
Place valves/thermostats at the inlet of the heating device; if necessary, install a tap at the outlet as well. This is done so that in the future it will be possible to independently drain the coolant. Regulating devices are installed on heating radiators, provided that the user knows exactly which pipe is the supply pipe, since a tap is made into it. In this case, the direction of movement of hot water in the riser is taken into account: from top to bottom or from bottom to top.
What else you should know
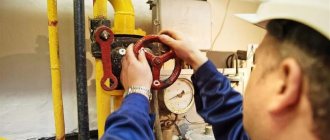
If you are wondering how to turn off the battery if there is no tap, then there is a solution here too. True, the option of blocking the riser is inevitable here. In this case, not only the individual battery will be blocked, but also part of the heating system. In small cities, the practice of turning off the heating independently is often used, just by shutting off the riser. It is turned off using a valve in the basement. At that point he approaches the sun lounger. Water valves are usually within sight.
You can find out which fittings are suitable for shutting off the heating in the technical documentation. Additionally, this should be known to an experienced plumber who is familiar with local utilities. In most cases, the heating system is shut off using a brass valve or a valve.
In the event that the window sill blocks the battery, there is no single solution. It all depends on the degree of overlap. So, for example, if the window sill completely blocked the battery, then this is considered unacceptable. This is explained by the concept of convection, in which warm air rises. There it replaces cold air, which goes down, after which it is heated by the battery. Thus, the room is heated. If the window sill completely blocks the radiator, then the convection process is hampered and the room does not warm up well. But there will definitely be a way out of this situation. You can make several rectangular holes in the window sill and cover them with decorative grilles.
- So, shutting off the batteries in an apartment is possible and, in some cases, even necessary. This can be most conveniently accomplished with special taps.
- After the end of the heating season, it is recommended to close one of them and leave the second open.
- On the day of heating, we close both taps for 1-2 days so that rusty water flows and eliminates the possibility of blockages.
- If there is no tap, then you will have to shut off the riser using a special valve or valve, which are most often located in the basement of the building, and usually in a visible place.
The main thing is to do everything thoughtfully and strictly in accordance with all standards and requirements. Do not close both taps at the end of the heating season, this may cause deformation and cracks in them. Do not forget about the basic rules that will help you shut off the battery in your apartment safely and correctly.
Small details.
To quickly and accurately measure the temperature of a steam heating battery, it is enough to apply a small amount of “KPT-8” thermal conductive paste to the sensor ball of a digital thermometer. During the measurement, the contact area should be covered with several layers of fabric or a layer of foam rubber.
The above experiment made me question the accuracy of my digital thermometer. To make sure his readings were correct, I compared them with the readings of a mercury thermometer. To do this, I immersed both thermometers in hot water to the same depth and monitored the readings as the water cooled.
Prolonged operation of fans immediately revealed the weak point of modern devices.
If the 1973 Penguin fan has a front sliding bearing equipped with an oil seal (the arrow marks the hole for filling the oil seal), which has allowed it to work for almost 40 years, then in a modern fan there is no trace of such an oil seal.
In addition, the Penguin has a spring that prevents longitudinal vibrations of the shaft. The new fan, after two days of operation, began to rattle, because due to the longitudinal runout of the shaft caused by the eccentricity of the propeller, one of the fluoroplastic gaskets quickly wore out.
To eliminate the longitudinal play, several ordinary and two thin-walled washers were needed, as well as a gasket cut from foam rubber.
First I disassembled the stator.
Then I put thin-walled washers and a gasket on the motor shaft, and used the remaining washers to increase the gap between the bearings.
To ensure any long-term operation of the fan, I cut out an oil seal from felt, and a seal plug from some nylon cover and pressed it all into the recess around the shaft. Naturally, I didn’t skimp on the oil either.
I started thinking about buying two dozen 120mm computer fans. I think if you install them directly between the battery sections, it should reduce noise and increase heat transfer efficiency.
Why do you need to make adjustments?
Setting the optimal temperature of the heating radiators allows you to create the most comfortable living conditions indoors. In addition, adjustment allows:
- Remove the effect of air in the batteries, allow the coolant to move freely through the pipeline of the heating system, effectively transferring its heat to the interior of the room.
- Reduce heat consumption costs by up to 25%.
- Do not keep windows constantly open if the air in the room is excessively overheated.
It is advisable to set up heating and adjust batteries before the start of the heating season. This is necessary so that later you do not experience discomfort in the apartment and do not adjust the heating temperature of the batteries in emergency mode. Before setting up and adjusting the radiators, initially in the summer you need to thermally insulate all windows. In addition, you need to take into account the specific location of the apartment:
- In the middle or corner of the house.
- Lower or upper floor.
After analyzing the situation, it is advisable to use energy-saving technologies to maximize heat conservation inside the apartment:
- Insulate walls, corners, floors.
- Carry out hydro and thermal insulation of the seams between the concrete joints of the panel house.
Without this work, it will be useless to regulate the temperature of the radiators, since the lion's share of the heat will heat the street.
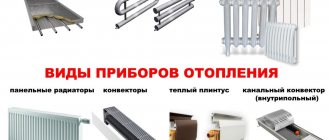
Results
Adjusting heating radiators is possible using different devices, but this must be done correctly using special control valves. These are manual regulators (taps) and automated ones - thermostats; in some versions it is possible to use a three-way valve with a thermal head.
In what case should I use what? In multi-storey apartments with central heating, a three-way valve and control taps are preferable. And all because the gap in thermostats for the coolant is not very wide, and if there are foreign particles in the coolant, it quickly becomes clogged. Therefore, they are recommended for use in individual heating systems.
If you really want automatic radiator control in your apartment, you can install a filter before the thermostat. It will retain most of the impurities, but you will have to wash it regularly. When you feel that the radiator has become too cold, check the filter.
In private houses, with battery regulation, everything is simple: what suits you best, then install it.
Adjusting heating flow or return
In some cases, hydraulic balancing—adjustment of flow and return—will help to effectively redistribute heat throughout the heating system. In this case, the coolant is directed from places of its excess to areas experiencing a deficiency.
In apartment buildings, the procedure is carried out in accordance with the state energy saving program. In a private cottage, this is the task of the owner himself. In addition to equalizing the temperature on all branches of the system, hydraulic balancing helps reduce energy consumption and, consequently, heating costs.
The work is performed by qualified specialists. In pipes with a length of 10 meters or more, and in areas remote from the circulation pump, balancing valves are installed. It is possible to divide the system into autonomous modules with individual settings, which is appropriate for obtaining different heat transfer in each room.
Coloring
It was noticed that dark-colored radiators warm up rooms much better than light-colored ones. By painting radiators brown, you can increase their heat transfer by 20-25%. Batteries need to be painted with special heat-resistant enamel.
In this case, it is advisable to remove the layer of paint already on the radiators. Several layers of paint are also a kind of heat insulator. Therefore, it will not be possible to obtain the effect of repainting.
The Frontier mod for Fallout: New Vegas will add new vehicles to the game
In the USSR, gardeners prepared seedlings from buckwheat.
Kazakh DJ Imanbek told how he created the Grammy-winning track
If the batteries are too hot
In this case, the question arises of how to adjust the heating radiators in the apartment. The user cannot change the network temperature; all that remains is to reduce the fluid flow rate in the heating devices. For this purpose, special manual or automatic devices are used.
A manually operated valve is the simplest and long-known method. By reducing the available cross-section of the pipe using a rod, we reduce the flow of heated liquid into the radiator and thereby reduce its heat transfer. In this case, you should check whether such “heat adjustment” will not be an unprofitable enterprise: when all batteries are connected in parallel, a decrease in the flow in the first one automatically causes cooling of the others. Thus, if the first radiator in the chain is located in the bedroom and it is too hot, you can reduce its heating. But then the last radiator - for example, in the kitchen - will turn out to be almost cold and the heating in the room will be insufficient.
Important: if it is hot in the apartment, but the heating system is single-pipe, adjustment can only be made if there are bypasses (jumpers). Otherwise, by “screwing on” the batteries at home, you can get into trouble with neighbors living “further down the riser” or with utility employees
With a two-pipe scheme, such problems do not arise.
To regulate heating radiators, install either a valve and a ball valve on the inlet and outlet pipes, respectively, or a thermostat on the heating radiator.
Important: a valve must be installed on the supply pipe, not a ball valve! The valve is a purely shut-off valve with two operating positions - “open” and “closed”. Intermediate positions of the ball lead to its gradual destruction by solid particles of the coolant, therefore the “lifetime” of such a valve is much shorter than that of a valve
The valve is considered a shut-off control valve for heating and has a wider range of operating positions between the extremes.
To manually adjust the heating system in an apartment, special control valves with direct or angular connections are used.
The choice of the desired position of the rod in this case depends on the outside temperature, the heating of the water supplied to the heating system and the wishes of the users. How to regulate radiators with a regulator? Carefully monitor the temperature in the apartment (house) and “tighten” the valve to the desired result. Interestingly, manual valves have a built-in thermal valve and you can relatively easily turn a device for manual adjustment into an automatic one by purchasing and attaching a thermal head to it.
Automatic regulators
Automatic devices consist of a thermal valve and a thermal head.
The valve allows you to change the cross-section in the supply pipe; the thermal head, based on remote or built-in temperature sensors, as well as additional controllers, gives a command to change the position of the rod in the valve.
The simplest (and cheapest) version of the device contains a capsule of gas or liquid, which expands and contracts under the influence of temperature changes. The rod piston located next to this capsule moves towards decreasing or increasing the flow area of the pipe. More complex devices are powered by a battery or accumulator and transmit force to the rod using electric current. Some options connect to the home electrical network, for example, thermostats built into the overall smart home system.
The question of how to regulate the temperature of a heating battery using a thermostat - in a fully automated mode or with the control of the homeowner - is decided depending on the general scheme of the smart home system and the features of its operation.
An important nuance: for normal operation of a device with a remote temperature sensor, it is necessary to ensure constant and free air circulation near the thermometer. If the sensor is located directly in the thermal head, it is better to mount it horizontally (perpendicular to the main plane of the radiator), since it is in this position that the heating elements have the least effect on the thermometer.
The quality of operation of remote temperature sensors is also affected by:
- thick curtains covering it;
- the distance between the window sill and the sensor is too small;
- installation of a heating device in a niche.
Features of heat transfer from radiators and ways to change it
When trying to regulate heating in an apartment building, you must first understand how the batteries are connected, how efficiently they give off heat, and what condition they are in. There are one- and two-way pipe connections. It is clear from the illustration that the one-sided option means connecting the inlet and outlet pipes on one side of the radiator, and the two-way option - on different sides. The efficiency of heat transfer depends on where the supply and exhaust pipes are located. This is due to the greater density of the cold liquid (with a difference of 2...10 degrees, the difference is small, but fundamental) and its high specific gravity. Thus, the cooled coolant automatically drops to the lower part of the radiator. If the heated liquid is supplied from below, it is difficult for it to displace the cold liquid to the upper part of the heating device. As a result, heating efficiency decreases.
Thus, the most rational option for “pass-through” radiators is to connect the inlet pipe to the top of the radiator, and the outlet pipe to the bottom on the opposite side. The battery that closes the working “chain” (that is, a series of parallel-connected radiators) can be connected according to the “top-bottom on the same side” principle.
If, despite the correct type of connection, the radiators do not produce enough heat, it is necessary to find out the temperature of the coolant. This can be done using data from a heat meter (if it is installed and has such a function) or a thermometer. Analysis using a thermal imager can also help (this method is also convenient for checking the slagging of radiators - the color change makes it clear which sections are working and which are not).
According to standards, heating of the coolant depends on the outside temperature and is determined by the pipeline entering the house.
Interesting: you can independently determine whether the heating of the radiators is really sufficient to create a comfortable temperature in the room using simple calculations. To do this, you can use the data below.
Example: a room of 15 square meters. has two external walls, both with windows. One of the windows faces north. The radiator is located in a small open niche under the north window. In this case, the minimum required power is 15 x 100 = 1500 W.
As amended
1500 +1500x(30+10)/100 = 2100 W
If the coolant temperature is sufficient, but the radiators give off too little heat, they will have to be replaced. If the heat transfer is uniform, but the temperature of the supplied liquid is too low, nothing can be done; you will have to deal with the utilities or arrange additional heating.
How to adjust (reconfigure)
All thermostats are factory adjusted. But their settings are standard and may not match your desired parameters. If you are not satisfied with something in the work - you want it to be warmer/colder, you can reconfigure the thermostat for the heating radiator. This must be done with the heating running. You will need a thermometer. You hang it at the point where you will control the state of the atmosphere.
- Close the doors, put the thermostat head in the extreme left position - completely open. The room temperature will begin to rise. When it becomes 5-6 degrees higher than what you want, turn the regulator all the way to the right.
- The radiator begins to cool down. When the temperature drops to a value that you consider comfortable, begin to slowly turn the knob to the right and listen. When you hear the coolant making noise and the radiator starting to warm up, stop. Remember what number is on the handle. It will need to be set to achieve the required temperature.
Adjusting the thermostat for a radiator is not difficult at all. And you can repeat this action several times, changing the settings.
Mixture for pouring screed
Filling a floor or screeding is a procedure that requires great care and precision. You can avoid cracking of the floor during drying and during the operation of the system by carefully observing the temperature regime and strictly following the instructions for preparing solutions.
For pouring, use ready-made self-leveling mixtures for heated floors or self-mixed ones on a concrete base.
In the first case, the mixtures are made on the basis of gypsum and require dilution with water to the consistency of sour cream. The drying time for the floor in this case is from 3 to 5 days. During this period, it is recommended to minimize air humidity.
It is better to refrain from using these solutions for floor screeding in rooms that are constantly exposed to water (bathroom, cellar).
Homemade mixtures are made based on cement. Recommended brand - M300 and above. The composition of the mixture is as follows:
- Cement - 1 part.
- Fine-grained sand - 4 parts.
- Water. Add water until the mixture reaches the consistency of dough. When adding water, constant stirring is necessary.
- Plasticizer. It facilitates screeding and is applied in concentrations recommended by the manufacturer, ranging from 1 to 10% of the volume. The criterion for the correct consistency of the mixture is the ability to form lumps from it that do not crumble or spread. If the plasticity of the composition is not sufficient, the ball cracks, which means there is not enough liquid in the mixture. If the mixture is too liquid, sand and cement must be added.
Before pouring, the perimeter of the room is covered with damper tape, which serves for sound insulation and prevents cracking of the floor when heated.
Pipes and cables are secured with rigid clamps.
The screed is produced at air temperatures from 5° to 30° (a number of professional mixtures allow installation at lower temperatures, they have a special marking).
The maximum area for one-time filling is 30 sq. m. Large spaces are best divided into sections. In places where the surface is divided into sections, protective corrugated hoses are put on the pipes.
The shelf life of the prepared solution is 1 hour, after which it cannot be used.
Filling one area is carried out quickly and in one step.
Immediately after the procedure, the mixture should be pierced in several places with an awl or a thin knitting needle to ensure the release of air bubbles. For the same purposes and additional leveling, use a needle roller or a stiff brush. The needle should be longer than the thickness of the solution layer.
Drying of homemade mixtures occurs within 20-30 days and has a number of features:
- Sudden changes in room temperature and exposure to direct sunlight are unacceptable. This is fraught with uneven drying and subsequent deformation.
It is better to cover the floor surface with plastic wrap and periodically (every few days) moisten it with liquid.
After drying, it is recommended to turn on the heating system for several hours at a moderate heat supply.
Recommended air humidity is 60-85%.
Before laying tiles, linoleum, parquet or wood flooring, the heating must be turned off.
When using materials prone to cracking and swelling, air humidity must be reduced to 65%.
The tiles are laid on tile adhesive, carpet, linoleum and laminate directly on the screed.
Self-installation of a heated water floor is possible only if you have enough time and careful and strict adherence to all instructions and rules.
We invite you to watch a video detailing the installation of water heated floors:
How to properly connect a bimetallic radiator?
Very often, and in the fall almost every day, on the most popular forum in RuNet on the topic of installation, mastergrad.com, topics or messages appear asking about problems connecting bimetallic radiators in apartments, and I am very sorry that in our time, when there is access to any information in networks, many people are faced with this problem when turning to “specialists” to replace radiators who do not have the slightest idea how this installation is performed. And the question is not only that the radiators do not warm up completely or completely, which casts doubt on the feasibility of such a replacement, but also that installation is also often carried out with serious violations of the design conditions of the heating system, which seriously affect its reliability, thereby The life and health of residents is in serious danger. In this topic, by posting photos of my work, I will try to give simple advice on how to connect radiators so that all building codes are observed and new heating devices are fully heated.
Which pipes should I choose for installing radiators?
Firstly, I would like to immediately decide on the type of pipeline material with which the new radiator is connected: if in the house according to the project the risers of the heating system are made of black steel pipe, then the inlets to the radiator should also be made of steel. Options made of plastic pipes (polypropylene, metal-plastic) are significantly inferior in reliability to steel pipes and are categorically unacceptable in systems designed from steel, especially with open installation, which is unacceptable according to SNiP requirements; connecting a radiator with copper pipes and stainless steel pipes, I personally consider inappropriate for economic and aesthetic reasons, as well as due to decreased reliability of the pipe due to the significantly smaller wall thickness.
Secondly, it’s worth determining the type of connection for the pipeline; it’s hard to argue that gas welding is optimal, both for reasons of reliability (with threaded connections there is always a weak point - a snag) and from an aesthetic point of view due to the absence of threaded fittings
It is also important that risers installed by house builders rarely have the correct geometry relative to the walls and floor, but with gas welding, installers can easily correct all the unevenness left by the builders
Heated towel rails
In old houses, heated towel rails made of steel pipes are very common, because in most cases they were laid out by the project, and almost until the end of the last century they were threaded into the system.
Not so long ago, they began to use circular inserts in elevator units, which ensure a stable hot temperature of the device.
Since the heating circuits in heated towel rails were constantly subject to temperature changes - they either heated up or cooled down - it was difficult for the threaded connections to withstand this regime, so they periodically began to leak.
Somewhat later, when the heating of these devices became stable thanks to the insertion into heating risers, the problem of leaks became less pressing. At the same time, the dimensions of the coil have become much smaller, resulting in a reduction in the heat transfer area of the steel pipe. However, such a heated towel rail remained warm not only while using hot water, but constantly.
Remember that the battery is always filled with water
The battery is filled with liquid throughout the year.
Water is drained only for a short time during centralized repair work. Therefore, if you plan to replace the battery, simply disconnecting it is not enough - you need to drain the water. Why is the system constantly filled with coolant? It is highly undesirable for oxygen to enter the heating system. When the water drains, air and water vapor take its place. This leads to active oxidation - that is, the appearance of rust on the surface of steel and bimetallic batteries. Oxygen dissolved in the coolant does not destroy the metal, i.e. does not lead to corrosion. Therefore, in order for the heating system to last a long time, it is always filled. Date: September 25, 2022
System purging
Airing or clogging of radiators leads to a completely cold canvas or part of it. Purging the system will help. There are several methods, each of which will require additional equipment:
- hydraulic purging;
- pneumohydroimpulse;
- the use of chemical compounds or soda ash.
These types most often involve servicing the entire system. This seems to be the most effective, because central heating is a complex system of pipes and pipelines.
It is recommended to carry out a single collective cleaning, which will be much more effective than individual cleaning.