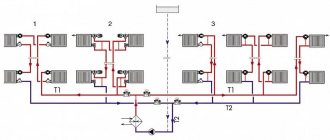
Regulators in one-pipe and two-pipe heating systems
In homes with an older single-pipe system, the batteries are connected in series.
This means that the thermostat, by stopping the supply of coolant to one radiator, actually stops the circulation of hot water throughout the entire system. Replacing old batteries with modern convectors should be accompanied by the installation of a bypass - a pipe connecting the inlet and outlet channels of the pipeline. For such a system, thermostats with a large internal diameter and low resistance are chosen. If you do not take this point into account, then all the coolant will go through the bypass, and the batteries will remain cold.
Examples of installing thermostats in a one-pipe and two-pipe heating system.
In a two-pipe system, radiators are connected in parallel. Disabling one battery will not affect the operation of the others. A bypass is not needed here, and for effective temperature control you can install a thermostat with high hydraulic resistance.
On a note! Regulators on aluminum, bimetallic and steel radiators that have low thermal inertia work much more efficiently.
Connecting an automatic thermostat to the battery yourself.
Wiring diagrams
Installation diagrams for installation in one- and two-pipe heating systems
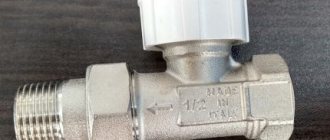
- When installing a thermostat on a radiator in a one-pipe heating system, it is necessary to change the battery connection diagram, additionally installing a bypass - a jumper between the input and output of the main line. Thanks to this, the coolant will be able to flow to other radiators while the valve is closed. Locking devices are additionally introduced into the connection diagram, which will allow you to remove the thermostat or battery for repair or replacement.
- In a two-pipe heating system, the thermostatic regulator is installed on the supply pipe, and a ball valve is mounted at the outlet of the battery.
Heating system thermostats can be installed on steel, aluminum and bimetallic radiators. Installation on cast iron batteries is impractical due to their high thermal inertia.
Thermal valve for heating radiator: classification
Now let's talk about the lower part of the thermostat - the valve (valve). First of all, you need to know that the industry produces control devices for different systems. And you only need to use devices for your system.
Devices for two-pipe systems have at least twice the hydraulic resistance than for single-pipe systems. This was done on purpose, since balancing in this case occurs due to the pressure drop across the valves. That is why devices with a small flow area are installed. If you put such a device in a single-pipe system, you will probably freeze. Therefore, be careful.
There are thermal valves for radiators in one-pipe and two-pipe systems. And you cannot use devices for a two-pipe system in a one-pipe system.
Sometimes modifications for single-pipe systems are positioned as devices for natural circulation systems. They have reduced hydraulic resistance and can be used in single-tubes.
Depending on the method of pipe installation, radiator temperature regulators are either angular or straight (through). There are also axial models. In this case, they are chosen depending on the type of connection of the heating device. If the pipe approaches from the side, it is more convenient to install a straight valve, if from below - one of the corner ones.
According to the type of connection, thermostatic valves for radiators are straight and angular
Thermal valves also differ in the material from which they are made. Metals that have good corrosion resistance are used. Some of them also have an additional protective coating applied (usually nickel or chrome plating). So, thermostatic valves are made from:
- bronze, nickel-plated and chrome-plated;
- brass, nickel plated;
- stainless steel
It is clear that stainless steel is better, but such valves cost a lot and are rarely found on sale.
Replacing the refrigerator temperature sensor
A faulty thermostat requires replacement. Replacing a broken thermostat yourself is quite simple if you get to the place where it is installed. This is where difficulties arise.
In modern refrigerators, the thermostat adjustment is usually located on the front panel and is located at the top of the refrigerator, but it can also be located inside. The refrigerator cooling module (evaporator) is hidden under the plastic casing and is located in the rear.
To install a new thermostat yourself, you need to remove the broken thermostat.
To do this, you need to turn off the power to the refrigerator by unplugging the power cord. Depending on the refrigerator model, remove the plastic casing cover that contains the broken thermostat.
Mark the wiring diagram with a marker. Remove the capillary tube of the broken thermostat from the place of attachment (placement).
Install the new thermostat in reverse order. Do not confuse different thermostats that look similar to each other. Some can only work at positive temperatures, others are intended only for freezers. Using a thermostat that is not designed to operate a refrigerator (freezer) can lead to incorrect operation of the equipment and failure of expensive components (compressor).
Therefore, be sure to check the wires connected to the thermostat. It’s one thing if you find your own replacement thermostat, from the same manufacturer or brand, but another thing if you use an analogue.
By the way, the wires suitable for the thermostat have the following purpose:
- orange, red or black - connects the thermostat to the compressor;
- brown - phase wire leading to the socket;
- white, yellow or green - leads to a light indicating that the refrigerator is on;
- striped yellow-green - grounding.
Starting from the size of the contacts (the width of flat conductive contacts has 2 standards - 4.8 and 6.3 mm), location, thermostats can differ in the settings of the contact groups (power or low-current) and purpose (medium-temperature or freezing). For example, using an externally similar temperature sensor K57-2.5 instead of K59-2.5 will lead to freezing in the rear wall of the refrigerator and a change in the temperature regime of the refrigerator.
All thermostats have a so-called operating temperature range (for example, for the RANCO K-59 thermostat it is -32/+6), which the thermostat is actually designed to maintain.
Thermostats on the outside of the housing or inside have 2 adjusting screws that are responsible for the adjustable temperature range within the operating range (this is approximately 4-18 degrees) and for the response differential (usually 2-8 degrees). Be careful - simply adjusting one screw shifts the operating on/off temperature range. For example, the normal factory thermostat adjustment in the extreme minimum position (in the extreme position when rotating counterclockwise) is set to response thresholds of minus 10 / plus 3.5 degrees Celsius.
Rotating the adjusting screw responsible for the temperature range shifts these settings -> for example, to the position minus 5 / plus 8.5 degrees or minus 15 / minus 1.5. As a result, increased or decreased temperature in the refrigerator and spoiled food, etc. And if the second screw is additionally adjusted, then it is very difficult to restore the factory settings after the intervention - often, it is necessary to replace the thermostat with a new one.
Carefully. Twisting is not recommended. The thread stroke of the adjusting screw in the thermostat may not be structurally limited (especially with Chinese analogues); as a result, the screw may fall out of the thread during adjustment - it will not be possible to reinsert the screw without disassembling the entire thermostat.
Operating principle of thermostats
Undoubtedly, an automatic heating temperature controller greatly simplifies the life of owners. But you can save thermal energy without a thermostat, although you will have to adjust the radiators yourself. A regular valve and throttle will help with this, but compared to a thermostat, using these devices is still inconvenient.
The thermostat responds to fluctuations in outside temperature and regulates the heat supply.
Using a throttle and valve, you will have to adjust everything yourself several times a day. Also, heat transfer will vary somewhat depending on fluctuations in coolant temperature.
The thermostat automatically regulates room temperature by increasing or decreasing the flow of water through the radiators. If it's hot, water consumption decreases. When it gets cold, the thermostat opens slightly. The very principle of operation of the heating thermostat depends on the specific type of adjustment.
Mechanical thermostat
The components of the thermostat are the thermal head and the valve. The thermal head includes a regulator, a fluid element and an actuator. Sometimes the liquid element is replaced by an elastic or gas element. The cylinder-shaped thermocouple has corrugated inner walls called a bellows. The bellows contains a working environment in which a reaction to changes in temperature occurs.
Proportionally, as the room temperature increases, the volume of the working medium increases and the bellows stretches. Next, the working valve adjustment rod moves, closing the coolant supply. If the temperature in the house drops, then the working medium decreases in volume and the bellows contracts. The reverse stroke of the rod promotes increased flow of coolant to the radiator. Interestingly, the mechanical heating temperature controller, or rather the expansion and contraction mechanism, can stretch up to 1 million times.
Electronic thermostat
An electronically controlled thermostat automatically controls the boiler and other actuators, such as valves, pumps, mixers, etc. The user can set the most preferred temperature microclimate, and the electronic thermostat maintains the set temperature.
A standard electronic thermostat for heating contains a temperature sensor that is installed anywhere in the apartment, but at a remote distance from heating devices. Next, the device reads information in the part of space in which it is located. The data is transferred and the thermostat can control the heating system of the house.
Electronic programmable thermostat for heating system is divided into two types: open logic thermostat and closed logic thermostat.
In closed logic, only some parameters are allowed to be changed, while open logic provides more freedom: thermostats are easy to program, and there is also a huge list of functions and all kinds of settings. Oddly enough, closed thermostats are in great demand. This is explained by the fact that it is difficult for ordinary residents to understand the settings and all sorts of modes; it is easier to install a closed thermostat that will do everything itself.
Installation of thermostats
Many people are concerned about which rooms to install thermostats in. Often installation is done in the bedroom, but this is not advisable. It is more efficient to install in rooms with temperature differences, in rooms with frequent presence of people (kitchen, living room, etc.). For a bedroom, a regular heat control valve is sufficient.
The installation of a thermostat in a two-story house must take place on the second floor, from where the heating system of a private house will be adjusted. This is explained by the fact that the flow of warm air is directed upward, as a result of which the first floor remains cooler than the second. A thermostat with a sensor is installed in rooms with free air circulation. The device is placed in a horizontal position; this is the only way the sensor shows reliable data. We have already written about how a heating thermostat works here.
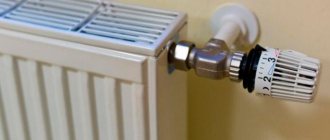
Correct installation occurs when installing the thermostat at the inlet of the battery. The thermostat valve has an external thread at one end and an internal thread at the other. Diameters come in half-inch and four-inch diameters. The thermostat is screwed into the radiator plug with the outer end of a suitable diameter.
Basic elements of a refrigerator temperature sensor
In household refrigerators, thermostats of various designs are used, but their individual elements perform very specific functions that are the same for all designs.
The abrupt contact opening unit protects the thermostat contacts from burning when opened. In the above schematic diagram of the thermostat, for the purpose of simplicity, the movable contact is placed on the power lever, which is directly acted upon by the bellows and the main spring. With this arrangement of the moving contact, severe burning of the contacts and their rapid failure are inevitable. This is explained by the fact that the rupture of the electrical circuit when the contacts are opened will occur slowly in accordance with the movement of the lever, which, in turn, is determined by the slow change in temperature and, accordingly, freon vapor pressure in the heat-sensitive system.
In addition, with such an arrangement of the moving contact, a slight turn of the power lever will immediately open or close the contacts, i.e. break the chain frequently. The abrupt contact opening unit eliminates these shortcomings. In this case, the moving contact is located on another lever (plate), connected to the power lever by a special reversible spring. When the power lever is rotated to certain positions, the lever with the contact will remain motionless, and then the flip spring will sharply change its position and the contacts will sharply open (or close).
The temperature change unit is a device that changes the tension of the main spring. In some thermostats, the spring tension is changed by rotating a screw, which moves a nut that rests on the end of the spring; in others, by rotating a roller with a profile cam pressed onto it, acting on the spring. The screw (roller) is rotated with a handle that has a pointer for setting it to a certain position on the instrument scale.
A temperature-sensitive system is a sensor that responds to changes in temperature in a controlled object and acts on the contact system of the device.
The final part of the tube, sensitive to temperature changes, may differ slightly for different thermostats, which depends mainly on the level of the liquid phase of freon in it. With a small inner diameter of the tube or a relatively large amount of freon in the tube, when the level of its liquid phase exceeds 80...100 mm, it is difficult to ensure a tight fit of the tube to the evaporator wall at such a length. In these cases, the end of the tube is curled into a spiral, bent into an elbow, or a can with an internal diameter larger than that of the tube is soldered.
The differential adjustment unit is used to regulate the differential value. The thermostat differential is the difference between the opening and closing temperatures of the contacts (at a certain tension of the main spring). The smaller the differential value of the device, the more within narrow limits the set temperature will be maintained. In thermostats of household refrigerators, this unit is used only for factory installation of the device. In many designs it is missing.
The differential is changed using a screw, which, being a limiter for the movement of the power lever, brings closer or removes the moment when the flip spring throws the lever with a moving contact.
The semi-automatic evaporator defrosting unit creates convenience when removing snow cover. The unit is used in individual designs of thermostats. The principle of its operation and design depend on the method of removing snow cover adopted in a particular refrigerator.
Installation and configuration of equipment
How to install and configure the device yourself? You need to do the following:
- choose the most suitable location for placing the thermostat. Where and how to install the equipment? It is not recommended to install the device in places exposed to direct sunlight, behind curtains, under a window sill or other obstruction, or next to other heating equipment. All of the above factors will affect the temperature reading of the thermal head;
Rules for determining the location for installing the thermostat
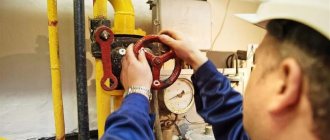
- drain the coolant. If the installation of a thermostat is carried out in an apartment building, then the help of employees of a service organization will be required;
- insert the thermal valve. To do this, a previously determined section of the pipeline is cut out, a thread is cut and the device is fixed;
The threads on the pipes or thermal head are sealed. To perform this action, you can use linen thread with protective paint or specialized thread, including FUM tape.
- Thermal head is installed;
- setup is in progress.
How to install a thermal head on a previously installed valve, watch the video.
How to set up a thermostat? To do this you need:
- eliminate all external factors affecting the room temperature: close windows and doors, turn off additional heating equipment, fans, and so on;
- Place a thermometer in the center of the room on a small elevation (stool, chair, table) to monitor the temperature;
- set the thermal head to maximum, that is, completely open the passage to the coolant;
- wait for the room to warm up 1 - 2 degrees more than the required parameter and turn off the thermostat. What is the optimal room temperature? Experts recommend maintaining a temperature of 24°C - 26°C in the bathroom, and no more than 24°C in other rooms;
Optimal temperature conditions in rooms
wait until this temperature is reached and gradually rotate the thermohead regulator until water noise begins to form.
Tips before installation
In addition, we would like to give you some useful tips before installing the equipment:
- Be sure to read the instructions from the manufacturer, since the installation and configuration of each device may have its own characteristics, without knowing which you can damage the equipment.
- Seal all connections well, do not overtighten the nuts to avoid damaging the parts.
- Look in which direction the arrows on the thermostat body point - they will correspond to the direction of coolant flow in the system.
- If the installation will take place with a single-pipe heating system, we must provide bypasses, otherwise your thermostat will disrupt all its operation.
- Choose a place to install the thermostat so that it is not exposed to direct sunlight and there are no other heat sources nearby, such as household appliances. This will allow the devices to work more accurately. Drafts are also contraindicated for them.
- In the coldest rooms, give preference to electronic devices, as they are more sensitive.
Valve installed on tee
The rules are quite simple, but despite this, they are very effective and will help you save on heating, reducing not only the cost of the regulators themselves, but also making them a plus over time.
Removing the thermostat
If you need to remove the device without dismantling, this can be easily done by separating the part with the thermal head from the valve, which is extremely simple:
- Before removing the thermal head, it is better to set the temperature indicator to maximum.
- Shut off the coolant supply.
- Unscrew the retaining nut, if there is one.
Unscrew the nut
- Move towards yourself to remove the thermal head from the rod, helping with light rocking from side to side. If the procedure cannot be completed manually, you can use pliers.
- There will be a rod sticking out at the installation site. You need to press it several times, like a button, and leave it pressed. This can be conveniently done using a flat-head screwdriver.
Press the rod several times
- Turn on the coolant supply. After a short period of time, the radiator will warm up, since without the device the temperature will be maximum.
How to install correctly
They install a thermostat for a heating radiator at the inlet or outlet of the heating device - there is no difference, they work with equal success in both positions. How to choose a place to install?
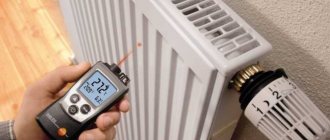
According to the recommended installation height. There is such a clause in the technical specifications. Each device is configured at the factory - they are calibrated to control the temperature at a certain height and usually this is the upper radiator manifold. In this case, the heat regulator is installed at a height of 60-80 cm; it is convenient to adjust it manually if necessary.
Danfoss products
Danfoss is particularly popular among manufacturers.
The most popular Danfoss models
It is worth noting that some RA series and RTD series devices have been converted to RTR series.
Thermocouple correspondence table
Valve correspondence table
It is worth remembering: in order for the thermostat to last for a long period of time, it is recommended to clean the equipment and remove the thermal head after each heating season.
Wide range and European quality
We offer a wide range of thermal heads for automatic control of thermostatic valves for your choice. Our catalog contains products from such well-known European companies as Danfoss, HEIMEIER, LUXOR, Meibes, RIFAR, STOUT, Watts.
For example, thermostatic elements produced by Danfoss (Denmark) are rightfully considered one of the best in terms of price/quality ratio. They are distinguished by their reliability and sophisticated design.
In our store, the prices for thermostats for radiators are very affordable. We have a wide range of thermal heads: gas, liquid, remote controlled, etc. We will always help you choose the best option for you. Contact us!
How to connect a thermostat to a boiler
When connecting, you need to be guided by two points: choosing a suitable place in the room and connecting to the boiler. To ensure proper operation, you need to know how to install the thermostat on the boiler. To reliably record the temperature, the thermostat for the boiler must be positioned based on the installation recommendations:
- the device is installed at a height of 1.5 m to 1.7 m from the floor;
- ensure that there are no heating devices, appliances, or radiators around the thermostat at a distance of at least 1 m, otherwise this may result in a false assessment of the room temperature;
- for the same reason, there should be no draft and no forced supply and exhaust ventilation in the room;
- The boiler thermostat should be located near the living rooms.
If the room has heated floors, then you should additionally purchase a temperature sensor to place it under the floor surface. Having secured the thermostat in a convenient place, you need to lay the connecting wire to the heating installation. The wire can run either open or closed.
Then the temperature controller is connected to the heating unit:
- At one end the cable is connected to the marked COM (common) and NO (normally open) contacts. In radio-controlled models, these contacts are located in the relay block;
- You need to find information about connecting the thermostat in the boiler passport, where the markings and contact diagram will be indicated;
- If the boiler is gas, then you need to open its front panel, behind which there are connectors;
- There will be a jumper in the required terminals that needs to be removed and saved;
- You need to connect the wiring from the thermostat to the indicated terminals (polarity is not important);
- In the case of a radio-controlled model, you need to connect the second relay block with a 220V power cable and a ground cable.
If the contacts are marked not with symbols, but with numbers, then the required terminals are found using a tester - the circuit between them must be open. After installing the thermostat, it should be configured. An incorrectly configured device can disrupt the indoor climate. Information on how to set up the thermostat is included in the instructions.
Before you start setting up, you need to get rid of drafts, close doors and windows and make sure that there is no heat loss. You need to place a thermometer in the room.
Next, the valve opens and the air temperature is expected to heat up by no less than 5 degrees. After which the valve closes and the noise of water and heating of the device typical for this procedure is expected, the position of the regulator head must be remembered. Now you can adjust the room temperature.
Signs of a faulty refrigerator temperature sensor
The following ghosts indicate problems with the sensor.
The refrigerator works and does not turn off
In this case, the functionality of the thermostat is checked without removing it. To do this you need:
- Unplug the plug from the socket.
- Empty the chambers of food.
- Set the knob to the maximum cold position or start the fast freezing mode, if available.
- Place a thermometer on the middle shelf of the refrigerator (not the freezer!), preferably one that can measure sub-zero temperatures.
- Turn on the refrigerator with empty compartments.
- After a couple of hours, remove the thermometer. It should show 6 - 7C. If the readings are different, the thermostat will need to be replaced.
So that the check does not take a lot of time, you need to get to the thermal relay and move the plate located near the pin on which the handle is placed. If there are no clicks when it moves or it does not move, the thermostat is changing.
Refrigerator won't turn on
The cause of this malfunction may be not only the thermal relay, but also a burnt-out compressor motor or a breakdown of the start-protection relay. But before calling a technician, you should check that the thermostat is working properly. To do this, you need to remove the casing, having first disconnected the unit from the power supply, and understand the wires.
In older models, only a couple of wires fit to the thermal relay terminals. They are removed and connected to each other with a piece of wire or even a paper clip, bending it appropriately.
The wires were connected to each other and the compressor started working. This means the thermostat is faulty. And if the compressor does not start when it closes, it means the start-protection relay is faulty or the engine has burned out. Therefore, it is impossible to do without a master.
In modern units, 4 multi-colored wires are connected to the thermostat:
the wire from the compressor motor is orange, red or black;
- from the fork - brown;
- from the signal light - white, yellow or green;
- the ground wire is yellow with a green stripe.
You need to close the first 3 wires, and then as indicated above.
Professionals consider it more reliable to check with a multimeter, which can be done by a home craftsman. The thermostat will have to be removed. If the multimeter analog switch is set to the position of measuring low resistances, and the arrow with the probes closed is set to “0” with the wheel on the left side. On a digital device, the switch is set to “200”.
In order for the test to be carried out in conditions as close as possible to the workers, the end of the bellows tube is placed in water with ice for a couple of minutes. Then measure the resistance between the terminals. If the needle on an analog multimeter goes off scale, but “1” is displayed on a digital one, the thermostat is sent to the landfill.
The appearance of ice on the walls of the refrigerator
This phenomenon is also observed with other malfunctions, but the check should begin with the thermostat. To do this, you need to perform the actions indicated for a unit that does not turn off. When the thermometer readings are 5 - 7 C, the temperature setting knob is turned to the left until the compressor stops.
If the compressor stops, the thermostat is working properly. Otherwise it is changed. When turned off, the unit is left to work for 5 - 6 hours with empty shelves. At this time, the time between starting and stopping the unit is measured. During normal operation, the duration of the intervals is about 40 minutes. At lower values, turning the knob to the right adds cold. If this does not help, change the thermostat.
Thermostat for a heating boiler (temperature regulator): types and recommendations for selection
When the house has a heating system using a gas boiler, the optimal room temperature has to be adjusted manually. Moreover, this heating option is very sensitive to weather changes. As soon as it gets colder outside, you have to increase the temperature of the coolant. Even expensive models with a high level of automation require these actions. To save consumers from such work, manufacturers have released a thermostat for the heating boiler (temperature regulator).
Smart Device Options
Thermostat for a heating boiler (temperature regulator): how it works
The installed heating system from a gas boiler heats the room to the set temperature, regardless of the level of heat or cold inside. At the same time, a person feels well the daily weather changes if he does not change the mode manually.
Thermostat installation option
To eliminate this problem in a small house without a second floor, it is enough to install one thermostat in the passage room.
Note! It is necessary to correctly connect and install the device so that it works correctly and sends a signal to the boiler. The design of a simple device includes a highly sensitive element (actuator) and a contact group with the regulator
In appearance, it is a closed bellows, inside of which there is usually a gas mixture, sometimes a liquid. This filler reacts to temperature changes and moves the rod to close the contacts when the temperature rises, and when the temperature drops, the opposite occurs
The design of a simple device includes a highly sensitive element (actuator) and a contact group with the regulator. In appearance, it is a closed bellows, inside of which there is usually a gas mixture, sometimes a liquid. This filler reacts to changes in temperature and moves the rod to close the contacts when the temperature rises, and when the temperature drops, the opposite occurs.
Schematic operation of the sensor
The thermostat performs the task of turning the heating system on and off when the set temperature is reached autonomously, without human intervention. A simple circuit includes two contacts, the wires of which are routed to the boiler and connected to the valve.
Equipment connection option
When the device is turned on, the last element is in the open state. When a short circuit occurs, the fuel supply to the burner is cut off and the flame stops. In the reverse process, fire occurs from the igniter.
Gas wall-mounted double-circuit boiler with a closed combustion chamber. What are its features, advantages and disadvantages, how to choose and install it correctly - read in this review.
Types of home temperature sensors for heating boilers
Thermostats for heating boilers (temperature controllers) come in several varieties:
Wired. The key to correct operation is the correct installation of conductors. This is necessary for uninterrupted communication of the equipment with the boiler.
Wireless. Using a radio signal, information about changes in temperature in the apartment is provided. The device consists of two blocks, one of which is mounted in the room, the other on the boiler itself. The controller unit has a liquid crystal display and a keyboard.
Remote type of sensor
We will analyze each option in more detail, with approximate costs and an overview of several models.
Mechanical (wired) thermostat
A mechanical thermostat for a heating boiler has its own characteristics; the price of the models varies as well as the characteristics. Such a device must be pre-set to achieve the optimal room temperature. This is a complex process, so it is better to contact a specialist.
Small mechanical model
Any model includes two parts: a thermal head and a valve. The operation of the device is influenced by:
- frequent ventilation;
- bright sunlight coming through the windows;
- sudden change in weather.
Installation must be done only in a horizontal position, and you must choose a place where there are no objects blocking the device or direct sunlight. Modern models have small dimensions that can be installed in a small niche.
Installation option near gas equipment
The installation itself will not take much time. If you turn off the heating, then you need to turn the thermostat knob. This will protect the device from sediment formation.
Here is an example of two popular mechanical thermostat models:
General information about the refrigerator temperature sensor
The thermostat is a mechanism with a lever and contacts. This is a small box with a handle. On one side it has a bellows tube, which is filled with refrigerant (freon), on the other there are contacts for connecting to the electrical circuit (from 2 to 6 pieces). The length of the sealed tube varies from 0.8 to 2.5 m. It is usually twisted into a spiral, which ensures a tight fit to the evaporator wall.
There are two types of thermostats:
- mechanical;
- electronic.
The electronic thermostat is an electronic plate on the display of which all data is displayed. This is the most advanced device; it records temperature changes with greater accuracy. But equipment with an electronic control module is expensive, so mechanical thermostats are more often used.
Reference. The mechanical thermostat can be replaced with an electronic one.
There are three main types of mechanical regulators on the market:
- Russian (Oryol plant) - TAM series;
- made in Denmark - Danfoss;
- Italian (Ranco company) - K-50, K-52, K-55, K-56, K-57, K-58, K-59.
They are used in refrigeration equipment "Minsk", "Orsk", Beko, Candy, Indesit, Bosch, Ardo, Samsung, etc.
The most common thermostats include:
- TAM-112, TAM-113 - used in single-chamber units, analogous to K-50;
- TAM-125 - installed in freezers of 2-chamber 2-compressor equipment, analogous to K-57;
- TAM-133 - used in refrigeration chambers of 2-chamber units, analogue of K-59, Danfoss 077B6;
- TAM-145 is a 3-pin freezer temperature controller with a defrost alarm (red light on the control panel).
And when the device stops functioning adequately, the signs may be the following:
- the motor runs continuously, the refrigeration unit does not turn off;
- a “snow coat” (deposits of ice and frost) is detected on the walls of the chamber, the injection is too active, the freon circulation is increased and the refrigerator freezes too much;
- It’s warm in the refrigerator compartment; the more items you load inside, the worse the space cools.
- after switching off, the motor does not start immediately (it holds the temperature for a long time and does not restart).
To correct the situation, you should turn off the device from the network and completely defrost it. The contents of the chambers should be removed, then turn on the refrigerator and switch the temperature regulator to full maximum (minimum temperature). You should place a thermometer inside the refrigerator (do not use liquid ones; electronic ones are best). If the thermostat is functioning, then as soon as the thermometer shows the readings you set, the refrigerator will turn off. If, after reaching the temperature, the motor continues to operate and cool the chambers, then the thermostat is faulty.
Under conditions of constant adjustments, the temperature inside the chamber is constantly changing, the rate of these changes depends on the level of sensitivity of the thermostat.
Temperature regulators for all refrigeration systems (including household appliances) are pressure gauge devices. They function due to changes in fill pressure. Pressure changes due to temperature differences. Some modern refrigerators contain an electronic thermostat - a much more advanced device that allows you to more accurately record temperature changes and turn the compressor relay off/on.
Thermostats are mechanisms containing a lever system and a set of contacts through which they are connected to the general electrical wiring of the device.
The temperature regulator is based on a so-called bellows - an element sensitive to temperature changes, which, with the help of a spring, acts on the general electrical circuit. Thus, when the temperature changes, the bellows transmits a signal to the spring, the spring to the lever, the lever to the main mechanism, and the mechanism to influence the overall electronic system. Of course, the regulator also contains a special gasket that acts as an insulator of the internal components of the thermostat from the external environment (primarily from humidity). Also, the regulator inside is filled with a special liquid (chloromethyl).
The most basic thing, and where you should start, is checking the thermostat. A sign of a malfunction or impending breakdown is excessive freezing of the refrigerator or, conversely, the device has stopped heating altogether. This means that the regulator “poorly understands” the temperature, i.e. it may work, but the range in which it detects temperature has changed. You set the refrigerator to 4 degrees, but it turns off at + 15? This means that the thermostat “thinks” that +15 is 4 degrees and therefore a false signal appears on the refrigerator.
Manufacturers of temperature controllers
The following brands are popular among users:
- Danfoss, which produces bellows-type thermal heads for direct fixation to a proprietary valve or installation using an adapter.
- Oventrop, which produces models of regulators with the ability to set temperatures in the range from +7 to +28 degrees.
- Thermo, mating with valves using union nuts.
Devices from all manufacturers recommend installing a balancing valve on the return and a standard valve on the supply.
Using a regulator for the heating system, you can adjust the temperature in the room, normalize the microclimate, and save on heating costs during the season. The devices are suitable for installation in cottages without permanent residence, apartments or private houses.
How to view the PIN code of the thermostat?
The generation of Wi-Fi thermostats frees up your hands in heating control. Using a mobile application, such as Terneo, installed on your phone or tablet, you can easily turn off or turn on room heating when you are far from home.
When you first connect to the cloud, you will be asked for a PIN code for registration.
- Login and register in the application.
- Click “+ Add” → “Device” → enter the PIN code.
To receive a PIN code:
- on the thermostat, hold down the “≡” button until the icon changes to “Pin”;
- release the button to display the PIN code.
Educational article: How to use a water heater correctly: 8 features of reasonable frugality
Types of thermostatic heads
There are three types of thermostatic elements: manual, mechanical and electronic. Even though they perform the same functions, they can provide different levels of comfort because they have different capabilities.
Manual adjustment
The operating principle of such devices is quite simple and is similar to the operation of a conventional shut-off valve. By turning the thermostat head in one direction or another, a certain temperature of the heating radiator is achieved due to the volume of the coolant. They are considered the most reliable, simplest and cheapest temperature control devices, but their convenience is at the lowest level. To adjust the optimal temperature, you have to turn the head manually.
Manual thermal head - the simplest and most reliable option
Their cost is not so high, and their functionality makes it possible not to install shut-off valves at the inlet and outlet of the battery.
Mechanical regulation
This method of regulation is associated with some difficulties, since such thermostats maintain the temperature of the radiators automatically. The basis of such a thermostat is a bellows in the form of an elastic cylinder filled with gas or liquid with a high coefficient of thermal expansion. When heated, the gas or liquid begins to increase in volume, due to which the adjustment occurs.
Thermostat device for a heating radiator with a mechanical thermostatic head
The bellows is connected to an element that blocks the passage of the coolant. Before the gas or liquid in the bellows heats up, the rod is in the depressed position and the maximum amount of coolant passes through the battery. As the gas or liquid heats up, it increases in volume, which is transmitted to the rod, which begins to block the passage hole, reducing the volume of coolant supply. As the substance cools, its volumes decrease and the rod begins to move in the opposite direction, opening the passage opening slightly and allowing the coolant to flow into the battery in large volumes. As a result, the battery begins to heat up again, increasing the temperature in the room.
Gas and liquid
Mechanical thermostats are capable of maintaining the battery temperature with an accuracy of 1 degree, and the accuracy depends on the substance used in the bellows. Gases react faster to temperature drift, but such devices are much more complex in design.
Liquid or gas bellows - not much difference
Liquids are somewhat more inert, but their production is not associated with technological difficulties. The accuracy, although somewhat lower, can hardly be felt by half a degree. In this regard, products with liquid filling are mainly found.
Remote sensors
The thermostatic head is installed so that it can regulate the temperature of the battery depending on the room temperature. Due to the fact that such devices are quite large, such installation is associated with certain difficulties. A thermostat with a remote sensor can solve this problem. The temperature sensor is connected to the head through a thin capillary tube. This allows you to install the sensor in a convenient location.
With remote sensor
The heat transfer of heating radiators is adjusted taking into account the air temperature in the rooms. The disadvantage of such solutions is their high cost, although the accuracy of temperature control is quite high.
Thermal head for radiators
Watch this video on YouTube
Electronic regulation
Electronic thermostats have both their advantages and disadvantages. The disadvantages include the somewhat larger size compared to mechanical ones, since the control mechanism takes up a larger volume, plus a couple of batteries, as well as electronic filling. The advantage is a large set of functions due to the operation of a microprocessor that controls the operation of the entire device.
Electronic thermostats on batteries are large in size
Thanks to specially developed programs, it is now possible to program the room temperature literally by the hour, depending on whether it is day or night.
Naturally, the cost of such thermostats is much higher than mechanical ones. In addition, it is necessary to monitor the battery charge, although they last for several years.
living eco thermostat – Installation
Watch this video on YouTube
How to regulate radiators
To understand how temperature regulation occurs, let’s remember how a heating radiator works. It is a labyrinth of pipes with different types of fins to increase heat transfer. Hot water enters the radiator inlet, passing through the labyrinth, it heats the metal. This, in turn, heats the air around it. Due to the fact that modern radiators have specially shaped fins that improve air movement (convection), hot air spreads very quickly. During active heating, there is a noticeable flow of heat from the radiators.
This battery is very hot. In this case, the regulator needs to be installed
From all this it follows that by changing the amount of coolant passing through the battery, you can change the temperature in the room (within certain limits). This is what the corresponding fittings do - control valves and thermostats.
Let's say right away that no regulators can increase heat transfer. They only lower it. If the room is hot, install it; if it’s cold, this is not your option.
How effectively the temperature of the batteries changes depends, firstly, on how the system is designed, whether there is a reserve power of the heating devices, and secondly, on how correctly the regulators themselves are selected and installed. The inertia of the system as a whole, and the heating devices themselves, plays a significant role. For example, aluminum heats up and cools down quickly, while cast iron, which has a large mass, changes temperature very slowly. So there is no point in changing anything with cast iron: it takes too long to wait for the result.
Options for connecting and installing control valves. But to be able to repair the radiator without stopping the system, you need to install a ball valve before the regulator (click on the picture to enlarge its size)
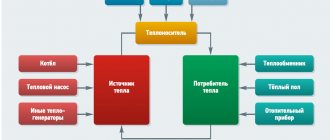
Device and principle of operation
The comfort of staying indoors largely depends on the heating system used. The temperature of the water heated floor is controlled using special devices - thermostats.
Many designs of such systems are used, but in most cases they use only a few fundamentally different adjustment methods.
Watch video - setup process
But, before considering the operating principle and design of thermostats, you need to understand the object of regulation.
What is heating wiring
Heating a room with a water floor can be done in various ways. One of them is the use of heat from heated water, which acts as a coolant. The transmission is carried out through pipes. Previously, steel pipes were mainly used for heating; now they have been replaced by modern ones made of plastic materials.
The heating circuit can be located along the walls in the form of radiators, or it can be located under the surface of the floor, heating it and the air in the room.
Hot water or antifreeze is heated in the boiler, after which, using a circulation pump, it is supplied to the heating circuit of the water floor.
Passing through its pipes, the coolant transfers heat into the enclosed surrounding space, heating the surface. The cooled liquid is returned to the boiler system. Depending on the temperature of the “return” in the mixing unit, it is heated or cooled by mixing in colder water from the tank.
In circuits with heated floors, which are connected by a separate circuit, a thermostat is installed for each of them, since they all have their own thermal regime. And the radiator heating circuits heat up to a temperature almost twice as high as for a warm floor.
How does the principle of temperature control work?
The main elements of heating control are servos, temperature sensors and thermostats. This composition of the equipment allows the temperature of the water heated floor to be adjusted steplessly in continuous automatic mode. This happens as follows:
- If a signal about insufficient temperature is received from the temperature sensor, the servo drive opens the valve and more hot water enters the heating circuit.
- When the coolant overheats, the cooled water mixing valve opens, reducing the degree of heating in the circuit.
- However, manual adjustment is also possible by setting the tap to a certain position. But this method requires constant visual monitoring, since the factors on which the heating mode depends change repeatedly during the day. Despite the relative cheapness of such devices, they are very inconvenient to use, since each condition in the room requires intervention in the heating operation.
Adjustment options
Watch video - adjusting the power of the temperature sensor unit
- The degree of heating of the floor covering. In this case, the heating sensor is installed in close proximity to it. Such a heated floor device is best suited for small rooms and low-power heating circuits that are used only as auxiliary ones, in particular for heated floors.
- Room air temperature - with this control scheme, sensors are used that are mounted directly in the thermostat housing. Correct operation of such a device can only be achieved if all the requirements for insulation of the heated building are met. Otherwise, it is difficult to achieve efficient heating operation - significant energy losses are inevitable. A properly built home with an extensive heating system and thermostat can provide up to 30% resource savings.
- Combined control systems, in which water heated floor temperature sensors are installed both in the heated room and on the mixing unit system. The parameters are adjusted to ensure the most comfortable temperature in the house. Such equipment with a thermostat is used in large rooms. Both sensors or one of them can be used for control.
Setting the time and date
First, set the time: To do this, press the “book” and “up” buttons simultaneously and hold for 5 seconds. We go to the menu, everything is intuitive here: - setting the clock “up” “down” switching “book”. Also at the bottom you need to put the desired day of the week, there is a gradation from 1 to 7, where 1 is Monday, 7 is Sunday. After setting, press the “power” button.
Recommendations for selection
Before purchasing a wireless thermostat, you should clarify parameters such as the total heated area of the room and the approximate level of air temperature that will need to be maintained. Knowing these indicators, the seller will help you choose the right regulator model and warn against buying an overly powerful device.
In terms of quality and reliability, the following brands of regulators have proven themselves to be the best:
- Oventrop (Germany).
- Danfoss (Denmark).
- Valtek (Italy).
- Kermi (Germany).
Wireless thermostats are sold by every company specializing in the manufacture of heating equipment. At the same time, manufacturers strongly recommend purchasing gas boilers and temperature controllers of the same brand.
This will simplify the installation and aggregation of equipment. And also the use of climate control devices of the same brand eliminates the occurrence of additional inconveniences in their operation.
Additional options for efficient heating
When choosing a room thermostat, you should pay attention to the presence of additional functions in the characteristics of the device:
- “ECO” - allows you to change the settings to a lower (energy-saving) value for a period of up to 24 hours.
- “Vacation” - reducing gas costs by lowering the temperature in the room during the absence of residents for up to several months.
- “Party” - the daytime mode is observed for 1-23 hours, after which the system returns to normal operation.
- “Non-working day” - when this function is activated, the Sunday program is supported in the room for up to several tens of days.
- “Open window” - the heating system is turned off when the temperature in the room sharply drops during ventilation.
- GSM module or WI-FI module - the user can control the operation of the gas boiler remotely via the Internet.
Price
When choosing the type of control device, you must focus on the following criteria:
- cost - the cheapest are wired electronic and wireless simple thermostats;
- saving energy resources - the optimal solution is to purchase programmable devices.
The cost of the simplest room thermostats is, on average, 40-50 dollars. Multifunctional models are even more expensive, starting at $80. However, when purchasing a regulator, you must remember that the device will pay for itself within 1-2 heating seasons by reducing gas and electricity consumption.
Important! Before installing a room thermostat, it is necessary to insulate the living space. Otherwise, due to high heat losses, energy consumption will not decrease
Methods for checking the health of the refrigerator temperature sensor
The first way is directly
Leave the thermostat inside the refrigerator. Finding the two wires that go into it, disconnect them carefully (so that later you can easily return them to their place) and connect them together. Be careful! The wires carry high voltage. All operations with wires should be done only with the engine turned off.
This method is good if the refrigerator does not turn on. It completely tests the thermostat, since all temperature restrictions are no longer relevant.
The second method is checking the bellows
This method allows you to check the regulator without removing and disassembling it. However, some basic knowledge of component design is required. Near the small axis on which the adjustment knob itself is attached, you should find a plate; you need to move it and click it.
If the plate is fixed “tightly” and cannot be moved (there are no clicks), then the regulator is out of order.
The third method is checking with a tester
To do this, you need to completely disconnect the refrigerator from the power supply, and then completely defrost it in accordance with the instructions. Of course, the contents will have to be removed.
After this, you need to turn on the device and move the thermostat knob to the position that will allow you to get the lowest possible temperature. If your refrigerator model has a freezing mode, it is recommended to use it.
To test the operation of the thermostat, you need to empty the refrigerator of all food, place a thermometer inside the chamber and check its readings after a few hours
In the refrigerator compartment, approximately in the middle, you need to place a thermometer designed to measure air temperature.
It is better to use a device that allows you to take measurements below zero. The refrigerator is left in this mode for about two hours. After this, you need to check the thermometer readings.
If the temperature in the refrigerator compartment has dropped to about six degrees by this time, there is no problem with the thermostat. But when the inside becomes noticeably warmer or colder than this level, the thermostat will have to be replaced.
The fourth method is visual inspection.
If, after defrosting, a so-called snow cap forms inside the chamber very quickly, the initial diagnosis of the health of the thermostat can be performed very simply.
The appearance of a snow coat in the refrigerator compartment almost always means that the thermostat is not working correctly; you need to diagnose its condition
To do this, when the compressor is operating, the adjustment knob begins to be turned in the direction of increasing the temperature inside the chamber.
If the relay is working properly, at a certain moment the sensors will record the desired temperature level, after which the compressor motor will turn off. If the engine continues to run, the thermostat needs to be changed.
After such diagnostics and if the thermal relay is working, it is recommended to remove all contents from the chamber and allow the device to run idle for about six hours. During this period, you need to pay attention to the duration of breaks in the operation of the compressor.
If it is about 40 minutes, everything is fine, you can use the refrigerator as usual.
When the compressor turns on too often or infrequently, you need to try to regulate this moment using the relay settings. If this fails, you will most likely have to install a new thermostat.
Video: how to check the thermostat (thermostat) on the refrigerator
How to check the thermostat (thermostat) on a refrigerator
Watch this video on YouTube
Summarizing
You can regulate heating radiators using several types of devices, but experts believe that the best solution is to use special control valves. Such products are manual taps and automated products - thermostats, and only in some cases can a three-way valve with a thermal head be used.
In high-rise apartments with centralized heating, it is better to give preference to control taps or a three-way valve. As for individual heating systems, the problem of how to reduce the temperature of the coolant in a heating radiator is solved using thermostats.
If the apartment owner still prefers automatic adjustment of radiators, then a filter should be installed before the thermostat - it will trap most of the various impurities.
Installation of the thermostatic element
First of all, the valve is mounted on the radiator. To do this, the coolant supply is shut off.
- Markings are made on the supply pipe. The area that will need to be cut should be the same length as the valve body minus the threaded connections.
- The heating pipe is cut and the extra section is cut out.
- Using a die, or die, a thread is made on the outside of the cut pipe.
- The connection is treated with plumbing paste and fum tape.
- The valve body is screwed onto the resulting thread.
- Since the pipe cannot be twisted, an American union nut is twisted on the opposite side of the valve, and then screwed (with a hex wrench) into the radiator hose.
- The body of the device is screwed into its own union nut through a rubber washer. This connection does not need to be sealed in any way, the main thing is that it is clean.
- After the valve is installed on the radiator, the protective cap is removed from it (located perpendicular to the pipe).
Temperature sensors for radiators
Common mechanisms of this type include:
- thermostatic head. It is an automatic sensor that monitors the temperature of the coolant in the battery. The principle of its operation is as follows: during the heating process, liquid and gaseous substances expand (for more details: “Which thermal head for a heating radiator is better - selection and installation”). This, as a consequence, leads to the fact that the heated product squeezes out a special rod, thereby blocking the access of the coolant;
- devices called chokes are no less often used. They are special screw-type taps, with which you can manually regulate the flow of coolant. Their cost is more affordable, and in addition, they can be used to control two-pipe heating systems;
- The least expensive and simplest mechanism to help regulate temperature is a traditional valve. Of course, in this case, only modern models should be used, and not outdated screw devices, since in old mechanisms valves very often come off, and there is also a risk of oil seals leaking. The situation is completely different with ball valves: even in a half-open position, they function reliably and efficiently over a long period of time.
Example of heating temperature controllers in the video:
Complete heating shutdown
Many people turn off the heating completely when leaving the house. However, this can put your home at risk of damp, mold and, in extreme conditions, burst pipes. To prevent adverse complications in very cold weather, it is recommended to use a lower temperature. A lower temperature does not mean the heating is turned off when you are outside the home. If the set temperature is suitable for your home, the heating will be switched off while you're out for a normal period of time, but protected from dropping too much if you're out longer than expected.
What temperature should the main heating thermostats be set to?
Getting to the target temperature for your home can take some time and may require some experimentation, but a good starting point is 16 degrees. The average home takes approximately 1 hour to warm up from 16 to 21 degrees, so you should adjust your program accordingly. Smart thermostats can save you the hassle of experimentation by automatically calculating the optimal temperature for your home when you're away and turning on the heating to warm your rooms just in time for your arrival.
Technical characteristics of thermostat E 51.716
220 V, 50 Hz
| Voltage | |
| Maximum switching current | 16 A |
| Maximum power | 3520 W |
| Temperature range | +5 °С … +60 °С |
| Temperature range maximum | +5 °C … +90 °C |
| Temperature control step | 0.5 °C … 10 °C (factory setting 1 °C) |
| Thermostat power consumption | 2 W |
| Installation temperature | -5 °С … +50 °С |
| Housing protection level | IP 20 |
| Housing material | High quality self-extinguishing plastic polymer |
| Floor sensor | NTC, 3 m |
| Air sensor | NTC built-in |
| dimensions | 86 x 90 x 46 mm |
| Manufacturer country | China |
Is it possible to save on central heating fees?
Theoretically, the answer is yes, but in practice everything is not so simple. Let's assume that you decide to install a smart thermostat with programmable thermostats in your apartment. As a result of equipment operation, resource consumption will be reduced by about a third. This will also depend on the amount of heat loss from the home and other factors. But this fact will not affect the amount in the payment in any way.
The fact is that residents in apartment buildings pay for heating according to so-called standards or according to meter readings. The latter can be individual or communal. In our case, in order to register the fact of reduced resource consumption and, accordingly, reduce heating fees, you will need to install a heat meter in the apartment. This is not always possible.
Malfunctions
In some cases, the operation of the device is disrupted by air pockets. They can be eliminated by bleeding the air using a Mayevsky valve. A decrease in heat transfer results from blockage of the pipe passage with sediment or rust. To get rid of dirt, it is recommended to rinse the radiator with special products.
In centralized systems, the temperature of the coolant may decrease as a result of an emergency on the main pipeline or unauthorized actions of neighbors that caused a change in the flow parameters in the common riser. Circulation is worsened by a broken valve at the radiator inlet or an incorrectly installed plug.
Most likely it will be enough:
- release air;
- wash the battery from the inside;
- change the valve.
As a rule, after performing one or several actions, the previous heat transfer is restored.
Electric boilers
A fairly common alternative to gas and solid fuel boilers. Lots of advantages, high efficiency, but long payback period. The connection is simple, like with gas boilers, but without a cold water supply. Temperature regulation and overheat protection are provided.
Mechanical boiler timer
Using a simple mechanical timer for an electric boiler, there are three options for starting the central heating system :
- The boiler is turned off;
- The boiler supplies warm water;
- The boiler turns on and off at the set time.
Mechanical timers usually have a large round dial with a 24-hour scale in the center. By turning the dial, you can set the desired time, and then leave it in that position. The boiler will turn on at the right time. The outer part consists of a set of tabs for a 15-minute period, which are inserted for easy adjustment of operation and mode settings. Emergency reconfiguration is possible, which is performed with the boiler connected to the network.
Mechanical timers are easy to set up, but the boiler always turns on and off at the same time every day, and this may not satisfy the owners if the family is large and bathing procedures are carried out several times a day at different times.
Raising the set temperature to heat the room faster
If you've just walked into a cold house on a freezing winter day, it might seem smart to turn the thermostat up. But this will not help you feel warmth and comfort faster. The reason for this is simple: the thermostat doesn't control how quickly your home heats up, all it does is set the final temperature for your comfort level. It's best to think of a basic thermostat as a temperature limiter. This allows the heat to be turned on completely until the set temperature is reached, at which point the thermostat will turn the heat off until the temperature drops again. So, if you turn the thermostat above the comfort level, the system will overheat the space, making your home too warm and wasting significant energy.
Thermostat functionality
A room thermostat is a small unit with controls that is mounted at one point or another in an apartment or house. By connecting to a heating boiler, it allows you to control its operation, control the temperature in the room, and set certain operating modes. A room thermostat is convenient when the boiler is located in a technical room or in the basement. It will also be useful in large houses - for example, we can set the desired temperature from a thermostat located on the second floor, while the boiler is on the first floor or in the basement of the building.
There is no need to install the thermostat in close proximity to the heating equipment.
A room thermostat cannot be called a vital device. On the contrary, we can do without it, saving money in the budget. The thermostat only provides ease of control of heating equipment. It will also be able to save money in your wallet, being equipped with a built-in temperature sensor. Let's see what functions a room thermostat has:
- Controlling the temperature in the heating circuit - just turn the knob or set the required value using the buttons;
- Setting the temperature during the day and at night - we create a comfortable environment at any time of the day;
- Programming operating modes - for example, during the daytime the temperature can be reduced, since all household members are at work. Towards evening, the room thermostat will command the temperature to increase to make the rooms warmer;
- Temperature control using a built-in sensor – ensures gas savings;
- Control of additional equipment - for example, weather-compensating automation or a solar collector.
The simplest room thermostats have minimal functionality. The basic function is temperature control, and we can call all the others service functions.
Signs of a broken temperature relay
The following signs indicate that the thermostat has failed:
- the compressor operates with little or no interruptions;
- the temperature in the chamber dropped to 0°C;
- the walls were covered with ice;
- the unit does not turn on after shutdown;
- the chamber is warm;
- puddle under household appliances.
Such signs may also indicate breakdowns of other parts of the unit, but the thermostat is checked first.
If the refrigerator motor runs non-stop, check the serviceability of the part using a thermometer. To do this, the unit is disconnected from the network, all products are removed, and defrosted. After this, the device is turned on and set to the lowest possible temperature. Place a thermometer in the center of the chamber and leave for 2 hours. Then the readings are checked. A decrease in temperature to +6°C indicates the serviceability of the part. If your refrigerator is warmer or colder, the thermostat needs to be replaced.
If ice has formed inside the chamber, diagnostics are carried out differently. While the compressor is operating, the adjustment knob is turned in the direction of increasing the temperature inside the chamber. A working part will fix the desired level and stop the motor. If this does not happen, the thermostat will have to be changed.
When the refrigerator does not turn on, find two wires that go into the thermostat to check. They are disconnected and shorted. If the unit starts working, then the relay is faulty.
Important! The wires are live. Before checking, disconnect the unit from the mains.
Experts use a multimeter to diagnose a thermostat. To do this, the part is dismantled. The tester is set to “resistance” mode. The bellows tube is immersed in cold water and held for 2-3 minutes. Then a check is carried out. If the number 1 appears on the tester screen in the “chain ringing” mode, it means the part is broken. If it's zero, it's working.
Features of the thermostat E 51.716
- The front panel of the E 51.716 thermostat contains an LCD display, control buttons and an air sensor.
- The thermostat is designed to maintain floor temperature within the range from +5 °C to +90 °C.
- The thermostat can operate in three modes: manual, programmable and comfortable. The thermostat can be programmed for every day and week using six time intervals.
- The thermostat has an independent power supply to save settings. After turning off and on the power supply, the thermostat will automatically switch to the heated floor heating operating mode, which was previously set by the user.
- To determine the temperature, an external temperature sensor (10 kOhm) is used, which is placed directly in the heated floor. The length of the temperature sensor wire is 3 meters.
- The thermostat E 51.716 is designed for standard concealed installation in a wall box with a diameter of 65 mm.
- The product is certified. Warranty period 3 years.
Radiator heat transfer - ways to increase
Heat transfer from a heated battery occurs:
- heat exchange;
- convection;
- radiation.
Each radiator model, whether cast iron, aluminum, steel or bimetallic, has a certain rated power. When calculating heating, many factors are taken into account, including climatic conditions, temperature conditions of the room, the location of the room, the type of insulation of walls, ceilings, etc.
Correct calculation ensures effective heating of a house or apartment during the cold season. But if there is not enough radiator power, the room does not warm up well. Also, the cause of cold may be a connection with non-compliance with the circulation regime.
There are radical measures that will help correct the situation:
- increasing the number of sections;
- changing the connection diagram;
- replacing radiators with more efficient ones.
But very often, a lack of heat transfer occurs as a result of less serious reasons and is compensated for in other ways.
How do servos change temperature?
Apply power to the room thermostat and turn on the heating. The servo drive is normally closed. Now you set the required temperature on the thermostat and if it is higher than the room temperature, the thermostat supplies power to the servo drive and it begins to open. The time for complete opening and closing of the servo drive is 3 minutes.
The coolant flows into the radiator and the temperature in the room begins to rise. When the room temperature rises to the one set on the thermostat, the thermostat cuts off power to the servo drive. The servomotor returns to the normally closed position using a spring built into it. And so on.
Adjusting room temperature with multiple radiators
According to its scenario, the principle of temperature regulation is the same with one radiator, but has some features.
In order to regulate the temperature of a group of radiators, it is necessary to rupture the radiator heating return line pipeline and insert a two-way valve under the servo drive into the line.
To do this, it is necessary to equip a niche on the floor in which a supply pipeline with shut-off valves and a return pipeline with valves for a servo drive will be mounted. All this is necessary for maintenance.
Since with a large number of such temperature control zones, you will not be able to embed valves into a pipeline that runs horizontally. Consequently, the pipelines must be mounted vertically, making for this purpose a kind of distribution manifold with a diameter larger than the main pipeline.
In this case, air will collect at the highest point, so to speak, of the distribution manifold. To remove air, you must use an automatic air vent.
In this case, the main connection system will be a two-pipe system with horizontal installation and forced circulation.
We determine the number of control zones. We install radiators and route the supply and return pipelines to the distributor.
We connect the supply pipelines through ball valves, and the return pipelines through two-way valves. Choosing a room thermostat. We determine its location. We install cables. We are finishing the premises.
After finishing, we install thermostats, servos and connect them. We supply power and enjoy the conditionally automatic regulation of room temperature with several radiators. In this case, I recommend mounting the air vent through a ball valve.
Shut-off and control valves
Varieties
- What shut-off and control valves can be used to regulate the temperature of a heating battery?
For this purpose, the following are routinely used:
- Chokes;
- Thermal heads.
The needle throttle is a screw valve with a conical metal valve. The adjustment is extremely simple: the stem with the valve is screwed in and out, while limiting the flow of coolant through the hole in the seat.
Needle throttle device.
The thermal head is an automatic regulator that allows you to focus not on the permeability of the line, but on the air temperature in the room.
The operating principle of inexpensive thermostatic heads uses the expansion of solids, gases and liquids when heated:
- When the target temperature is reached, the expanding working fluid of the thermal head pushes the valve towards the seat and blocks the coolant flow;
- When cooling, the valve is moved away from the seat by a return spring, and the heater begins to heat up.
Mechanical liquid thermal head.
In addition, on sale you can find electronic thermal heads with a temperature sensor and a servo drive powered by a galvanic element. They are easily recognized by the screen, which shows the set or current temperature in the room.
Electronic thermostat.
Prices
- How much do chokes and thermal heads cost?
Here are the approximate prices at the end of 2016 for Valtec products:
| Shut-off valve element (thread size 1/2 inch) | Price |
| Manual adjustment valve | 300 rubles |
| Thermostatic valve without thermal head | 600 rubles |
| Thermal head without valve, mechanical | 700 - 1200 rubles |
| Electronic thermal head without valve | 2000 - 5000 rubles |
| Set of thermostatic valve and mechanical thermal head | From 1200 rubles |
Polypropylene corner choke costs 284 rubles (1/2 inch size).
Liquid thermal head costing 900 rubles.
Alternatives
- How else can you regulate the permeability of the supply line to the heating device or heating circuit?
To adjust the permeability of individual sections of the circuit in the heating system, the following can be used abnormally:
- Screw valves;
- Ball and plug valves;
Brass plug taps.
Valves.
Let me emphasize once again: the use as chokes for all of the listed elements of shut-off valves is an abnormal mode.
What does it threaten?
With a screw valve, the half-open valve will continuously move in the turbulent coolant flow, since it is movably attached to the stem. As a rule, throttling with a screw valve ends with the valve breaking off, after which the valve stops closing or opening;
Disassembled screw valve. The valve is movably attached to the stem and, when beating in a turbulent flow, will sooner or later come off.
According to the manufacturers, the half-open position of the valve on a ball valve usually leads to wear of the fluoroplastic or Teflon rings that ensure tightness in the closed position - with quite predictable consequences. Less often, scale that gets between the valve and the body simply prevents the valve from closing;
Ball valve device. In the half-open position, the flow of water with abrasive particles wears out the O-rings.
The tap that limits the maximum water flow through the faucet has been in the half-closed position for the last four years and is still working.
Semi-closed valves are characterized by falling cheeks, completely blocking the coolant passage.
How does the draft control work?
The main part of the air regulator is a mechanical thermoelement placed in a cylindrical housing. Through a lever and a chain, it regulates the rise of the air damper on the ash pan door.
The device is a sealed flask filled with a heat-sensitive liquid that expands greatly when heated. The flask stands inside the housing, which is screwed into the sleeve of the boiler's water jacket and is in contact with the coolant. How a thermostat with a chain drive works is shown in the diagram:
The operating principle of the automatic draft regulator is based on controlling the flow of air flowing into the firebox under the influence of chimney draft. The algorithm looks like this:
- When solid fuel burns and the coolant heats up, the liquid inside the element expands and acts on the actuator and lever, overcoming the elastic force of the spring.
- The lever weakens the chain, the valve begins to close and reduce the flow area. Less air enters the firebox, and the combustion process slows down.
- The temperature of the water in the boiler tank decreases, the liquid is compressed and the return spring forces the lever to open the damper again through a chain.
- The cycle is repeated until the wood in the firebox is completely burned out, then the spring opens the door as wide as possible.
The draft limiter works on the opposite principle - the higher the water temperature in the boiler tank, the more the damper closes.
The adjustment handle at the end of the thermostat serves to limit the stroke of the lever and, accordingly, the air damper. This sets the maximum coolant temperature.
Reference. In addition to mechanical regulators that do not depend on electricity, there is automation for solid fuel boilers with a controller and a blower fan (or smoke exhauster). The latter supplies air to the firebox at the command of the electronic unit, which is guided by the signals from the temperature sensor. Similar automation kits are installed on all pyrolysis and pellet boilers.
We have the best price for a room thermostat for a gas boiler!
Our established relationships with manufacturers allow us to offer our customers reasonable prices for products that are worthy in all respects. Prices for a room thermostat for a gas boiler start from 2000 rubles and can be supplemented with favorable discounts!
So I became the happy owner of a gas boiler, which I just had to connect to the thermostat. Of course, I could call a specialist and pay for his work, but this is not in my rules; I decided to connect the room thermostat to the gas boiler with my own hands. The article describes several ways to do this.
Installers advise installing thermostats in living rooms. Their installation in the kitchen, hallway or boiler room leads to system disorientation and false alarms. It is recommended to choose the coolest room or where there are the most people.
No heat sources such as radiators or heaters should be located near the thermostat. The device should not be exposed to direct sunlight. It is necessary to avoid placing the thermostat in a draft. It is also undesirable to be near electrical appliances that emit thermal noise.
The boiler is turned on and off by a special relay. The thermostat is connected using a terminal on the boiler at a specified location or via a thermostat cable. The programmer requires batteries to operate.
Before connecting the room thermostat, you need to read the instructions, which are located in the technical data sheet of the device. Usually the passport has a separate section dedicated to connecting the thermostat.