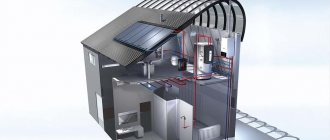
The installation or reconstruction of a heating system involves the installation or replacement of heating devices. The good news is that, if you wish, you can handle this yourself without the involvement of specialists. How heating radiators should be installed, where and how to place them, what is needed to carry out the work - all this is in the article.
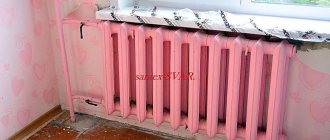
It is possible to install heating radiators with your own hands
Types of radiators
When selecting components for an autonomous heating system, you need to take into account its features and desired characteristics. Not only the operation, but also the installation of heating radiators in a private home will depend on the selected elements.
Heating systems of private houses differ from centralized ones in the following qualities:
- Firstly, operating conditions are more favorable - for example, the pressure in local heating is an order of magnitude lower;
- Secondly, the quality of the coolant in private homes is always at a higher level;
- Thirdly, there are no significant pressure drops, and the likelihood of water hammer is practically absent.
There are quite a lot of radiators that can withstand such operating conditions, so you will have to spend some time choosing the best option. However, if you simplify the choice of radiators to the limit, then the best option will be products with the best combination of heat transfer, price and quality.
Depending on the design, the following types of batteries are distinguished:
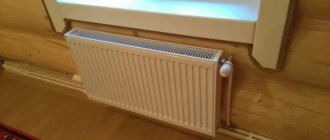
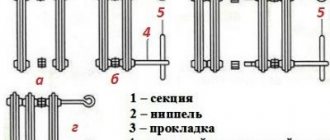
- Panel and sectional . The cheapest type of battery, characterized by fairly high heat transfer and relatively small size. These radiators do not impose any requirements on the connection diagram.
- Tubular . The technical characteristics of tubular radiators are practically the same as the previous type, but the cost is much higher. The increased cost is due to the good visual qualities of tubular products and the ability to use radiators as dryers.
However, much more often radiators are classified according to the material of manufacture, depending on which the following types are distinguished:
- Aluminum . Quite a popular option, perfect for use in private homes. The main advantages of aluminum radiators are good visual qualities and high heat transfer. It takes a little time to warm up, but such radiators cannot retain heat. The cost of aluminum products varies over a fairly wide range depending on the manufacturer and characteristics.
- Bimetallic . This type of radiator, as the name suggests, consists of two materials. Due to this, it is possible to create a product with an optimal combination of characteristics - in particular, bimetallic batteries can withstand pressure drops well and do not corrode. The cost of bimetallic products is quite high, so they are not very popular among owners of private houses.
- Steel . Steel batteries have good heat dissipation and good decorative properties. Simple steel batteries are cheap, but quickly fail due to corrosion. Stainless steel options are more reliable, but also cost an order of magnitude more.
- Cast iron . The arsenal of advantages of such devices includes high wear resistance, due to the high thickness of cast iron and its resistance to corrosion, as well as the ability to operate at high temperatures and pressure changes. Cast iron batteries have high inertia. For normal operation, such products must be cleaned every year.
Before installing heating radiators in a private home, you need to select the best option for radiators that will meet specific operating conditions.
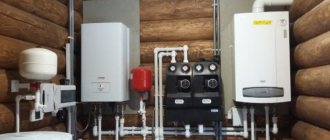
Electric boilers
It must be said that electric heating is the most efficient of all existing ones.
Not only are the efficiency of boilers about 99%, but in addition they do not require chimneys or ventilation. There is practically no maintenance of the units as such, except for cleaning once every 2-3 years. And most importantly: equipment and installation are very cheap, and the degree of automation can be any. The boiler simply does not need your attention. No matter how pleasant the advantages of an electric boiler are, the main disadvantage is just as significant - the price of electricity. Even if you use a multi-tariff electricity meter, you will not be able to beat a wood-burning heat generator in terms of this indicator. This is the price to pay for comfort, reliability and high efficiency. Well, the second disadvantage is the lack of the necessary electrical power on the supply networks. Such an annoying nuisance can immediately cancel out all thoughts about electric heating.
Radiator location
The choice of location for installing heating radiators depends mainly on the specific features of the building. In particular, you need to take into account the location of the windows - in most cases, the installation of heating radiators in a private house is carried out precisely under them. The absence of batteries in these areas leads to the unhindered penetration of cold air to the lower level of the room.
The standards state that the most effective protection against cold penetration through windows is achieved if the width of the battery is at least 70% of the width of the window itself. The discrepancy between the dimensions of the radiator does not allow it to demonstrate high heat transfer and will allow cold to enter the room, where it will cause condensation.
When installing radiators in a private house, you must also pay attention to the fact that the window sill does not cover them completely - in order for the movement of heated air masses to be possible, they need to create suitable conditions. The best option would be timely design of the heating system, taking into account the installation features of radiators and the use of protective screens that ensure effective heat transfer and protect residents from accidental contact with the battery.
If the house is located in a region characterized by a harsh climate, it may be necessary to install radiators near the front door, and it is advisable to minimize the distance from it. All radiators must be easily accessible so that if necessary, you can quickly intervene in their operation.
Heating parameters for selecting appliances
An initial knowledge of the modes and operating conditions of heating devices will help you understand what battery designs are needed.
Below is a summary of information about the parameters of heating systems that are important when choosing batteries:
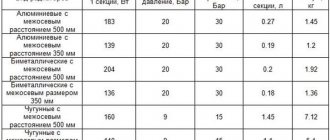
1. Internal pressure. The value required for the correct selection of a device that can withstand the pressure in the heating circuit:
- Private house (autonomous) = 1.5-2 atm.
- Private house (centralized) = 2-4 atm.
- 5-storey building (centralized and autonomous) = 2-4 atm.
- 9-storey building (centralized and autonomous) = 5-7 atm.
- House over 9 floors (autonomous) = 5-7 atm.
- House over 9 floors (centralized) = 7-10 atm.
If the technical capabilities of the battery are lower than the pressure in the heating circuit, there is a possibility of depressurization of the device with other negative consequences.
2. Permissible heating temperature . A characteristic indicating the upper temperature limit, above which the battery may fail:
- Autonomous = up to 90⁰С.
- Centralized with plastic wiring = up to 90⁰С.
- Centralized with steel wiring = up to 95⁰С.
Operation in violation of the temperature regime leads to melting of the seals, deformation and loss of tightness of the device.
3. Degree of coolant contamination. A parameter that is mainly of interest to owners of autonomous heating and water supply systems:
- Autonomous private house = high, medium, low when installing filters.
- Autonomous multi-storey building = high, medium, low when installing a filter system.
- Centralized = low, in rare cases medium.
Water supplied by centralized networks to municipal heating systems undergoes comprehensive purification. The content of sand and clay suspension in water extracted from private wells, wells, and open sources may exceed the permissible limit.
The choice of heating devices must be oriented towards the upcoming operating conditions. It is necessary to find out the characteristics of the heating circuit
Radiator connection diagrams
Before installing a heating battery in the house, you need to choose the optimal connection diagram for heating devices. The heat transfer of the batteries and the efficiency of the heating system as a whole directly depend on the choice of circuit.
There are the following connection diagrams for heating radiators:
- Diagonal . This option is the most effective. When connected diagonally, the coolant enters the radiator through the upper pipe on one side and exits through the lower pipe on the other side. This is precisely the reason for the name of the connection diagram. Due to the diagonal scheme, the most uniform distribution of coolant throughout the internal cavities of the radiator is achieved.
- Lateral . With a lateral connection, both radiator pipes located on the same side are used. The supply is carried out through the upper pipe, and the return pipe is connected to the lower one. This scheme leads to insufficient heating of different sections of the radiator - areas located closer to the pipeline receive most of the heat. However, for small buildings, lateral connection of radiators is quite suitable, especially if the heating system is equipped with a circulation pump.
- Bottom . The bottom connection is usually used if hidden installation of heating pipelines is planned. Supply and return are connected only to the lower radiator pipes. This connection scheme is characterized by the greatest heat loss, but also the best visual qualities.
Knowing how to properly install a heating radiator is closely related to its connection diagram, because the efficiency of the entire heating system depends on it.
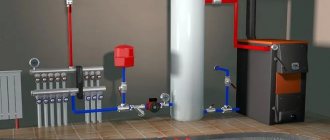
Two-pipe system
With a two-pipe connection system, hot water enters the battery through a pipe directly from the boiler, and the cooled water goes into the “return”. This system is preferable for large modern cottages. Advantages:
- Almost all radiators receive coolant at the same temperature. Therefore, uniform heating of all rooms is ensured. And therefore there is practically no need to regulate the heating of each room. Of course, if the project is done correctly.
- The system is easier to adjust than a single-pipe system.
Preparing components for installing batteries
To ensure that installing heating radiators in a private home does not cause problems, you need to stock up on a set of materials and tools. You will need elements of shut-off valves (taps, taps, dampers and thermostats), adapters, brackets with angles and bypasses. It is best to purchase all these parts in accordance with a pre-designed heating system project.
It is important to consider the way in which the heating will be installed. The possibility of hidden pipe laying should not be overlooked - if the walls are sheathed with plasterboard or decorative plastic, then the pipes must be immediately laid in niches, leaving only the edges outside that are necessary for connecting the external elements of the system. Hidden installation makes it possible to avoid damage to the wall covering.
Pipes can be connected either by welding or by threading. Welding seams are reliable and ideal for difficult situations (for example, in old houses where pipe threading is not possible). In turn, a threaded connection requires less labor, but parts assembled in this way do not withstand mechanical loads and vibration well. However, modern heating systems are very often made of plastic products, which do not even require welding.
Wall marking
The installation of batteries in a wooden house (as in any other house) begins with marking the walls, according to which heating devices will be installed in the next stages of work. If a system with natural circulation of coolant is installed in the house, then the pipeline must have a constant slope of at least 6 degrees along the flow of water. Failure to comply with this rule will certainly lead to the appearance of air jams, and in the worst case, will not allow the system to function. For systems with forced circulation, this rule does not matter.
You need to mark the wall along which the brackets for the radiators will be installed. Radiators cannot be installed close to the wall - the distance between them should be about 5-10 cm. The radiator must be removed from the floor by at least 10 cm, and from the window sill by 8 cm. The markings are done level with a pencil. When marking, you need to take into account the width of the radiator sections so that the installed holders are strictly between the sections.
It is advisable to install foil material behind the radiators, which will act as a heat reflector. If there is a gap of at least 3 cm between this material and the radiator, it is possible to significantly increase the efficiency of the radiator and reduce heat losses.
When the marking is completed, holes of the required sizes are drilled in accordance with it. The dowels are driven in with a hammer, after which the brackets are secured using self-tapping screws. To make your work easier, you can purchase special battery holders equipped with threads that allow you to screw them directly into the dowel.
When selecting brackets, you need to take into account the type and characteristics of the radiators being installed so that the elements match each other. You also need to pay attention to the number of brackets used for one radiator (in most cases, three holders are enough, two of which are located at the top and one at the bottom).
What is needed for installation
Installation of heating radiators of any type requires devices and consumables. The set of necessary materials is almost the same, but for cast iron batteries, for example, the plugs are large, and they do not install a Mayevsky valve, but instead, somewhere at the highest point of the system, they install an automatic air vent. But the installation of aluminum and bimetallic heating radiators is absolutely the same.
Steel panel ones also have some differences, but only in terms of hanging - they come with brackets, and on the back panel there are special arms cast from metal, with which the heater clings to the hooks of the brackets.
These are the arms that hook the hooks
Mayevsky crane or automatic air vent
This is a small device for releasing air that may accumulate in the radiator. Placed on the free upper outlet (collector). It must be on every heating device when installing aluminum and bimetallic radiators. The size of this device is significantly smaller than the diameter of the manifold, so you will also need an adapter, but Mayevsky taps usually come complete with adapters, you just need to know the diameter of the manifold (connection dimensions).
Mayevsky crane and method of its installation
In addition to the Mayevsky crane, there are also automatic air vents. They can also be installed on radiators, but they are slightly larger in size and for some reason are only available in a brass or nickel-plated case. Not in white enamel. In general, the picture is unattractive and, although they deflate automatically, they are rarely installed.
This is what a compact automatic air vent looks like (there are more bulky models)
Stub
The side-connected radiator has four outputs. Two of them are occupied by the supply and return pipelines, on the third they install a Mayevsky valve. The fourth entrance is closed with a plug. It, like most modern batteries, is most often painted with white enamel and does not spoil the appearance at all.
Where to install the Mayevsky plug and tap for different connection methods
Shut-off valves
You will need two more ball valves or shut-off valves that can be adjusted. They are placed on each battery at the input and output. If these are ordinary ball valves, they are needed so that, if necessary, you can turn off the radiator and remove it (emergency repairs, replacement during the heating season). In this case, even if something happens to the radiator, you will cut it off, and the rest of the system will work. The advantage of this solution is the low price of ball valves, the disadvantage is the impossibility of adjusting heat transfer.
Radiator taps
Almost the same tasks, but with the ability to change the intensity of the coolant flow, are performed by shut-off control valves. They are more expensive, but they also allow you to adjust the heat transfer (make it less), and they look better externally; they are available in straight and angular versions, so the piping itself is more accurate.
If desired, you can install a thermostat on the coolant supply after the ball valve. This is a relatively small device that allows you to change the heat output of a heating device. If the radiator does not heat well, you cannot install them - it will be even worse, since they can only reduce the flow. There are different thermostats for batteries - automatic electronic ones, but more often they use the simplest one - mechanical.
Related materials and tools
You will also need hooks or brackets for hanging on walls. Their number depends on the size of the batteries:
- if there are no more than 8 sections or the length of the radiator is no more than 1.2 m, two mounting points on top and one on the bottom are sufficient;
- For every next 50 cm or 5-6 sections, add one fastener at the top and bottom.
You also need fum tape or linen winding and plumbing paste to seal the joints. You will also need a drill with drills, a level (preferably a level, but a regular bubble one will do), and a number of dowels. You will also need equipment for connecting pipes and fittings, but it depends on the type of pipes. That's all.
Radiator power calculation
In order for the heating system to be sufficiently efficient, you need to correctly select the power of the radiators for each room. There are several professional calculation methods, but most of them are very complex. Despite the possibility of taking into account a large number of parameters, owners of private houses rarely use complex formulas, preferring simple solutions.
The simplest method of calculation looks like this: to heat 1 m3 of room, 20 W of power is required. Accordingly, knowing the volume of the room and dividing it by 20, you can easily find the desired result. The resulting value is divided by the heat transfer rate of one radiator section, as a result of which the number of sections required to heat a particular room is determined. If the quality of home insulation leaves much to be desired, then approximately 15% of the tolerance should be included in the calculations.
Radiator assembly
Before connecting the radiator to the heating system, it must be assembled. A winder is screwed into the threaded section of the radiator. Previously, paint-treated tow acted as a winding material, but today there are more modern options - for example, high-temperature sealing paste, or fum tape, which ensures a tight connection of pipes.
The part treated with a sealant is put on the tap nut, after which the entire structure is screwed into the battery plug. Subsequently, it will need to be carefully tightened with a wrench. Using a similar technology, Mayevsky taps and plugs are installed on all pipes that will not be used for connection.
Necessary tools and strapping elements
To connect the battery you will need a regular plumbing kit:
- open-end/adjustable wrenches;
- tow + sealing paste for sealing threaded connections;
- for fastening to the wall - hammer drill, level, tape measure.
You will also need strapping elements:
- tap fittings with union nuts for connection to the system;
- fittings (adapters) for switching to conventional right-hand threads;
- plugs for installation on unused pipes;
- Mayevsky valve with a key for releasing air if necessary;
- brackets for hanging the radiator;
- ball valves, preferably with a coupling connection and a union nut - for shutting off during maintenance and repair work.
Battery installation technology
To summarize, we can say that heating radiators in a wooden house are installed using the following technology:
- Marking and installation of holders;
- Installation of components on the radiator;
- Installation of an air vent (there are automatic and manual devices);
- Installation of adapters (performed if there is a need to connect pipes of different diameters);
- Installation of shut-off and control valves;
- Hanging radiators on brackets;
- Connecting radiators in accordance with the selected circuit and the characteristics of the materials used;
- Test run of the system or pressure testing (the latter is an increase in pressure in the system in order to check the circuit for leaks).
Mixed system
When designing heating for a spacious or two-story building, it is impossible to use a radial connection or a single-pipe system.
The two-pipe system will also be divided into parts - for each floor or wing of the building separately.
In practice, the heating system boils down to the fact that separate lines go from the collector to different parts of the building. The heating system for each part of the building is two-pipe.
- Sometimes part of the system can be single-pipe - for example, for heating an extension, veranda or winter garden.
- In fact, the heating device has a design combined from two or three schemes.
- Disadvantages: requires a competent design and installation of thermal heads on each battery.
- Plus - you can design a heating device for buildings of any number of floors and configuration.