An integral part of arranging an autonomous heating system for a private home is the installation of batteries. However, in order for their operation to be durable, trouble-free and provide comfortable living, it is necessary to take into account several important nuances. Let's look at what SNiP requirements the installation of heating radiators must comply with, what are the main criteria for choosing devices, how to correctly determine the location for their installation and the method of connection, what are their main varieties and what are their features, as well as what stages the installation procedure consists of.
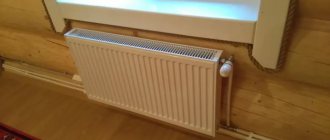
Heating radiator under the window Source srubdacha.ru
Installation of heating radiators - SNiP requirements
In order for the heating device to produce the properties specified by the manufacturer during operation and successfully cope with its function, a number of SNiP requirements must be taken into account when installing it:
- Installation of heating radiators must be carried out with a gap to surrounding objects and structures - at least 3-5 cm to the wall, at least 5 cm to the window sill strip, and from 7 to 15 cm to the floor surface.
- The length of the device body should be from 50 to 75% of the width of the window opening under which it is located.
- To ensure better circulation of heated air, the radiator is installed next to the doors or window.
- The optimal placement of the device relative to the window is in the center. A deviation of 2-3 cm is allowed.
Advice! Shielding the area of insufficient wall thickness next to which the radiator is installed with foil-coated thermal insulation material can reduce the heat loss of the device by 10-15%. However, such protection should not be installed in all cases. For example, heating the wall under the window sill allows you to avoid the accumulation of dampness near the window.
Installing a radiator in a niche Source santex-tomsk.ru
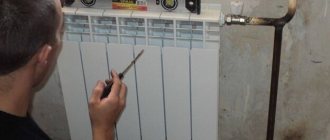
Step-by-step instructions for installing cast iron batteries in an apartment
A standard cast iron radiator has 10 sections. Before installation, you need to screw the nuts with winding into the holes. Often the sharp edges of the nut damage the sealing material. Grinding the edge with a rasp helps to avoid this.
Wind the winder onto the threads of the nut in the direction opposite to the thread.
You need to wind it tightly so that the material does not slip while screwing the nut. Lubricate the winding with silicone sealant.
Tighten the nut with an adjustable wrench.
Perform the same operation with the other nut. Prepare the taps in a similar way - wrap a linen thread and lubricate them with sealant.
Screw the tap into the previously installed nut.
Tighten using a large screwdriver or a homemade wrench.
In order to connect the polypropylene pipe from which the line is made to the tap, wrap it with thread and lubricate the coupling with silicone. Twist the coupling and tap. Assemble the supply and return units.
A Mayevsky tap will be installed to remove air. Hang the cast iron radiator on hooks fixed in the wall. Now it is ready to connect.
Criteria for choosing a radiator - technical parameters, types
Despite the fact that the main selection criteria are appearance, compliance with the interior and cost, without taking into account technical parameters, correct, trouble-free and durable operation of devices is almost impossible. Therefore, in addition to the type of material and design features, it is important to take into account the technical characteristics of the device.
Options
In order to correctly assemble and install heating radiators, you must first understand their basic technical characteristics:
- System pressure. The materials and design of the device must be designed not only for the operating pressure, but also for possible water hammer. For autonomous systems, its value, as a rule, does not exceed 2-4 atm.
- Heating level. The temperature of the coolant leaving the boiler circuit should not exceed the permissible heating level of the battery. Otherwise, this will lead to deformation of the seals and distortion of the housing itself, which can lead to depressurization and leakage. For private systems, its value usually does not exceed 900C.
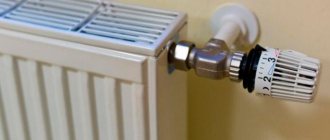
The use of thermal heads allows you to control the heating level of the battery Source otoplenieblog.ru
- Coolant purity level. Various suspensions and dissolved substances present in the coolant, when heated/cooled, can settle on the walls of radiators, narrowing their clearance and reducing heat transfer. Over time, this will lead to excessive consumption of coolant, overloading the pump and the need to replace devices.
Important! Often, when designing a house, special niches are placed in the walls into which heating radiators can be hung, but such a design must be created correctly from the beginning. This is not only the dimensions and depth of the excavation, but also the sufficient thickness of the partition, facing the other side onto the street, in order to avoid significant heat loss and excessive consumption of energy resources.
Varieties
When choosing radiators, the material of its body and design features are also taken into account. Based on this feature, they are divided into 6 main varieties:
- Aluminum sectional. Made from an alloy of aluminum and silicon. They are distinguished by their light weight, aesthetics, maximum heat transfer and heat resistance. However, they are sensitive to water hammer and the composition of the coolant.
Aluminum sectional radiators of different heights Source googleapis.com
See also: https://m-strana.ru/services/inzhenernye-sistemy-otoplenie-vodosnabzhenie-kanalizatsiya/
- Bimetallic with a silumin body and a steel base - sectional and monolithic. Heat transfer is close to aluminum analogues. Quite expensive products.
- Steel panel and tubular. They are universal in use, but are not as durable as their cast iron counterparts; in addition, they are characterized by insufficient heat transfer.
- Cast iron sectional. They are characterized by low cost, durability, strength, durability and inertia. Disadvantages: heavy weight, cumbersome.
- Copper. Suitable for installation and operation in any conditions. The downside is the very high cost.
- Plastic. Applicable for systems with low pressure and stable operation when heated to no higher than 800C.
The most popular are aluminum radiators; they are lightweight, quickly transfer heat and are durable - they are assembled from silumin sectors - however, installation in an autonomous heating system requires strict control of parameters. This is primarily the operating pressure, pH level and degree of purity of the coolant. Otherwise, the device body quickly corrodes, deforms, cracks and fails.
Aluminum radiators will easily fit into any interior of a modern home Source teplosfera31.ru
Locking elements
When installing batteries in an apartment, you will definitely need taps. They can be ball or shut-off; the second option allows you to regulate heat transfer. The taps are located at the pipeline inlet to the radiator and at its outlet. Ball valves allow you to disconnect the battery from the general system in case of emergency repairs or replacement during the heating season. In this case, the supply of coolant to the battery is stopped without affecting the operation of the entire system. Ball valves have a relatively low price, which gives them a great advantage over similar devices. However, with their help it is impossible to regulate the heat transfer of the heating device, which is a negative characteristic of the device.
Shut-off control valves shut off the water supply to the radiator in emergency cases, and at the same time allow you to change the intensity of the coolant flow. In addition, such devices look more attractive and have two configurations, straight and angular. This makes it possible to make the binding more accurate. But it is worth considering that the cost of shut-off control valves is several points higher than the price of ball valves.
In some cases, when using ball valves, thermostats are installed. They can be electronic, automatic and mechanical. Using this device you can change the heat dissipation of the battery. But it should be remembered that these devices can only reduce the flow, therefore, there is no need to install such a device on poorly heating radiators.
Installation locations and connection methods
Due to the fact that the main purpose of heating devices is to minimize the influence of weather conditions on the microclimate of the room, they are installed in the following places where heat is most likely to leak:
- In the window sill area.
- The space between window openings.
- Walls of corner rooms.
- Hallways, corridors.
- Solid walls inside bathrooms, showers, storage rooms and utility rooms.
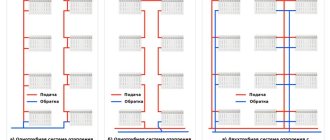
The rules for wiring a radiator during installation in a heating system are determined by the type of its assembly - there are the following three options:
- Single-pipe. The coolant passes through the system using one pipe - sequentially passing through all the devices and returning back to the heating circuit. The advantage is a simple device, the disadvantage is that subsequent batteries receive less heat than the previous ones.
- Two-pipe. There are two parallel highways - forward and reverse. Radiators are connected to both of them and receive the same amount of heat regardless of the distance in the circuit.
- Collector. The system involves connecting separate lines to each device.
Diagonal method of connecting a radiator Source sjthemes.com
Modern heating batteries, depending on operating conditions, can be connected in the following different ways:
- Lateral or one-sided. The supply line is connected to the top input, the return line is connected to the bottom of the same side. The method is characterized by a high degree of heat transfer. The scheme is applicable when the devices are at a short distance from the boiler, as well as in powerful systems. On the contrary, with a large distance and low pressure, the coolant will not warm up most of the radiator sections.
- Diagonal. The direct supply pipe is connected to the top of the radiator on one side, the return pipe to the lower outlet on the other. The method is applicable to devices with a long body and is one of the most effective. It is also used to connect batteries in weak systems.
- The bottom is double sided. Both lines - inlet and outlet - are connected to the lower pipes, but on opposite sides. This option is convenient when the coolant pipeline is installed in the floor. However, the efficiency of this method is minimal and heat loss is the greatest - up to 15%.
Calculation of the number of sections
In order for radiators to provide the required heating power, it is necessary to determine the optimal number of sections (for sectional devices). SP 60.13330.2010 is used as a regulatory guide, containing recommendations for the calculation of heating, ventilation and air conditioning systems.
The technique is not simple, it involves the use of various coefficients and the following data:
- room volume;
- orientation relative to cardinal directions;
- climatic parameters;
- presence of thermal insulation of external surfaces;
- number, type and sizes of windows;
- characteristics of the heating system;
- power of one radiator section.
In practice, when installing heating batteries in an apartment or private house, simpler calculation methods are used that give results with acceptable accuracy.
Method No. 1. Determining the number of sections based on the required standard heat transfer of 100 W per square meter of room.
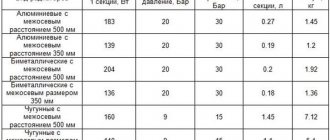
For example, you need to calculate sections for a room of 18 sq.m. Heat transfer according to the standard is 18x100=1800 W. We divide this value by the power according to the passport of 1 radiator section. For aluminum it is about 200 W, bimetallic 150 W, cast iron 100 W.
We get the required number of sections:
1800/200=9 aluminum or 1800/150=12 bimetal or 1800/100=18 cast iron.
Method No. 2. Using an online calculator. In each field of the program you need to enter your data, the radiator model and click “Calculate”. You will receive an answer in 1-2 seconds, and specific parameters and coefficients will already be taken into account.
The required power calculated using method No. 2 may differ from the value obtained by method No. 1 by 10-50%, both up and down. In order for the heating system to operate efficiently and be economical, it is recommended to carry out calculations using a more accurate scheme.
Installation stages
The installation of the radiator is specified by the requirements of SNiP and corresponds to the following algorithm:
- The installation location, type and number of fastening elements are determined, depending on the type, weight and dimensions of the device.
- Fastening brackets and hooks.
- The necessary adapters, fittings, and plugs are mounted on the radiator.
- The radiator is installed on fastening elements.
- The supply and discharge lines are connected to the device.
- An air venting mechanism is connected, for example, a Mayevsky tap.
- The system is being tested.
Some types of modern aluminum and bimetallic radiators have a protective film on the body - it is better to remove it after installation is completed. This will avoid accidental damage to their surface and deterioration of aesthetic parameters.
How to install correctly
Metal radiators, except cast iron, are quite lightweight. When fastening them, there are no problems with the load-bearing capacity of walls made of aerated concrete or brick. But in some cases, for example, frame houses or rooms with a large glass area, the equipment can be fixed to the floor.
To select fasteners, the battery load is taken into account. Cast iron can be hung on strong hooks or mounted with floor brackets, lightweight steel and aluminum can be hung on plate brackets or overhead corners. Installation diagram:
- for 8 sections - 2 on top and 1 on bottom;
- for every additional 5-6 sections - 1 more on top and 1 on the bottom.
Steel panel radiator diagram
With this arrangement of fasteners, the heating device will be stably and securely fixed to the wall. It is recommended to place the brackets closer to the outer sections.
Wall mount
Installation begins by marking the surface. First mark the points on the wall for attaching the lower brackets and screw them loose.
Then the center distance is set upward, the points are marked and the upper brackets are mounted.
The radiator is hung on the wall and checked for horizontalness. If necessary, make adjustments. After this, the brackets are finally fixed.
Briefly about the main thing
The battery installation must be carried out in accordance with the requirements of SNiP. The choice of model for specific application conditions should take into account the operating parameters of the system:
- Pressure.
- Temperatures.
- Coolant composition.
Based on the type of material and design, radiators are divided into aluminum, bimetallic, steel, cast iron, copper and plastic. They can be connected to the system in lateral, diagonal and bottom ways. Radiators are installed in places where cold is most likely to penetrate into the room in accordance with the instructions and technology.
Battery near the wall: what to do with it?
Let's start with the important things. Maybe this will even be news to some
In general, the fact is that nowadays it is not customary to be shy about radiators. In many modern design projects, batteries are displayed in prominent places. Often they are even emphasized. They are turned into a decorative object or a style-forming element.
So if this is unimportant, if the battery is located in a corner and does not bother anyone, you can simply buy a new beautiful radiator and not try to disguise it.
The second thing I would like to remind you of. Do not close the radiator tightly. It must perform its main function - heating. If you hide the battery in a cabinet behind solid doors, its heating efficiency will significantly decrease. It is necessary to leave at least the top and bottom of the structure or the entire facade free for air movement (by making it perforated).
Well, now to other solutions.
Washing
If you want to get a modern kitchen design, washing under the window is an excellent solution that has many advantages. Most often, the window is not involved in space optimization. By placing a sink underneath it, you will free up some space for other tasks. You can also save a little on electricity by getting more natural light from the window.
Frosted glass is an excellent analogue to curtains
Having made the choice to place the work area along the window, you need to pay special attention to the curtains. As a rule, it is very difficult to maintain perfect cleanliness where people cook. Therefore, textiles should be practical and not interfere with the cooking process.
Short curtains or blinds are perfect for this.
Therefore, textiles should be practical and not interfere with the cooking process. Short curtains or blinds are perfect for this.
Modern sunny style
Colorful elements in a bright kitchen make it more interesting
The disadvantage of placing the sink under the window is the additional costs involved. The main costs are the transfer of communications. For example, the most pressing issue will be battery transfer. What can be done to successfully implement such a project?
Useful tips
Many people believe that the radiator connection option is not that important when it comes to heat dissipation. After all, much will depend on the type of heat source chosen. For example, bimetallic heating radiators have higher heat transfer than cast iron ones. But imagine that cast iron devices are installed according to the diagonal principle of coolant movement, and bimetallic ones are installed along the bottom. In the first case, heat loss is 2%, and in the second - 12%. The difference in losses is as much as 10%. For a heating system, this is a fairly high indicator, which will affect not only the indoor temperature, but also the amount of fuel consumed
This is very important for private houses
Today, experts give recommendations regarding increasing the heat transfer of devices. To do this, you can install a reflective panel on the wall behind the radiator, for example, a regular piece of fiberboard trimmed with aluminum foil. But keep in mind that the distance from the wall to the radiator in this case should be at least 1.5 cm.
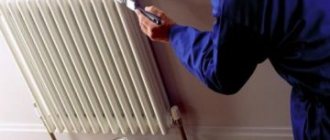
Cleaning a cast iron radiator when a blockage is detected
You need to remove the battery, wash it and put it back in place. The work is carried out with an assistant, since the weight of the product is quite large. The procedure should be carried out in the summer, when the coolant does not circulate through the system. To remove internal blockages, you need to dissolve soda ash in hot water, then pour the solution into the battery and shake the device a little. The main thing is to close the plugs on both sides so that the liquid does not leak out.
Leave the battery for 1.5-2 hours with the soda solution inside, then tap the radiator with a hammer or stick, but not too hard, so rust and impurities will fall off the inner walls. Now all that remains is to open the plugs, insert a hose into one of the holes and rinse the inside of the radiator with good water pressure. After washing, the battery is installed in place.
Bottom line
Assembling and installing cast iron batteries is not difficult. No special skills, tools, or knowledge are needed. Installation affects the durability and efficiency of the system.
Having pre-thought out the assembly down to the smallest detail, you will make the atmosphere in the room comfortable. If you doubt your abilities, it’s better not to take risks and turn to a specialist. Of course, this will require additional costs, but the result will be of high quality, and you will not worry that the heating system may fail.
Average score of ratings is more than 0
Share link
Comments There are no comments yet, but you could be the first...
Work technology
Owners of private houses can replace radiators at any time convenient for them. To do this, just turn off the boiler and drain the water from the heating circuit. But in an apartment in a multi-storey building, the replacement of the radiator will have to be previously agreed upon with the servicing utility organization.
If all installation work is carried out in the summer, when the heating is turned off, there will be fewer difficulties. However, you will still have to clarify whether water was drained from the system or not.
The efficiency of their operation will depend on how well the radiators are mounted to the floor or to the wall. The fasteners must be installed absolutely level, since if they are skewed, problems may arise when connecting the system.
Using available means - a pencil, a level, a plumb line and a tape measure - perform the initial markings. Mark the central axis of the window, which should coincide with the middle of the radiator. A horizontal line is drawn through this point along which the upper supports will be attached.
In cases where there is only one lower support element, it is mounted on the central axis. If there are several of them, another horizontal line is drawn parallel to the top line. After marking, begin drilling holes and installing brackets.
Fasteners for steel heating devices
There are two different types in this group: tubular and panel radiators. They have different designs and, accordingly, different fastenings.
In panel radiators, brackets are welded on the rear wall, with the help of which they are hung on brackets. The shape of this type of fastener is different: it is designed specifically for staples.
In panel radiators, brackets are welded on the rear wall
When installing panel radiators, it is necessary to strictly monitor the vertical position of the brackets. High precision required: four or six staples must fit exactly onto the hooks
It is also important that the wall is perfectly flat and smooth. In general, using conventional brackets, panel radiators are quite difficult to hang
It is easier to work with other types of holders.
Standard bracket for panel radiator
Since the mass of the heating device is small, it is quite enough to fix it on the upper brackets and install stops at the bottom that will give it direction in the horizontal plane. They are not attached to the wall, but are hooked onto a bracket and simply rest against the wall. For reliability, the part that faces the wall is expanded.
This is what a set of brackets for tubular steel batteries looks like: the upper collector is hung on the hooks, and plastic stops are placed below
There are also special mounting strips for easy installation. They are a strip of metal with plastic clips at the top and bottom. When using this fastener, there is no need for brackets on the rear panel. The slats are fixed to the wall, a radiator is inserted into them, which is held in place by plastic hooks.
Rail for quick installation of panel batteries
Fasteners for tubular radiators are similar to sectional ones: the same hooks, only of a different size, often equipped with plastic covers.
There is also a special fastener with SMB tube grips. This is a strip of steel with plastic clips and a shelf at the bottom that serves as a support for the radiator. This mounting plate can be used if the weight of the device filled with water does not exceed 100 kg. Installation is simple: place the battery on the shelf, bring the top edge closer to the latches. They grab the nearest tube and a click is heard. The radiator is installed, the supply pipes can be connected.
Bar for quick installation of a tubular radiator with shelf and clamps
There is a second option for quick installation: SVD fasteners. It consists of two parts. One is attached to the radiator, the second to the wall. Then they are connected to each other and secured with a steel loop.
Another type of holder for tubular models: two parts, one is attached to the wall, the second is attached to the pipe. They are held together with a wire fastener.
Floor mounting for tubular radiators can be of several types: tubular supports that are welded at the factory, or stands with hooks. Radiators are hung on such racks, and the racks themselves are attached to the floor.
Brackets for radiators are of different types and types: for wall and floor installation. The standard ones that come with the kit are reliable, but they are more difficult to work with. Planks and devices for quick installation save time, but cost a lot.
How to hang an aluminum radiator or radiator on drywall
A radiator is a structure made of aluminum or metal, which is much lighter in weight and looks more attractive than cast iron elements. The mounting process is simpler: firstly, the weight of the structure is small, and secondly, a special fastener with a plug is included with the radiator.
- Installation begins, as in the first case, with drilling holes in the drywall. Here you need to take a drill corresponding to the thickness of the fastener.
- Then take a hammer drill and a size 8 drill, make holes in the base - 7 cm deep.
- Screw the plug onto the bracket and drive it into the prepared holes with a hammer.
- As soon as the bracket with the plug is driven into the wall, you need to push the plug and tighten the fasteners.
For lightweight radiators with a small number of sections, you can use special fasteners that allow you to hang the structure directly on a gypsum board sheet. This fastener is similar to a butterfly dowel. When screwed into the back of the plasterboard, an umbrella opens, which distributes the load across the sheet.
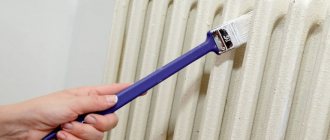
Painting. Recommendations from professionals
It is better to choose a special heat-resistant paint. Acrylic is more often used, which has a less pungent odor. Before applying paint, you need to prepare the surface:
- Remove dirt and paint residues using a remover. If the paint stays even, you can apply a new coat over it.
- Sand the surface with sandpaper. It is more convenient to use a special attachment on a drill or a metal brush.
- Degrease the surface with ordinary acetone or solvent.
- Apply a coat of primer suitable for the paint being used. Wait until dry.
- Apply paint. For the inner surface, take a special curved brush. You need to start from above. Paint the inside first.
- For best results, paint in two thin layers. Each of them must dry out. This will make the paint last longer.
Painting cast iron radiators
Decorative design of structures
The appliances can be designed so that they do not stand out from the interior and emphasize individuality.
Openwork screens can hide heating elements and give the room elegance. Batteries are often stained.
"Artistic modeling" on radiators
Screen
Interior