Thanks to the correctly selected connection scheme for heating radiators, water is supplied more efficiently with minimal losses in their power. For this reason, your own connection diagram must be selected for each specific situation. For example, the bottom connection of heating radiators provides for hidden pipe routing, and therefore such a system will harmoniously combine with the interior of the room.
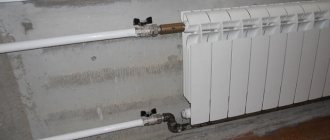
Bottom connection of heating radiators
About battery connection methods
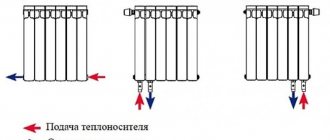
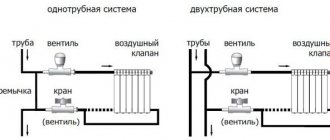
Let's start with the fact that the connection diagram is:
- one-sided;
- cross;
- bottom.
Connection diagrams for heating radiators
According to the one-way option, the connection is made, as a rule, in city apartments where central heating is used. Here the pipes are connected only on one side of the battery. The advantage of the scheme is that the system can operate at maximum rated power, but how efficient the heat transfer is depends on the number of battery sections. In this case, water cannot reach areas remote from the connection point, which negatively affects the efficiency of the entire heating system. This effect is especially noticeable when using a battery consisting of 15 sections, therefore, when connecting multi-section radiators, it is better to give preference to a different circuit.
Adapter for bottom one-sided radiator connection
In recent years, bimetallic radiators have become increasingly popular; they can be connected in a diagonal (also called cross) pattern. The essence of this scheme is that the liner is connected from above, and the branch is connected from below, but on the other side. With this installation, the liquid is more evenly distributed throughout the battery, which means the loss of its power is minimized.
Diagonal connection of heating radiators
On a note! When using a diagonal scheme, it is necessary to take into account how the outlet/supply pipes are located. After all, if the inlet is made from below and the outlet from above, then the radiator can lose over 50% of its power.
Diagonal diagram for connecting heating radiators with a two-pipe and one-pipe system
Sometimes the diagrams described above are not used indoors for one reason or another. Then only the bottom connection , which creates a through passage of the coolant; It is obvious that in this case the liquid does not reach the upper sections of the radiator, which is why heat transfer can decrease by 15%. However, this scheme is often used in private houses with individual heating. And heat transfer can be replenished through distribution pipes.
Heating radiator design
Key Points of Bottom Connection
So, we found out that this scheme allows you to hide pipes from prominent places and is used mainly in private homes. The pipes connected to the radiator go to the floor, which frees up some space, and the room itself looks more neat and noble. Today you can buy 2 types of batteries with this connection - these are panel and steel devices.
Bottom radiator connection
They can have either 1 or 3 heating panels. The more of them, the warmer the room will be, and therefore when choosing devices it is necessary to take into account the area that needs heating.
Important! Steel radiators, when compared with analogues, are easy to install and take up little space. Ideal for any room. Panel models have already installed thermostatic fittings, as well as a connection point.
Bottom connection node
Types of panel radiators
Such batteries are:
- hygienic;
- smooth;
- profile.
Dimensions of steel panel radiators of various types.
The first two types are intended for hospitals, schools and kindergartens. The most popular manufacturers of such models are Purmo and Kermi.
Steel panel radiators PURMO COMPACT
As for profile batteries, they are made of sheet steel and coated on the outside with a special powder coating. They are also coated with neutral anti-corrosion varnish, and therefore can last for many years. Note that such radiators can be of any color.
Bimetallic heating radiators
Tubular steel batteries are better than panel ones, because they can be turned over on either side (in this case, panel models are purchased with a specific connection). The coolant in tubular models is supplied directly to the outer section, which is very good if you need to replace old batteries with new ones.
Steel tubular radiator
Advantages of this connection scheme
This type of connection allows for easy concealment of pipes, and the loss of efficiency will be insignificant. The radiator will heat up faster and stronger from below than from above, which is explained by the rapid flow of coolant through it.
Bottom connection
Sometimes efficiency may be reduced due to air accumulation or blockages. Warming up with the lower connection, as noted earlier, is uneven, but it is still no worse than the upper one.
Note! When installing batteries - regardless of the circuit used - you must comply with all installation requirements. First of all, this refers to the proportions between the width of the battery and the window.
Video - What are the benefits of batteries with bottom connections?
Nuances of installing radiators
The most important thing during installation is to do everything in the original packaging so as not to damage the external coating of the radiators. In addition, it is important not to confuse the supply and return. If the entrance and exit are located at different ends, then you cannot make a mistake - to do this, just study the markings. But if they are on one side, you need to act carefully and carefully! An error may result in an incorrect connection, which could result in a power reduction of up to 60% (the exact value will vary depending on the model selected).
Bottom connection unit with bypass
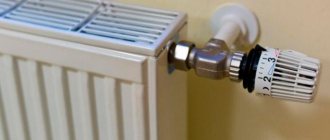
On a note! Each model with a bottom connection has a thermostatic insert that allows you to easily regulate the temperature of the device. This feature affected the cost - it is, on average, 10% higher than other batteries.
Calculator for calculating the number of heating radiator sections
Go to calculations
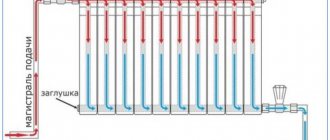
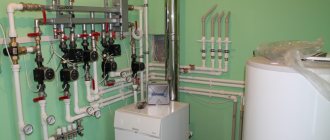
Not everyone will like this “web of pipes” created for the most efficient connection of the battery
What radiators are suitable
Manufacturers produce batteries for bottom connections with outlet and inlet pipes at the bottom. Universal models have 4 gaps for lines, so they fit in any way. Heating pipes are installed at two entrances, the rest are hidden with plugs. It is allowed to connect radiators using the bottom method under the side insert. You will need a special installation kit to attach the pipes to, into, or under the floor.
Fixation is carried out from below on brackets. The element should be slightly inclined towards the reverse movement of the coolant. In this way, air pockets are quickly removed from the system.
The lower method of connecting radiators is suitable for single-pipe and two-pipe heating systems. Using special fittings and devices, the technology is implemented in apartments and private houses.
Bottom liner options
There are only two of these, let’s get acquainted with the features of each of them.
Table. Bottom pipe options.
| Name, photo | Short description |
| One-sided | In this case, both pipes are connected on one side. The hot coolant enters through the top plug, and the cooled coolant is discharged through the bottom. |
| Versatile | The entrance and exit, as you might guess from the name, are on different sides. This connection option is ideal for individual heating systems. The good thing about this option is that hot water can flow in any direction, plus the length of supply and return is shorter here. |
Features of the diagonal connection scheme
If you also wondered why a diagonal connection is the most effective, then you should consider this option in more detail.
If we take into account the process where hot air or water is involved, then the action will occur according to one physical law, which involves the rise of warm masses upward, while the cold ones sink downwards
To ensure uniform heat distribution throughout the volume of the radiator, the coolant should be distributed throughout the battery. As mentioned above, lateral connection in city apartments acts as the main circuit. After all, forced circulation under high pressure is used there. The diameter of the incoming and outgoing pipes is only 20 mm. Through them, water enters the battery under high pressure, which allows the device to be filled evenly and quickly.
If we are talking about private housing construction, where the circulation is natural, the filling of radiators occurs under the influence of the above-mentioned physical law. That is why hot streams penetrate through the upper pipe, pushing cold water through the lower outlet on the opposite side. The two pipes are located diagonally when viewing the device. This is where the name of the connection comes from. The coolant fills the battery gradually, releasing heat to the entire volume. It is necessary to take into account not only the law of heat transfer, but also the physical law. That is why this scheme is the most effective.
Bottom connection methods
Next, we will consider exactly how radiators can be connected to the heating system.
Bottom connection in a two-pipe system
Method No1. With side outlets
The connection is easy to make; the pipes in this case are located below - in the floor or under it. The radiator can be removed without stopping the entire heating process, but for this, shut-off valves are mounted on both sides. And an air vent is placed on top (on either side).
Double-sided bottom connection
Method No2. Using an adapter
If it is not possible to connect pipes to the radiator on both sides, then the problem can be solved by using an adapter. It is screwed into the lower hole, and a stainless steel tube is passed to the upper hole. The heating pipes are connected to the adapter itself from below.
Installation of the radiator bottom connection unit
On a note! You can learn more about this method from the video below.
Video - How to connect a sectional radiator from below
Method No3. With flow extender
The extension cord must be screwed into the lower hole without any bends to the upper one. The coolant circulates due to the fact that, passing through the middle of the device, it comes out at its end and rises, thereby squeezing out the cold liquid through the outlet located in the device.
Radiator guide or duct extension
Important! This connection option is not suitable for a gravity heating system.
Operating principle of a flow extender for a heating radiator
Piping to the room heater
Currently, the best piping options are polypropylene and cross-linked polyethylene pipes. They are reliable and have an attractive appearance. Experts do not recommend using steel pipelines for wiring the heating system.
Pipes connected to the battery from below are often laid under the floor covering or even along the ceiling of the floor below. For this installation method, steel pipelines are not the best option. The optimal solution, proven in practice, is tying heating radiators with polypropylene. A good solution is also to use copper and PEX piping for heating distribution.
Polypropylene pipe for heating system Source vyborexperta.ru
The use of insulation on pipes also has its own characteristics:
- the absence of thermal insulation protection will provide additional heating of the room;
- the presence of thermal insulation will reduce heat loss - this is an important nuance if the pipelines are laid in the suspended ceiling of the floor below;
- the thermal insulation layer replaces the damping material when heating is installed in the screed - the insulation compensates for the thermal expansion of the polymer, which allows the plastic to expand in any direction without negative consequences.
Thermally insulated heating pipes laid in a screed Source odstroy.ru
Before installing pipelines, be sure to determine the exact location of the heating devices. Their horizontal displacement is unacceptable, unlike height. The reason for this is the lack of a swivel fitting above the floor covering.
Usually only small straight sections of piping are above the surface. They are connected to the heater taps. The exception is batteries that are tied from below using knots that provide lower side connection to the pipes. This option assumes that the pipeline outlets are located at a distance of approximately 120 mm from the fittings.
Using radiators with bottom connections
This method is not only the most effective, but also the most aesthetically acceptable. The advantages of this connection include:
- possibility of installing a flow direction adapter;
Flow direction adapter
- no need to purchase a suitable thermostat - it is already on the radiator;
- the fact that both pipes from the battery go into the wall or floor.
Piping in the wall
However, there are also disadvantages, including:
- the need to install an air vent on each radiator;
- the need for constant use of a circulation pump;
- less uniform heating, lower efficiency;
- impossibility of use for gravity heating systems.
You need to bleed the air from the battery
Battery Location Requirements
Regardless of which connection method is chosen, the radiator should be located:
- 5 cm from the wall;
- 10 cm from the window sill (a distance of at least 5 cm can be allowed);
- 10 cm from the floor surface (a slight deviation is possible - maximum 2 cm).
How to install heating radiators correctly
On a note! When purchasing fasteners, consider the thickness of the foil thermal insulation (if provided). In this case, the length of the locking hooks should be slightly longer.
Radiator location standards are observed
Reinforcement elements and consumables
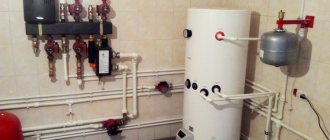
Installation of batteries, to which the pipelines are connected from below, is not difficult. However, the process is carried out using special fittings. Its type is selected for the installed radiators.
Bottom connection of the heating battery with polypropylene or other pipelines involves the use of a set of adapters. They are selected according to the material of the connected pipes. Typically solder sleeves and press fittings are used. If polypropylene pipes are connected, it is recommended to use “American” threads.
Completed lower piping of the heating device using a set of fittings and adapters Source remontnik.ru
On a note! Adjustment fittings are rarely installed under heating equipment. It is usually located on the manifold.
If a lateral pipe supply is made from below, a control and thermostatic valve is installed on the heater. Installation of fittings is carried out using threads.
On a note! When installing any room heating device, 2 shut-off valves are installed. They allow you to turn off and remove heating equipment without stopping the operation of the heating circuit of the house.
When installing the battery, radiator plugs and air vents are also used, which are often Mayevsky taps. To seal threaded connections, tow is usually used together with a special paste.
Manual air vent - Mayevsky tap Source eurobion.info
About special radiators designed for the lower connection scheme
As noted earlier, special batteries with bottom connections are sold today. Their design is such that optimal heat transfer is ensured. Radiators consist of a pair of steel plates connected to each other by welding, thereby forming technological channels for the movement of working fluid. The plates are varnished in two layers for high-quality protection against corrosion.
Bimetallic radiators Titan (Marek) 500/96 with bottom connection
To connect the radiator with your own hands, you need to prepare:
- L- or T-shaped tubes;
- building level;
- multiflex nodes;
- FUM tape;
- thermal insulation;
- pipe cutter;
- nuts in the required quantity.
It is advisable that the bottom connection of the batteries be made in the early stages of renovation of the apartment/house, because the pipes in this case are laid inside the floor (or wall). Keep this in mind when planning the installation of a concrete floor screed.
It is better to connect the radiator in the early stages of repair
Note! Each battery model with a bottom connection can have its own mounting kit or its own unit, thanks to which you can mount the device on the wall.
If for one reason or another the pipes cannot be laid into the floor, then in the future they can be covered with a plinth or plasterboard box.
Skirting for radiator pipes
Pros and cons of technology
The connection method is chosen to ensure uniform heating of the radiators.
The optimal option for using a unit for connecting a heating radiator with a bottom type of connection is a two-pipe system. Communications eliminate heat losses and have several advantages:
- uniform heating of the top and bottom of the batteries;
- ease of serial connection of pipes;
- high-quality heating of rooms, which allows only the two-pipe method to be implemented;
- masking radiator elements in the floor or walls;
- quick dismantling and replacement of elements;
- possibility of installing pipelines made of polypropylene, copper, PEX, bimetal, aluminum, steel.
The disadvantages of the lower supply include the need to equip each battery with air vents and the impossibility of installing it if there is a circulation pump.
Features of installing radiators with bottom connections
The installation process is determined by which scheme is chosen. So, the pipeline can be laid:
- in the wall;
- in the floor;
- between the radiator and the floor.
On a note! The efficiency of the heating system does not depend on the location of the pipes - they are hidden for aesthetic reasons.
The connection is made using special fittings.
First, radiators are installed, having previously calculated their number for each room, after which pipes are supplied to them.
If you follow the advice from this article, you will not encounter any difficulties.
Master Class. We connect the radiator from the floor using L-shaped tubes
L-shaped tube
Step 1. Installation begins with the installation of the nipple.
Nipple installation
Step 2. Then the block of ball valves is installed.
Installation of ball valve block
Step 3. Place the threaded clamp onto the L-shaped tube.
Threaded clamp connection is put on
Step 4: Now the L-shaped tube is flared using a tool.
The L-shaped tube is flared using a tool
As a result, the rubber seal no longer slips off the tube into the Eurocone.
Now the seal does not slip off the tube
Step 5. The tubes are installed in the fixing angle.
Installation of tubes in the fixing angle
Step 6. Next, the tubes are inserted into the block of ball valves and baited.
Baiting tubes
Step 7. A hole is marked for attaching the fixing angle, after which the tubes are dismantled.
The future hole is marked. Removing the tubes.
Step 8. A hole is drilled in the floor according to the markings.
A hole is drilled in the floor
The kit with a fixing angle includes a dowel and a self-tapping screw. The dowel is driven into the hole made.
Dowel and self-tapping screw
The dowel is driven into the hole
Step 9. The L-shaped connecting tubes are installed back and fixed to the ceiling.
Fixing L-shaped tubes
Step 10. Take the pipe and connect it to the L-shaped connecting tubes. The thermal insulation on the pipe is moved back at least 2 lengths of the sliding sleeve. Then the sleeve is fixed.
Pipe for heating system
Thermal insulation is moved back by 2 sleeve lengths
Fixing the sleeve
Step 11: The connection is made. The end of the pipe is flared.
Note! In this example, a metal-polymer pipe is used, which is why the nozzle on the tool is green.
A green nozzle is used Flaring the pipe The pipes are connected
Step 12. The pipes are attached to the ceiling using dowel hooks with a pitch of 50 cm. Thanks to this, the pipes will not float up when pouring the screed.
The pipes are attached to the floor with dowel hooks
Types of fittings for the assembly
Types of fittings that are used to connect pipes and radiators in a heating system.
You can connect communications using the bottom method using three types of fittings:
- Direct. They are used to connect radiator modules to pipes emerging from the floor in a vertical position. The direct fitting scheme involves the presence of fittings with an “American” (flare nut) or compression adapter coupling.
- Angular. The pipes come out of the wall at a minimum height from the floor surface. The corner fitting is connected by an American connector located at the ends of the pipes.
- Taps for closing the system and adjusting the temperature. The fitting is built into the battery housing and provides quick connection to the two-pipe wiring. Using ball or valve valves with recessed tips, you can adjust the return, flow, and turn off radiators.
Parts of the steel pipeline are fixed with a metal-plastic union nut with a Eurocone type connector.
Master Class. We connect the radiator from the floor using T-shaped tubes
Also, T-shaped connecting tubes can be used to connect the battery from the floor. They are necessary if the line goes under the heating device. Let's look at this process step by step.
T-tube
Step 1. A threaded clamp connection is put on the tube.
Threaded clamp connection is put on
Step 2. After this, the tube is flared.
T-Tube Flaring
Step 3. Next, you can proceed directly to installing the tubes.
Installation of tubes
On a note! In the photo you see that the connecting tubes are installed in different directions.
The tubes are installed in different directions
Step 4. A connection is made using a sliding sleeve. The radiator is connected using T-tubes, and the line goes further to the next heating device.
The heating device is connected using T-tubes
Step 5. The exit of the pipes from the floor can be decorated using overlays in accordance with the finishing floor covering. Overlays can be made for different coatings.
Decorative overlay
Example of using decorative overlays
If there are no high aesthetic requirements for the interior of the room, then you can use a budget connection option using a connecting set. This set is used for cross-linked polyethylene pipes without an aluminum layer.
Connection set
Inside this set there are guides and rings for fixing the pipe. This set is necessary to prevent threaded connections from loosening and to compensate for thermal expansion.
Guides
Ring for fixing the pipe
First, the ring is put on the pipe. Then the clamp is removed from the guide, the pipe is inserted into it and secured with a ring. The latch is inserted.
The ring is put on the pipe The pipe is fixed with a ring
The latch is inserted
The pipe is cut to the required length, after which a connection is put on it and installation is carried out to the heating device.
Pipe cutting
Threaded clamp connection is put on Installation to a heating radiator
Decorative overlays are installed, pre-cut to size.
Mark the cut location Installation of decorative overlays
Using this element, the two parts are connected to each other.
This element is necessary to connect two parts Connecting two parts
The connection kit is attached to the ceiling. That's it, the installation can be considered complete.
The kit is attached to the ceiling. Installation work is completed.
Types of connection nodes
The H-shaped unit located at the bottom facilitates the process of setting up, shutting off the radiators and draining the coolant from them. Depending on the type of contour reinforcement, there are several types of structures.
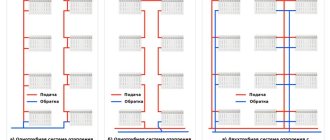
Monotube
You need to choose a connection system with 1 or 2 pipes based on the area of the room.
The coolant moves along the main line to the heating devices. Due to the drop in water temperature, the battery warms up well only in the first circuit, the latter remain cold. To equalize the temperature difference, bypass wiring is used. The temperature compensation system divides the input flows into two parts. One is sent to the radiator devices and begins to heat the case. The second at this moment moves to the next device.
Double pipe
Radiators heat up evenly without bypass. If there is a lower unit, a “binoculars” design is used in the form of fittings with adjustment and closing taps. One pipe goes to the supply, the second to the return.
Combined
A main line with a bypass channel inside is used in one-pipe and two-pipe distribution. On a heating main from one pipe the bypass opens slightly, from two pipes it closes completely.
The importance of a competent approach to choosing a connection diagram
First of all, always pay attention to the radiator installation diagram. As a rule, it affects the functionality of the heating device and its efficiency. In addition, if the installation is performed incorrectly, thermoregulation will be disrupted and the pressure in the battery will increase, which will inevitably lead to operational problems. If you do the installation yourself, without the appropriate skills, you will encounter many problems and, most likely, ruin the interior of the room.
Radiator bottom connection unit
By giving preference to the lower connection, prepare for a slight decrease in the efficiency of the entire heating system. Although this is a small thing when compared with convenience and hiding the pipes. If you connect radiators correctly, they will save heating costs in the future and will serve you for many years!