How to calculate the return temperature?
– temperature of cold water that is prepared and heated at the heat source, usually tх. V. 5 °C is accepted. The amount of heat in the return is calculated similarly: Q 1 = G2*(t2- tх.
Interesting materials:
What is zapadlo? What is Heat Resistant Glass? What is a star in the world around us, grade 2? What is a barn? What did Taras Bulba respect in his wife? What flows from the willow tree? What is heavier, gas or air? What's heavier: iron or cotton candy? What is traded on the Moscow Exchange? What does the plate on the tap indicate?
Various ways to connect supply and return
In a house or city apartment, heating can be arranged in the following ways:
- bottom connection;
- side connection;
- diagonal connection.
Let's figure out where the heating return is for each method.
Bottom connection method
When using the lower (other names: sickle-shaped, saddle, Lenigradka) connection method, the supply and discharge pipes of the coolant are connected to the bottom of the radiator.
Bottom ways to connect the battery
The difference between supply and return in this situation is minimal. The lower method is distinguished by its simplicity of execution and the ability to hide the pipes that are part of the heating system in the floor.
A significant disadvantage is the large loss of heat transfer. Efficiency is reduced by an average of 15% compared to other connection methods.
Side connection method
A more popular scheme for organizing the supply and removal of coolant is the lateral method. In this case, the inlet pipe (supply) is connected to the heating radiator assembly in the upper part of the equipment, and the outlet pipe is connected to the same side, only in the lower part.
Side connection
This method is optimal for radiators with a small number of sections, since minimal volumes contribute to more uniform heat distribution.
Diagonal connection method
The heating supply and return temperatures will differ slightly if you choose a diagonal battery connection. When using this method, the supply pipe is connected to the upper side of the radiator, and the return pipe is connected to the bottom of the battery, but on the opposite side.
Diagonal radiator connection
Design features of the heating circuit
Modern buildings often use additional elements, such as collectors, heat meters for batteries and other equipment. In recent years, almost every heating system in high-rise buildings has been equipped with automation to minimize human intervention in the operation of the structure (read: “Weather-dependent automation of heating systems - about automation and controllers for boilers using examples”). All the described details allow you to achieve better performance, increase efficiency and make it possible to more evenly distribute thermal energy throughout all apartments.
Control of operating pressure in heating circuits
For normal, trouble-free operation of the heating system, it is necessary to regularly monitor the temperature and pressure of the coolant.
To check the latter, deformation pressure gauges with a Bourdon tube are usually used. To measure small pressures, their varieties can be used - diaphragm devices.
Figure 1 – Strain gauge with Bourdon tube
In systems where automatic control and regulation of pressure are provided, various types of sensors are additionally used (for example, electric contact).
- at the inlet and outlet of the heating source;
- before and after the pump, filters, mud traps, pressure regulators (if any);
- at the exit of the main line from the thermal power plant or boiler house and at its entry into the building (with a centralized scheme).
Figure 2 – Section of the heating circuit with installed pressure gauges
Penalty for excess return flow Blog of a heating engineer
Hello, dear readers of the blog teplosniks.ru! On my blog I previously wrote about overheating of the heating return. The most unpleasant thing in such a situation is when you are given a specific bill for overheating in the return pipeline. No one wants to part with money, especially when the volume of heat consumption is calculated in the form of penalties. You have to pay the meter and more. So, how exactly does the energy supply organization calculate the fine?
The first point determines the contractual flow of network water through the heating unit. It is determined by the formula:
where Qdog is the heat load for heating under the contract (this figure must be in the contract, look). Let's take a specific figure of 0.332 Gcal/hour.
C—heat capacity of water, kcal/kg °C
t1 — supply temperature according to schedule, °C
t2 — return temperature according to schedule, °C
We substitute specific numbers. Usually the temperature graph is 150/70 °C (but it can also be 130/70 °C and 105/70 °C, etc.). In our case t1 = 150°С; t2 = 70°C. The heat capacity of water can be taken to be unity, C = 1. In fact, the heat capacity will be slightly different from unity, but we don’t need such super-precision. So, we calculate the figure, the consumption of network water, which should be according to the contract.
Where is the return route?
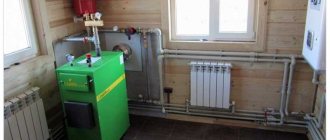
In short, the heating circuit consists of several important elements: a heating boiler, batteries and an expansion tank. In order for heat to flow through radiators, a coolant is needed: water or antifreeze. If the circuit is constructed correctly, the coolant heats up in the boiler, rises through the pipes, increasing its volume, and all excess ends up in the expansion tank.
Based on the fact that the batteries are filled with liquid, hot water displaces cold water, which, in turn, goes back into the boiler for subsequent heating. Gradually the water temperature increases and reaches the desired temperature. The coolant circulation can be natural or gravitational, carried out using pumps.
Based on this, the return can be considered a coolant that has passed through the entire circuit, giving off heat, and, already cooled, returned to the boiler for subsequent heating.
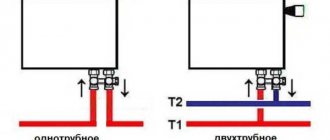
Features of return connection
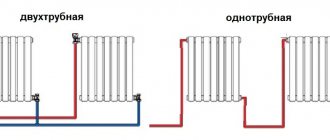
Depending on the type of wiring of the heating system in a residential area, return and supply can be organized:
- one pipe at a time;
- through two different pipes.
Single-pipe heating systems
The single pipe system is mainly used in apartment buildings, as it differs:
- relatively low cost of materials and installation work;
- a high coolant pressure indicator, since the pressure in the return of the heating system must be sufficient to pass through the radiators connected downstream.
The negative aspects of this method include:
- impossibility of adjusting heat in a separate radiator;
- a significant reduction in the level of heat transfer on batteries located further from the heating equipment.
System with supply and removal of coolant through one pipe
To increase heat transfer, a circulation pump is additionally installed in a single-pipe system.
Two-pipe heating systems
In individual houses, two-pipe heating systems are most often organized, in which independent lines are provided for the supply and removal of coolant.
System with two pipes for supply and removal of coolant
The advantages of this system include:
- more uniform heating of all batteries, regardless of distance from heating equipment;
- possibility of adjustment, partial shutdown, for example, to repair or replace a radiator, without affecting the operation of other batteries.
The most significant drawback is the complexity of installation work. If a natural slope is not provided during the wiring and the coolant does not circulate by gravity, then a heating return pump is required, which also increases the cost of consumables.
No circulation or poor circulation in the heating system
The boiler is working, the pump is definitely working, but there is no circulation in the heating system. Again, the first thing we do is check the air in the radiators. Then, we check the shut-off valves (taps), which may have been closed somewhere due to inattention. The next step is to clean the filter in front of the boiler and in other places, if any. This will solve the issue in 90% of cases, even if the heating system has been recently installed. If not, then we check the heating pipes for the possibility of air pockets in the pipes (see installation of the heating system). If there are such areas in the heating distribution, then the problem can be temporarily solved by draining the water from the radiator under pressure. which is located behind the loop, the flow of water will expel the air from the loop. If possible, an automatic air vent should be installed on large hinges. This will eliminate the problem in the future. If, as a result of the above measures, circulation is not restored, then you need to contact a specialist.
Discuss this article, leave a review on Google+ | VKontakte | Facebook
Where to install the radiator?
Proper connection of heating radiators allows you to obtain, in addition to direct heating, a protective function. This means that rising warm currents form a strip that prevents cold currents from entering the room. When creating this effect, you will not be at all interested in which circuit to connect the radiator to. It is precisely because of this feature that the devices are most often installed under window openings.
To ensure the best protection of this kind, you should correctly determine the installation location before starting to install radiators. It wouldn’t hurt to think about this in advance, because... then you won't be able to change anything.
It would also be a good idea to not only decide on the location, but also the type of location, because... This will be useful when further planning the installation of heating batteries.
There are several basic rules for placing objects and surfaces that must be followed:
1. The distance from the window sill to the battery is no less than 10 centimeters;
2. The distance from the floor to the battery is no less than 12 centimeters;
3. The distance from the wall to the battery is no less than 2 centimeters.
Types of radiators for heating apartment buildings
In multi-storey buildings there is no single rule allowing the use of a specific type of radiator, so the choice is not particularly limited. The heating scheme of a multi-storey building is quite universal and has a good balance between temperature and pressure.
The main models of radiators used in apartments include the following devices:
- Cast iron batteries
. Often used even in the most modern buildings. They are cheap and very easy to install: as a rule, apartment owners install this type of radiators themselves. - Steel heaters
. This option is a logical continuation of the development of new heating devices. Being more modern, steel heating panels demonstrate good aesthetic qualities, are quite reliable and practical. They combine very well with the control elements of the heating system. Experts agree that steel batteries can be called optimal for use in apartments. - Aluminum and bimetallic batteries
. Products made from aluminum are highly valued by owners of private houses and apartments. Aluminum batteries have the best performance when compared with previous options: excellent appearance, light weight and compactness are perfectly combined with high performance characteristics. The only disadvantage of these devices, which often scares off buyers, is the high cost. However, experts do not recommend saving on heating and believe that such an investment will pay off quite quickly.
Connection diagrams for boilers, radiators, piping in home heating
You can make a heating system for your home yourself if you have the skills to do plumbing and construction work. In other words, you need to be able to solder pipes, cut them, connect them, and also tighten nuts, know the purpose and technical characteristics of the equipment used, have an understanding of hydraulics and heating engineering, and much more...
Then, using standard proven schemes and solutions, you can create a heating system for a small house only with your own hands.
But if you don’t have the skills to do the work, you will have to watch how specialists make the heating system. At the same time, it is also highly advisable to familiarize yourself with the basic rules for creating a system, equipment layout diagrams, etc., in order to monitor the progress of work and eliminate errors in a timely manner, if any are made.
Below are some nuances of creating a heating system in a private home, which you should always pay attention to first. Let's start with connecting the boiler, since many mistakes are often made in the boiler room.
Connecting a wall-mounted boiler
Wall-mounted boilers are usually automated; they contain two important elements of the heating system:
- safety group, which usually consists of an air valve, pressure gauge, emergency overpressure valve;
- circulation pump, which ensures the movement of fluid in the heating system;
Therefore, connecting a wall-mounted boiler is the simplest; it should be done according to the following scheme (we consider the direction “from the boiler”):
Supply: – tap with American connection for connecting the boiler; - transition fitting for pipes - American.
The tap is required and is placed immediately in front of the boiler so that the boiler can be serviced without draining the system.
Return: - tap with American connection for connecting the boiler; — dirt filter; - tap; — a tee with an expansion tank, a shut-off valve, a drain and fill valve for the system. - transition fitting for pipes - American.
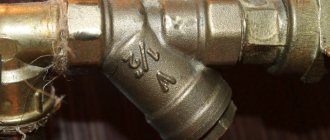
A dirt filter is a mandatory element of any heating system. It is installed with the sump facing down, or, in extreme cases, horizontally. Dirt from the system will accumulate in the filter and is periodically removed from the sump. When installing, you must observe the direction relative to the stream.
The taps near the filter are required; only by closing both taps can you service and clean the filter.
Next, let's look at the piping of a floor-standing boiler. It is more complicated, since a floor-standing boiler does not have a safety group and a pump. Therefore, they are installed independently, like elements of a boiler room.
Safety group, circulation pump, expansion tank
For the safety group, it is better to purchase a special tee and mount the devices listed above on it. It is important to select devices in accordance with the parameters of the heating system, usually the maximum pressure is 4 MPa, the operating pressure is 1.5 - 2.0 Atm.
The pump is purchased according to the characteristics of the system. For an ordinary small house (up to 150 sq. m.), a circulation pump with a pressure of up to 4 m (0.4 atm) will always be sufficient for the heating system (often for radiators up to 250 sq. m.)
Accordingly, the pump is marked 25 - 40, where the first number indicates the thread diameter of the connection pipes, in this case 25 mm - 1 inch, but it can be 32 mm or more. The second number 40 is a designation of the pressure created - up to 0.4 atm, and therefore, indirectly, the power of the pump.
Each circulation pump has a rotation speed adjustment in at least 3 positions, which will determine the volume of liquid pumped and the actual power consumption.
In the first adjustment position, the circulation pump 25-40 will consume no more than 30 W of electricity. More often, for a properly designed heating system in an insulated house up to 150 sq. m. There will be enough thermal energy that can be supplied by this pump at first speed.