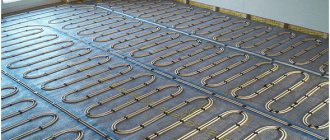
When organizing a heating system in a private house, falling and return pipelines are often laid in a screed. This option for hidden pipe routing allows you not to disturb the design of the premises. Let's find out what other advantages and disadvantages the bottom connection of heating radiators has. Let's consider the types of batteries used, suitable types of heating systems, and fittings used when pipelines are connected from below to heating devices.
An installed heating device, to which the supply pipe and return pipe are connected from below Source oventrop-home.ru
Do-it-yourself heating system installation
Before heating a private home, you need to stock up on the following tools for soldering polypropylene pipes:
- A shaver that allows you to remove reinforcement from the soldering area and chamfer the pipe;
- Pipe cutter;
- Soldering iron for polypropylene pipes with a set of nozzles of the required diameter.
The pipe connection technology is as follows:
- First you need to put the shaver on the pipe and turn it several times to remove the aluminum layer. If this is not done, the metal will gradually become damaged upon contact with the liquid, thereby having a negative impact on the entire heating system.
- The soldering iron nozzle is heated to the required temperature, then a pipe is inserted into the socket, and a fitting is put on the opposite side of the nozzle.
- When the parts melt a little, they need to be combined with some force and held in this position for a few seconds. After the plastic has hardened, you can begin soldering the next section.
A safety group is installed near the boiler outlet pipe. The installation location is determined by the fact that it is in this section of the system that the pressure rises when the system malfunctions. The expansion tank can be mounted anywhere, but there is one caveat: when installing the tank in front of the pump, the distance between them should be more than two filling diameters, and if the tank is attached behind the pump, then the distance increases to ten filling diameters. Failure to comply with this rule leads to premature failure of the membrane - and it is unlikely that it will be possible to determine the problem immediately, so you will also have to think about how to check the heating in a private house.
Sometimes the question arises whether a gravity system can be converted into heating with forced circulation. The answer to this question is affirmative - if necessary, the pump can be installed in any circuit, which allows you to completely remake the heating in a private house.
- The diameters and wiring configuration are selected so that the system can operate with natural circulation;
- Parallel to the wiring, two connections are installed in front of the boiler, to which the circulation pump is connected;
- The taps are separated from each other by a check ball valve.
When the pump is running, the valve closes and completely closes the passage in the bypass, thereby ensuring forced circulation of the coolant. When the pump is turned off, the heating automatically switches to natural circulation - the valve opens and the coolant continues to move. Of course, the check valve can be replaced with a gate or ball valve - but in this case, you will have to switch the operating mode of the system manually.
Conclusion
This article gives a superficial idea of how to install heating in a private house with your own hands. Each design element can be examined in more detail, so if there is such a need, you can look for the relevant article for a deeper understanding of a specific issue. In general, it can be noted that the heating system has a fairly simple design, and with due attention it is quite possible to assemble it yourself.
Master Class. We connect the radiator from the floor using T-shaped tubes
Also, T-shaped connecting tubes can be used to connect the battery from the floor. They are necessary if the line goes under the heating device. Let's look at this process step by step.
T-tube
Step 1. A threaded clamp connection is put on the tube.
Threaded clamp connection is put on
Step 2. After this, the tube is flared.
T-Tube Flaring
Step 3. Next, you can proceed directly to installing the tubes.
Installation of tubes
On a note! In the photo you see that the connecting tubes are installed in different directions.
The tubes are installed in different directions
Step 4. A connection is made using a sliding sleeve. The radiator is connected using T-tubes, and the line goes further to the next heating device.
The heating device is connected using T-tubes
Step 5. The exit of the pipes from the floor can be decorated using overlays in accordance with the finishing floor covering. Overlays can be made for different coatings.
Decorative overlay
Example of using decorative overlays
If there are no high aesthetic requirements for the interior of the room, then you can use a budget connection option using a connecting set. This set is used for cross-linked polyethylene pipes without an aluminum layer.
Connection set
Inside this set there are guides and rings for fixing the pipe. This set is necessary to prevent threaded connections from loosening and to compensate for thermal expansion.
Guides
Ring for fixing the pipe
First, the ring is put on the pipe. Then the clamp is removed from the guide, the pipe is inserted into it and secured with a ring. The latch is inserted.
The ring is put on the pipe
The pipe is fixed with a ring. A clamp is inserted.
The pipe is cut to the required length, after which a connection is put on it and installation is carried out to the heating device.
Pipe cutting
Threaded clamp connection is put on
Installation to a heating radiator
Decorative overlays are installed, pre-cut to size.
Mark the cut location Installation of decorative overlays
Using this element, the two parts are connected to each other.
This element is necessary to connect two parts Connecting two parts
The connection kit is attached to the ceiling. That's it, the installation can be considered complete.
The kit is attached to the ceiling. Installation work is completed.
Battery tying
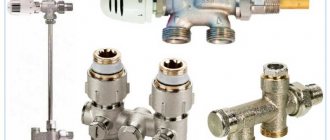
Before heating the house yourself, you also need to think about the amount of fittings that will be used in the system. In the event that you only plan to turn off the radiators, then two ball valves installed on the connections on each side of the heating devices will be sufficient. Such cranes are quite reliable and durable, so there will be no problems with them.
It's another matter if the system needs to be configured. To regulate the coolant flow, you will need radiator valves. Structurally, they are ordinary valves in which a metal valve is installed. To automatically adjust the permeability of the connections, it is better to take valves with thermal heads that regulate the heat transfer of the batteries when the air temperature in the room changes.
What tools will you need?
The tying process is highly complex, so special tools are required, which include:
- Special keys.
- Seal for each threaded connection.
- Tow and thread pastes.
- Threaded threads.
This list is not exhaustive, because each system requires an individual approach.
Heating wiring
The simplest and most reliable heating wiring diagram is “Leningradka”, or single-pipe system wiring. Such a system is structurally a looped circuit running along the entire perimeter of the building. Radiators are connected to the pipeline in parallel. The main disadvantage of the Leningradka is the uneven heating of the radiators connected in the circuit.
A much more effective option for how to properly install heating, especially in multi-storey buildings, is a two-pipe heating system. There are two varieties of such a system, one of which is called a dead-end system. This scheme must be balanced, i.e. limit the flow of radiators located close to the boiler - otherwise heating of heating devices located far away will be insufficient.
In a passing circuit, there are several parallel circuits of the same length. There is no need to balance the associated wiring, since in it the heat transfer of all batteries is initially almost at the same level. If no obstacles prevent you from creating a circular passing circuit, then it needs to be done, but otherwise a dead-end two-pipe wiring is quite suitable. In any case, in order to know exactly how to properly install heating in a house, you need to think through all the known nuances in advance.
Heating boilers
The choice of heat source is a key factor on which the further selection of heating elements and the operating efficiency of the assembled system will depend. The cheapest fuel today is gas, therefore, if a gas main is connected to the site, a gas-fired boiler will be the best solution.
Condensing gas boilers with electric ignition, which have a couple of features, have proven to be the most economical:
- When the coolant is heated to too high a temperature, gas is simply not consumed, which reduces its costs by about 25%;
- The heat given off to water vapor is also used for heating, which saves another 10-12% of energy resources.
If we arrange heating equipment operating on other types of fuel in order of decreasing efficiency, we will get a list of the following type:
- Wood boilers;
- Pellet boilers;
- Coal boilers;
- Diesel boilers;
- Electric heating devices.
When choosing a heat source before heating a private home, you need to pay attention to a number of nuances:
- For gas boilers, you can use not only main gas, but also bottled gas. True, the cost of heating in this case increases several times.
- Before purchasing a heating device that runs on a certain type of fuel, it is worth at least approximately studying the dynamics of rising prices for different types of fuel, and when studying, you need to tie fuel prices to geography.
- Coal boilers use firewood for heating. This must be taken into account - firstly, kindling and warming up the system will take longer, and secondly, purchasing firewood will require additional costs.
- Gas, diesel and electric boilers operate uninterruptedly if fuel is available. Pellet boilers with an automatic feeding system can operate for a week. Solid fuel boilers must be heated and cleaned at least (and often more often) once a day. A long-burning boiler can operate on one burner for several hours longer, and the most expensive and modern devices operate without problems throughout the day.
- The waste can be used as fuel for diesel boilers - this will reduce heating costs several times. The disadvantage of such savings is the shortage of used oil, which is very difficult to purchase in sufficient quantities and on an ongoing basis.
Electricity in such devices is required only for the operation of the compressor. Such schemes turn out to be quite profitable - the cost of heating can ultimately compete on equal terms with the savings when using solid fuel boilers and gas.
Of course, you have to pay for the savings somewhere - the cost of heat pumps is very high, and the installation of such equipment costs a tidy sum. It is enough to give a simple example: to install a geothermal pump, you need to drill a well several tens of meters deep, or dig a pit, the area of which will be three times larger than the area of the heated building.
There is a solution to this problem - you can use a type of heat pump in which the coolant is air outside the house. Thermal energy is pumped out of it, which is subsequently used to heat the building. In essence, this scheme represents the operation of a conventional air conditioner set to heating mode.
Selection of pipe diameter
Another important issue that needs to be resolved in advance is how to install heating and with what pipes. The diameters of the pipes must be selected depending on what kind of heat transfer is planned in a certain section of the heating circuit. For example, on the wiring, this value corresponds to the power of the boiler, the connections to the radiators must transfer enough coolant to heat the radiators themselves, and the throughput of the risers must ensure normal heat transfer of all heating devices connected to them.
In principle, if it is possible to increase the circulation rate of the coolant (by increasing the pump power), the diameter of the pipes can be reduced
But at this point it is important not to overdo it - acceleration of the coolant leads to an increase in noise in the system. The standard speed value is about 0.4-0.6 m/s.
When using a gravity heating system, the diameter of the distribution pipes must be increased by at least one step. It's all about the very low pressure characteristic of systems with natural coolant circulation. Too wide pipes will reduce the hydraulic resistance of the circuit, sometimes even to the point of complete loss of system functionality. Knowledge of such points is already a large part of the answers to questions about how to make efficient heating in a private home.
How to connect a heating radiator to a polypropylene pipe
Connecting a radiator to polypropylene pipes is a process consisting of several stages:
- Drawing up a drawing, marking.
- Fastening batteries to walls using brackets.
- Installation of pipes, connection of individual parts.
- Pipeline testing.
There are several ways to connect the battery to the pipes:
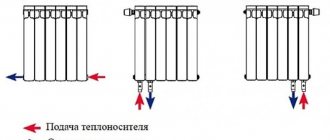
- Bottom connection. The tubes are connected on both sides of the radiator at the bottom. Suitable for horizontal installation of a single-circuit pipeline.
- Lateral connection. On one side of the battery there are two holes for the liquid supply and waste outlet.
- Diagonal connection. A classic option for connecting radiators to pipes. The coolant supply and outlet openings are located on both sides in the lower and upper parts.
Possible connection diagrams
The most efficient connection of batteries is quite easy to carry out - both in terms of the number of nodes and in terms of installation technology.
Heating radiator designTwo-pipe heating system
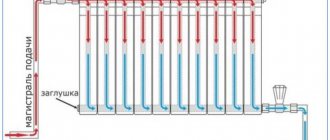
Option #1. Tichelman scheme
The most popular connection scheme, its main advantage is the maximum efficiency of all heating radiators at any point in the system. In addition, the Tichelman circuit allows you to regulate a separate radiator without any effect on the rest of the system. So, if it is very hot in one of the rooms, then the battery there can be completely/partially disconnected from the supply of hot coolant. And the thermal energy that is released as a result will be evenly distributed over the remaining radiators.
Tichelman's schemeAlbert Tichelman's solution
Another advantage of the scheme is that the water in both pipes has a common direction of movement. In terms of hydraulics, this is very good, since the load on all components of the system (in particular, the pump and heating boiler) drops noticeably.
Hot water begins to move from the boiler, moving alternately through all radiators. The return movement also starts from the first battery. It turns out that battery No. 1 will be the last on the return path, but the first on the hot coolant supply. Water will flow to battery No. 2 at a slightly lower temperature, but this unit is already closer than the first to the boiler on the “return” circuit.
Water flow process
The situation is similar with each subsequent radiator: the further it is from the source of hot coolant, the shorter the distance to the cold water outlet point. As a result, the conditions for all batteries are approximately equal (in terms of heat exchange with the system); they all heat up equally, regardless of their location.
Pipes with a diameter of 25 mm are used for wiring, while the batteries are connected to the network using pipes of 20 mm.
The radiator in the middle will not work
The Tichelman scheme has only one drawback - radiators cannot be placed exactly in the middle of the system (they simply will not heat in this place). This is explained by the hydraulic effect that occurs in the middle - here the outflow of cold and the supply of hot fluid form equal pressure. In reality, this almost never happens; the problem is solved by slightly moving the battery to the right or left. Although there is a simpler option - to create a small turn on one of the circuits in order to increase its length and thereby move the heating battery from the middle.
Dead-end and associated house heating schemes
Option #2. Connection via two double collectors
This scheme differs from the previous one in that the battery, which is the first to the heating boiler on the supply side, is also the first on the “return” path. This first battery operates as efficiently as possible, while the remaining nodes lose efficiency as they move further into the system.
Connection via two double collectors
The use of two collectors makes it possible to minimize this effect, since two circuits are created. Thanks to this, the number of radiators in one circuit is reduced, and thermal energy is distributed more or less evenly.
Two circuits
In this circuit, each subsequent radiator heats up worse, as we already mentioned above, but this effect can be partially eliminated using balancing valves. If you tighten this valve a little at the supply to the first radiator, then a better flow of coolant will be ensured to the remaining nodes, which are more distant. We also note that it is necessary to adjust the valves in any case, since in reality the length of the circuits created by the manifolds always differs somewhat. Consequently, the batteries will not produce the same amount of heat and therefore need to be balanced to balance their operating efficiency.
Which scheme should I choose?
From everything we said above, we can conclude: the simplest, most flexible and effective is the Tichelman scheme. The use of two double collectors can be an alternative - the efficiency of liquid distribution in such a scheme is quite high, but there are some difficulties during installation; in addition, additional adjustment will be required in the future.
Tichelman loop diagram
How to piping a boiler correctly
The next component of the heating system is the boiler piping. The first step is to look for a circulation pump with good performance. If it can produce a pressure of 2 meters, then such a device is quite suitable even for heating in multi-storey buildings.
The power of the circulation pump is calculated using a formula of the form:
- Q = 0.86R/Dt, where
- Q – pump performance (measured in cubic meters per hour);
- R – power of the heating boiler or circuit into which the circulation pump will be built;
- Dt is the temperature difference in the supply and return circuits (usually about 20 degrees).
When choosing a safety valve, you need to start from the maximum pressure that can arise in the system (as a rule, this value is 2.5 kgf/cm2). The volume of the expansion tank should be 1/10 of the volume of coolant in the circuit. It is advisable to take a tank with a small reserve. In standard heating systems, 1 kW of boiler power requires about 15 liters of coolant.
As a rule, the tank begins to operate at a pressure of 1.5 kgf/cm2 - i.e. when the operating pressure in a balanced heating system is exceeded. To increase the pressure, you need to use a tap connecting the heating and cold water supply, or simply pump the expansion tank with air.
Basic installation requirements
First, let's figure out what tools are needed to install heating radiators with bottom connections. Here they are:
- tube in the shape of the letter “G”;
- mounting level;
- multiflex;
- FUM tape;
- thermal insulation;
- pipe cutter;
- appropriate number of nuts.
Important! It is recommended to carry out the lower eyeliner at the initial stages of repair work in a residential area. This can be explained quite simply: the pipeline in this case is laid in the wall or floor
Therefore, you should think about this even before pouring the concrete screed.
In most cases, batteries are equipped with their own mounting kits or assemblies that allow you to fix the devices on the walls.
Step 1. The distance between the radiator and the floor should not be less than 15 centimeters, and between it and the wall - 2 centimeters.
Step 2. First, the radiator is placed on a special stand, and a building level is placed on top of it.
Step 3. When the device is level, it is necessary to drive in the fasteners, but only taking into account the number of sections. If, for example, there are only five such sections, then two fastenings will be enough, but if there are seven or more, then another, third fastening may be needed.
Step 4. Holes for fasteners are made, the heating radiator is installed.
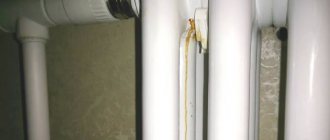
It is also worth adding that in the lower connection method, the L-shaped tubes are necessarily strengthened and filled with polyurethane foam. But this should be done only after the installation is completed and the heating system has been pressure tested.
And now - some more practical installation tips
It is important that the supply and return pipes are not mixed up, but to do this it will be enough to simply read the corresponding factory markings. Although if both tubes must be connected on the same side, then special vigilance should be exercised
The fact is that if you connect them incorrectly, the performance of the device can decrease by 50-60% (a more accurate figure depends on the characteristics of the specific model).
We advise you to familiarize yourself with how to properly change a heating radiator. more details
Any current model includes a thermostatic insert; through it the temperature in the device is adjusted. But the presence of such an insert also affected the cost (about 1/10 more expensive than other models).
Strapping methods
To install a battery harness in a private house or city apartment, you will need:
- shut-off valves, which are most often used as simple ball valves;
- plugs for blocking the remaining channels;
- Mayevsky valves, which allow you to bleed air from the system during seasonal startup of equipment;
Device for removing air from the heating system
sealing material.
Additionally, you can install on any heating radiator:
- a pressure gauge that determines the pressure in the system (most often used when installing equipment in autonomous country houses);
- thermostat operating in manual or automatic mode. Using this equipment, you can set a certain temperature for any individual radiator.
Device for setting a specific battery operating mode
If tying is carried out with polypropylene, then additional welding equipment will be required.
Device for welding polypropylene pipes
So, depending on the factors presented above, the heating radiator piping can be performed according to the following schemes:
- for lateral connection;
- for diagonal connection;
- for bottom connection.
Side connection strapping
With a side connection method and a single-pipe system, installation of the piping is performed as follows:
- Ball valves are installed on the inlet and outlet pipes, making it possible to shut off the coolant supply to perform repair or maintenance work;
- taps are connected to tees;
- A section of pipe is inserted into the remaining branches of the tees, acting as a bypass.
A bypass is necessary for autonomously shutting off a separate radiator, for example, for repairs, without shutting down the entire heating system.
When connecting to a two-pipe system laterally, the work is performed in a similar manner. However, installing a bypass is not required in this situation.
Strapping diagrams when choosing a side battery connection method
Diagonal connection strapping
The connection of the radiator to the pipes with a diagonal connection is as follows:
- the incoming pipe is connected to a section of pipe no more than 10 cm - 15 cm long;
- Next, a ball valve and a tee are installed to connect the bypass;
- the outlet pipe is connected to the elbow and only after that is connected to the coolant removal pipeline;
- A tap is installed before connecting to the central line.
When connected to a two-pipe system, the work is performed in the same way, with the exception of the bypass.
Battery wiring diagram when choosing a diagonal connection method
Bottom connection strapping
Tying the bottom connection method is easier than all others:
- Shut-off valves are connected to the inlet and outlet of the radiator;
- pipe bends are introduced into the central mains. If necessary, special adapters - angles or tees - are installed at the bend points.
Radiator wiring diagram with bottom connection method
There is a separate nuance when piping the lower connection when connecting to a single-pipe system. In most cases, the connection is made as shown in the figure, that is, without a bypass, which allows autonomous shutdown of the heating device. But if you want to use the device, you can install it. To do this, an additional section of pipe is installed between the inlet and outlet pipes.
Piping the lower connection using a bypass
The following video provides a detailed description of the types of battery piping in a heating system.
Thus, with the correct choice of connection method and correct installation, the heating system will serve for a long time, evenly heating all rooms.
Briefly about the main thing
The bottom connection of heating devices with a thermostat allows you to hide the pipes under the floor covering or in the wall. However, when piping, air vents must be installed on all batteries, and a circulation pump unit must be installed in the system itself.
In devices, even with a bottom connection, water moves in a diagonal direction. This is ensured by the special internal design of the heating equipment. The lower one-sided or two-sided connection to radiators in the usual design is made using fittings.
Piping from below is often carried out if there is a two-pipe system in the house. It is not recommended to make a bottom connection if the facility has a single-pipe heating circuit, as balancing becomes more difficult.
Selecting the type of strapping
The heating system radiator piping scheme is selected based on the following factors:
- the type of system that supplies heat to the room;
- method of connecting the radiator to the central lines.
Determining the system type
Before proceeding with the selection of heating equipment piping, it is necessary to determine the type of room heating system. The following types are currently used:
- single-pipe systems;
- two-pipe systems.
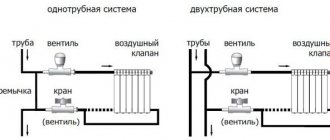
Single-pipe heating is a system in which all heating equipment is connected by one pipe. The coolant sequentially enters each radiator and returns to the boiler through one closed circuit.
Heating system with one closed circuit
The advantages of a single-pipe heating system are:
- balanced system, which allows for uniform heating of all connected radiators;
- increased warm-up speed;
- aesthetic appearance and minimal amount of occupied space;
- ease of installation;
- savings on materials.
The disadvantages include:
- the interconnectedness of all elements of the system, which makes it impossible to carry out repair work on one of them without shutting down the other;
- difficulty in regulating coolant temperature;
- the need to install a pump with a high power rating.
Two-pipe heating includes two main pipelines. One delivers coolant to the radiators, and the second returns it to the heating equipment.
Heating network with two main pipelines
The advantages of such a system are:
- the same temperature of all radiators, since the coolant for a separate battery comes directly from the heating device;
- the possibility of constructing a system with lower internal pressure, which allows the installation of equipment of lower power.
The most significant disadvantage is the cost of the system. It is generally accepted that the cost of purchasing materials increases by 2 times. In fact, this statement is incorrect, since a single-pipe system requires fewer pipes, but with a larger diameter, and for a two-pipe system it is vice versa.
A single-pipe heating system is installed in almost all old apartment buildings. It is also advisable to install it in country houses with an area of up to 150 m². In new houses and country cottages, a two-pipe system is installed.
Connection options
Methods for connecting radiators also depend on the location of the pipes in a private or apartment building. Highlight:
lateral connection, in which the inlet and outlet pipes are located on one side of the radiator. This type is characterized by minimal costs for arranging the connection (serial connection), aesthetics and minimal losses of thermal energy. Typically used in most apartment buildings;
Lateral radiator connection
diagonal connection. Unlike the previous case, the input and output are located on opposite sides of the radiators. The main advantage is the possibility of uniform heating of radiators with a large number of sections (from 12 pieces);
Diagonal battery connection
bottom connection - inlet and outlet pipes are supplied from below. The advantages of this method are aesthetics and the ability to install lines on the floor or wall. The disadvantages include significant losses of thermal energy, ranging from 1% to 15%.
Bottom connection of the heating device
Single-pipe scheme (apartment version)
This connection scheme is very common in apartment buildings (from 9 floors and above).
One pipe (riser) descends from the technical floor, passes through all floors and enters the basement, where it enters the return pipe. In such a connection system, there will be heat in the upper apartments, since, having passed through all the floors and given off the heat to the bottom, the water in the pipe will cool down.
And if there is no technical floor (5-story buildings and below), then such a system is “ringed”. One pipe (riser) rises from the basement, passes through all floors, goes through the apartment on the top floor to the next room and descends, also through all floors, to the basement. In this case, it is not known who is lucky. On the ground floor, in one room, it may be warm where the pipe rises, but in the next room it is cold, where the same pipe descends, giving off heat to all apartments.
Types of radiators for piping
To install a heating system, you must select the type of radiator. Different types of heating equipment differ in mounting to the wall, materials of manufacture, and pipe connections. Today manufacturers offer the following options:
Construction of sectional radiators.
- Panel steel batteries made in the form of relatively thin solid panels. The connection of such radiators can be side or bottom.
- Sectional lightweight, made of aluminum. Bimetallic ones are also often used. Such batteries can be connected in one or several sections, the connection to the general system is lateral, polypropylene pipes are ideal.
For apartments with central heating, bimetallic radiators are used (cast iron ones are used less and less, this is explained by their large weight, bulkiness, and fragility). This is due to the fact that the water supplied to the heating system often contains alkali and sand, which can damage other types of radiators.
For a private home, aluminum and steel panel radiators are excellent, but all connection conditions must be met (for a copper pipeline, steel and aluminum radiators are used, for a regular one, only aluminum ones are possible).
Features and basic rules for storing honey in honeycombs
Honey in combs is a special delicacy that can also be stored in the apartment. This healthy and nutritious product needs special attention due to the fact that it contains beeswax. The conditions for storing honeycomb should be the same as for liquid consistency.
Pre-sterilized jars are best suited for storing honeycombs. Cut the honeycomb into pieces of such a size that they can fit freely into the opening of the jar. Cover the top of the jar tightly with a lid. Under such conditions, cells can remain for no more than one year.
In order to increase the shelf life, you should fill the honeycombs with liquid fresh honey, and then seal them with melted wax. After this, seal the jar with a lid. Under such conditions, soda can be stored for more than 10 years.