When installing heating systems in private houses, heat exchange radiators with water supply through a pipeline located in the floor under the screed are often used. This arrangement of pipes allows you to efficiently and aesthetically supply the coolant to the heat exchange devices through the lower connection of the radiator.
The connection is made from below using steel or aluminum panel radiators that have outlets at the bottom with external threads at a standard distance from each other. The radiator is connected to pipe outlets in the wall or floor using angled or straight N-shaped adapters with an American screw connector on the outlet pipe (they are also popularly called “binoculars” because of their similar appearance).
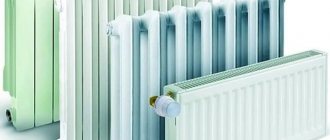
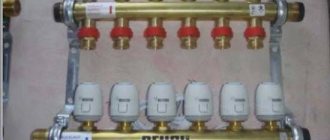
Rice. 1 Connection nodes for heating radiators - varieties
Radiator connection methods
The heat transfer efficiency of the radiator directly depends on the choice of heating piping connection scheme. If the coolant does not circulate throughout its entire internal area, but quickly exits into the return line, then the battery releases heat to a minimum.
The most effective connection method is diagonal. With it, the water inside the radiator has time to cover all sections on the way from the entrance to the exit, giving off thermal energy to each
There are three ways to connect pipes with coolant to the radiator:
- lateral one-sided - pipes are located on the side on one side;
- horizontal - lower or upper - the pipes are at the same level horizontally relative to each other on top or bottom of the battery - one fits on the right, and the second on the left;
- diagonal cross - pipes are connected diagonally.
In radiator data sheets, heat transfer is usually indicated for the diagonal connection method. With a side connection, heat loss will reach 10% of this maximum. And with the horizontal option they can reach all of 20–25%.
However, much here depends on the number of sections and the internal structure of the battery. Plus, the material used to make the radiator, as well as its location in the room, plays an important role.
Pipeline layouts for coolant supply are:
- with top supply;
- with bottom inlet.
If the system is with natural circulation, then a scheme with top wiring will be more efficient and preferable. But if you have a circulation pump, both options are acceptable.
The process of connecting the radiator itself does not depend much on the method of supplying the heating pipes. The supply and return are connected to the battery in accordance with the selected circuit. And the remaining two holes are closed with a Mayevsky tap and a plug.
Option #1 – with top wiring
In this scheme, the coolant line approaches the radiator from above. The outlet pipe can be connected on the same side, in the side version, or on the other (diagonal analogue). In this case, the movement of water in the supply and return circuits can be either forward or counter (dead-end).
If there are fewer than ten sections in the radiator, then the lateral method of connecting the pipes is almost as good as the diagonal one - but if there are more of them, the coolant will reach the edge of the battery farthest from the entrance only with strong pressure in the system
When choosing an upper connection, it is recommended to organize the movement of the coolant according to a parallel scheme. In this case, the return and supply circuits are approximately the same length, which greatly simplifies the balancing of the entire system.
In practice, a dead-end scheme is more often used, since it requires slightly smaller pipes.
If the house is small - up to 200 sq. m and want to save as much as possible on the heating system, you should prefer a scheme with counter-movement of heated water. Here the adjustment is not so complicated and quite feasible. But for a large cottage - two to four floors, it is better to choose something else.
Option #2 – with bottom supply
In this case, the coolant is supplied from below. If such wiring is built in a one-story house, then this allows you to get rid of risers. Both pipes are laid from the boiler along the floor and do not disturb the interior with their appearance. The fewer pipelines there are in a room, the more beautiful everything looks.
The main advantage of the lower supply is the absence of risers, which slightly reduces the amount of the estimate for installing a heating system in the house
The return line can be connected in the following scheme:
- side;
- horizontally from below;
- diagonally.
If a regular radiator is used, without a special partition for more efficient circulation of coolant inside, then it is best to choose a diagonal connection method.
However, the hydraulic resistance in this case is greater than with the horizontal version. Here you need to carefully consider what is more profitable when making thermal engineering calculations.
Often the horizontal method is the most efficient in terms of heat loss. But this is only possible if there is a plug at the inlet between the first and second sections of the battery, which directs the coolant upward throughout the radiator. This way the resistance is minimal and the heat transfer is maximum.
It is recommended to choose the bottom supply only for circulation heating systems. With the natural movement of the coolant, air will constantly accumulate in the radiators, especially with horizontal and lateral pipeline connections.
It will have to be constantly lowered using Mayevsky cranes. And these are additional body movements, so it is better to initially rid yourself of such worries.
What kind of harness can be
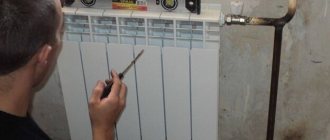
The main stage of installing a heating system in a house is tying the heating radiator with polypropylene. During this process, you need to install parts that allow you to regulate heat transfer.
Shut-off valves
There are several types of shut-off valves that are suitable for piping heating radiators:
- Chokes with thermal control capability. To adjust heat transfer, you need to set the parameters. After this, the mechanism will work automatically. Regardless of what temperature changes occur outside, the same temperature regime will be maintained in the room. Throttle is a valve designed for manual adjustment of heat transfer. The temperature begins to change two hours after changing the valve position.
- Valves are a part that is installed in front of the battery. Designed to shut off the coolant supply.
Fitting
To connect the battery to the pipeline, you need to use the following fittings:
- American couplings with which shut-off valves are connected. If there is a union nut, you can quickly dismantle the heat exchanger.
- Triple couplings - suitable for connecting pipes for supplying coolant simultaneously with control valves.
- Tees that have vias.
The choice of connecting part depends on the complexity of the water supply system.
Tools
To assemble a polypropylene heating system you will need a set of tools:
- special soldering iron for welding plastic;
- a tool for removing the reinforcing layer from tubes - a shaver;
- key with hooks for installing shut-off valves;
- scissors for cutting polypropylene.
Additionally, you will need measuring and marking tools.
Stages of connecting heating radiators
Installation of radiators with polypropylene pipes is carried out in several stages:
- Marking the laying of tubes and battery installation locations.
- Fastening heat exchangers to the wall. For small models, two brackets are enough, for large ones - one per section.
- Installation of shut-off valves.
- Pipe connection.
- Installation of jumpers, compensators.
The last stage is connecting the pipeline to the battery. To make the joints more airtight, you can use sealants that are resistant to prolonged exposure to high temperatures.
To heat rooms in an apartment or private house, it is necessary to install radiators in each room. For them to work, you need to correctly connect the heat exchangers to the heating pipeline.
What else do you need to know
Side connecting holes (also called inlets, pipes and manifolds) can have different diameters. The most common:
- G1” – one inch (2.54 cm);
- G3/4” - three quarters of an inch (1.91 cm);
- G1/2” – half an inch (1.27 cm).
This is important to know when choosing shut-off and control valves: you need to know whether it will be possible to connect the device to the radiator directly or whether adapters will be required. When connecting sectional radiators of any type, you cannot do without adapters (footers): here in some collectors the thread is left-handed, and in others - right-handed
Therefore, special installation kits are produced for sectional radiators with side connections. They are available for different diameters of collectors and supply pipes. Their configuration varies, but most often there are seven elements: four adapter fittings, a Mayevsky valve (air vent) with a key and a plug (for an unused manifold)
When connecting sectional radiators of any type, you cannot do without adapters (footers): here in some collectors the thread is left-handed, and in others - right-handed. Therefore, special installation kits are produced for sectional radiators with side connections. They are available for different diameters of collectors and supply pipes. Their configuration varies, but most often there are seven elements: four adapter fittings, a Mayevsky valve (air vent) with a key and a plug (for an unused manifold).
https://youtube.com/watch?v=nnQz2VA7C_M
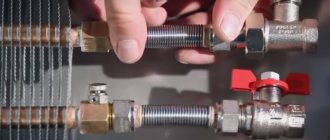
With a bottom connection, all you need is a radiator connection unit, which is also called “multiflex”. Two shut-off ball valves are built inside it, which serve to cut off the coolant. If necessary, simply turn the miniature taps and the radiator is turned off: it can be removed.
He can be:
- straight - pipes are supplied from below;
- corner - pipes come out of the wall.
When choosing it, it is important to know the distance between the centers of the pipes (center distance). This value is indicated in the technical data and is usually 80 or 50 mm. There is a set of adapters for any type of pipes for the bottom connection of radiators
For more information about these fittings, watch the video.
There is a set of adapters for any type of pipes for the bottom connection of radiators. For more information about these fittings, watch the video.
https://youtube.com/watch?v=otVXrHAX2EE
Master Class. We connect the radiator from the floor using L-shaped tubes
Step 1. Installation begins with the installation of the nipple.
Step 2. Then the block of ball valves is installed.
Step 3. Place the threaded clamp onto the L-shaped tube.
Step 4: Now the L-shaped tube is flared using a tool.
As a result, the rubber seal no longer slips off the tube into the Eurocone.
Step 5. The tubes are installed in the fixing angle.
Step 6. Next, the tubes are inserted into the block of ball valves and baited.
Step 7. A hole is marked for attaching the fixing angle, after which the tubes are dismantled.
Step 8. A hole is drilled in the floor according to the markings.
The kit with a fixing angle includes a dowel and a self-tapping screw. The dowel is driven into the hole made.
Step 9. The L-shaped connecting tubes are installed back and fixed to the ceiling.
Step 10. Take the pipe and connect it to the L-shaped connecting tubes. The thermal insulation on the pipe is moved back at least 2 lengths of the sliding sleeve. Then the sleeve is fixed.
Step 11: The connection is made. The end of the pipe is flared.
Note! In this example, a metal-polymer pipe is used, which is why the nozzle on the tool is green.
Step 12. The pipes are attached to the ceiling using dowel hooks in increments of 50 cm. Thanks to this, the pipes will not float up when pouring the screed.
Which battery connection diagram is the most efficient?
There are three ways to install a radiator.
Diagonal
It is considered the most effective and is used in most cases.
Photo 1. Four options for diagonally connecting a radiator to heating, for one-pipe and two-pipe systems.
This is due to high efficiency:
- The coolant enters the battery from the top corner.
- The liquid disperses throughout the available volume.
- It flows out at the opposite point.
According to this scheme, systems are tested in factories.
Lower
It is less common than others because it has a lower efficiency. Both pipes are connected to the bottom of the battery. The average loss is 15%.
Photo 2. One-pipe and two-pipe method of lower connection of the heating battery. In the second case, more materials are needed.
One of the advantages is the possibility of installation in the floor, which hides the harness. And to compensate for low efficiency, it is recommended to install a more powerful radiator.
You should not use a similar scheme in a piping without a pump, since a vortex phenomenon occurs. The flow heats the surface of the pipes, increasing heat transfer during natural circulation of water. The phenomenon has not yet been studied, so the possible consequences are unclear.
Lateral or one-sided
True to the name, the pipes are included from one side: at the upper and lower corners. A similar installation option is used in buildings with vertical highways, for example, in apartment buildings. This scheme is not used when supplying coolant from below, since installation is significantly more complicated.
Photo 3. Both one-pipe and two-pipe systems allow for side connection of the battery. In the first case, a bypass is required.
It has high efficiency, slightly less than the diagonal circuit. This applies to radiators with 10 or fewer sections. Long batteries warm up worse, since the working fluid has to travel a long way in one direction.
Important! This factor does not affect panel heat exchangers, in which special rods are installed that improve the flow
Installation rules
Before connecting the radiator to the system, it is assembled in a lying state with the installation of all fittings. Ultimately, only two straight press fittings or union nut connections should remain: on the supply and return lines.
The lower connection valve replaces the radiator liner. Its sealing occurs in the standard way for this unit - using an o-ring seal. It is advisable to mark the position of the through hole on the shank on the valve nut so that after tightening it is positioned strictly vertically. To adjust the position, you can use seals of different thicknesses and adjust the degree of tightening.
The injection unit is connected in a similar way, but quite often it does not have a nut that replaces the fitting. With a one-way bottom connection, the outlet on the reverse side is plugged with a plug, like one of the top ones, and a Mayevsky tap is installed in the remaining one. The further assembly scheme is simple: all the necessary shut-off and control equipment is packed onto the threaded fittings of the valve, injection unit or lower outlets onto tow with sealing paste. Ultimately, the radiator is installed in place as an assembly and fixed using a wall or floor mounting method, then it is connected to the system.
rmnt.ru
Single-pipe scheme (apartment version)
This connection scheme is very common in apartment buildings (from 9 floors and above).
One pipe (riser) descends from the technical floor, passes through all floors and enters the basement, where it enters the return pipe. In such a connection system, there will be heat in the upper apartments, since, having passed through all the floors and given off the heat to the bottom, the water in the pipe will cool down.
And if there is no technical floor (5-story buildings and below), then such a system is “ringed”. One pipe (riser) rises from the basement, passes through all floors, goes through the apartment on the top floor to the next room and descends, also through all floors, to the basement. In this case, it is not known who is lucky. On the ground floor, in one room, it may be warm where the pipe rises, but in the next room it is cold, where the same pipe descends, giving off heat to all apartments.
Classification of panel devices
Panel radiators come in three types:
- profile;
- smooth;
- hygienic.
In the manufacture of profile devices, sheet steel is used, all external surfaces are coated with a protective powder coating. Moreover, the neutral anti-corrosion varnish, which is also used in manufacturing, significantly extends the service life. The color can be any - there are no restrictions here.
The second and third types of radiators are used in educational institutions, hospitals and kindergartens. Vivid examples are the products of brands such as, say, Purmo or Kermi.
Important! The advantage of tubular batteries over panel batteries is that the former can be turned in any direction, while the latter should be purchased with a predetermined connection. And in old buildings, pipes do not always fit new batteries. Although this problem can be solved - this requires relocating the pipeline.
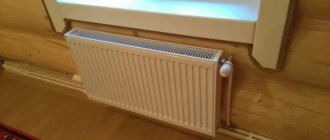
Radiator location
The traditional location for radiators is under the window. This is explained as follows:
- Firstly, the warm air emanating from the batteries prevents the passage of cold from the window opening.
- Secondly, heating the glass with heat from radiators prevents the formation of condensation.
However, to operate effectively, the batteries must occupy more than 70 percent of the area under the window. This should be remembered when connecting heating batteries and the wiring diagram.
In addition, the height of the battery and the location of the heating element under the window must be correct. The installation diagram of heating batteries implies compliance with the following conditions:
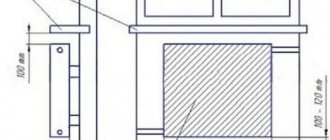
- The distance from the floor to the lower level of the radiator should be 8-12 cm. With a smaller distance, it may be difficult to clean under the radiator; increasing the clearance leads to a decrease in the air temperature on the floor.
- A space of 10-12 cm should also be left between the window sill and the upper level of the radiator. This will allow warm air to freely go around the window sill and rise to the window glass.
- The distance from the wall to the back wall of the radiator is of great importance; it should be at least 5 cm. In this case, heat can rise between the wall and the radiator, increasing the rate of heating of the room.
Price
The price range on the market for heating devices with bottom connections is currently as follows:
- German-made radiators with a power from 300 to 6000 W cost 3,000-15,000 rubles;
- products from Russian manufacturers cost from 1,500 to 6,000 rubles;
- Swiss heating appliances can be bought for 4500-8000 rubles.
The cost of Polish-made products is comparable to Russian ones.
If water heating cannot be implemented in private construction, electric oil heating radiators come to the rescue. Read an overview of the types and tips for choosing.
Detailed instructions for installing heating batteries with your own hands are presented on this page.
Features of the diagonal connection scheme
If you also wondered why a diagonal connection is the most effective, then you should consider this option in more detail.
If we take into account the process where hot air or water is involved, then the action will occur according to one physical law, which involves the rise of warm masses upward, while the cold ones sink downwards
To ensure uniform heat distribution throughout the volume of the radiator, the coolant should be distributed throughout the battery. As mentioned above, lateral connection in city apartments acts as the main circuit. After all, forced circulation under high pressure is used there. The diameter of the incoming and outgoing pipes is only 20 mm. Through them, water enters the battery under high pressure, which allows the device to be filled evenly and quickly.
If we are talking about private housing construction, where the circulation is natural, the filling of radiators occurs under the influence of the above-mentioned physical law. That is why hot streams penetrate through the upper pipe, pushing cold water through the lower outlet on the opposite side. The two pipes are located diagonally when viewing the device. This is where the name of the connection comes from. The coolant fills the battery gradually, releasing heat to the entire volume. It is necessary to take into account not only the law of heat transfer, but also the physical law. That is why this scheme is the most effective.
Useful tips
For long-term operation, it is not enough to connect the device correctly. By providing proper care, you can significantly extend the life of the radiator.
At the end of the heating season, water from the central heating is drained for the entire summer period. This is necessary for pipe maintenance and repair. However, this process cannot be called useful for radiators - most devices undergo internal corrosion during this period.
Creating favorable conditions for the summer period is quite simple.
To do this, it is necessary to carry out the following activities:
- after the radiators have completely cooled down, all valves on the direct and return water supply should be closed;
- After this, all air vents must be opened.
Thus, the remaining water in the radiator will be released into the air vent due to thermal expansion, which occurs due to the chemical reaction of the metal with water.
At the beginning of the heating season, it is necessary to close the air vent before filling the batteries with hot water. Don't forget to flush your radiators at least once every two years.
This happens as follows:
- the lower and upper valves are closed;
- open air vents;
- drain the water through a plug or drain valve;
- unscrew the detachable fasteners;
- remove the radiator from the bracket;
- After all the above manipulations, you can rinse the device with water through a hose that can be easily attached to the water tap.
When washing, the use of abrasive products is strictly prohibited.
Don't forget about external cleaning. Dust clogging into the battery fins reduces the heat transfer of the device, so regular washing of the case will not harm the device.
Cast iron radiators require painting. For this purpose, special paint is used for batteries and heating structures, which can withstand high temperatures. Such paints do not turn yellow, do not crack, and do not wash off.
Radiator connection diagrams
How well the radiators will heat depends on how the coolant is supplied to them. There are more and less effective options.
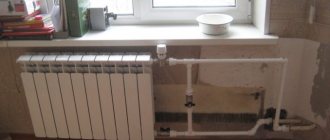
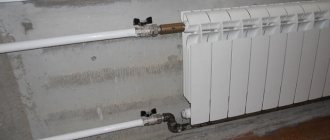
Radiators with bottom connection
All heating radiators have two types of connection - side and bottom. There can be no discrepancies with the bottom connection. There are only two pipes - inlet and outlet. Accordingly, coolant is supplied to the radiator on one side and removed from the other.
Bottom connection of heating radiators for single-pipe and two-pipe heating systems
Specifically, where to connect the supply and where the return is connected is written in the installation instructions, which must be available.
Heating radiators with side connection
With a lateral connection, there are many more options: here the supply and return pipelines can be connected into two pipes, respectively, there are four options.
Option #1. Diagonal connection
This connection of heating radiators is considered the most effective, it is taken as a standard and this is how manufacturers test their heating devices and the data in the thermal power passport for such a connection. All other connection types transfer heat less efficiently.
Diagonal diagram for connecting heating radiators with a two-pipe and one-pipe system
This is because when the batteries are connected diagonally, the hot coolant is supplied to the upper inlet on one side, passes through the entire radiator and exits from the opposite, lower side.
Option #2. Unilateral
As the name implies, pipelines are connected on one side - supply from above, return from below. This option is convenient when the riser runs on the side of the heating device, which often happens in apartments, because this type of connection usually predominates. When the coolant is supplied from below, this scheme is used infrequently - it is not very convenient to position the pipes.
Lateral connection for two-pipe and one-pipe systems
With this connection of radiators, the heating efficiency is only slightly lower - by 2%. But this is only if there are few sections in the radiators - no more than 10. With a longer battery, its farthest edge will not heat up well or will remain cold at all. In panel radiators, to solve the problem, flow extenders are installed - tubes that bring the coolant a little further than the middle. The same devices can be installed in aluminum or bimetallic radiators, thereby improving heat transfer.
Option #3. Bottom or saddle connection
Of all the options, saddle connections for heating radiators are the least effective. Losses are approximately 12-14%. But this option is the most inconspicuous - pipes are usually laid on the floor or under it, and this method is the most optimal from an aesthetic point of view. And so that losses do not affect the temperature in the room, you can take a radiator a little more powerful than required.
Saddle connection of heating radiators
In systems with natural circulation, this type of connection should not be made, but if there is a pump, it works well. In some cases, it’s not even worse than the side one. It’s just that at a certain speed of movement of the coolant, vortex flows arise, the entire surface heats up, and heat transfer increases. These phenomena have not yet been fully studied, therefore it is not yet possible to predict the behavior of the coolant.
Advantages and disadvantages
The main advantage of heating devices with bottom connections is the aesthetic aspect. Since both pipes are built into the lower part of the device, the heating system pipes can be hidden in the floor or walls. Their unsightly appearance will not spoil the harmony of the interior - it’s not for nothing that designers love such radiators.
Another positive point: the lower zone of the battery heats up faster.
The essence of the bottom connection
However, this type of heating device also has a number of disadvantages:
- an air vent must be installed on each radiator;
- they are completely unsuitable for installation in a gravity heating system - the circulation pump must be activated constantly;
- The heating of the radiator is not uniform and highly efficient.
Possible connection diagrams
The most efficient connection of batteries is quite easy to carry out - both in terms of the number of nodes and in terms of installation technology.
Heating radiator designTwo-pipe heating system
Option #1. Tichelman scheme
The most popular connection scheme, its main advantage is the maximum efficiency of all heating radiators at any point in the system. In addition, the Tichelman circuit allows you to regulate a separate radiator without any effect on the rest of the system. So, if it is very hot in one of the rooms, then the battery there can be completely/partially disconnected from the supply of hot coolant. And the thermal energy that is released as a result will be evenly distributed over the remaining radiators.
Tichelman's schemeAlbert Tichelman's solution
Another advantage of the scheme is that the water in both pipes has a common direction of movement. In terms of hydraulics, this is very good, since the load on all components of the system (in particular, the pump and heating boiler) drops noticeably.
Hot water begins to move from the boiler, moving alternately through all radiators. The return movement also starts from the first battery. It turns out that battery No. 1 will be the last on the return path, but the first on the hot coolant supply. Water will flow to battery No. 2 at a slightly lower temperature, but this unit is already closer than the first to the boiler on the “return” circuit.
Water flow process
The situation is similar with each subsequent radiator: the further it is from the source of hot coolant, the shorter the distance to the cold water outlet point. As a result, the conditions for all batteries are approximately equal (in terms of heat exchange with the system); they all heat up equally, regardless of their location.
Pipes with a diameter of 25 mm are used for wiring, while the batteries are connected to the network using pipes of 20 mm.
The radiator in the middle will not work
The Tichelman scheme has only one drawback - radiators cannot be placed exactly in the middle of the system (they simply will not heat in this place). This is explained by the hydraulic effect that occurs in the middle - here the outflow of cold and the supply of hot fluid form equal pressure. In reality, this almost never happens; the problem is solved by slightly moving the battery to the right or left. Although there is a simpler option - to create a small turn on one of the circuits in order to increase its length and thereby move the heating battery from the middle.
Dead-end and associated house heating schemes
Option #2. Connection via two double collectors
This scheme differs from the previous one in that the battery, which is the first to the heating boiler on the supply side, is also the first on the “return” path. This first battery operates as efficiently as possible, while the remaining nodes lose efficiency as they move further into the system.
Connection via two double collectors
The use of two collectors makes it possible to minimize this effect, since two circuits are created. Thanks to this, the number of radiators in one circuit is reduced, and thermal energy is distributed more or less evenly.
Two circuits
In this circuit, each subsequent radiator heats up worse, as we already mentioned above, but this effect can be partially eliminated using balancing valves. If you tighten this valve a little at the supply to the first radiator, then a better flow of coolant will be ensured to the remaining nodes, which are more distant. We also note that it is necessary to adjust the valves in any case, since in reality the length of the circuits created by the manifolds always differs somewhat. Consequently, the batteries will not produce the same amount of heat and therefore need to be balanced to balance their operating efficiency.
Which scheme should I choose?
From everything we said above, we can conclude: the simplest, most flexible and effective is the Tichelman scheme. The use of two double collectors can be an alternative - the efficiency of liquid distribution in such a scheme is quite high, but there are some difficulties during installation; in addition, additional adjustment will be required in the future.
Tichelman loop diagram
Master Class. We connect the radiator from the floor using T-shaped tubes
Also, T-shaped connecting tubes can be used to connect the battery from the floor. They are necessary if the line goes under the heating device. Let's look at this process step by step.
Step 1. A threaded clamp connection is put on the tube.
Step 2. After this, the tube is flared.
Step 3. Next, you can proceed directly to installing the tubes.
On a note! In the photo you see that the connecting tubes are installed in different directions.
Step 4. The connection is made using a sliding sleeve. The radiator is connected using T-tubes, and the line goes further to the next heating device.
Step 5. The exit of the pipes from the floor can be decorated using overlays in accordance with the finishing floor covering. Overlays can be made for different coatings.
If there are no high aesthetic requirements for the interior of the room, then you can use a budget connection option using a connecting set. This set is used for cross-linked polyethylene pipes without an aluminum layer.
Inside this set there are guides and rings for fixing the pipe. This set is necessary to prevent threaded connections from loosening and to compensate for thermal expansion.
First, the ring is put on the pipe. Then the clamp is removed from the guide, the pipe is inserted into it and secured with a ring. The latch is inserted.
The pipe is cut to the required length, after which a connection is put on it and installation is carried out to the heating device.
Decorative overlays are installed, pre-cut to size.
Using this element, the two parts are connected to each other.
The connection kit is attached to the ceiling. That's it, the installation can be considered complete.
Radiators with bottom connection
The following types of radiators with bottom connections are available:
- steel panels;
- steel tubular;
- bimetallic;
- aluminum.
Steel panel radiators
The largest market share is occupied by steel panel radiators. The inlet and outlet tubes are most often located on one side. There are also models where the tubes are on different sides - right and left. Steel batteries are characterized by high heat transfer and ease of use - they are easy to care for.
Tubular steel radiators
If the heating system has more stringent design requirements, you should pay attention to tubular steel models with bottom connections. They are characterized by a good appearance and are well suited for installation in any room.
Some of them resemble classic cast iron batteries in appearance, differing from them in more advanced technical characteristics.
If you decide to go with panel or tubular models, do not forget to purchase connection units for radiators with bottom connections. For single-pipe systems, choose units with built-in bypasses and control valves.
Tubular vertical radiators
Tubular vertical heating radiators with bottom wiring look good in bathrooms, on landings, in narrow rooms, as well as in rooms with panoramic windows (in this case they are located on the sides of the windows). If you are going to install vertical batteries, be prepared for high expenses - they are expensive. But they look just great.
A notable feature of vertical batteries is that among them there are designer models used for installation in rooms with designer decoration.
Bimetallic radiators
Bimetallic radiators with bottom connection have the same design as aluminum batteries. As in the case of steel models, the connection is made from the bottom and on both sides, or from the bottom and on one side (using connection nodes). The heat transfer of such batteries is slightly lower than that of steel models, but this does not prevent them from being installed in rooms where it is necessary to hide heating pipes in walls or floors.
Aluminum radiators with bottom connections are much less common on sale, and the leaders in this area are steel models - panel and tubular (including designer ones).
What batteries are best used in heating systems where bottom connections will be used? Preference should be given to aluminum and steel models, as they have the greatest heat transfer. They also benefit in terms of cost. As for cast iron batteries, which can also be connected using a bottom wiring diagram, they do not have high heat transfer.
The use of bimetallic radiators with bottom connections in private homes is not justified.
They are suitable for industrial and administrative buildings, as well as for multi-storey buildings connected to centralized boiler houses. There is high coolant pressure here, and sometimes water hammers occur. Therefore, we need bimetallic radiators that are resistant to high pressure and other troubles. In private houses connected to autonomous systems, installing bimetallic radiators will lead to almost useless costs. Date: September 25, 2022
Two-pipe heating system
This is a wiring with a pair of pipelines, through one of which coolant flows, and through the second the return flows out. The line fits to each radiator, ensuring a stable coolant temperature. This is called a parallel connection and allows you to regulate the media flow rate by installing a thermostat on the battery.
The disadvantages include significant costs - you will need twice as many pipes, shut-off valves, and other elements. But this minus is offset by the ease of balancing and the opportunity to save. For example, in a private house you can reduce the coolant temperature for a period while no one is at home, which will reduce fuel costs.
(no votes yet)