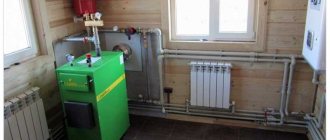
To keep your home warm, it is important to properly develop a heating scheme. One of the components of its effectiveness is the connection of heating radiators. It doesn’t matter whether you are going to install cast iron, aluminum, bimetallic or steel radiators, it is important to choose the right way to connect them.
The way the radiator is connected affects its heat transfer
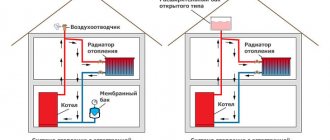
Types of heating systems
The amount of heat that the heating radiator will emit depends not least on the type of heating system and the selected type of connection. To choose the best option, you must first understand what kind of heating systems there are and how they differ.
Monotube
A single-pipe heating system is the most economical option in terms of installation costs. Therefore, this type of wiring is preferred in multi-storey buildings, although in private buildings such a system is far from uncommon. With this scheme, the radiators are connected to the main line in series and the coolant first passes through one heating outlet, then enters the input of the second, and so on. The output of the last radiator is connected to the input of the heating boiler or to the riser in high-rise buildings.
Example of a one-pipe system
The disadvantage of this wiring method is the impossibility of adjusting the heat transfer of radiators. By installing a regulator on any of the radiators, you will regulate the rest of the system. The second significant drawback is the different coolant temperatures on different radiators. Those that are closer to the boiler heat up very well, those that are further away become increasingly colder. This is a consequence of the serial connection of heating radiators.
Two-pipe wiring
A two-pipe heating system is distinguished by the fact that it has two pipelines - supply and return. Each radiator is connected to both, that is, it turns out that all radiators are connected to the system in parallel. This is good because the coolant of the same temperature enters the input of each of them. The second positive point is that you can install a thermostat on each of the radiators and use it to change the amount of heat it emits.
The disadvantage of such a system is that the number of pipes when laying out the system is almost twice as large. But the system can be easily balanced.
Reducing the resistance of pipes and circuits
With any wiring diagram or coolant circulation method, it is necessary to reduce the pipeline resistance and ensure optimal fluid movement through the pipes, avoiding both laminar movement and completely turbulent movement.
For systems with natural circulation:
- Any turns and bends along the route are carried out taking into account the minimum permissible turning radius for the type of pipe used.
- Transitions between pipes with different diameters, insertion of risers into the distribution manifold are carried out without narrowing the smaller diameter and, if possible, with a gradual expansion/constriction of the channel.
- In front of shut-off, control valves, radiators or other equipment, a smooth section of pipe should be formed at least 5-6 pipe diameters in order to eliminate unnecessary turbulence and turbulence in the liquid flow.
For a system with forced circulation, the previous tips are not mandatory; it is important that the circuit resistance is less than the pressure generated by the pump. However, if all requirements are met, the load on the pump will decrease and its operating life will accordingly increase. Due to the forced pumping of the coolant, you can use metal-plastic pipes with a small cross-section, a lower two-pipe or one-pipe connection scheme, including packing the pipes into a screed or walls.
Where to put radiators
Traditionally, heating radiators are placed under windows, and this is no accident. The rising flow of warm air cuts off the cold air that comes from the windows. In addition, warm air heats the glass, preventing condensation from forming on it. Only for this it is necessary that the radiator occupies at least 70% of the width of the window opening. This is the only way the window will not fog up. Therefore, when choosing the power of radiators, select it so that the width of the entire heating battery is not less than the specified value.
How to place a radiator under a window
In addition, it is necessary to correctly select the height of the radiator and the location for its placement under the window. It must be placed so that the distance to the floor is around 8-12 cm. If you lower it lower, it will be inconvenient to clean, if you raise it higher, your feet will be cold. The distance to the window sill is also regulated - it should be 10-12 cm. In this case, warm air will freely go around the obstacle - the window sill - and rise along the window glass.
And the last distance that must be maintained when connecting heating radiators is the distance to the wall. It should be 3-5 cm. In this case, rising currents of warm air will rise along the back wall of the radiator, and the rate of heating the room will improve.
Equipment installation rules
Installation and connection of the boiler to the system should begin after passing the design stage, when a place in the house has been prepared for the unit. If you install it in violation of the requirements, the specialists of the gas distribution company will not connect the equipment to the gas main.
General requirements at the design stage
The basic standards for installing gas equipment are prescribed in SNiP 42-01-2002. Supporting information is also contained in the already invalid, but useful SNiP 2.04.08-87 .
Usually all the rules are taken into account by the design engineer, but it is also useful to know them for yourself. The room for the boiler can be a kitchen if the power of the device ranges up to 60 kW. A separate or attached combustion chamber is relevant for units with a power rating of up to 150 kW.
Additional standards for the installation of gas equipment are given in SNiP on boiler installations, as well as on heating, ventilation, and air conditioning
The premises requirements are as follows:
- The minimum room height is 2 m, volume is 7.5 m3. If there are two or more gas appliances, the parameters change to 2.5 m3 and 13.5 m3, respectively.
- Not suitable for installation: basements, balconies, bathrooms, corridors, rooms without windows.
- The walls of the room must be covered with non-flammable materials or protected with special panels.
- Lighting: per 10 m3 of room there is at least 0.3 m2 of window. In the event of a gas explosion, the windows are an easily removable structure, which increases the safety of equipment operation.
- It is necessary to have grounding and a cold water pipeline.
- The cross-section of the chimney corresponds to the power of the installed equipment.
- The space left around the device is: in front - from 1.25 m, on the sides (if maintenance is necessary) - from 0.7 m.
- The distance from the vertical chimney to the unit is maintained - no more than 3 m.
Ventilation must also be provided. Natural is calculated at the rate of 3 room volumes per hour. When organizing a supply air system, combustion air is added to this value (the parameter is indicated in the boiler passport).
The requirements apply not only to premises. The distance from the attachment to the nearest structures is also regulated. This information is indicated by the manufacturer in the equipment instructions.
If a double-circuit boiler is installed on a wooden wall, a sheet of roofing steel (0.8 - 1 mm) or a mineralite slab is attached to it. If the equipment is not located in the kitchen, asbestos is also possible
Floor-standing boiler models are installed on non-combustible bases. If the surface is wooden, a metal backing is required.
It is recommended to place the device as close to the gas pipe as possible. The use of special hoses is acceptable, but they should not be very long. Bellows hoses up to 5 m are available on sale; they are allowed for installation, but according to European standards, the length is limited to two meters.
Documentation preparation process
After a general familiarization with how to technically correctly connect double-circuit gas boilers, you can begin preparing documentation. The first stage is obtaining technical specifications . It is necessary to contact the regional gas service with a statement indicating the expected volume of blue fuel consumption per hour.
Technical specifications are issued in 1-2 weeks. The document is a permit to connect housing to the gas main.
The second stage - according to the technical specifications, an equipment installation project . The third is approval of the prepared documentation by engineers of the gas distribution company.
The project includes both the installation diagram of the boiler itself and the laying of a gas pipeline from the connection point to the main line. If we are talking about a private house, a drawing of communications on the site is added
The boiler technical passport, operating instructions, certificates, and an expert opinion on the compliance of the device with all standards are submitted to the regulatory organization. The necessary papers are provided by the manufacturer of the double-circuit boiler.
Coordination of documentation can happen in a week or last up to 3 months, it all depends on the complexity of the project. In case of refusal, the inspection is obliged to provide a list of edits to eliminate the deficiencies. If all requirements are met, stamps are affixed and you can begin connecting the equipment.
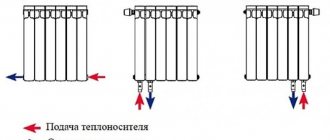
Radiator connection diagrams
How well the radiators will heat depends on how the coolant is supplied to them. There are more and less effective options.
Radiators with bottom connection
All heating radiators have two types of connection - side and bottom. There can be no discrepancies with the bottom connection. There are only two pipes - inlet and outlet. Accordingly, coolant is supplied to the radiator on one side and removed from the other.
Bottom connection of heating radiators for single-pipe and two-pipe heating systems
Specifically, where to connect the supply and where the return is connected is written in the installation instructions, which must be available.
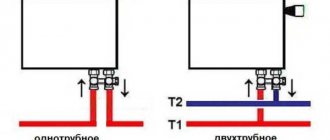
Heating radiators with side connection
With a lateral connection, there are many more options: here the supply and return pipelines can be connected into two pipes, respectively, there are four options.
Option #1. Diagonal connection
This connection of heating radiators is considered the most effective, it is taken as a standard and this is how manufacturers test their heating devices and the data in the thermal power passport for such a connection. All other connection types transfer heat less efficiently.
Price for 1m2 of work
It is difficult to independently take into account all the nuances and correctly install the heating network around the house. It is much better to entrust this work to specialists who will offer the best option and a set of additional equipment. Based on experience, designers and installers are able to correctly place emphasis depending on the customer’s wishes: to provide heating with maximum efficiency and ease of use, or to strive to save money on work and installation.
The cost of the work includes separate installation of the boiler, connection of additional equipment, pipe routing and installation of radiators. Each item has its own price list, according to which the cost of all work on equipping the heating system in the house is calculated.
| Type of work | units | Cost, rub. |
| Installation of a heating boiler with a power of up to 50 kW | PC. | 12000-20000 |
| Installation of a boiler with a power of over 50 kW | PC. | 25000-50000 |
| Security group installation | PC. | from 1500 |
| Expansion tank | PC. | from 2000 |
| Circulation pump | PC. | from 2000 |
| Installation and connection of the comb (collector) | PC. | from 1500 |
| Pipe routing D16-25 | linear meters | 60-85 |
| Pipe routing D32-40 | linear meters | 75-90 |
| Pipe routing D55-63 | linear meters | 90-120 |
| Pipe routing D75-110 | linear meters | 100-150 |
| Installation and connection of the radiator | PC. | 2000-5000 |
| Installing a thermostat | PC. | 500 |
| Pressure testing according to the requirements of the boiler equipment manufacturer | from 4500 | |
| Commissioning works | from 3500 |
Routing pipes from the boiler to the radiators can average 300-500 rubles per linear meter, taking into account laying, connection, passage and wall grooves. Prices are indicative for Moscow and the region.
Where is the return route?
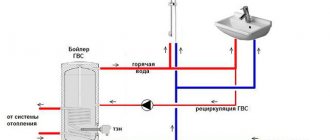
In short, the heating circuit consists of several important elements : a heating boiler, batteries and an expansion tank. In order for heat to flow through radiators, a coolant is needed: water or antifreeze . If the circuit is constructed correctly, the coolant heats up in the boiler, rises through the pipes, increasing its volume, and all excess ends up in the expansion tank.
Based on the fact that the batteries are filled with liquid, hot water displaces cold water , which, in turn, enters the boiler again for subsequent heating. Gradually the water temperature increases and reaches the desired temperature. circulation can be natural or gravitational , carried out using pumps.
Based on this, the return can be considered a coolant that has passed through the entire circuit, giving off heat, and, already cooled, returned to the boiler for subsequent heating.
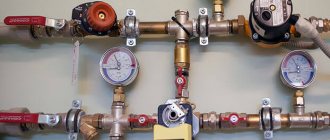
Gas boiler piping
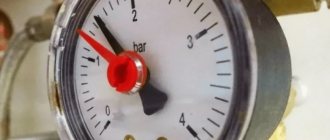
Modern gas boilers have good automation that controls all parameters of the equipment’s operation: gas pressure, the presence of a flame on the burner, the pressure level and temperature of the coolant in the heating system. There is even automation that can adjust work to weather data. In addition, wall-mounted gas boilers in most cases contain such necessary devices as:
- safety group (pressure gauge, air bleed valve, emergency valve);
- expansion tank;
- circulation pump.
In wall-mounted gas boilers, an expansion membrane tank and a safety group are already installed
The parameters of all these devices are indicated in the technical data of gas boilers. When choosing a model, you need to pay attention to them and choose a model not only by power, but also by the volume of the expansion tank and the maximum volume of coolant.
Wiring diagram for a wall-mounted gas boiler
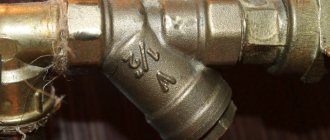
In the simplest case, the boiler piping contains only shut-off valves at the entrance to the boiler - so that repair work can be carried out if necessary. A dirt filter is also installed on the return pipeline coming from the heating system to remove possible contaminants. That's all the harness.
An example of piping a wall-mounted gas boiler (double-circuit)
In the photo above there are corner ball valves, but this, as you understand, is not necessary - it is quite possible to install ordinary models, and turn the pipes closer to the wall using corners. Also note that there are taps on both sides of the sump tank - this is so that you can remove it and clean it without draining the system.
In the case of connecting a single-circuit wall-mounted gas boiler, everything is even simpler - only gas is supplied (gas workers connect), hot water supply to the radiators or water heated floor and return from them.
Wiring diagrams for floor-standing gas boilers
Floor-standing models of gas heating boilers are also equipped with automation, but do not have a safety group, an expansion tank, or a circulation pump. All these devices have to be installed additionally. Because of this, the wiring diagram looks a little more complicated.
Wiring diagrams for a floor-standing gas boiler
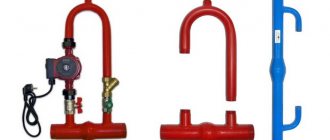
On two classical boiler piping schemes, an additional jumper is installed. This is the so-called “anti-condensation” loop. It is needed in large systems; if the return water temperature is too low, it can cause condensation. To eliminate this phenomenon, this jumper is installed. With its help, hot water from the supply is mixed into the return pipe, raising the temperature above the dew point (usually 40 °C). There are two main ways to implement it:
- with installation of a circulation pump with an external temperature sensor in the jumper (and the photo is at the top right);
- using a three-way valve (pictured below left).
In a scheme with a circulation pump on a jumper (condensation pump), it is made with a pipe of a smaller diameter than the mains. The sensor is attached to the return pipe. When the temperature drops below the set value, the pump power circuit is turned on and hot water is added. When the temperature rises above the threshold, the pump turns off. The second pump is the heating system itself; it works all the time while the boiler is running.
In the second scheme with a three-way valve, it opens the addition of hot water when the temperature drops (set on the valve). In this case, the pump is located in the return pipeline.
Differences between them
The difference between the described concepts is as follows:
- The supply is a coolant that flows through the radiators from the heat source.
- The return is a liquid that has passed through the entire circuit, and cooled down again to the heat source for subsequent heating. Therefore, occurs at the output .
- The difference is in temperature: the return is colder .
- The difference is in the installation. The water line that is attached to the top of the battery is the supply. What is attached to the bottom is the return line.
Important! Some tips need to be followed. The entire system must be completely filled with water or antifreeze . Maintaining fluid speed, circulation and pressure is equally important.
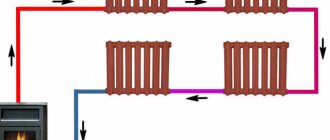
Temperature difference across radiators
The temperature difference should be 30 °C . In this case, the batteries will feel approximately the same to the touch . It is important to ensure that the difference in these values is not too large.
Photo 2. Heating diagram for 6 radiators: changes in flow and return temperatures on each of them are indicated.
Pipe diameter
Theoretically, calculating the optimal pipe diameter for a heating system in a house is quite difficult. The required pressure, static and dynamic pressure, pipeline resistance are taken into account, taking into account the laying route, the roughness of the inner surface of the pipes and many additional parameters. In practice, you will still have to choose from a fairly limited list of pipe diameters from one material or another. The standard sizes and main characteristics of the pipes have long been standardized, as well as all the additional elements necessary to assemble the heating circuit from the boiler to the radiators.
The main idea is to provide:
- the speed of movement of the coolant in the pipes is at the level of 0.4-0.6 m/s;
- the resistance of the entire heating circuit is lower than the pressure created by the pump or gravity in a system with natural circulation;
- minimum volume of coolant in the pipes. Not to be confused with the total volume, including the boiler and, if necessary, storage tank.
Example 5
The heating system is closed. Heat meter T21 Compact DN65 installed. The red graph is the coolant flow rate at the supply (channel V1). Control flow meter on the return (channel V2, green graph). The counter has been operational since March 20, 2013.
Problem: The error in some places goes beyond 5-10%.
Analysis: Probably the system is not closed, given the maximum error of the devices is 4%, the house consumes 1-5% of the flow. The graph shows mirror-symmetrical costs, which raises suspicion that the manufacturing plant’s engineers are already looking into this defect.
Is it possible to install it without authorization?
A technically trained boiler owner can easily install gas shut-off valves, a shut-off valve, a meter and an air pollution sensor on his own.
However, only gas service workers have the right to connect the boiler to the gas main and all work on it; they also perform the first start-up of the equipment.
This is a mandatory condition for the safe connection of a gas boiler, which allows such work to be carried out by companies and specialists with special permission. But you can connect the gas boiler to the heating system yourself.