Characteristics of Leningradka
When choosing an installation, you should pay attention that it differs in the method of coolant circulation:
- Water is forced to move. Leningradka with a pump increases circulation, but at the same time consumes electricity.
- Water moves by gravity. The process is carried out thanks to physical laws. Cyclicity is ensured by temperature differences and gravity.
The technical characteristics of Leningradka without a pump are inferior to forced ones in terms of the speed of movement of the coolant and the speed of heating.
To improve the properties of the equipment, it is equipped with various devices:
- Ball valves - thanks to them you can regulate the temperature level to heat the room.
- Thermostats direct the coolant to the desired zones.
- Valves are used to regulate water circulation.
The listed additions allow you to upgrade even a previously installed system.
Advantages and disadvantages
The advantages of use include:
- Cost-effective – the cost of the elements is low, installation can be done independently. During operation, energy is saved.
- Availability - parts for assembly are available in any hardware store.
- The heating system of a private house in Leningradka can be easily repaired if it breaks down.
Among the shortcomings are noted:
- Installation features. To equalize heat transfer, it is necessary to add several sections to each radiator located far from the boiler.
- Inability to connect to horizontal installation of heated floors or heated towel rails.
- Since pipes with a large cross-section are used when forming an external network, the equipment looks unaesthetic.
How to install correctly?
Installing Leningradka is quite feasible with your own hands; for this, choose one of the methods:
1. Horizontal. A prerequisite is the installation of a floor covering in the structure or on top of it; this must be chosen at the design stage.
The supply network is installed at a slope to ensure free movement of water. All radiators must be located at the same level.
2. Vertical is used when using forced-type equipment. The advantage of this method is the rapid heating of the coolant, even when installing pipes with a small cross-section. Operation occurs due to the installation of a circulation pump. If you want to do without it, then you should purchase pipes with a large diameter and place them at an angle. The Leningradka vertical water heating system is installed with bypasses, allowing repair of individual equipment elements without shutting it down. The length should not exceed 30 m.
Features of installing the Leningradka heating system come down to following the sequence of work:
- Install the boiler and connect it to the common line. The pipeline must run along the entire perimeter of the building.
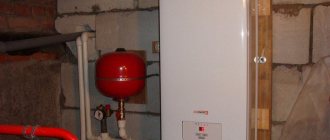
- The expansion tank is a mandatory element. To connect it, a vertical pipe is cut in. It should be located close to the heating boiler. The tank is installed above all other elements.
- Radiators are installed into the supply network. They are equipped with bypasses and ball valves.
- The equipment is connected to the heating boiler.
A video review of the Leningradka heating distribution system will help you understand the order of work and follow their sequence.
“Several years ago we moved to live outside the city. We have a single-pipe heating system installed in a two-story house similar to Leningradka. For normal circulation, I connected the equipment to the pump. There is enough pressure to heat the 2nd floor, it is not cold. All rooms are well heated. Easy to install, no expensive materials required.”
Grigory Astapov, Moscow.
“When choosing heating, I studied a lot of information. According to reviews, Leningradka suited us due to the savings in materials. We chose bimetallic radiators. It works uninterruptedly, completely copes with heating a two-story house, but the equipment should be cleaned periodically. After 3 years, our radiators stopped working at full capacity. It turns out that there was debris on the approaches to them. After cleaning, operation resumed.”
Oleg Egorov, St. Petersburg.
“The Leningradka heating distribution system has been working with us for several years now. Overall satisfied, easy installation and easy maintenance. The pipes were polypropylene, 32 mm in diameter, the boiler runs on solid fuel. We use antifreeze diluted with water as a coolant. The equipment completely copes with heating a house of 120 m2.”
Alexey Chizhov, Ekaterinburg.
We lay pipes with our own hands
Before carrying out work, it is necessary to draw up a detailed design of the heating system.
At this stage, you should choose one of the two schemes described earlier: vertical or horizontal. You should be guided by your preferences and characteristics of the premises. Then you need to choose the most suitable type of coolant: antifreeze or water. The first, diluted with water, is best used with vertical decoupling so that it does not freeze in the attic during the cold season. The second one can be safely poured into a highway with a horizontal junction.
Let's get started
First, you need to determine what the heating boiler for the Leningrad heating system will be like and where it is best to locate it. Most often, a gas floor heating unit is installed, which is placed in the basement. It is necessary to take care of safety by reliably protecting the surfaces around and covering the floor with sheet iron.
Then you have to think about the chimney. Its type and design features will depend on the type of boiler selected
It is very important that it provides a sufficient level of draft and at the same time does not let smoke in, removing it out
You should start connecting the main main pipe, which has the largest diameter. Experts recommend choosing one of the following options:
- Metal-plastic (26 mm or more)
- Galvanized (22 mm or more)
- Steel (22 mm or more)
You can use polypropylene pipes. However, they have a significantly higher heat exchange with the environment, so they are not suitable in systems with 3 or more radiators. Distributing branches are made from pipes of smaller diameter.
The expansion tank must be securely fixed above the heating boiler. Its height must be at least 3 m from the heating device.
Next, a pipe creeps throughout the house and each of the heating radiators is cut parallel to it. You should try to make as few bends as possible when laying the highway. It is recommended to place batteries under window openings.
The Leningrad heating system must close at the boiler. At the end, it is recommended to place a filter element that will remove various impurities from the coolant. A node is also provided through which the system will be filled with water or emptied.
Despite the simplicity of Leningradka, no one forbids making some modifications to it to simplify operation and maintenance. By installing taps in front of each heating device and thermostats, the following advantages can be achieved:
- The heating will be controlled, allowing the room temperature to be set, and each radiator will be regulated separately
- It becomes possible to heat only living rooms and block the circulation of coolant through radiators in non-residential premises
Features of Leningradka with vertical trim
Having settled on a vertical scheme, you need to choose a coolant circulation method:
- Forced
- Natural
Forced circulation is more common, since it does not depend on the characteristics of the pipe used. The coolant rises to the top using an installed pump.
If the circulation of liquid is natural, the diameter of the pipes will need to be increased. It is recommended to use products with an internal cross-section of more than 25 mm. As for the material of manufacture, it is worth abandoning steel pipes to reduce internal resistance.
Let's sum it up
Of course, the Leningrad heating system will be popular for many years to come. It is simple and extremely effective, easy to build, operate and repair in case of breakdowns. However, feeling unsure of your efforts, it is recommended to seek help from specialists.
Horizontal installation
This installation scheme is simple, but it has its own nuances that must be taken into account when performing work. So, the main should be either in the floor structure or on top of it
It is necessary to pay special attention to the thermal insulation of the system, otherwise it will not be possible to avoid high heat transfer
When laid on the floor, the covering will be mounted directly under the system. When using a single-pipe system, the installation procedure can be revised as the work progresses.
The supply line must be installed at an angle to create the required slope for fluid circulation. In this case, the heating batteries are placed on the same level. It is still worth installing Mayevsky taps on the radiators; with their help it will be possible to remove air bubbles from the system.
Overview of basic technological schemes
Each of the Leningrad heating schemes has its own features of practical implementation, advantages and disadvantages, which we will familiarize ourselves with below.
Features of horizontal schemes
In one-story private houses or small premises, Leningradka is usually installed in a horizontal pattern. When implementing horizontal schemes in practice, it should be taken into account that all heating elements (batteries) are located on the same level, and they are installed along the walls along the perimeter of the room being equipped.
Let's consider the simplest classical horizontal open-type scheme with forced circulation.
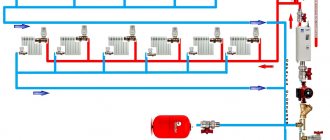
On the horizontal diagram of "Leningradka": 1 - boiler; 2 - pipe; 3 - tank; 4 - circulation pump; 5 - drain ball valve; 6 — accelerating manifold; 7 — Mayevsky tap; 8 — radiators; 9 - outlet pipeline; 10 - sewerage; 11 - ball valve; 12 - filter; 14 - supply pipeline. The arrows show the direction in which the coolant moves
The diagram shows that the system consists of:
- heating boiler, which is connected to the water supply system and to sewer networks;
- expansion tank with a pipe - due to the presence of this tank, the system is called open. A pipe is connected to it, from which excess water comes out when the circuit is filled, and air, which can appear when the liquid boils in the boiler;
- circulation pump, which is built into the return pipeline. It ensures water circulation along the circuit;
- hot water supply pipeline and cooled coolant discharge pipeline;
- radiators with installed Mayevsky valves through which air is released;
- a filter through which water passes before entering the boiler;
- two ball valves - when one of them is opened, the system begins to fill with coolant-water up to the nozzle. The second is secret; with its help, water is drained from the system directly into the sewer.
The batteries in the diagram are connected via a pipeline from below, but a diagonal connection can be arranged, which is considered more efficient in terms of heat transfer.
This diagram illustrates the principle of diagonal connection. The coolant enters from above through a pipeline connected to the top of the radiator, and exits from the back of the device at the bottom
The above scheme has significant drawbacks. For example, if a radiator needs to be repaired or replaced, you will have to completely turn off the heating system and drain the water, which is extremely undesirable during the heating season. Also, the scheme does not provide the ability to regulate the heat transfer of the batteries, reduce the temperature in the rooms or increase it. The improved circuit below solves these problems.
The main difference between the scheme and the previous one is that ball valves were placed on the pipelines on both sides (highlighted in blue), and bypasses with needle valves were introduced into the lower pipe (highlighted in green)
Ball valves installed on both sides of the battery are installed in order to be able to stop the flow of water to the radiator. To remove the battery for repair or replacement without draining water from the system, you can close the ball valves. Thanks to the presence of bypasses, the battery can be removed without shutting down the system - water will flow through the circuit through the lower pipe.
Bypasses also allow you to regulate the amount of coolant flow. If the needle valve is completely closed, the radiator receives and releases the maximum amount of heat. If you open the needle valve slightly, part of the coolant will flow through the bypass, and the other part through the ball valve. In this case, the volume of coolant entering the radiator will decrease.
Thus, by adjusting the level of the needle valve, you can control the temperature in a particular room.
Let's consider a horizontal closed heating circuit with forced circulation.
The figure shows the implementation of the closed Leningradka scheme with forced circulation. The heated coolant is supplied through one collector pipe, which collects cooled water and discharges it to the boiler for further processing
Unlike an open circuit, a closed type system is under pressure due to the presence of a closed expansion tank. The system also includes a control and management panel. It consists of a housing on which is installed:
- Safety valve. It is selected based on the technical parameters of the boiler, namely, the maximum permissible pressure. If the thermostat breaks down, excess water will escape through the valve, thereby reducing the pressure in the system.
- Air vent. The device removes excess air from the system. If the thermoregulation system fails, then when the liquid boils, excess air will appear in the boiler, which will automatically escape through the air vent;
- Pressure gauge. A device that allows you to control and change the pressure in the system. Typically, the optimal pressure is 1.5 atmospheres, but the figure may be different - it usually depends on the parameters of the boiler.
The closed system is considered the most modern solution due to the automation of some processes.
Image gallery
Photo from
In Leningradka, a horizontal type is required to use a circulation pump, without which it would be difficult for the coolant to overcome the hydraulic resistance in the system components
When using circulation pumps, a safety group must be included in the heating circuit, consisting of an air vent, a pressure gauge control device and a safety valve
In horizontal heating circuits, there inevitably arises the need to remove excess air, therefore the devices must be equipped with automatic air vents or mechanical devices - Mayevsky taps
To connect devices with the ability to balance the heating circuit, fittings with a built-in ball valve and a bypass formed by a cast body are used
Circulation pump in a single-pipe heating system
Safety group for pump heating
Automatic air vent on the radiator
Balancing fitting with bypass and ball valve
Application of vertical schemes
Vertical installation schemes of "Leningradka" are used in two-story houses with a small area. By analogy, they can be of an open or closed type, represented by circuits with forced circulation and gravity flow. We have given systems with a circulation pump above. Let's consider a vertical scheme with closed-type natural circulation.
In the diagram, the pipeline is located vertically, and water is supplied from top to bottom through the expansion tank
It is quite difficult to implement a scheme with natural circulation. Here the pipeline is mounted in the upper part of the wall at a certain angle in the direction of water movement. The coolant flows from the boiler into the expansion tank, from where it moves under pressure through pipes and radiators. For efficient operation of the system, the boiler must be located below the installation level of the radiators.
The scheme may also provide for the possibility of removing radiator batteries without stopping the heating system by installing bypasses with needle valves and ball valves on the pipeline.
Comparison of gravity and pump systems
There is an opinion that organizing a gravity heating system allows you to save on a circulation pump.
To organize the natural movement of the coolant along the circuit, it is necessary to correctly calculate the angles of inclination, diameter and length of the pipes, which is not easy to do. Moreover, a gravity system can operate smoothly and efficiently only in small one-story rooms; in other houses, its operation can cause a number of problems.
Another disadvantage of gravity flow is that its organization requires pipes with a diameter larger than when constructing forced heating circuits. They cost more and spoil the interior.
The diagram shows the implementation of gravity flow for horizontal wiring. Here the boiler is located below the level of the radiators, the coolant rises through a strictly vertically oriented pipe, enters the expansion tank and from there, through the accelerating manifold, enters the radiators
The room must have a basement for the boiler, since the heat source must be located below the level of the radiators. Also, to organize gravity flow, you will need a well-equipped and insulated attic on which the expansion tank will be mounted.
The problem with any gravity flow in a two-story house is that the radiators on the second floor heat up more than on the first. Installing balancing valves and bypasses will help partially solve this problem, but not significantly. Moreover, the introduction of additional equipment leads to an increase in the price of the system itself, and its operation may remain unstable.
The most rational solution to the issue of the difference in the temperature of the coolant leaving the boiler and reaching distant devices on the ground floor is to install radiators with an increased number of sections. Increasing the heat transfer area in this way makes it possible to practically equalize the heating characteristics at different tiers of the system.
Gravity-flowing “Leningradka” is not suitable for mansard-type houses, because it is possible to position the pipe evenly only in a house with a full roof. Also, the system cannot be implemented if people do not live in the house permanently.
Image gallery
Photo from
In the gravity variants of Leningradka, the coolant enters the device from a collector pipe located under the ceiling or a battery located on the floor above
Gravity systems use a minimum of shut-off valves. Full bore ball valves are recommended for installation
A significant disadvantage is the limitations on the length of the heating circuit. The maximum distance from the boiler to the outer battery is 30 m
To stabilize the pressure in the system and balance the temperature, the pipeline is constructed with an accelerating section located after the boiler
The principle of natural movement
Minimum reinforcement in the diagram
Limitations on the length of systems
Acceleration section of the collector pipe
In which houses is it beneficial to install single-pipe pumping systems?
A reduction in the length of heating pipes relative to two-pipe schemes is inherent in multi-storey residential buildings and industrial buildings (workshops, warehouses), characterized by heating circuit lengths of hundreds of meters. The use of “one-pipe” in them really saves heating pipes. Widespread use in individual construction is explained by a misunderstanding of the real cost-benefit ratio of this type of heating by customers and practical heating engineers.
In small two-story houses with an area of about 100 sq.m. (50 sq.m. on the first floor, 50 sq.m. on the second floor), a “one-pipe” is often installed, which works well with short circuits containing 4-5 heating devices. Large houses with many radiators are not well suited for single-pipe circuits, although objects with a dozen batteries in a floor circuit actually work, as in the mixed vertical-horizontal single-pipe circuit shown below.
Single-pipe system of mixed (vertical - horizontal) type.
Single-pipe heating system for a two-story house with a circulation pump
Includes floor circuits with horizontal single-pipe distribution, connected by vertical “supply” and “return” risers. The latter are spatially separated or combined into a two-pipe riser. The circulation pump is connected to the return line (“return”) in front of the heating boiler.
The simplest one-pipe heating system for a two-story house, the diagram of which contains two circuits of 3 radiators each, is shown below.
Single-pipe horizontal system of a 2-story house with a pump.
The coolant flow through the horizontal line is N times greater (N is the number of radiators connected in series) required by the two-pipe circuit. The “single-pipe”, which has the same number of heating devices as the “double-pipe”, is equipped with a circulation pump of greater power.
Pros and cons of this heating system
It’s not for nothing that Leningradka is very popular, because it has many important advantages:
- Possibility of laying the supply pipeline under the door opening;
- Low cost of setting up the system;
- Simple and inexpensive installation that you can do even with your own hands;
- Leningradka provides a minimum number of pipes on the surface, so communications will not spoil the interior of the room;
- The system can even be connected to two heating devices;
- If necessary, the system can be repaired;
- There are separate elements for Leningrad on the market, which will help you easily replace failed components;
- The system allows you to create a “warm floor” in the house.
Using one ring at the outer walls you will go around your entire home. With this installation method, the supply pipe comes from the center of the Leningradskaya, passes throughout the room and goes back.
It would be unfair not to talk about the shortcomings. This system also has them, but there are not many of them, and with proper planning and installation of disadvantages you can avoid:
The radiators that go at the end of the system must have a large number of sections. This solution will allow for uniform heat transfer from all batteries in the house;
The layout of a horizontal Leningradka is quite complex, and it is almost impossible to install heated floors and heated towel rails. Therefore, if you need such elements, it is better to use a vertical layout;
The single-pipe version of Leningrad will work effectively only at high pressure of the heat source.
How does underfloor heating from a heating boiler work?
The range of work that needs to be done to power a heated floor from a heating boiler is no different from that when cutting into a centralized route
You just need to pay attention to the following factors:
- Availability of a security group. If it is not included in the boiler design, then the installation of the group will be required in accordance with the design standards for heating networks.
- Insertion of the collector unit. This element will allow you to distribute the coolant flow between radiators and heated floors in the required proportion.
- Installation of a circulation pump. If it is not built into the boiler, then you will have to spend a certain amount of money on purchase, which guarantees the efficiency of heat supply and its uniform distribution throughout all rooms of the building.
A nuance - any modifications carried out on central heating must be agreed upon and accompanied by a certain set of documents, one of which is an approved and agreed upon design solution. Buying a boiler will not be a cheap pleasure, but it will allow you to avoid many troubles with licensing authorities.
Operating principle
Leningradka - classic heating scheme
The classic Leningradka system is a set of heating devices that are connected by a single pipeline. A coolant, which is water or antifreeze, circulates throughout the circuit. With the advent of new heating equipment, the system was improved, made controllable and expanded in functionality.
Depending on how the pipeline is located, the heating circuit is divided into two groups:
- horizontal;
- vertical.
The location of the pipes can be upper or lower. In the first case, the heat transfer efficiency is higher, but installation is more complicated. Bottom installation of the system is easier, but it is necessary to install a pump.
The circulation of the coolant in the circuit can be carried out in two ways - natural and forced using a pump. There are also closed and open systems.
The recommended number of heating devices when installing the Leningradka system is 5. This value can be increased to 6-7 by first performing the appropriate calculations. Installing more radiators will not be effective, and its cost will be unreasonably high.
How to even out uneven heating of radiators
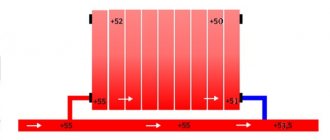
The usual way to equalize their heat transfer during unequal heating is to gradually increase the thermal power (or, equivalently, the number of sections) of the radiators as the coolant moves in the circuit. If the power of the first heating device in the circuit is taken as 100%, then the next one has it 110%, and so on up to 150-200% of the power of the last one (depending on the number of serial radiators).
When implementing a single-pipe heating system for a two-story house, the diagram of which includes a main pipe, the diameter of the latter is taken to be large. So, when making connections to radiators with a DN16 metal-plastic pipe, for eight or nine heating devices in a floor circuit, you should take a “main line” with DN40. The DN32 pipe will work, but the stability of the system will decrease. This means that any change in coolant temperature will lead to its imbalance, i.e. a noticeable change in the heating temperature difference between adjacent radiators in the circuit.
“Single-pipe” schemes with so-called radiator piping are common. "bypasses", as shown in the photo below.
Connecting a radiator in the “Leningrad” circuit with a bypass.
These are sections of smaller diameter included in the breaks in the line under the radiators, sometimes with a flow control device installed (needle valve or others). Control valves are also installed in one (or both!) connections to the radiators. It turns out that instead of a continuous line of one diameter, there is a pipe of variable diameter. At the same time, practical installers mistakenly believe that in order to branch the coolant flow into two components in the tee for supplying the radiator, it is necessary to narrow the main passage for it. This is incorrect because a liquid under pressure will fill any free volume encountered in its flow path.
Of course, if in such a scheme with many flow control devices you constantly manually control the heating of each device, then you can still, spending a lot of time, constantly achieve their uniform heating. But is the “game” worth the candle? If you make a “single-pipe”, then the radiators should be connected to a line with a constant large diameter, ensuring their stable operation with a slight decrease in the heating of devices along the circuit.
Conclusion
If radiators in a single-pipe circuit are connected to a main pipe with a diameter at least twice the diameter of the connections to them (with the appropriate size of fittings), then at the cost of such materials costs it is possible to reduce the temperature in the chain to 8-10 devices. In a two-pipe scheme, the same result is achieved with a small diameter of all heating pipes.
How to implement alternative heating for a private home
Two-pipe heating system for a private house - classification, types and practical design skills
Single-pipe and two-pipe heating distribution in a private house
Generalization on the topic
Today we can talk about a boom in the construction of individual housing. Many people prefer to solve the problems that owners of a private home have on their own. Practice shows that by doing heating installation yourself, you can save significantly. To avoid mistakes, simpler schemes are chosen. And the easiest system to assemble is a single-pipe heating option for a private home. Leningradka is an effective and economical heating scheme that is easy to assemble and maintain.
In such a system there are absolutely no risers for return flow or intake of water as waste coolant.
In addition, single-pipe systems are much easier to install and require much less materials.
Due to the special design of a single-pipe system, namely the serial connection of radiators, during its operation it is impossible to adjust the heating intensity of each of them without negative consequences for subsequent ones. Thus, if it is hot in the bedroom and it is necessary to reduce the temperature by pressing down the valve on the radiator, the water in the other rooms will also begin to cool.
This heating system requires increased coolant pressure during operation.
If we are talking about installing a single-pipe heating system in a one-story house, then it should have a vertical outlet.
The expansion tank must be installed in the attic, which in this case serves as a technical floor.
When such a system is installed in a multi-storey building, additional tricks are resorted to to ensure the same coolant temperature on all floors. With a vertical spout, water flows down through a single-pipe system and passes sequentially through radiators on all floors, in each of which it releases part of the heat. Therefore, with such a system, additional jumpers are installed on each floor; a larger number of radiator sections are installed on the lower floors than on the upper ones.
Advantages
Today, the single-pipe system is one of the most common, especially in the construction of private houses. Its main shortcomings, characteristic of the Soviet era, were eliminated.
Secondly, a significant advantage of such a system is the saving of materials and a more aesthetic appearance of the finished structure.
Thirdly, there are many technological techniques that will eliminate the problems that occurred ten years ago. When using modern single-pipe heating systems, thermostatic valves, special air vents, radiator regulators, balancing valves, and ball valves are installed. All this makes it possible to achieve a decrease in temperature in previous radiators without lowering it in subsequent ones.
Wiring diagram
In a private house, when installing a single-pipe heating system, the coolant enters the radiators installed in the house sequentially.
Hot water or antifreeze, moving in the direction of movement, entering the first radiator, transfers some heat to it and cools down somewhat, thus, the second and subsequent batteries that are in the chain do not receive such hot water.
The temperature in the room where the last radiator is located will be lower than in the room where the first radiator is located.
To ensure a comfortable, uniform temperature in all rooms, it is necessary to install additional sections in those rooms where the coolant will arrive last.
For balanced operation of the system, additional mechanisms are used on radiators - ball valves, balancing valves, thermostats, etc. These devices allow you to control the temperature in heating appliances.
Features and device
With a horizontal system, there is a need to maintain the movement of coolants forcibly, using a pump. A horizontal system in a one-story building is laid above the floor or hidden in the floor structure. In this case, to prevent heat loss, the pipes must be insulated. In addition, radiators must be installed at one level, the horizontal line is made with a slope towards the movement of the coolant.
In a two-story building, the horizontal system has a vertical riser through which the coolant is supplied to the upper floor.
It cuts in on the ground floor up to the first radiator, if possible. In the gap formed by the riser and the first battery, taps are installed. Thanks to them, you can supply heat and regulate the temperature floor by floor.
Selection of pipes by diameter
How to choose the materials that make up the Leningrad heating system
Pipe diameters are one of the main characteristics that is important to choose correctly. In general, the diameter used depends on many factors, including the area of the house, the cooling rate of the coolant, heat loss, circulation speed, etc.
All this is quite difficult to calculate, so it is better to determine which pipes are needed based on the nominal pressure. So, if 10 atmospheres is enough for the system to operate, then 25 mm pipes can be used. When the pressure is at 20-25 atmospheres, it is better to install pipes at 32 millimeters.
Automatic control of heating system parameters
A servo drive is an automatic mechanism that provides the specified parameters of the coolant by sending a control signal to the mixer. The servo drive for heating works as follows. From a room thermostat or other sensors that record the temperature of the floor, coolant or air in the room, a signal is sent to the servo drive, which sets the mixer damper (three-way or four-way) to a position corresponding to the temperatures set on the sensors. The floor temperature is adjusted, for example, by moving the mixer damper. This movement bypasses the heated floor circuit and redirects part of the coolant to the return line. Thus, the floor temperature decreases and when the minimum permissible temperature is reached, the servo drive turns on again, but this time it closes the damper, more coolant enters the circuit and the temperature increases to the set temperature on the sensor. The cycle repeats periodically.
- How to fill water into an open and closed heating system?
- Popular floor-standing gas boiler made in Russia
- How to properly bleed air from a heating radiator?
- Expansion tank for closed heating: device and principle of operation
- Gas double-circuit wall-mounted boiler Navien: error codes for malfunctions
Recommended reading
Which batteries are best to choose for heating a private home? Heating project for a two-story house: choosing a scheme and connection method What does the heating scheme for a one-story house with forced circulation look like? Heating of greenhouses - types of systems and heating sources
2016–2017 — Leading heating portal. All rights reserved and protected by law
Copying site materials is prohibited. Any copyright infringement will result in legal liability. Contacts
Schemes and principle of operation
The Leningrad heating system for a private house provides for sequential installation and connection of heating devices. The coolant in the form of ordinary water or non-freezing liquid moves through all batteries, and along this path its temperature drops. As a result, the water inside the batteries farthest from the boiler will not be as hot. As already mentioned, this problem is solved by increasing the number of sections.
For heating a small house on 1-2 floors, a single-pipe system is perfect. If the scheme involves laying pipes under the floor level, then care should be taken to insulate them; for this, roll materials are used. If this is not done, there will be large heat losses.
The operation scheme of a single-pipe system for a two-story building is quite simple: the coolant enters the batteries and begins to move to the top point. When the liquid cools, it will begin to descend to the bottom. At the same time, the heating and cooling processes take place simultaneously, so the Leningrad machine works without interruptions.
Single-pipe heating circuit
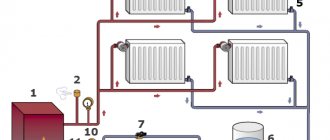
The single-pipe heating circuit has a fairly simple equipment model, which can be examined in more detail in the video. It is necessary to lay a main line from the heating boiler, which will be branched. After this, the required number of radiators or batteries is placed on it. The main line, stretched throughout the house, comes back and connects to the boiler. This method creates a circulation of hot water inside the pipes to uniformly heat a private home.
The hot water cycle can be configured so that it can be turned on forcibly, or so that it circulates randomly. Along with this, the heating circuit can be designed both as a closed type and as an open one, depending on the source of heated water.
At the moment, a single-pipe heating system can be installed even by the standards of current heating design in a private house. At the owner’s discretion, elements such as radiator controllers, thermostats, balancing valves and ball valves can be added to the circuit. With the help of these devices, the heating system of a private home will acquire a modern temperature control model, which will have a positive effect on the overall comfort of its control.
Ball valves on radiators. Click on photo to enlarge.
First of all, it will be possible to lower the temperature in little-used rooms, but you must always set the regulator to the minimum value so that the room does not become damp and maintains its proper appearance. In addition, it will be possible to increase the temperature in the bathroom or bedrooms if desired. The modernized Leningradka also allows you to regulate the heating of a specific radiator, that is, independently of other heating devices.
Along with this, a good solution would be to include a bypass valve circuit in a single-pipe heating system. The advantage of such equipment is understandable, since the repair of each radiator will occur independently of the entire heating system. In this case, it is not even necessary to turn off the system.
Principles of installation of a horizontal single-pipe system
Despite the fact that it is quite simple to equip a private house with a horizontal heating system, this procedure has its own nuance that must be taken into account when designing: the main line must be placed exactly under the floor.
When installing a horizontal single-pipe system, you need to lay the line directly into the structure of the floors or on top of them. You can see this diagram in the video. When choosing the first option, you need to think about insulating the heat that will come from the pipes, otherwise there will be excess heat transfer in this room.
Mayevsky crane. Click on photo to enlarge.
If you place Leningrad in the floor structure, then its surface, as a rule, is equipped for this heating system. In the case of placing a single-pipe heating circuit on top of the floor, the alteration, accordingly, can be carried out directly during the construction period.
The main line is placed at a slight slope so that the liquid inside the pipes can circulate according to a given flow. But the heating radiators are placed at the same height. In addition, it is necessary to install Mayevsky taps on them so that air can be released from the pipes before starting the heating system.
Horizontal heating system. Click on photo to enlarge.
Principles of installation of a vertical single-pipe system
The Leningrad heating system for private housing based on a vertical scheme is installed if there is a need for forced circulation of hot water. This type of installation has its advantage: the radiators heat up faster, even if the main line is made of narrow pipes. But for this circuit to work, a circular pump is required.
In the absence of such a pump (not provided), hot water circulates naturally, without outside help. This scheme is due to a specific installation in which the coolant circulates due to the simplest laws of physics: a liquid with a changed density provokes the movement of masses under the influence of heating or cooling.
Scheme of operation of a vertical heating system. Click on photo to enlarge.
Such a heating system requires a main line of sufficiently large diameter. In addition, it is installed at a certain angle. When envisioning a vertical heating system, you need to design its installation well, otherwise there will be a risk of not reaching the main line to its destination. Its length can be a maximum of 30 m.
121LO
5-, 10- and 9-story buildings of the 121LO series are still being built. The ceilings here reach 280 cm. There are balconies even on the ground floor.
Five-story panel building 121 series
The layout of the house is comfortable. Few people change them. Yes, this is practically impossible, since the interior walls here are load-bearing.
Layout of a typical section
The maximum that can be done is to use the balcony as a living space. Usually there is a relaxation area or a desktop with a computer.
Several design options for such balconies:
All series have a problem with poor sound insulation. But in new houses the issue has been partly resolved by sealing the internal joints of the panels with silicone.
In any case, when buying an apartment in a Leningrad-style building, you will have to think about soundproofing the walls, ceiling and floor.
Adblock detector
Advantages and disadvantages
The system is best suited for one-story houses with a small area.
The Leningradka heating system has its positive and negative sides. The advantages include:
Simplicity of wiring and installation. The amount of installation work has been significantly reduced. You can install it without the help of specialists. High efficiency. Economical. Pipe consumption is 30% lower than other heating systems. In addition, there is no need to purchase expensive equipment. The introduction of control elements (bypasses, ball valves) made it possible to improve the circuit and regulate the temperature conditions in different rooms. Adding new elements makes it easier to make repairs and replacements without shutting down the entire heating system in the house. Versatility. The system can be used in one- and two-story houses. The difference in the schemes will be small. Reliability. The heating system will function without failure. With a lower location in a building with one floor, you can hide the pipes in the thickness of the floor
It is important to observe measures of thermal insulation and tightness of connections.
“Leningradka” has proven itself well in one-story buildings with a small area.
The main disadvantages include the complexity of calculations. The number of sections and pipe diameters depend on many parameters, including the individual characteristics of the house, so problems may arise with the correct determination of the parameters. Difficulties also arise when balancing the system. This may require additional equipment and repair work. The system cannot be implemented in large apartment buildings due to its inefficiency.
Suitable pipes
It is worth approaching the solution of the issue as responsibly as possible. It’s better to take your time and take into account important points:
- Installation method
- Maximum pressure indicator
- Presence or absence of a pump in the system
- Number of pipes in the system design
Steel pipes. Popular in markets until recently. They are often used in communications where a large cross-sectional diameter is required. Steel pipes conduct heat well, do not expand when heated strongly, and can easily withstand high pressure.
Pipes retain strength even when bending. Able to withstand temperature changes without consequences. Optimal balance between price and quality. The difficulty lies in installation, which requires the use of expensive equipment.
Alloy steel. Quite strong material. The composition of the material contains impurities, which improves the efficiency of the system. Advanced metal pipes are corrosion resistant and easy to maintain. The weight of the structure is significantly reduced. Pipes are used in a system with abnormal pressure and temperature conditions. It is permissible to use hot steam as a coolant.
Series 1LG
The houses in this series are panel.
1LG 502
Brezhnevki 1LG 502 were built from 1963 to 1972. These are five-story buildings with two or more entrances and a ceiling height of 250 cm.
Balconies and loggias are not available in all apartments. Houses without a garbage disposal with four apartments per floor.
Most apartments in the 502 series do not have balconies
House structure:
- The external walls are made of expanded clay concrete panels 303 mm thick in three layers with ceramic mosaic cladding. Internal – single-layer 140 mm.
- The ceilings are solid, 120 mm thick. The covering of the last floor is ribbed.
- Flights of stairs on the central stringer.
- The bathrooms are made from solid reinforced concrete cabins, separate and spacious.
Layout of house section 1LG 502
1LG 504D-MK
In 1975, the 502 series from Lenproekt was replaced by another standard version of panel apartment buildings - 1LG-504D-MK. They were built before 1989. These were two to eight entrance 12-story buildings. Some have two non-residential floors below.
12-storey building 504 series
All apartments, starting from the 2nd floor, have balconies. The height of the premises increased to 270 cm.
Standard layout of sections and apartments:
1LG 600
Houses of the six hundredth series were built in the Leningrad, Tyumen, Pskov and Chelyabinsk regions for 22 years, from 1967 to 1989. They featured curved brick inserts designed to dampen gusts of wind in coastal areas. Because of this, they are called "ships".
House 600 series
Houses with Leningrad layouts are the most in demand on the secondary housing market.
They were built in old neighborhoods with good infrastructure. They have an elevator and a garbage chute.
Disadvantages: poor sound insulation and small six-meter kitchens in the first houses. Later, this omission was improved and the kitchen area was increased.
In the northern regions, many hotel-type houses of the 1LG-600A/UR-25 modification were built for small-family hostels. These are 108-apartment nine-story buildings that have little in common with the main series.
Houses with three sections connected perpendicularly are called “three-leaf houses.”
In addition to them there were several modifications:
- 9-storey buildings with 54, 180, 252, 322 apartments;
- 12-storey buildings with 54 and 72 apartments;
- 15-storey buildings with 90 apartments.
Section plan and most common layouts:
1LG-602
The standard design went into production in 1966. Five- and nine-story buildings with 216, 252, 288 and 324 apartments without a technical floor were built until 1982. There were 6-9 entrances. Loggias appeared at the ends. The windows became three-frame.
Five-story building 602 series
In 1972, rotating and corner sections appeared in the houses of this series. In 1975, experiments were carried out with the front cladding of wall panels. The shape of the canopies over the entrance to the entrance, the design of the ventilation ducts, and the layout of the bathrooms have changed.
Typical floor plan
The soundproofing of the apartments has become better than in the houses of previous series. The disadvantage is the impossibility of redevelopment of apartments.
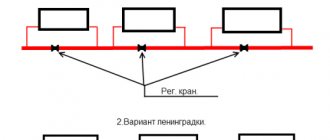
Heating Leningradka open wiring diagram
The open scheme of water heating "Leningradka" has an interesting feature - the sequential placement of all structural elements along the outer contour of the walls.
The central unit of such a single-pipe system is the heating boiler, which is connected to the first battery through a supply riser. Then, from the first radiator, hot water flows into the next element and so on until it passes through all the heating units in the entire house. Having passed through all the batteries, the cooled water returns through the return pipe to the boiler for reheating and everything repeats again, forming a closed cycle. Due to the heating of water in the heating system, according to the laws of physics, it expands in volume. Therefore, to remove its excess, an expansion tank is installed in the circuit. Moreover, in an open heating system, such a structural element is connected to the air in the room through a special pipe. After the coolant has cooled, it enters the system again from the expansion tank.
Very often, to increase heating efficiency, a single-pipe system is equipped with a circulation pump. which is installed in front of the boiler on the return pipe. Thanks to this addition, the heating rate of a private house, both one-story and two-story, increases significantly, since the coolant begins to circulate according to the forced principle.
To make it easier to fill the heating system with water, a cold water supply pipeline is connected where the return pipe passes through a locking mechanism and a cleaning filter. Also, a drain pipe with a tap at the end is mounted at the lowest point of the system. This device allows, if necessary, to drain all the coolant from the system.
In private housing construction, standard radiators with a lower connection diagram are usually used. Moreover, each battery is equipped with a Mayevsky tap to remove air locks. In addition, in private houses for Leningradka they often use a sequential diagonal method of connecting batteries.
But, despite the popularity of such heating distribution schemes, they have a common significant drawback - they do not provide for adjustment of the heat transfer level of each individual battery. To solve this problem, there is a radically different way to connect radiators.
To improve the operation of the heating system by adjusting the heat of each radiator, a parallel connection of all batteries to the riser is used. In this case, each heating device at the inlet and outlet pipes is equipped with shut-off valves. Also, in a section of the riser parallel to the battery, which in such a situation acts as a bypass, a needle valve is mounted to regulate the intensity of the water flow through the heating battery. This was achieved thanks to the laws of physics, because when the locking mechanism is fully opened, the coolant will not flow up the battery, overcoming the force of gravity. This leads to the fact that as the valve opening degree increases, the temperature in the battery decreases.
Types of wiring
Water heating systems can be divided according to the method of coolant circulation into natural and forced. In the first case, hot water moves by gravity due to the difference in density - its own and the cold liquid. And in the second case, the coolant moves under the action of a circulation pump. It is clear that with natural movement, water will not be able to rise through the pipes to heat the upper floors of the building. For these purposes, circulation pumps are installed in the heating system. The choice of wiring depends on the type of coolant movement and, naturally, on the number of floors of the building and its area.
When installing heating systems in residential, civil and industrial buildings, as a rule, wiring systems are used, which depend on the location of the pipes:
- lower horizontal;
- top vertical;
- diagonal.
Each of these schemes involves a different connection of radiators to pipes and is divided according to this parameter into single-pipe and double-pipe.
With horizontal bottom wiring, the pipe leaving the heating boiler is positioned horizontally, and the radiators are connected by connecting pipes to the bottom of the heating device. This system is convenient in that it allows you to quickly shut off the flow of coolant to the radiators if repairs are necessary or when regulating the temperature in the room.
The top wiring involves connecting to the top of the radiators, while the coolant rises up the riser and then enters the radiators. This system is suitable for multi-storey buildings. Moreover, the pipe supplying hot coolant is usually located in the attic of the building or under the ceiling of the upper heated floor, if the attic is not insulated.
Diagonal wiring means that hot water enters the radiator from above and, after passing through it, exits at the bottom of the heating device. Until recently, the expansion tank, with natural or forced circulation of the coolant, was located in the attic. But in the latest models of heating boilers, this sealed device has a compact, attractive appearance, so that it can be placed directly in the house.
Note! All heating system wiring diagrams have a bypass pipe for each heating device, called a bypass, a Mayevsky tap or an automatic device. With their help, air accumulated in the system is removed, which prevents it from becoming airy.
In addition, additional devices such as sensors and temperature regulators can be installed on each radiator. They allow you to maintain optimal thermal conditions in the room, and, if necessary, turn off the heating, saving the heat source and money.
Fundamental features of the functioning of Leningradskaya
As already mentioned, the Leningrad heating system wiring diagram involves the sequential connection of all devices starting from the boiler.
Therefore, the temperature at the inlet of the coolant return pipe will be much lower than at the outlet of the supply pipeline. It is thanks to this temperature difference that water naturally, according to the laws of physics, circulates along the circuit of the heating system. At the same time, the single-pipe “Leningradka” scheme, despite all its apparent simplicity, can be used even in two-story buildings. Since in the provided scheme it is possible to lay the pipeline below the level of the floor surface, it is necessary to worry about high-quality thermal insulation. If this issue is neglected, then the efficiency of the Leningrad heating system will significantly decrease and, in addition, the structural elements of the floor will overheat greatly, since the temperature of the coolant in the pipe is quite high.
Installation features
For hidden installation, thermal insulation of the walls is required.
The installation of the Leningradka single-pipe system requires care in calculations and execution. To implement it, it is necessary to calculate in advance the dimensions of the pipes, the number of sections in the radiator, prepare the premises and do a number of other works.
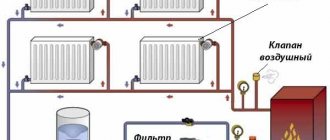
The system consists of the following mandatory elements:
- boiler;
- pipeline;
- heating battery sections;
- expansion barrel;
- tees.
If the Leningradka heating system with forced circulation is organized, another pump will be required. To improve the capabilities, ball valves (2 pieces per battery) and bypasses with a needle valve are used.
The main line can be mounted in the plane of the wall or along its surface
When located inside walls, floors or ceilings, it is important to make high-quality thermal insulation. Otherwise, heat losses will increase and the temperature in the radiators will be lower
This is due to microcracks that form during the wall gating process.
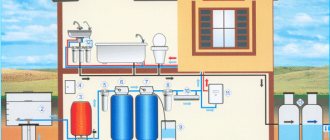
The installation location of the expansion tank and boiler is selected in advance. The tank should be placed above the level of the radiators - for example, in the attic. The boiler is usually installed in the basement.
Selection of materials
Pipes are selected taking into account the length of the pipeline, coolant temperature, installation method
The amount of heat in the radiator depends on the material of the pipes. Typically polypropylene or metal products are used.
Heating in a private house from Leningradka polypropylene pipes can be easily done with your own hands
It is important to note that such pipes are not suitable for installation in houses located in the northern regions. This is due to the properties of the material
Polypropylene melts when it reaches +95°C, which increases the risk of pipe rupture at maximum heat transfer of the system.
Metal products are more difficult to install, as welding of components is required, but their quality and reliability are at a high level. They are ways to withstand high temperatures. They are durable.
The diameter of the pipe depends on the number of heaters. If 4-5 radiators are installed in the house, pipes with a diameter of 25 mm and a bypass of 20 mm are needed. When the number of batteries is 6-8, a 32 mm main line and a 25 mm bypass are selected. In the case of creating a gravity system, pipes with a diameter of 40 mm or more are purchased. The size also depends on the number of batteries in the circuit.
Connecting elements and pipes to each other
The bypass serves for uninterrupted operation of the heating system
Bypasses are built into the assembled main line. They are manufactured separately with bends, the distance between which is calculated with an error of 2 mm. A backlash for trimming of 1-2 mm is allowed. If this distance is increased, the system may leak. To determine the exact dimensions, the corner valves in the radiator are turned out, and the distance between the centers of the couplings is measured.
Tees must be welded or connected to the bends. One hole should be allocated for bypasses. The second is selected according to the distance between the central axes of the bends.
Welding parts
Metal pipes are connected by welding. To do this, the master must have special equipment and skills to work with it. Otherwise, installation should be entrusted to professionals.
When welding, it is important to ensure that internal beads do not form. This will lead to a decrease in the amount of coolant that enters the radiator
If nodules form, the work should be redone.
After welding all parts, the radiators are placed on the wall using corner valves and couplings. Bypasses with outlets are placed in the grooves. Their length is measured and the excess is cut off.
Installation of the heating structure "Leningradka"
Before you start building a heating system for a private house with your own hands, you need to perform a competent and accurate calculation. It will be problematic to do this on your own, so it is better to turn to professionals in this industry. Using calculations, you can determine the list of equipment and materials needed for the work.
The main elements of the “Leningradka” include the following:
- boiler for heating the coolant;
- metal or polypropylene pipeline;
- radiators (batteries);
- expansion tank or tank with valve (for an open system);
- tees;
- a pump to ensure coolant circulation (in the case of a forced design);
- Ball Valves;
- bypasses with needle valve.
In addition to calculations and purchasing materials, you should also take into account the location of the pipeline. If you plan to install it in a wall or floor, you will need to prepare special niches - grooves, which should be located along the entire perimeter of the contours. In addition, all pipes must be wrapped in thermal insulation material in order to prevent the temperature of the liquid from dropping before entering the radiators.
What is the best material to choose for the pipeline?
Most often, polypropylene is used as a pipeline for installing Leningradka in a private house. This material is quite simple to install and inexpensive. However, experts do not recommend installing polypropylene pipes in regions where the air temperature drops too low, meaning the Northern Territories.
Polypropylene begins to melt if the coolant temperature rises above 95 degrees, which can lead to pipe ruptures. In such cases, it is more advisable to use metal analogues, which are rightfully considered the most reliable and durable.
In addition to the material, when choosing a pipeline, it is important to choose the correct cross-section. In this case, the number of radiators used in the circuit is of no small importance. For example, if the circuit is supposed to have 4–5 elements, then the diameter of the pipes for the main should be 25 mm, and for the bypass this value changes to 20 mm
Thus, the more radiators in the system, the larger the cross-section of the pipes. This will make it easier to carry out balancing when starting the heating structure
For example, if there are supposed to be 4-5 elements in the circuit, then the diameter of the pipes for the main should be 25 mm, and for the bypass this value changes to 20 mm. Thus, the more radiators in the system, the larger the cross-section of the pipes. This will make it easier to carry out balancing when starting up the heating structure.
Connection of radiators and pipes
Installation of Mayevsky crane.
Bypasses are manufactured together with bends and then installed into the main line. In this case, the distance maintained when installing the taps must have an error of 2 mm so that the battery fits when connecting the structural elements.
The play that is allowed when pulling up an American woman is usually 1–2 mm. The main thing is to stick to this value and not exceed it, otherwise it may go downhill and a leak will appear. To obtain more accurate dimensions, you will need to unscrew the valves located in the corners of the radiator and measure the distance between the couplings.
Starting a heating structure
Before starting the Leningradka heating system, it is necessary to open the Mayevsky taps installed on the radiators and release the air. After which a control inspection of the structure is carried out for the presence of flaws. If they are found, they should be eliminated.
After starting the equipment, all connections and components are checked, and then the system is balanced. This procedure means equalizing the temperature in all radiators, which is regulated using needle valves. If there are no leaks in the structure, no unnecessary noise and the rooms heat up quickly enough, the equipment is installed correctly.
The Leningrad heating system for a private house, although outdated over time, has changed, but is still widespread, especially in buildings with small dimensions. It is easy to install it yourself, while saving money on hiring specialists and the equipment necessary for construction.