Film heated floors are one of the easiest floor heating methods to install. It is quite possible to install and connect a film floor yourself, following simple instructions. It can be used as the only source of heating the room, however, in this case, the economic efficiency may be lower than that of a water-heated floor.
Do-it-yourself warm film floor
Application area
Film flooring can be installed in any room
Film heated floors can be used in absolutely any room. It can be installed in the bathroom under tiles, as well as under any other types of finished flooring in the kitchen, living room, dining room, hallway, nursery and bedroom. Very often, warm film flooring is used for renovations at socially significant facilities: schools, kindergartens, nurseries and hospital wards.
And even on the ceiling
Features of installation of film heated floors
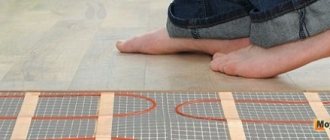
The main feature of installing a film floor is that it does not require careful preparation of the base. It can be installed even after the repair has been completely completed. If the floor in the room is fairly level and does not have sharp changes in height in the form of joints of boards or slabs, protruding nail heads or paint sagging, then it is enough to cover it with one layer of heat-insulating material. After that, strips of thermal film and a temperature sensor are mounted on the floor. All this is connected to the electrical network through a thermostat. After checking its functionality, the heated floor is covered with a protective material, on top of which the finishing coating is laid.
Film flooring can be mounted on any flat surface
Impact on the environment and the human body
The properties of film floors have not yet been fully studied, since they began to be used relatively recently. In this regard, the most contradictory judgments arise regarding these systems. There is an opinion about the beneficial effects of infrared radiation on the human body. Allegedly, it is completely harmless and serves as an effective means for the prevention of many diseases.
However, both supporters and opponents of film floors are wrong. The fact is that the emitted electromagnetic waves have extremely low intensity and do not have any negative effect on humans. Much greater radiation is emitted by heated cable floors used under tiles and with other coatings. However, it is considered completely safe and harmless to health.
With such a low level of radiation, film floors do not have a positive effect on the human body. The positive influence of electromagnetic fields is possible only when the temperatures of the human body and the infrared wave coincide. This state is almost impossible to achieve at home. The uniform heat of a heated room and optimal air humidity are considered more beneficial.
There is a misconception that it is impossible to use an infrared floor in conjunction with laminate or linoleum, which prevents the passage of radiation. Indeed, the rays from the film do not pass through such a floor barrier, but in this case they themselves heat up first, and only then the heat from them enters the room. If other types of flooring are used, the heat directly warms the air and spreads immediately to the entire height.
The principle of operation of film heated floors
Heating is carried out due to infrared thermal radiation emitted by graphite coating under the influence of electric current. Unlike traditional electric heated floors, this heating method does not require a heat-accumulating screed or special floor preparation. The floor covering itself, be it carpet, laminate or linoleum, will accumulate and release heat.
Almost none of the heating devices common today creates a level of comfort comparable to film heated floors.
What consequences can result from errors when installing film heated floors?
A common mistake during installation is incorrect connection of film strips to each other; the connection must be strictly parallel. With a series connection, heating will be ineffective, and with other errors in the connection, a short circuit may occur.
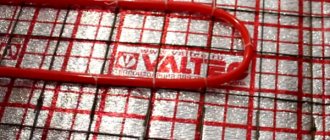
Infrared heating film is mounted strictly parallel
Cutting the film is allowed only in places designated by the manufacturer. If you cut the film in another place, a break will appear in the electrical circuit and the floor will not heat up.
How to cut film heated floors
Insufficiently thorough cleaning of the floor and preparation of the surface can lead to subsequent physical damage to the tape in places of contact with solid particles of debris or chafing in places with a sharp difference in height. Damage to the tape will turn off the heating of part of the floor or the entire floor. It is extremely important to connect the heated floor through a separate residual current circuit breaker. This ensures timely shutdown of power to the floor in the event of a break or short circuit in the circuit. Ignoring this rule may result in fire or electric shock.
Another common mistake is incorrect location of the temperature sensor. If the area of the floor under which the sensor is located is additionally cooled, for example, due to its close location to the balcony door, or, conversely, heats up due to direct sunlight through the window, the thermostat may receive incorrect data on the floor temperature and increase or decrease heating unnecessarily.
Electricity consumption of film heated floors
Advantages and disadvantages of film heated floors
The advantages of this heating method are:
- low cost of a set of materials. You only need to buy film, a thermostat and connecting wires. No need to spend money on an expensive screed;
- ease of installation. Preparing the floor, laying out and attaching the film is quite easy. No special knowledge is required for this;
- speed of installation. The film is spread out and connected in just a few hours and this can be done even alone;
- film heated floor can be the only source of heating. This allows you to avoid heating radiators.
Advantages and disadvantages of film heated floors
The disadvantages of film heated floors include:
- relatively high energy consumption. If a film heated floor is used as the only heating method, then in a room measuring 20 m2 the floor will consume about 1.5 kW/h;
- quick cooling of the floor. Since heat accumulates only in the top layer of the coating, when the heating is turned off, the floor cools down quite quickly;
- dependence on the operation of electrical networks. In the event of a planned or emergency power outage, the heating is also turned off. In some cases, combined with the rapid cooling of the floor, this can become a problem.
How to choose the right warm film
Film is chosen, as a rule, based on its power. For indoor comfort, as additional heating, use a product with a power of 150 W/sq.m. In order for the film to cope with the task of being the only source of heat in the room, a power of at least 220 W/sq.m is required.
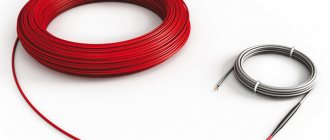
Copper wires for connecting the film are selected in accordance with the power of the product.
To choose a thermostat, you should familiarize yourself with the recommendations of the film manufacturer. Choose a product with a small power reserve. If the device operates at the limit of its capabilities, it will burn out prematurely.
Choosing a film heated floor
Film heated floor
The main criterion for choosing a film is its power. All manufacturers offer two types of film: with a power of 150 W/m2 and 220 W/m2. The first option can be used if the warm floor is not the only source of heating in the room, but is needed only for comfort. If other heating options are not provided, then you should choose a film with a power of 220 W/m2.
Film power calculation
Choosing a heated floor kit
Soft copper wires should be used to connect the sheets. The choice of cross-section depends on the final power of the entire heated floor and usually ranges from 1.5 to 2.5 mm2.
Calculation of wire cross-section
Energy consumption calculation
It is better to use the thermostat exactly the model recommended by the film manufacturer; it is important to ensure that the permissible current of the thermostat is greater than the current consumed by the floor.
Differential automatic
Be sure to connect the heated floor through a residual current circuit breaker with a leakage current setting of 10 mA.
Warm floor CALEO GOLD with self-regulating effect
Warm floor CALEO GOLD with self-regulating effect
| Index | Meaning | Dimension |
| Specific power consumption | 170 | W/m2 |
| Width of thermal film CALEO GOLD | 50 | cm |
| Maximum length of one strip of thermal film | 10 | linear m |
| Melting point of thermal film | 130 | °C |
| IR heating wavelength | 5-20 | µm |
| The share of IR rays in the total spectrum | 9,40 | % |
| Anti-spark mesh | + | — |
| CALEO GOLD 170 W. Price | 1647-32939 (for sets from 170-0.5-1.0 to 170-0.5-20.0) | rub. |
| CALEO GOLD 230 W. Price | 1729-34586 (for sets from 230-0.5-1.0 to 230-0.5-20.0) | rub. |
Technical characteristics of heating film
Before purchasing a film floor, it is recommended to carefully study the models offered on the market in order to choose the best option in terms of quality and cost. To do this, you need to understand the differences and technical parameters of the different options.
When purchasing thermal film, it is advisable to pay attention to the following characteristics:
- power - always indicated per linear meter. Generally, 44-68 W is a suitable value;
- melting temperature - 130 degrees is indicated, but during operation it should not rise above 55 degrees Celsius;
- percentage of IR radiation in the total frequency spectrum – a value above 95% is recommended;
- material thickness – the most common thickness is 0.4 mm;
- the length and width of the film sheet is in most cases 8 x 0.5 m. Determined based on the area of the room.
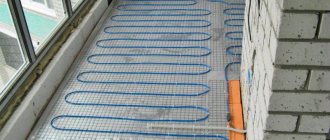
Preparing the base
The base should be cleaned and dust free
First, you need to provide a place to connect the heated floor, and make a recess in the wall to install the thermostat and place the wiring.
After this, you need to thoroughly sweep the floor. The surface must be clean and level; it is unacceptable to leave even small lumps of dirt, protruding nail heads or other irregularities. There should be no sharp differences in height on the floor of more than 3 mm, for example, at the junction of boards or slabs.
After this, the entire floor must be covered with thermal insulation material. It is best to use the type of thermal insulation recommended by the film manufacturer. The edges of the material must be secured with tape so that it does not move during further work. The thickness of the thermal insulation must be at least 3 mm.
Thermal insulation layer
What is foil insulation?
This is a combined material that consists of a layer of aluminum foil or metallized film connected to a thermal insulation material. The reflective layer can be one-sided or two-sided. It is easy and quick to install due to its elasticity. Thinner than other thermal insulation materials.
In addition to preserving heat, it can be used as waterproofing, as it does not allow moisture to pass through. The thinner the foil layer, the better it transmits heat through itself.
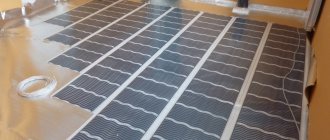
Laying film heated floors
Tools for work
Laying schemes
Film cutting options
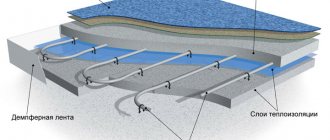
Installation diagram
Indoor installation diagram (including furniture)
First, decide on the floor area that needs to be heated. The film must not be placed under heavy furniture and appliances, such as cabinets, chests of drawers, a refrigerator or a washing machine. The distance from the edge of the film to the place where such furniture will stand should be 20 cm. The same distance should remain to the walls. Mark the boundaries of the future location of the film using a marker or bright tape.
The film is fixed with tape
Lay the film along the long side of the room, this will reduce the number of electrical connections in the entire system. Usually the manufacturer somehow marks the top of the film; if there are no marks, then the film is double-sided and can be laid on either side. The film must be cut strictly along the cut line drawn by the manufacturer.
It is important that there is a distance of at least 5 mm between the rows of film. Overlapping and contact of different sheets of film with each other is not allowed. To prevent the film from moving, it must be secured with double-sided tape.
When the entire floor is covered, you can start connecting.
Making a diagram
Before purchasing a kit for a film floor under a laminate, you need to thoroughly think through and draw a diagram for laying the heaters and connecting them to the power supply.
When drawing up a diagram, you need to consider the following points:
- Do not completely cover the floor with film. It is not installed under furniture, as normal heat exchange is disrupted. In addition, heating will cause deformation of furniture and laminate. It will also reduce the service life and increase the cost of electrical energy.
- Place heating elements at a safe distance (250 - 300 mm) from walls and heating sources.
- Rolls of film flooring should be rolled out along a large wall of the room, this will reduce the number of contact connections.
- The distance between sheets should be 50 mm. They cannot be overlapped.
- In order for the room to warm up well, it is enough to cover 60 - 70% of the area with heating elements. It is permissible to plan areas of increased comfort - this is a children's room and a place to relax.
In addition, you should consider the location of the system’s cable communications:
- Choose the optimal location on the wall for the control unit; it should be at a height of at least 500 mm from the floor, and be convenient for connecting wires.
- It is forbidden to connect a “warm floor” to an ordinary outlet, since the total power of the system is high. It is necessary to plan a separate power line of the appropriate cross-section. For maximum safety, it is recommended to provide an RCD device in the circuit for protection.
- Most thermostats can be installed in a standard outlet on the wall. It is enough to make grooves from it to the floor measuring 20 by 20.
- When planning the wiring, crossing the wires is not allowed. Connection schemes vary, but the most common is when the cable is connected to the heating elements at one end.
There are cases when it is more convenient and profitable to connect the phase and neutral cables from different sides.
- It is necessary to provide on the drawing the area where the sensor will be installed. It is placed in the center of the film heater. It is recommended to make a distance from the walls of at least 500 mm. The ideal location is the coldest area in the room.
An accurately drawn up diagram will allow you to correctly calculate the need for material and components, and will facilitate the installation of heated floors under laminate.
Connecting film heated floors
First you need to connect all the rows of film together. To connect, use only the clamps that came with the film. Using other clamps or improvised materials may be dangerous. All strips of film must be connected in parallel; carefully study the connection diagram in the instructions for the film. Usually manufacturers depict it very clearly.
To save wires, you should connect those sides of the rows that are closer to the thermostat. The contacts in the places where the film is cut on the opposite side of the row must be insulated with special overlays, which are included in the heated floor kit.
Connecting contacts and wires
Connecting wires and contacts
Contact crimping
The next step is to install the thermal sensor, it should be located in the center of the thermal film strip, but not too far from the thermostat. To prevent a protrusion from forming at the sensor installation site, it is necessary to cut a recess for it in the heat-insulating substrate.
A thermostat of this power is connected to 18 square meters of film (no more)
Connecting the thermostat
Connecting the thermostat
The display shows the operating mode
The final step will be to connect the thermal film and temperature sensor to the temperature controller and connect the entire system to the electrical network via a differential circuit breaker.
After the connection is completed, the heated floor must be checked in operation. Turn the heat up to full and wait a few minutes. Make sure that the floor is heated and there are no unpleasant odors of burnt plastic, as well as sparking or clicking noises.
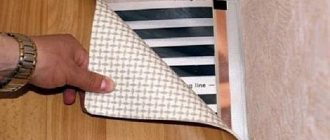
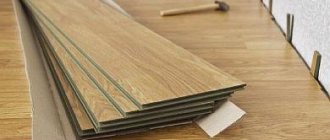
If the heated floor has successfully passed the test, you can begin laying the protective material and finishing coating.
Laying the finishing coating
Laying the finishing coating
The big advantage of a film heated floor is that it does not require filling with a screed. If the finishing coating is laminate or parquet, then it is enough to protect the heating elements with plastic film or a soundproofing substrate.
If the finishing coating is soft, for example, linoleum or carpet, then a layer of plywood or fiberboard should be placed on top of the thermal film. It will protect the film in case of damage to the finish coating.
Another undoubted advantage is that, if desired, you can easily dismantle the film heated floor system, for example, when moving. To do this, you just need to perform all the above steps in reverse order.