Connecting a ladder heated towel rail raises more questions than a coil. Several options for connection schemes are used, depending on the type of wiring (upper, lower), type of circulation, location of the ladder relative to the supply pipes, and distance from the water riser.
The coolant circulation in the radiator is:
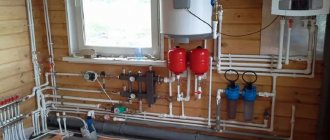
- Natural (gravitational), arising due to the difference in hydrostatic pressure of heated and cold fluid, due to the lower density of the first. Hot water replaces the cooled water, which sinks down. Inherent in autonomous heating of individual buildings, apartments, private houses.
- Forced, provided by a pump, for example, in two-pipe hot water supply (DHW) systems of apartment buildings, during recirculation. Guarantees trouble-free operation.
Types of wiring
Connection
In practice, only in dead-end schemes does water exchange stop without water being withdrawn. In other cases, the circulation caused by the pump is supplemented by the movement caused by gravitational pressure.
Bottom connection
The option with the lower standard connection of the device has limitations:
- Works stably in systems with overhead distribution or forced circulation.
For any direction of delivery.
For top feed only. - The return line is laid below the connection to the ladder.
- With bottom supply, the upper outlet of the riser must be below the level of the device.
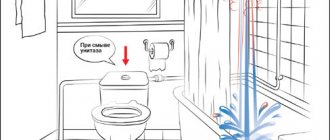
- Requires bleeding when filling after water supply is turned off.
Take into account the hydraulic resistance of the inlet and outlet branches. If the network pressure is low, it is recommended to install the dryer near the DHW line. Avoid the formation of loops on the route, reduce the number of turns.
Satisfactory water exchange is ensured by connecting steel pipes with a nominal diameter of at least DN 20 (DN 20), polypropylene pipes - DN 25 (outer diameter). To turn off the heated towel rail, full bore ball valves of the same size are used. “American” ones with a narrowed section of the fitting under the union nut are not allowed.
With a lower supply of coolant, the diameter of the unbiased bypass is reduced by one standard size opposite the main line. The cross-section of the displaced jumper is identical to the riser. Maintain slopes of horizontal sections along the direction of travel of at least 3 mm per meter.
The advantages of this option are:
- Free bathroom walls thanks to hidden connections. Low inserts will be needed, otherwise you will pay for the aesthetics with harmful hinges.
- Compact installation of lines with minimal center distance.
- Compensation for thermal elongation of plastic liners by turning the route.
Where to connect and where to hang
You can connect a water heated towel rail to both the hot water riser and the heating system. If both of these options are available, DHW is usually chosen. There are three reasons for this: there is less hassle with permission to connect, you can connect at any time of the year (agree with the management company to turn off the riser and that’s it) and, most importantly, such a heated towel rail heats up all year round.
If there is no hot water supply in the house, you will have to connect to the heating riser. This requires permission from the Criminal Code and a project. Buy a heated towel rail (preferably a simple design), go to the housing office with its passport (copy), write an application. If permission is given, order the project (you will also need a copy of the passport with connecting dimensions). Then, according to the project, you do it yourself or hire performers (plumbers from the housing office, as an option). Call representatives of the Housing Office for acceptance.
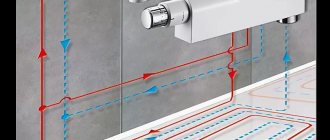
To ensure that the “towel” always warms up without problems, all connections are straight, without arcs or pockets
When determining where to install the heated towel rail, questions may still arise about what height it should be hung. If you have a choice, it is most convenient to place it so that it is at head level and below. This is if you install a U-shaped or snake. If we are talking about “ladders” of great height, the top bar is placed at the level of the heat of the raised hand (approximately 190-200 cm).
When choosing a location for installing a heated towel rail, you must also take into account the distance from the riser. In principle, the closer to the riser, the better - the greater the chance that it will work. But, it can be attributed to a meter or so only if the following conditions are met:
- low hydraulic resistance of the heated towel rail (simple shape and cross-section 1″ or 3/4″),
- sufficient pressure (2 atm or more)
- drain pipes of normal diameter (one step smaller than the riser).
At the same time, be sure to follow other connection rules. Then there will be chances that such a “remote” device will work normally.
Side connection
In terms of reliability, the method is superior to the previous one if the following conditions are met:
- The branches are laid with a slope of at least 3 mm / 1 m.
- The device is installed above the return circuit.
- There are no loops on the leads.
The diagonal connection is in the lead. The supply is made to the upper far corner, the cooled water is taken from the lower near one. The flow path eliminates stagnant zones inside the dryer.
Connecting on one side is easier: the route does not cross the dimensions of the ladder. With top feed, in both cases the “gravity pump” operates effectively.
Installing radiators with lateral or diagonal connections above the insertion into the riser increases the likelihood of airing.
The presence of a displaced or narrowed bypass at the lower distribution increases the risk of stopping the flow. The movement of the liquid stops when the artificial circulation pressure is equalized with the gravitational pressure from the difference in temperature and density.
The situation is provoked by:
- Long pipelines.
- Reduced cross-section of lashes.
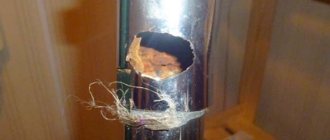
Moving the ladder closer to the highway and replacing narrowed areas helps. Often, the heated towel rail does not heat due to overgrowing of steel pipes. Plastic products are less susceptible to “disease”.
Deposits of salts and rust in old steel pipelines increase pressure losses by two or more times.
Types of lateral connection:
- Simple - with external thread or union nut, suitable for open laying of lines.
- Through the corners - promotes uniform heating of the grill.
- The rear one optimally mates with the track hidden behind the trim.
Types of heated towel rails
Modern manufacturers offer consumers equipment for drying small items of three modifications, which are divided among themselves depending on the heating source:
- Water drying devices are the most common equipment, since the heat source is public hot water pipes. It is not difficult to install or replace such systems yourself. The “ladder” heated towel rail with a bottom connection or any other does not heat only during periods of centralized repair and maintenance work.
- Electrical devices are capable of heating the bathroom at any time, regardless of the availability of hot water. Such equipment contains its own internal environment, which is brought to a certain temperature by an electric heating element. The convenience of this model is that it can be installed anywhere as long as there is an electrical outlet.
- Recently, combined drying devices have become popular, which contain all the advantages of water and electric devices.
Installation nuances
Pipelines
When planning the installation of a ladder-type heated towel rail, coordinate the position of the main connections with the installation location of the product:
- With a bottom connection, it is rational to arrange the supply and discharge taps closer to the floor.
- The horizontal one-sided connection is coordinated according to the interaxial dimensions with the riser tie-ins, taking into account the slopes.
Hidden lines are connected to the heated towel rail through water sockets.
Important! The installation of grooves in the ceilings and main walls of panel buildings is prohibited! Horizontal furrows are especially dangerous because they reduce the load-bearing capacity. Similar work in brick and monolithic houses is carried out on the basis of a conclusion from the designers.
Based on ergonomics and heating engineering, building codes limit the placement height: the top of the coil is no more than 1.7 m from the floor, the bottom is 0.9 m. The indicated values are indicative for ladders.
According to SNiP, hot water supply pipelines must withstand a pressure of at least 0.68 MPa at a water temperature of 75˚C. The conditions are met by pipes: water and gas pipes GOST 3262-75, metal-plastic, glass-fiber reinforced polypropylene. The latter are preferred due to the combination of their properties. Taking into account the reduction in the service life of plastic with increasing temperature, products of the PN 20 group are selected with a pressure reserve.
The greater the temperature gradient, the more intense the circulation, so heat losses are minimized by insulating the riser and connections. Shells made of foamed polypropylene are used, the standard minimum thickness is 10 mm.
The thermal expansion of the plastic is compensated by turning the route, at which sliding supports are installed. The elongation of polypropylene heated to 60˚C will be 8 mm / 1 m. With horizontal lateral connection without hinges, the radiator brackets should not prevent axial displacement.
Connections, fittings
With a lower hidden connection, it is necessary to install water sockets at the same height, with the same depth, so marking and installation are carried out according to the spirit level. To maintain the correct center-to-center dimension, holes for dowels are marked after screwing the dryer in place. Small errors are compensated by eccentrics.
Choose angles with internal threads ½ inch, screwed eccentric transitions from ½ to ¾ inches. If the water sockets are precisely fixed on the profile, or fixed together with the ladder, you can eliminate the adapters by using parts with external threads corresponding to the union nuts.
In practice, implementations with flexible connections are rarely encountered. If the towel is attached near the riser, the method is attractive in its simplicity. However, the cross-section of the sleeves is always reduced.
Tension, twisting, bending radius less than 5 diameters - reduce the service life and cause damage. The standard recommends replacing polymer or rubber-metal hoses after 3 years.
The tightness of joints with union nuts is ensured by a mechanical seal using silicone or paronite gaskets. The latter are preferable for heating circuits and are sensitive to distortions.
Non-parallelism of the mating ends causes excessive deformation of the gaskets during tightening, resulting in leaks. It is impossible to rewind or coat the threads with sealant in such connections; distortions are eliminated by resoldering the sections.
Inch threaded connections are sealed in one of the following ways:
- The old fashioned way - with a strand of flax impregnated with red lead or white on drying oil. Lay from the end clockwise.
- Flax fiber coated with plumbing paste. A workable option. Flax fiber and sanitary paste.
- Fluoroplastic sealing material (FUM tape). It is difficult to wind up the required number of layers; they are often additionally lubricated with sealant.
- Sealing thread wound crosswise. The material is impregnated with a special composition at the factory, does not dry out, does not swell, the best solution.
It is not advisable to use silicone for sealing. “Sandwiches” from FUM, threads are a dubious technique.
Tips for attaching water sockets:
Elegant and practical connection via kit:
You need to connect a ladder-type heated towel rail to the water riser through ball valves. The fittings will allow you to turn off the device when the water supply is cut off, in emergency situations. It is convenient to start the radiator after flushing or replacing.
Valves are not used due to high hydraulic resistance. For steel wiring, bronze or brass taps with a stainless sphere are used; cast iron fittings are prohibited.
It is impossible to install a tap on the bypass; blocking or removing the bypass will unbalance the system and leave neighbors’ bathrooms with cold dryers. Transferring or changing the cross-section of a jumper without calculations can lead to similar consequences.
Without jumpers and taps they are placed on the heating riser.
Procedure
First, a diagram is drawn on paper with linear, interaxial dimensions, height marks, and diameters of sections. Further repairs are divided into two stages.
In the preparatory cycle, the existing coil is dismantled, if necessary, the riser pipes are changed, and taps are moved. They finish by installing taps on the outlets so as not to cut off the water supply to adjacent apartments. Move on to the main operations:
- Mark the sketch using a pencil.
- The route is prepared: furrows are cut in the partitions, support profiles and supports are attached. Mark the groove. Cut with a diamond disc.
Knock out the rear sight with a chisel or chisel.
Mark the fastening centers.
Drill holes for dowels.
The dowels are driven in.
Screw the mounting plate. - Assemblies are assembled: sections are soldered, component fittings are attached to the device, transitions are screwed into the taps. Fully equipped heated towel rail. A model that allows you to choose the type of connection.
“American” for lateral connection.
Having connected at the riser, we check the location of the ends of the American women. - The route is soldered from blanks.
To avoid damage to the polishing, the packaging film is not removed until the final run.
- Install water sockets: drill mounting holes according to the markings, tighten them with dowel nails. Without relying on the accuracy of the markings, you can temporarily attach a heated towel rail by screwing eccentrics into the corners and marking the center of the dowels. You will need an assistant to hold the towel.
Recessed water sockets are secured with dowel nails to the wall or screws to the mounting plate.
Fastening with self-tapping screws to a plasterboard profile. The coupling ends are fixed with a solution. The length of the outlets is the same and must be overlapped by a decorative cup. - Fill the system, bleed air from the dryer, and leave it for testing. Letting out the air.
- Turn off the water and remove the radiator.
- After finishing the cladding, install the dryer completely, not forgetting to screw on the decorative trims. Secure the brackets with the supplied hardware. Do a control filling. Marking the bracket fastenings
Protecting tiles from chipping when drilling
Drill, install dowels, screw on the holders
Installing and connecting the dryer
Useful videos:
Preliminary stage
The basis of the preliminary surface preparation stage is the marking and installation of channels for supply pipes. If you have an old heated towel rail, you must first dismantle the device. If the device was welded into the riser, it is easier to cut it off with an electric cutting tool (grinder).
Next you need to make markings. It should be taken into account that it is better to install the dryer at a height that allows an average height person to easily reach the top rung of the “ladder”. Also, to reduce heat loss, the device must be placed no further than two meters from the riser.
The next step is to hollow out the recess for the pipes. The process of wall slitting is best done with a special tool, and safety precautions must be strictly observed. Ladder water heated towel rails with a bottom connection can be installed without punching channels, for example, when pipes are laid under a bathtub.
Interesting connection with a heat exchanger
Some users speak positively about structures with a heat exchanger isolated from the main line. The solution consists of a sealed stainless jacket placed over the main pipe; a heated towel rail is connected to the drawer.
Trying on a heat exchanger insert
We observe circulation slopes
Distilled water mixed with antifreeze in a ratio of 10:1 is poured inside the closed circuit. The liquid separated by the walls is heated by heat transfer, and natural circulation occurs.
Filling the outline
Design advantages:
- Stable water exchange, independent of main line pressure.
- The device does not become overgrown.
- It can be removed for maintenance and can be replaced at any time; shut-off taps are not needed, just drain the liquid.
- Temperature self-regulation: as the air heats up, the flow slows down, heat transfer decreases and vice versa.
- The possibility of flooding neighbors due to broken fittings and connections is eliminated.
Among the disadvantages:
- The need for metalworking and welding operations. Cutting workpieces Welding heat exchanger
- Mediocre efficiency. The heat exchange area is limited by the height of the jacket; the temperature difference between the heating and heated media is more than 10 degrees.
- A plastic riser is not suitable for the device due to low thermal conductivity.
- Mains water below 50˚C will not heat the heat exchanger to acceptable values.
Actual thermogram
It is probably wise to spend money on high-quality reinforced polypropylene, fittings and fittings.
Pipe routing
Having prepared the necessary tools and devices, you can begin laying the connecting pipes. Wiring is carried out using special fittings.
The use of modern polypropylene pipes has greatly improved the efficiency and quality of the installation stage. The pipes are laid in prepared channels in compliance with the required slope, and then connected to the point of water supply and drainage.
Next, you need to temporarily connect the heated towel rail without carrying out work on sealing the joints in order to fully ensure that the preliminary operations were carried out correctly. It should be taken into account that the couplings must protrude from the wall to the thickness of the facing material.
After the control installation, the channels are putty and the surface is tiled.
Summing up
Analyze the old diagram: diameters, presence of a jumper, feed direction. Try to keep the pipe sections unchanged. When connecting the heated towel rail, follow the recommendations given and the manufacturer's instructions.
Check the functioning of the assembled circuit before finishing finishing work. The dryer is left connected for half a day. A test run will allow you to identify leaks, heating problems, and eliminate shortcomings while access to the wiring is free.
Advice! If you need bathroom renovation specialists, there is a very convenient service for selecting specialists from PROFI.RU. Just fill out the order details, the experts will respond and you can choose who to collaborate with. Each specialist in the system has a rating, reviews and examples of work, which will help with the choice. Looks like a mini tender. Placing an application is FREE and does not oblige you to anything. Works in almost all cities of Russia.
If you are a master, follow this link, register in the system and be able to accept orders.
Water heated towel rail device
You may be interested in:Digma laptops: customer reviews, characteristics, features and types
In apartment buildings of old Soviet construction, heated towel rails are installed in the form of a coil. This design is the simplest, and is a curved pipe that is embedded in the general hot water supply system of the house.
In modern multi-apartment buildings, it is possible to connect a heated towel rail via a special outlet from the hot water supply pipe. This design solution made it possible to create drying devices of various configurations (from U-shaped to the popular “ladder”).
You will be interested in: The evolution of televisions: history of appearance, first televisions, modernization, stages of development and prospects
To connect a ladder heated towel rail with a bottom connection, you must add the following elements to the system:
- valve for bleeding air;
- special plugs;
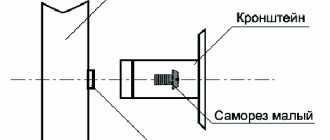
- brackets for attaching the device to the wall;
- shut-off valves.
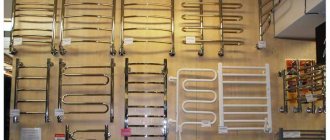
Top brands
On store shelves you can find many high-quality models of ladder dryers. They are produced by a variety of brands. Let's find out more about the best of them.
Terminus. A large manufacturer of high-quality heated towel rails. The company produces both classic and original ladders of various modifications. Each buyer can choose the ideal model for himself, which will suit him both in functionality and design. This grade of steel is characterized by ideal welding quality, as well as impeccable resistance to corrosion and oxidation.
There are many more excellent brands that produce electric, water, and universal (combined) dryers, complete with a Mayevsky faucet, various regulators and other functional components. Every buyer can make the right choice.
Main types of dryers
Different types of coils differ in shape and material from which they are made. Products made of stainless steel have a long service life. Their surface is not coated with additional coating, but is simply polished to a shine, thereby creating an attractive appearance.
As for brass and chrome-plated products, the service life varies from 5 to 10 years, after which replacement will be required.
We advise you to choose heated towel rail models that do not have jumpers or connecting seams.
, the diameter of the pipes and the shape of the dryer structure are important . Among the most common forms:
on the shape and design features , which is prescribed in the standard for household consumers .
Installation of a heated towel rail
The device assembled according to the technical instructions is installed in the following order:
Remember that the correct bottom connection of the ladder heated towel rail is the key to efficient and high-quality operation of the device for many years. Therefore, if you do not have sufficient experience in performing plumbing work, it is better to seek help from experienced specialists.
Source
How to make bends and how to change the riser
If the riser is metal and you are not going to change it, then installing a heated towel rail is possible with steel or polypropylene pipes. If you change the riser (the best option) and install polypropylene, there is no choice - PPR pipes are also used for bends. Use polypropylene for hot water, preferably reinforced with fiberglass.
Why is metal-plastic not suitable? Because its fittings have a very narrow clearance. This has a very bad effect on circulation. As a result, even 100% efficient circuits do not provide normal heating.
Installation of a heated towel rail with polypropylene pipes
A little about why to change the riser. It makes sense to do this in old houses when renovating a bathroom or bathroom (depending on where your riser is located). Firstly, the pipes are usually already old and worn out. Even welding an outlet to them can be problematic, the metal is so worn out. Secondly, modern renovations involve hidden installation of communications and you will also want to cover the riser. Hiding an old pipe and then destroying everything again a few years later... is not a good solution.
A little about how to change. You need to come to an agreement with the neighbors below and above, as well as with the housing office (DEZ, UK). With your neighbors that you will cut off their riser and install a new one on the thread. Why do they have it? Because leaving an old pipe in the ceiling is dangerous: it will collapse and leak. It will flood you or your neighbors below. Therefore, it is better to pass through the ceilings with a new pipe.
With this connection, the dryer is part of the riser and there cannot be any taps
Having agreed or not with your neighbors (their riser may already be closed), you go to the housing office and agree on the date of replacement and the time for which the riser will be turned off. The work can be done by “local” mechanics, you yourself (if you have welding qualifications) or people you hire. After the connection, the water is turned on, you check the functionality of the heated towel rail and the system as a whole. If it doesn’t start to cool within 30 minutes, it means it’s set correctly. This completes the replacement or installation of the heated towel rail.