A heated towel rail is a necessary attribute of any bathroom, ensuring the comfort of its use; without it it is impossible to imagine a modern apartment or country house. When carrying out construction or repair work yourself or moving the device to another location during reconstruction, it is important to know how to connect a heated towel rail to the heating system.
The task is complicated by the fact that there are different types of heated towel rails and ways to connect them; to choose the best option, it is useful to study the basic diagrams of their location. And studying the correct installation technology will allow you to avoid uneven heating or its absence, airing of the system and leaks, which are a fairly common occurrence among errors when installing the device.
Rice. 1 Heated towel rails for bathrooms - varieties
Connecting a water heated towel rail - features
A heated towel rail is an important attribute that creates increased convenience when using the bathroom, in which it performs the following functions:
- Drying towels that are wet after washing and washing clothes and shoes.
- Heating the bathroom for a comfortable stay in the room after taking a bath or shower.
- Combating dampness affecting finishing materials, electrical sockets and lamps, heating boilers and household appliances.
The heated towel rail is connected to the heating or hot water supply system by parallel or series connection to the pipeline through which hot water flows.
Any heated towel rail has an inlet and outlet pipe with a thread at the end for quick and convenient connection to pipes. In some schemes, the heated towel rail becomes part of the pipeline, placed in the gap in place of the cut section of the pipe. During installation, it is welded to pipes or installed on American-type threaded connections.
Rice. 2 Design and equipment of the ladder heated towel rail
Connection options
Water heated towel rails may have different connections to the hot water supply, therefore, when purchasing such a device, it is necessary to take into account this factor to make its installation easier. So, according to the installation method, these accessories can have:
- Bottom connection.
- Top connection.
- Angled water supply.
- Side connection (left or right)
Types of connection
The most practical and optimal is the side connection, since models with this design can be adapted to any installation location. This installation option will help make the connection point almost invisible, so the type of connection will not spoil the interior design. It is necessary to clarify the center-to-center distance between the DHW connection pipes if you do not plan to re-pipe. Typically this parameter is 500 mm, but there are exceptions. You definitely need to take this into account when you go shopping.
Types of heated towel rails
Heated towel rails connected to the pipeline are divided into three main categories:
- Mermen. The main type in all apartment buildings and private buildings, they work on the principle of circulating water through a heated towel rail, and are a piece of curved pipe of various shapes or a ladder with threaded outlet pipes. In old houses, the element was often connected to heating pipes and it functioned only during the heating season; in modern residential high-rise buildings, the heated towel rail is connected to the hot water supply pipeline.
- Electrical. The device is a regular autonomous heating element not connected to water; it can be installed anywhere in the apartment: in the bathroom, in the kitchen, in the loggia. Although this device is a modern development, its use in the household is limited due to high energy consumption and additional financial costs for electricity.
- Combined. Such models combine water and electric heating of the heated towel rail, which is very convenient when connecting it to the heating system. In this case, during the heating season, the heated towel rail operates due to hot water passing through it, and when the heating is turned off, heating occurs due to electricity. This option is less popular due to its higher cost.
Rice. 3 Electric coil - modifications
Varieties
There are two main types of heated towel rails:
- water
- electric
There are also combined ones, but they are used very rarely and, for the most part, due to their cost, are not particularly in demand in our market.
The tasks for both models are the same:
- Direct purpose is drying towels or other linen
- secondary - a heating radiator for a small room to create a comfortable temperature and coziness
If you don’t have a heated floor in your bathroom, then it’s not very pleasant in the winter to bring in a fan heater every time before taking a bath in order to raise the temperature to an acceptable level, and not get goosebumps.
- they also help prevent mirror fogging and condensation accumulation
A good heated towel rail should cope with all three of the above tasks.
Main materials of manufacture - comparison of characteristics
The main materials for the manufacture of heated towel rails are stainless steel and brass; in budget options, galvanized steel is used for installation in apartment buildings. When choosing, the buyer often gives preference to the widely advertised stainless steel, which has an aesthetic appearance. To determine which metal is better, their main characteristics should be compared in terms of efficiency as materials for heat exchange devices.
If we consider stainless steel, it is almost three times cheaper than brass or copper, can withstand temperatures of more than 450º C, and is slightly susceptible to corrosion in water. Although stainless steel is corrosion-resistant and is not afraid of the effects of solutions of most acids and alkalis, if the alloy is made poorly (violation of technology, structural defects, reduced content of the main alloying additives of chromium), corrosion processes can occur in the structure. The material has high strength and durability, is harmless throughout the entire period of operation, but non-ferrous metals are used much less frequently as parts of plumbing fittings.
Copper-based brass alloys have thermal conductivity 4 times higher than stainless steel, which is the main advantage when using the material as a heat exchanger. Brass has high corrosion resistance (its surface is covered with a protective film of oxides, which serves as a barrier against the penetration of oxygen into the pure metal). Non-ferrous metals, unlike steels, are not subject to electrochemical corrosion; when used, the maximum temperature of the flowing coolant should not exceed 260º C.
Rice. 4 Types of heated towel rails - U-shaped, M-shaped and ladder
Material
Metal is used to produce heated towel rails. A material with high thermal conductivity that is best suited for water pipes. The metal is durable, and the drying device sometimes has to experience serious loads: internal pressure, the weight of the items being dried.
Constant exposure to a humid environment adversely affects the condition of metal products. Moisture affects the internal and external surfaces of the device. Such conditions require mandatory corrosion protection.
Made from:
- Ferrous metal;
- Of stainless steel;
- Brass or copper.
It is possible to use thin-walled aluminum tubes.
What designs are there?
The main diameter of the pipe for a heated towel rail is 32 mm; if the body has a complex structure in the form of a ladder with welded pipe sections, their diameter is about 20 mm. On the market you can find other dimensional parameters of the main pipeline with an outer diameter of 26, 28, 50 mm.
All structures can be divided into two categories: single-pipe U-shaped or M-shaped and multi-pipe, consisting of two pipe sections of large diameter and small cross-section pipes located between them in the form of a ladder.
Some models provide for connection using special seals that allow the device to be rotated around its axis; in other modifications, a set of heated towel rails is possible from several fragments connected in series to each other. To connect the heated towel rail to the water riser, use a bottom, side or diagonal connection - this is how the inlet and outlet pipes are located in manufactured models.
Rice. 5 Single-pipe arrangement of a heated towel rail in the system
Finishing work
The final installation of the heated towel rail consists of strengthening it on special brackets and connecting the pipes to the taps. Some models of dryers use telescopic holders or, for example, clamps instead of brackets - all these fasteners are usually included in the heated towel rail kit.
Quite rare, but there are devices that are installed in the reverse order: first, the device is connected to the pipeline, and only then it is attached to the wall. But in any case, the distance from the heated towel rail pipes to the wall should be at least 1.4 times their diameter.
It is better to seal connections to ordinary threads with linen winding, but for conical threaded connections it is better to use FUM tape. In both cases, the amount of sealant must be such that tightening occurs with a small but noticeable interference. Excessive effort is not acceptable!
Where to connect and where to hang - recommendations
When installing heated towel rails, the following recommendations should be followed:
- The distance from the vertically located riser to the most remote section of the heated towel rail pipeline should not exceed 2 meters - if the device is located at a greater distance, due to the high hydraulic resistance of the resulting loop, water simply will not flow into it. In the bathroom, the heated towel rail is installed by direct connection to the tee adapters of the riser.
- It is more practical to choose more expensive products made from chrome-plated non-ferrous metals - they have four times better thermal conductivity compared to stainless steel and better corrosion resistance.
- To connect the heated towel rail, you should use the installation option using an American connection, which allows you to connect the fittings in a stationary position of the parts without turning around their axis.
- Before installation, it is better to replace the cheap rubber gaskets in the American union nut, which at constant high temperatures quickly lose their plasticity, with higher-quality fluoroplastic ones; you can install silicone and paronite rings or use a sandwich of soft and hard rings.
- If the heated towel rail is part of a common building riser of an old design, to replace it and carry out preventive maintenance, install a bypass and connect the device through ball valves, which are also secured using fittings.
- When connecting a heated towel rail to fittings, it does not hurt to maintain electrochemical compatibility, that is, to join products from the same material. A common mistake is contact between steel and brass, which creates a galvanic couple with accelerated corrosion.
- To seal the seal, it is more practical to use flax tow or plumbing thread; it is better to avoid using Fum tape - it is often cut with threads and assembled in the channel in parts, allowing water to penetrate between sections.
- If the heated towel rail is connected in a line parallel to the riser, it is useful to install shut-off ball valves in front of its inlet and outlet pipes for the convenience of carrying out preventive and repair work in the unit.
Rice. 6 Installing a heated towel rail in the bathroom - assembly diagram
Common mistakes
In order for the heating device to properly perform its functions, it is necessary to avoid common mistakes in the process of connecting it.
How not to connect a dryer
- You should not connect the product using parts that narrow the clearance in the pipe (fittings, taps).
- Dips and protrusions of pipes are not allowed on horizontal routes.
- You cannot install shut-off valves that shut off the water in the device if it is part of the riser.
- There is no need to install the device without a bypass provided in the system design.
Reference! A bypass is a jumper installed between the heated towel rail outlets parallel to the main system. It provides free flow of coolant to other consumers in the event of repair or replacement of the dryer in a separate apartment.
The action scheme is as follows:
Hot water, having reached the fork, is divided into two parts, one of which enters the heated towel rail, heating it. The other is sent to the bypass and passes further through the hot water supply system. Having cooled by 1-2 degrees, the flow from the dryer is mixed with the bypass and returned to the main line.
Important! It is unacceptable to install shut-off valves on the bypass!
Typical connection errors:
Using a metal-plastic pipe for drainage.
If communications are located inconveniently, there is a desire to install a metal-plastic pipe, which tends to bend in the desired direction.
This is unjustified, since the loops provide excessive resistance to the flow of water and air accumulates in them. Fittings that have small clearance also reduce circulation.
The towel dryer is shifted downwards relative to the lower outlet.
The liquid in the lower part of the device is not “pressed” by the lighter, hotter one, so it stagnates and cools. The principle of the “gravity pump” ceases to operate.
Water supply in the form of a U-shaped loop at the top or bottom.
The error occurs when you need to hide supply pipes under the ceiling or under the floor. It can work for some time with sufficient pressure in the system. Airiness in the upper part of the inlet is a problem that can be encountered during operation. The cessation of water flow in the lower part is inevitable over time.
A combination of the two previous non-working options.
An attempt to remove pipes under the floor screed and behind the ceiling at the same time involves the installation of two loops: in the upper part of the structure, at the liquid supply, and in the lower part, at the outlet. Numerous elbows and bends are fraught with blockages, especially in the lower part of the system. At the top, the movement of the liquid flow is hampered by the resulting air chambers.
What the correct wiring looks like:
- The slope of the supply pipes has been maintained. A difference of 30 mm per meter is normal.
- The upper outlet of the riser is located above the top point of the dryer, the lower - below.
- The diameter of the pipes for installation is at least ¾ for steel, 25 mm for polypropylene. Ball valves, which are used to maintain maximum circulation - at least ¾.
- The supply pipes are covered with thermal insulation.
Technology for connecting a heated towel rail
It is clear that connecting a heated towel rail to the heating system is a bad option; in private homes it is installed in the hot water supply pipeline, for which many use modern plastic pipes to supply water. The pipeline can be placed in any convenient place, the liner can be made from sections of pipes not only of the same type, but also from any material used for hot water.
If the work is carried out in an apartment building, when repairing a bathroom, the riser located in the basement of two pipelines of the forward and return lines will have to be closed; the material of the old risers is always steel; if they were replaced, in most cases polypropylene was used.
When the pipe is steel, you can weld an outlet threaded fitting to it, cut it with further cutting of external or internal threads to connect adapter tees, or attach a clamp with a branch - all methods are quite complicated except for the last one, but this option is not very reliable. There is another modern innovative option for connecting transition fittings to a steel pipe, which will be discussed below.
If there is a polypropylene riser, a section is cut out of it and two tees are soldered in to connect pipes or the heated towel rail itself.
Rice. 12 Connecting a heated towel rail through the threads on the pipes
Functional load
The heated towel rail is a pipe system located on the wall of the bathroom. The name speaks for itself: this equipment is very convenient for drying towels. However, its functionality is not limited to this. There are at least three areas in which life becomes more comfortable thanks to this product:
- maintaining a comfortable room temperature. Hot water circulates inside the heated towel rail. The pipe system is made of metal, due to which heat transfer to the surrounding space is very active. Due to this, the air in the bathroom heats up. It is comfortable to be in a warm room and take various water procedures.
- humidity level control. Thanks to the same increase in room temperature, surfaces dry out faster, which means there is a real chance to resist the appearance of mold and mildew. And in general, decorative finishing of the floor, ceiling and walls feels much better in such conditions,
- possibility to dry clothes. Man does not live by towels alone, and therefore he has many options for using heated pipes. For example, if there is a very small child in the family, then dirtying diapers occurs much faster than wrapping a baby in them. In order not to stock up on mountains of satin and flannel, you can wash what gets dirty as you go and dry it immediately. This is where every additional place that can serve as a drying place comes in handy. The heated towel rail does this perfectly.
As you can see, the presence of this equipment in the bathroom is not only a matter of convenience, but also functionality. But in order to get the maximum desired result, you must initially decide which model will suit your specific needs.
Bends from steel hot water riser for heated towel rails
When installing a heated towel rail in multi-apartment residential buildings, the main problem is connecting to a steel riser pipeline, and several methods are considered:
Welding. To connect a directly installed heated towel rail to the pipeline, two holes are cut in the pipe and a threaded fitting is welded. The method requires a welding machine or gas torch, as well as the presence of a gas welding specialist; difficulties may arise in the case of an old pipeline with thin walls, which the device will burn through, making welding difficult or impossible.
Thread cutting. With this technique, the steel pipeline is cut, a thread is cut into the surface of the pipe using a die, and then the adapter tees are screwed on from steel to polypropylene. Then they connect to the riser sections of soldered polypropylene pipe with threaded fittings at the end, which are laid in the wall grooves.
In addition to complexity and labor-intensiveness, the method has significant drawbacks: it is rarely possible to cut a thread when placing the pipeline at a short distance from the wall; moreover, old steel pipes have thin walls, and additional weakening often leads to their breakage.
Rice. 13 Example of a clamp connection in a private house
Clamps. The method is quite simple and is carried out in the following way: a large diameter hole is drilled in the pipeline and a composite clamp with a sealing rubber gasket and a threaded outlet of the required diameter is installed at this point, both halves are connected using bolts.
The method is quite simple and does not involve large costs, it is easy to implement with your own hands, the disadvantages are a rubber gasket that is not intended for long-term work with hot pipes (it is better to use fluoroplastic) and the possibility of moving the assembly down when loosening the bolts.
Gebo couplings. Gebo cast iron couplings are compression fittings that are securely and tightly connected to the pipe through a slotted metal ring (cracker) and an O-ring. To connect, a section of pipe is cut out, Gebo tees with bends of the required diameter and a pipe section between them are inserted at the top and bottom. The connection is very reliable and surpasses the above technologies in practicality of use, working in nodes for 10 years or more.
Rice. 14 Gebo couplings
Recommendations for installation work
The efficiency of a heated towel rail depends on its correct installation. To avoid future problems with the operation of the device, it is recommended to take into account the following recommendations during the installation process:
- The diameter of the pipeline should not exceed the cross-section of the heated towel rail itself. Compliance with this requirement helps prevent an increase in pressure in narrowing areas.
- Installation of adapters in the presence of different sections of pipelines and pipes is allowed if the diameter of the towel dryer is smaller than the pipes. Violation of this installation procedure can cause a significant increase in pressure in the device, which will lead to an emergency.
- To remove air from the device, ensure normal operating process, as well as the possibility of repair, it is recommended to install a bypass. In order not to disrupt the good circulation of the coolant, shut-off valves should not be installed on the jumper.
- A distance of 4 centimeters must be maintained from the wall surface to the heated towel rail. If the diameter of the device pipes exceeds 25 millimeters, then it should be increased to 7 centimeters.
- The location of the bottom of the dryer from the floor should be 90 centimeters. The optimal height is considered to be 120 centimeters.
Experts recommend using materials of the same origin when installing a heated towel rail. The combination of different metals can lead to the process of structural destruction. Teflon gaskets will help eliminate problems with corrosion at joints.
The method of installing a heated towel rail in a private home depends on the type of device chosen and the complexity of its design. Taking into account all the installation requirements, you can connect the towel dryer yourself.
Do-it-yourself preparatory work
When carrying out work on installing a heated towel rail with your own hands in a metal riser, depending on the chosen method, you will need different tools. To install the clamps, you need a drill with a metal drill and a hexagon of the required diameter; if the pipe is cut to attach the Gebo coupling, you will need a grinder with a metal disc to trim the riser and adjust the size of the pipe section between the couplings.
To fix the fasteners, you need a hammer drill with a concrete drill with a diameter of 6 mm. and dowels with screws.
To properly connect such a device, you will need a building level - it is recommended to connect the lower pipes to the heated towel rail with a slight slope to ensure spontaneous drainage of water from the heated towel rail pipeline in the absence of coolant (especially important when connecting the unit to the heating system).
Before carrying out work, disconnect the riser from the water supply to the heated towel rail pipeline and prepare two containers for continuously draining water from the system.
Rice. 16 Examples of installing an old heated towel rail in a single-pipe and two-pipe system
Structural elements
Hidden bypass valves
Structurally, the bypass system includes a jumper connecting the direct and reverse supply of coolant, shut-off valves to stop the access of water to the heated towel rail. The jumper itself can be made in the form of a piece of metal or plastic pipe, depending on the material of the pipeline.
The metal jumper is most often welded to metal supply pipes, forming an integral structure. Modern systems provide for the possibility of disassembly, and therefore tees with access to a jumper are installed on the inlets
When such elements are assembled, it is important to reliably seal the detachable joints
Shut-off equipment involves the installation of valves. They are usually installed immediately after the bypass at the inlet and outlet of the heated towel rail. Officially it is not allowed to install a shut-off valve directly on the bypass. The fact is that only an authorized person has the right to turn off the common heating riser, and therefore the common shut-off equipment is located in a room where access to unauthorized persons is limited. The presence of a shut-off valve on the bypass allows the apartment owner to shut off the main line at his own discretion, which is unacceptable. A valve can only be installed on a lintel if it cannot shut off the common riser.
Where is the bypass installed? This is not an idle question, because if the connected heated towel rail is located far from the bypass, a decrease in temperature on it will be observed. The distance from the jumper to the entrance to the dryer should not exceed 0.4 m. Based on this circumstance, there are 2 standard options. When the heated towel rail is located directly next to the heating riser, the bends cut into it, forming a parallel circuit when the bypass is not gentle at all.
If the bathroom is remote from the main line and a separate pipeline is installed for the heated towel rail, then the jumper is installed near the device.
Connection to the hot water supply system
To connect a heated towel rail to a riser located at a great distance, polypropylene pipes are used - compared to metal plastic and cross-linked polyethylene, they are produced in a large diameter, which is necessary to reduce hydraulic losses. The connection is made using a pipe soldering iron; the necessary fittings are soldered at the ends. The heated towel rail is connected in the following sequence:
- After completing the plastering work, mark the connection points on the wall where the heated towel rail is installed, make markings and knock out grooves in the wall through which the pipes will pass. Install the plastic pipeline by soldering, leaving the threaded fittings protruding from the wall so that the later laid tiles are flush with them.
- Temporarily screw the heated towel rail on, level it and fix it on the wall using telescopic fasteners on the body, then cover the pipes with gypsum binding solution, after the plaster has dried, remove the device, and screw plugs into the fittings.
Rice. 17 DIY installation of a heated towel rail - main steps
- Further work is carried out upon completion of finishing work on laying tiles. The manufacturer produces heated towel rails with a different set of components; American ones are often found that are screwed onto the outlet pipes of the device with a special key. For sealing, it is better to use flax tow complete with a special paste.
- After placing the American on the outlet pipes, the device is screwed to the pipes through eccentric adapter couplings, which are connected and sealed with flax - this allows you to adjust the position of the pipes in the absence of alignment.
- Then unscrew the telescopic fasteners on the pipe walls of the heated towel rail until it makes contact with the wall, mark the holes for the fasteners with a marker, after which the device is removed.
- Using a self-tapping screw or any sharp object, a small depression is punched into the tile to prevent the drill from sliding on its smooth surface, after which a hole is made in the tile in the drilling mode. Then switch the tool to perforation mode and drill a hole of the required depth in the concrete; upon completion of the work, hammer in the dowels with a rubber hammer to avoid damaging the tiles.
- Finally, install the heated towel rail in place using an adjustable wrench, if necessary, replacing the low-quality American rubber gasket with a fluoroplastic one, screw the mount with self-tapping screws to the dowels using a Phillips screwdriver or screwdriver.
When carrying out work, one important rule should be observed - place a rag under the adjustable wrench or insulate its jaws to avoid scratches on the chrome-plated clamping nuts.
Rice. 18 Models of heated towel rails with complex shapes
Where to install in the bathroom?
To choose the right location for the device, you need to take into account the installation height requirements specified in SNiP. If measured from the floor level, the height should be 120 cm. When measuring the distance to the dryer from interior items or plumbing equipment, you cannot install the device (electric or combined type) closer than 60 cm to them.
If for some reason it is impossible to adhere to such recommendations regarding the installation height, then the device is installed at a height of 95 cm or higher, but it should not be fixed at a distance of 170 cm from the floor or more.
Attention! There is a requirement in SNiP that you need to install a washing machine under a heated towel rail. If the washing machine has a vertical loading, then you should take care that the device does not touch the pipes
How to connect a heated towel rail to the heating system
In a private house, there are no problems connecting to the heating riser - this can be done at any convenient time by draining the coolant from the system; in an apartment building you will have to wait until the end of the heating season.
When carrying out installation work in a multi-storey building in the absence of coolant, the functionality and tightness of the unit cannot be checked before turning on the heating, so it is better to install the heated towel rail with the bypass and shut-off valves at the inlet and outlet turned on.
Cranes
To control the operation of the heated towel rail, two shut-off valves with a cross-section corresponding to the main pipes are installed in front of it. The design and arrangement of these valves is not particularly important - both two-position (open/closed) ball and multi-turn products are equally suitable. However, if an air lock accidentally forms in the towel dryer, leading to a sharp decrease in the efficiency of the heating device, it will not be possible to remove it using such taps. Initially, air can be released through the nuts, but if you twist them often, the seals will quickly become unusable.
The best option is to install at least one Mayevsky valve, which allows you to easily remove air from the system. And automatic models of such faucets will allow you to completely forget about such a problem as airing of the heated towel rail!
The taps usually have a threaded connection - therefore, if there are no threads on the main pipes, it must be cut or a corresponding fitting must be welded.
We install the Mayevsky tap in this way if the system often airs out
How to connect heated towel rails with complex shapes
The main difference between the operation of a heated towel rail made from a large number of elements and a simple one is its high hydraulic resistance, which leads to the fact that the volume of passing coolant will be less and, accordingly, the device will not be sufficiently warmed up. In this case, you should reduce the diameter of the jumper, if present, or abandon the bypass altogether and remove all shut-off valves, connecting the heated towel rail in series to the riser pipeline.
If a highly branched heated towel rail is located at a large distance from the riser and you do not want to remove the bypass, you should choose the diameter of the supply pipes equal to or greater than the cross-section of the riser.
Rice. 19 Combined heated towel rails
Removing the old
Work begins after complete “dehydration” of the system to which the connection is made. Dismantling an old heated towel rail is usually done with a grinder - even with a threaded connection, the nuts and couplings most often “stick” to the pipes tightly and cannot be unscrewed. If this does not happen, the old dryer is simply unscrewed and removed from the brackets.
It should be taken into account that the remaining pipes for connection must have a length that allows for subsequent threading or welding of the corresponding fitting.
Bypass required
A bypass is a piece of pipe that serves as a jumper between the “supply” and “return”, to which a heated towel rail is connected, mounted BEFORE the taps that control the operation of the device. Its purpose is to ensure the operability of the system when one of the elements is removed from its composition (in this case, the dryer): if there is a bypass in the system, the circulation of hot water in it will not stop. In the absence of it, if something happens, you will have to completely turn off the water...
The bypass can be welded to the main line pipes or connected through tees, but the diameter of its working section must necessarily be less than the diameter of the main pipes.
The bypass can be welded to the main pipes or screwed using triple adapters
A little about installing a combined heated towel rail
A combined heated towel rail is a rather rare guest on the construction market, although its installation in a heating system is quite effective. During the heating season, the heated towel rail will be hot due to flowing hot water; if the heating is turned off, the coolant in the circuit will be heated by the built-in heating element.
Structurally, the device is made in the form of a conventional heated towel rail with the difference that one of the fittings at the bottom (the bottom connection is mainly used) is made in the form of a tee, into the lower outlet of which a heating element with a thermostat is screwed. The combined model is connected in the same way as its water counterparts - from below, from the side or diagonally, the thermostat is always located at the bottom, in the design the outlets are assembled with the possibility of right or left connection.
Rice. 20 Installing a heated towel rail in a combined type bathroom
Connecting the substation to hot water supply or central heating
Connecting a heated towel rail to the risers of central networks can be done in different ways.
The tactics of work depend on the modification of the coil:
- Top connection . Water enters from above, and the return is located below.
- Bottom connection . The coolant enters on one side and exits on the other.
- Diagonally . Inlet from above, outlet from below on the opposite side.
- At the bottom of the device in the center.
Regardless of where the substation is connected - to the GSV system or to the central heating riser, similar schemes are used.
The photo shows the main stages of installing a heated towel rail. It can be used as visual instructions when doing work with your own hands (+)
Installation of a heated towel rail in a riser
To install a heated towel rail in a bathroom located in an apartment in a multi-storey building, you need to turn off the hot water on the riser. The task is made easier if the unit can be dismantled by simply unscrewing the nuts connecting it to the common pipe. The main thing is that the connecting pipes of the new device have similar dimensions.
Image gallery
Photo from
Heated towel rail in the bathroom
The device is located next to the supply and return risers
Location in adjacent room
Installation of pipe sleeves
When an old-style device is welded to the hot water riser, it is more difficult to disconnect it. The best solution is to connect the heated towel rail with your own hands and replace the riser, either partially or completely. The second option is preferable. Pieces of old pipe left in ceilings pose a potential hazard.
The riser along with the old unit is cut out using a grinder, then the pipe threads are cut from the neighbors above and below, a new riser is connected and taken out to your room.
The use of polypropylene pipes with the same diameter is preferable to steel ones. They are cheaper, lighter, do not corrode, are resistant to high temperatures, and durable.
To seal the threaded collapsible connections of heated towel rails as well as other types of plumbing and heating appliances, it is better to use durable natural options: plumbing flax and thread made from it
There is a large selection of fittings for PPS pipes, which are welded into the riser in order to switch to the thread and connect the heated towel rail.
A special soldering iron is used for soldering. Many people install a box to hide the wiring behind it without changing the connection diagram.
Self-installation of a simple configuration PS
The dryer is assembled, shut-off valves are installed on the supply line using detachable connections, then they are tried on a pre-marked place on the wall, horizontal and vertical are checked, and the brackets for fastening the PS are fixed.
Before installing a heated towel rail, think carefully about all the points: determine a place for it, study the installation diagram, draw a rough sketch (+)
The connection is made using the following technology:
- Install a bypass using pipes or tees. In the places where it is connected to the device, one valve is installed.
- Secure the heated towel rail using brackets or other fasteners.
- Connect the device to valves using bushings or fittings.
- Slowly open the taps and fill the unit with water.
The bypass in this scheme performs an important function - it ensures the same temperature of the supplied coolant in all apartments located along the riser. Ball valves allow you to optionally turn off the device or even remove it altogether and install a thermostat on it that maintains the set temperature.
Bypass is an important component of the substation connection diagram. It is necessary to provide for its installation at the very initial stage of installation (+)
Many, trying to optimize the circulation of the coolant through the dryer, make it offset or choose a pipe for it with a diameter 1 order of magnitude smaller than the liner. Professionals consider this approach unjustified. In a device with a simple configuration, good circulation is observed even with a direct bypass.
This phenomenon can be explained using the laws of physics: the cooling liquid in a heated towel rail has a higher specific gravity compared to the hotter coolant, so it rushes down.
By analogy with the connection diagrams for the DHW network, insertion into the heating circuit is carried out both with and without a bypass. The use of a tap that shuts off the flow depends on whether the heated towel rail is being installed in a multi-storey or private house (+)
As a result, the cooled liquid is pushed into the central pipe from the lowest point of the unit. Liquid with a higher temperature from the riser enters the upper point of the heated towel rail and the cycle repeats. Cooled water here acts as a perpetual motion machine.
Some people recommend installing shut-off valves on the bypass to shut off the flow of water. But this contradicts the rule that in a multi-storey building, not a single apartment owner should have any opportunity to shut off the central riser on his own and deprive everyone of hot water.
Another thing is a private house, here the owner can place the faucet wherever he wants, but if the system is properly balanced and there are thermostatic devices, then there is no need to install the faucet on the lintel.
A not very aesthetically attractive open pipe connection can be hidden:
Image gallery
Photo from
Hidden gasket option
Eyeliner device in a niche
Drywall masking panel
Construction of a box for riser and pipes
Shut-off valves in front of the substation are needed to control its operation. Both ball and 2-position, multi-turn options are suitable for this purpose. They are of little use for removing air pockets.
While the products are new, this can be done by unscrewing the nut, but because of this, the seals quickly become unusable. If, although there are threads on the taps, there are none on the pipes, then they should either be cut or a suitable fitting should be welded.
In a new building, it is easier to install a heated towel rail into the heating system, but it will only be warm during the heating season. Installation in SGV is more efficient.
Technology for working with the “ladder” model
Connection diagrams for the “Lesenka” heated towel rail to the riser can also work on natural circulation, while the most commonly used, well-proven connections are lateral or diagonal.
For these schemes, neither the direction of coolant supply in the riser nor the coolant circulation speed plays a role, and airing of the system is not observed in the event of a water supply shutdown.
The heated towel rail “Lesenka” is distinguished by high heat transfer and decorates the room. With a little experience, you can install it yourself (+)
The connection sequence is the same as in the case of a simple configuration PS.
For the scheme to work, you need to take into account some features:
- Place the riser outlet located at the top at the level of the substation or above its top point, and the one at the bottom - equal to or below the bottom point.
- Keep the supply pipes strictly horizontal or make a slope of 5-10 mm along the entire length. If this condition is not met, air locks may occur. If you have chosen bottom feed, then using a pipe of a smaller diameter for the bypass is unacceptable.
- Choose pipes with a diameter of at least 25 mm , if they are polypropylene, at least ¾ inch - steel, 3/4″ ball valves. With smaller diameters, uneven heating will be observed - hotter at the top and cooler at the bottom.
- Place plastic pipes in insulation if you plan to bury them in the wall.
If you installed a narrowed bypass or displaced it, then natural circulation will work in combination with forced circulation. This scheme has a significant drawback: it is completely inoperable with the lower connection; only the upper option is acceptable.
There are also positive aspects: with top supply it works stably, does not get airy, the heated towel rail can be removed from the riser at an arbitrary distance.
Lateral and diagonal substation connection schemes are approximately equal in efficiency (+)
If you decide to make a bottom connection, then be prepared for the fact that this method is less effective, but it also has some advantages: the direction of water supply in the central riser does not matter, it becomes possible to hide the pipes under the bathtub.
The main disadvantage is the mandatory presence of a Mayevsky valve for air release. A prerequisite for the operation of the circuit is the installation of a lower outlet below the substation housing.
If desired, the bottom connection can be converted into a side connection. To do this, 90° angles are mounted on the inlet and outlet pipes. The working cross-section of the adapters should not differ from the diameter of the pipes in a smaller direction, otherwise the performance of the system will be impaired. Reverse modernization - converting the side connection to the bottom connection is impossible.
If all the pipes are embedded in the wall, you can install a substation with a side connection. This design looks aesthetically pleasing (+)
Inserting a substation into a centralized heating system
If you want to install a towel dryer in winter, then this idea is unlikely to yield anything. In this case, you will have to stop heating and remove coolant from the system, so you will have to wait until summer.
But even then the work is complicated by the fact that the heating system must be emptied and its supply must be shut off. For all this you need to obtain permission from housing and communal services.
It is also difficult to check the performance of the PS in the summer. Defects, in the form of leaks at welds and threaded connections, will manifest themselves only after the heating is connected. This fact once again demonstrates in favor of the mandatory installation of taps after the bypass.
Features of electric heated towel rails and their installation
An electric heated towel rail is an autonomous design that does not depend on the presence of water in the house; there are dry and wet modifications. The first includes an electric heating cable placed in a housing; the principle of operation is similar to the heated floor used for heating in many homes.
In wet devices, TEN heats the oil inside the housing; the product differs from common oil electric heaters only in the shape of the housing. The models of such devices offered on the market have the following features:
- Devices with a built-in heating cable quickly reach operating temperature and cool at the same speed, while oil-based devices heat up slowly and take a long time to cool down.
- Oil devices are more expensive than cable devices due to the labor-intensive technology of manufacturing a sealed housing and a more complex design, including temperature control of heating elements; cable devices usually do not have temperature settings.
- The power of oil heated towel rails is higher than that of cable ones, so they are installed in bathrooms to heat the room and dry things; cable ones are used only for drying.
- All products are produced in floor and wall versions, while oil ones, due to their large weight, require a professional approach to installation using special fittings, while cable ones can be hung on the wall by any homeowner without much difficulty.
When choosing to obtain better heat transfer, you should purchase products with a large number of tubes or an increased cross-sectional area; things are better held on arched pipes.
Rice. 21 Electric heated towel rail - device
The connection of the heated towel rail to the heating or hot water supply system is made using tee bends from the riser pipe; to supply coolant when located remotely, a polypropylene pipeline with fittings connected by soldering is most often used. Any home craftsman can attach the heated towel rail to ready-made outlets - the fittings are screwed on using an adjustable wrench; to secure the fasteners to the dowels, you will need a hammer drill and a 6 mm concrete drill.
Which schemes should be avoided in principle?
Finally, it remains to look at several schemes that contain a fundamental error. These options either don’t work at all, or are so “capricious” that it’s better not to mess with them. And if the invited “master” plumber begins to “sculpt” something like that, his services should be refused immediately.
- The desire to hide the upper section of the horizontal line, for example, above a suspended ceiling, sometimes leads to such “works of art”.
It is quite obvious that air will soon accumulate in this man-made hump, which will tightly block the circulation of water through the heated towel rail.
They may object - they say, is there an air vent or a Mayevsky valve stationed on this loop? Then we will object - is it even worth being smart with such an inadequate scheme? Wouldn’t it be better to find a simpler and more reliable option?
- The next unsuccessful option is when, with a lateral connection, the insertion point of the lower connection ends up above the bottom edge of the heated towel rail. That is, most often - if you do not want to redo the riser left over from the previous model of the device.
A scheme that will certainly torment the owners with its “whims” and, most likely, will soon stop working altogether.
A loop has formed (it is highlighted in the diagram with a red oval) which turns into a kind of “trap” for the water flow. Here, at the lowest point, there will probably be forced flows, depending on pressure, and gravitational flows, depending on the difference in water density, and there will be no way out for both. One will be locked by pressure in the riser, the second by hotter water, which will be in the upper part of the heated towel rail. Which will begin to cool down and tend downwards, but the resulting “trap” will in every possible way prevent this.
As a result, the heated towel rail, which seems to have started up at first, soon begins to cool down, and very unevenly, with a clear gradation of temperatures along the height. The collision of oncoming flows will lead to stagnation in the circuit, and it will simply be easier for water to move along the riser rather than make its way through the labyrinths of the device.
They say that sometimes this option even works - a lot depends on the pressure and temperature of the hot water in the riser. But do not disdain good advice - do not rely on luck, but initially consider this scheme unworkable. It’s easier to choose another one than to look sadly at a heated towel rail that has turned into an ordinary hanger.
- And one more option that you should run from like fire!
By what physical principles a heated towel rail should work with such a connection is completely unclear!
All the rules have been broken. That is, both insertion points are located above the bottom edge of the heated towel rail when it is connected at the bottom. This already makes us think - what incentive will water have, in principle, to move along the contour of the device? In addition, not only one “trap” for water flows has been formed, but two. Which certainly guarantees quick locking of the circuit if there is some kind of circulation at first.
Although, it is unlikely that it will start at all - there are too many reasons for water to choose a simpler and shorter path through the riser.
All of the above incorrect connection schemes may have their own variations. Therefore, it is important to understand the key error, the reason for the inoperability, in order to prevent such installation.
* * * * * * *
As you can see, there are quite enough working schemes, including completely universal ones. If you plan to do the installation yourself, check the drawing once again, according to which the assembly will be carried out, for possible fundamental errors. If a master is invited, ask him to present in advance the scheme that he is going to implement. Unfortunately, among the craftsmen there are people who have absolutely no understanding of the principles of operation of plumbing fixtures. And those who only know how, even if efficiently, to perform a certain set of actions, without understanding and coordinating with the existing real conditions. And sometimes even with common sense...
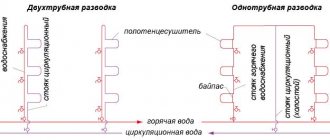
DHW and circulation
Let's start with a small lyrical digression.
The hot water supply system in an apartment building can be a dead-end and circulation system. In the first case, water moves through a single bottling and dead-end risers only when it flows through one of the plumbing fixtures.
Elevator in a house with dead-end hot water supply
In the absence of water supply, bottlings and risers gradually cool down due to inevitable heat loss.
This feature of a dead-end system has three practical consequences:
- If there is no hot water supply for a long time (for example, in the morning), it has to be drained for a long time until a comfortable temperature is obtained;
- Due to heat loss, the water temperature in apartments far from the elevator unit can drop to 55°C and below;
Set of rules for designing building engineering systems
- By definition, a heated towel rail with hot water supply cannot be hot around the clock: in the absence of water supply, it will cool down.
All these problems have been successfully solved in recirculating systems. How are they different from dead-end ones?
- There are two hot water dispensers throughout the house;
Two hot pours indicate recirculating water supply
- The risers are connected to them one by one. The number of risers connected to the bottling stations does not necessarily have to be the same: often there is one return riser for three supply risers;
- On the top floor or (less often) in the attic, the risers are combined by jumpers equipped with Mayevsky taps or automatic air vents to remove air pockets;
Jumper connection diagram for risers
- The pressure difference between bottlings, depending on the heat supply scheme used and the hot water supply scheme, is ensured by the pressure difference between the supply and return of the heating main, throttling washers in the elevator unit or circulation pumps.
Elevator unit with additional hot water inlets for its recirculation
As a result, we get two extremely pleasant features of the system - instant heating of water when the tap is opened, regardless of the location of the apartment within the house, and round-the-clock operation of heated towel rails.
Of course, if they are connected correctly. Which brings us close to the next question: how to properly connect heated towel rails to hot water supply?
Installation and connection: step-by-step instructions
Before starting installation, it is a good idea to lay out on the floor both the device itself and all the fittings for it in order to once again clarify all the dimensions. To do this, you can even dry assemble all the connections. No one has canceled the saying about measuring seven times!
- We mark the installation dimensions of the new heated towel rail on the wall.
- Having chosen the location of the future unit on the wall, it is necessary to carefully examine it for the passage of internal communications, both pipeline and electrical. Special devices—metal detectors—can help with this.
- We drill holes, insert dowels and hang the device on the wall, securing it with screws or bolts.
- We cut threads on the cut ends of the pipeline.
- We prepare the bypass jumper by carefully marking and installing tees-outlets for the heated towel rail and a shut-off valve on it.
- During operation, we seal all connections with plumber's tow or Teflon tape.
- We install it in the cutout of the riser using bends, straight couplings and locknuts, so that the tee branches are located exactly opposite the inputs of our device.
- Segments of different lengths are used to adjust the installation dimensions of pipeline sections and simplify their connections.
They have threaded threads at the ends: short on one side and long on the other. The locknut and coupling are screwed onto the long one. A tee, angle or valve is screwed onto the pipe from one side. A bend is screwed into them with a short thread, which is then connected with a long threaded end to the other side of the pipe with a coupling and secured with a lock nut. - We screw shut-off ball valves to the outlets, and connect the inputs of our unit to them.
- We open the ball valves to the heated towel rail and close the bypass valve.
- Open the common riser valve. If there is water pressure in the system, carefully check the connections made for leaks.
All! Our new heated towel rail is ready for use. In this video you can watch the process of dismantling and installing a new heated towel rail in the bathroom with your own hands:
https://youtube.com/watch?v=Lx-2Qop81SA
Work on the pipeline system of an apartment building should be carried out in advance by agreeing with the management company, only if you have sufficient experience or under the guidance of a qualified craftsman.
Modern heated towel rails can be quite complex in design, such as, for example, double-circuit ones. Before installing them yourself, you should study all the technical specifications and installation rules.
You also need to remember that some units must be selected for galvanic compatibility with the metal pipelines of the materials from which they are made.
Basic moments
Otherwise, electrolytic corrosion will inevitably occur.
To prevent this from happening, only Teflon gaskets are used to seal connections.
If you want your heated towel rail to work all year round, it must be connected to a hot water supply. When connecting a ladder type model, it is better to use the side connection method. In this case, it is necessary to maintain an interaxial distance of 50 cm.
Do you want to connect a heating device to your heating system? A combined model is suitable for these purposes.
Worth knowing! The device must be connected to the riser using “American wires”.
Important point! When carrying out installation work, all docking units must be carefully insulated. If you decide to “burrow” the pipe into the wall, it will be incredibly difficult to fix leaks later.
Watch the video to see how to install a heated towel rail in a new building with your own hands.
Installation diagram of a structure with bottom connection
The connection diagram consists of several stages.
At what height should I hang it?
The dimensions of the product are determined depending on the area of the room. When choosing an installation location, the distance from the riser is also taken into account. It is recommended to install it directly next to it. The height of the ladder heated towel rail (upper installation point) is 1.9 - 2.0 m.
Photo 2. Dikron L water heated towel rail with side connection and stainless steel shelf.
Removing old equipment
This process will require turning off the water. For this purpose, contact your utility service. If the previous device was fixed to the pipe using a thread, then you can simply unscrew it. If difficulties arise with this, then a grinder is used.
How to properly connect a ladder to a riser?
Couplings suitable for the size of the pipes are fixed to the heating system. The lower outlet pipe is mounted below the level of the body of the device itself. The supply of heated water is connected to one of the pipelines, and its outflow to the other.
Attention! Supply pipelines must be thermally insulated
Installation of taps
A Mayevsky tap is installed in one of the vertical pipes to remove excess air. Shut-off valves are installed on the supply pipeline with detachable connections.
Wall Mount
To begin with, places for future fastenings are marked, walls are laid for laying pipes.
Then the correct fixation of the heated towel rail is checked by applying a special building level. Brackets are fixed to the wall.
Initially, a bypass is installed. One ball valve is attached to it, and the other two are at the connection points of the heated towel rail.
Important! It is necessary to leave a gap from the lined wall to the staircase. The device is connected to the valves using fittings
All joints are tightly sealed with flax or FUM tape
The device is connected to the valves using fittings. All joints are tightly sealed with flax or FUM tape.