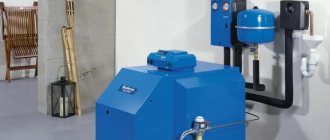
Functional and practical water convectors are used if you need to create an effective and economical heating system in any room. Such equipment is reliable; it can work for decades without the slightest problem. However, to feel the benefits, you need to know the rules for choosing devices. Do you agree?
You will learn everything about choosing water-type convectors for the construction or modernization of heating systems from the article we presented. We described in detail the specifics of the convector type of heating and listed the existing types of equipment. They provided criteria on the basis of which you can make an informed choice.
How do convectors heat?
All water heating devices are traditionally designed to heat all kinds of rooms using convection - this is a physical phenomenon in which heated air rises upward, and cold masses take its place.
This process occurs continuously until the temperature equalizes in all layers of some closed volume. To ensure maximum efficiency, convectors have a special design.
They consist of the following elements:
- a pipe through which the coolant flows (this is what hot water is called);
- heat exchanger, which is metal plates (fins) placed on a pipe.
All main parts are covered with a casing; special slots (grid) allow air to circulate freely. This part of the device is designed without sharp corners or protruding parts to prevent injury.
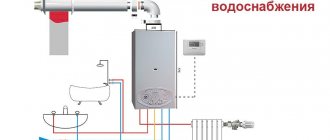
Principle of operation
The very word “convector” indicates that the principle of its operation is based on such a physical phenomenon as convection. Cold air, being more dense, is located in the lower layers - near the floor of the room. Having passed through the convector, the air warms up, its density decreases, as a result of which it rises.
Convection can be not only natural, but also forced. The built-in fan will help increase the convection air flow and thereby increase the efficiency of the heating device.
Classification of water convectors
Modern water convectors for heating are divided into types, indicating technical characteristics. Moreover, it is not difficult to understand all the features, since they differ in only two parameters: the type of convection and the installation method.
For water-type heating devices, convection can be:
- forced;
- natural.
All natural convection equipment has lower power, lower cost and is suitable for heating a variety of small rooms with low ceilings.
In addition, it is often used as an auxiliary heating system for large premises, such as shops, or with a significant area of glazing. To solve these problems, convectors are installed near doorways and windows.
Wall-mounted convector with natural convection is the most popular type for installation in living rooms and offices
The presence of a forced convention means that the heating device is equipped with a fan, which accelerates the air circulation process, and, consequently, the rate of its heating, which ensures rapid heating of even large retail and industrial premises.
Products of this type are also successfully used for heating restaurants, offices, swimming pools and various housing with complex configurations. They create an effective heating system in cases where this is difficult to do with other types of equipment, for example, when installing traditional radiators.
Additionally, convectors are divided according to installation method. In this case, the following types are distinguished:
- wall-mounted, recently a variety of them is often used - ceiling-mounted fixtures;
- floor;
- built into the floor, sometimes the equipment is mounted instead of baseboards.
In any case, the products can be used as part of centralized and autonomous heating systems, and the coolant is exclusively liquid. And also every modern device can be used in the main or auxiliary network.
Can be used for room cooling
A convector can be called universal climate control equipment, since it can perform different tasks in different seasons: heating in winter, cooling in summer. True, not every device is adapted for cooling; manufacturers usually indicate that one or another of their models has this capability.
It should be borne in mind that convectors generate cold much worse than heat, so when calculating the power of the device, you need to rely on your needs for cold, because reducing the heating power, as you now know, is not difficult.
In order for your convector to start cooling, rather than heating, the air in the room, you need to empty it, fill it with a special liquid and connect it to the chiller. However, there are models in which the process of transition from one mode to another is much simpler and faster. They have two unconnected circuits at once: one for the coolant, the other for the refrigerant. To change the operating mode, you will only need to turn off the fluid circulation in one circuit and turn it on in the other.
And a couple more comments regarding the possibility of using this type of climate control equipment for cooling a room. Remembering the principle of operation of a convector, you will understand that in natural mode it is not able to work for cooling. That is why all models designed to operate in two modes are equipped with fans. In addition, the fan helps reduce the amount of condensate formed on the heat exchanger when the convector is operating for cooling.
Existing types of equipment
In addition to the function of fully heating the room, additional convectors are often installed near places where a comfortable microclimate is especially important, for example, near a crib.
Additional equipment must be switched on when the main heating devices cannot cope with timely heating of the air. This situation can arise due to severe frosts or poor quality work of public utilities.
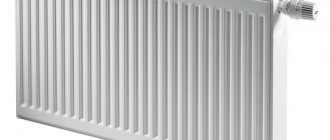
Features of wall models
The most popular are wall convectors. There are several reasons for this - they are affordable in cost and easy to install. And such equipment can be placed anywhere.
The floor-standing type of convector can be installed anywhere in the room to provide comfortable conditions in the selected area
This opportunity is provided by low weight, which allows you to mount equipment even on lightweight partitions, and a large assortment of models. Most often, such a product is designed for heating using natural convection.
For more efficient operation, devices are often equipped with casings that have air channels directed in the right direction, which significantly increases productivity and heating speed.
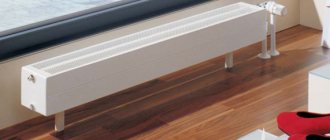
Description of floor-standing convectors
Floor-standing units are used to heat objects where installation of wall-mounted models is not possible, for example, when glazing starts from the floor level, or large areas need to be heated in industrial buildings.
Often, products belonging to the class of floor-standing water convectors are equipped with fans, which increases productivity and heating speed, but makes the operation somewhat noisy.
A water-type floor convector is easy to install, but takes up useful space. This should be remembered at the stage of choosing a suitable model.
Built-in heating products
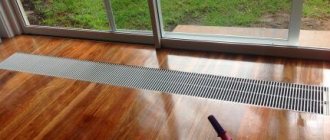
The so-called floor-recessed models will fit into any interior. They do not take up useful space and can heat a room of any size.
But the installation of such equipment is the most expensive, the reason: this procedure requires a niche in which the convector is installed. To attach it, you must first make a floor screed or install a reliable raised floor.
If the model is not equipped with a fan, thermal insulation must be used. This will eliminate the loss of heat that will go to heating the floor. If we neglect this requirement, the efficiency of the device will become an order of magnitude lower.
There is another important feature: a sufficient amount of dust accumulates in the casing of such devices, and quickly, which needs to be eliminated, but this is not difficult to do.
Additional advantages of built-in equipment are the longest service life among all types and a variety of standard sizes. High decorative qualities are considered an important advantage. Although the device itself is located in a niche, the protective grille is clearly visible against the background of the floor, so it is given all sorts of colors and shades.
The water convector is an effective thermal barrier and can serve as an elegant interior detail
Still, it is worth remembering that it is more convenient to install such devices during renovation or construction of a building. Since special dismantling of floors for laying pipes and installing in-floor products will be an expensive pleasure.
Installation of wall convector
All the fasteners required to mount the convector on the wall are included with the device. The passport must indicate the overall and installation dimensions, as well as the distances from the floor and other surfaces required for a particular model.
Compact wall-mounted water convector
Tools you will need:
- drill or hammer drill depending on the type of walls;
- screwdriver;
- bubble level, tape measure and pencil;
- tool for cutting and connecting pipes;
- in case of installation of a device with forced convection - a power tool for connecting electrical wiring.
Before installation, remove the device from its original packaging and check that the device is complete. Determine the installation location, taking into account the dimensions of the convector and the required distances to structures and objects.
Table 1. Installation of wall-mounted water convectors.
| Steps, photo | Description of actions |
Step 1 | Mark the wall using a level and tape measure. In this case, you can use the installation dimensions from the device data sheet or attach the convector to the wall and mark the location. The places for water supply and, if necessary, electrical cable are also marked. |
Step 2 | Drill holes according to the markings and insert dowels into them. Pipes and electrical cable are supplied. |
Step 3 | The installation back of the device is applied to the wall and secured using the screws included in the kit. The screws are not fully tightened; using a level, the installation part is given a horizontal position, and only after that the fasteners are fully tightened. |
Step 4 | Attach the heat exchanger to the installation part using the holders and screws included in the kit. |
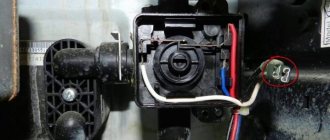
Step 5 | Connect the electrical cable to the terminal box in accordance with the diagram supplied with the device. If necessary, adjust the operation of the fans using potentiometers on the board. |
Step 6 | Connect fittings for connecting pipes: at the inlet - a thermostatic valve, at the outlet - a threaded connection. Check the tightness of the connections using an air compressor. Connect the heating system pipes. |
Step 7 | Assemble the device body: attach the frame, walls and grille. Install the thermostatic valve head. |
| Step 8 | Adjust the verticality of the device body using adjusting screws and a level. |
Step 9 | When starting the device for the first time, loosen the air valve to ventilate the system. It is usually located on the side wall of the device. When water appears, tighten it. |
Note! Work on connecting the electrical cable to the device is carried out with the circuit breaker in the input panel turned off.
Advantages of convectors over radiators
Although residents of the CIS, for the most part, out of habit, use traditional cast-iron radiators or more modern bimetallic radiators for heating any premises, this trend is now changing. Convectors have a list of significant advantages, which makes them a more practical solution in a number of situations.
Their main advantages are:
- Economical - to heat identical rooms, such devices spend only a quarter of the thermal energy that radiators need.
- High efficiency - in many cases, the products are capable of providing full heating of all kinds of rooms at a coolant (water) temperature of 50°C. According to the standards, conventional radiators at the specified water temperature can heat the room well when it is only 5 °C outside, and at -5 °C it will be necessary to heat the coolant to 78 °C.
- Rapid heating of rooms - thanks to the convention, heating of any room occurs an order of magnitude faster than when heating with radiators. Because they simply emit heat. In addition, the speed of heat propagation is facilitated by the rapid heating of the heat exchanger (pipes, fins). For example, such a procedure with these devices occurs many times more quickly than with cast iron products that are familiar to everyone.
In addition, all convectors are easy to maintain, light weight, compact, and are famous for their high fire safety. Our recommended article will help you get an idea of the advantages of a convector compared to a fan heater.
Their only source of possible danger may be the fan. But it is not installed on all models, and is also low-voltage. Such equipment rarely becomes a source of trouble. The surface of its casing is always cool, which will prevent burns.
Convectors are increasingly used in apartments as main or additional heating devices. In the photo, the built-in device serves as a thermal barrier at the entrance to the balcony
The product is not without its shortcomings, but the list of them is quite short. Thus, the convention creates air currents that contribute to greater dustiness in the premises.
And moving air masses can create a slight draft. This phenomenon is not critical, but undesirable for people suffering from various types of colds. These disadvantages are compensated by an important advantage - convectors never dry out the air.
The biggest disadvantage is the uneven heating of rooms with very high ceilings. The reason lies in the fact that under the influence of the convention, warm air accumulates under the ceilings, and can only descend when cooled, which does not contribute to creating a comfortable temperature.
The same situation will arise if the heated room has moderate-height ceilings, but forced ventilation is used simultaneously with heating.
Description of the basic principles of convection
Heated air becomes lighter and therefore rises, and cooled gas flows fall. This is the principle of convection, which exists in nature and all convection devices operate on it, regardless of the energy carrier or heat source. The efficiency of moving warm gas allows you to quickly warm up a space and maintain a certain temperature regime for a long time.
How to warm up rooms:
- The radiators have a large surface area heating element built into them. This explains the efficiency of heating gas flows.
- Air rises from the radiator and is replaced by cold gas from the bottom of the room.
- Substitution of flows helps maintain circulation, thereby achieving optimal heating balance.
There are elements on sale that are powered by electricity and gas; water ones operate by circulating hot coolant.
How to make the right choice?
To get the expected result, a potential buyer must find out whether it is possible to install convectors in the selected room. It is necessary to take into account whether forced ventilation will be used to create the desired microclimate and whether the ceiling height is acceptable.
You should also make sure that it is technologically possible to supply the necessary equipment. For example, in many cases it is not practical to place built-in devices in residential premises due to the complexity of installation.
Power calculation is a mandatory procedure
If convectors can be installed indoors, the power needs to be calculated. This procedure cannot be ignored - otherwise it will be impossible to create the desired microclimate. That is, it will not heat a home, office or any other object. Another extreme is often encountered - heat, which also will not please the buyer.
To perform the calculation yourself, the following formula is suitable: for every 10 square meters of any room there must be at least a kilowatt of thermal power. But you need to understand that not everything is so simple - this formula will only allow you to determine the average value.
The design of water convectors is simple and reliable, which ensures their service life for decades
Water convectors should be selected with a twenty percent reserve. Better yet, invite a specialist who will carry out an accurate calculation taking into account the heat losses of the building and room. That is, all the features of the object to be heated will be taken into account. This includes glazing area, ceiling height, etc.
The specialist will also be able to indicate the exact location of the devices and suggest where it is best to install additional equipment.
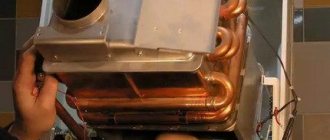
Material of manufacture is always important
When choosing, you should pay attention to the material of manufacture - it affects efficiency, cost, durability and even decorative qualities. Moreover, the last point has become one of the most important today.
For example, devices can be:
- steel;
- aluminum;
- bimetallic - in this case, two types of metals are used for manufacturing.
Copper is also often used. Bimetallic and aluminum devices are considered the most effective today. But steel devices also have a significant advantage - their cost is the most affordable.
The built-in convector can fit perfectly into any interior thanks to the rich color palette available from most equipment manufacturers
It is worth paying attention to the decorative elements of the equipment; they can be different: metal, wood. And for painting, powder paints of various colors are used, which makes the offer even more diverse.
What else to pay attention to
Each heating system (centralized, autonomous) has an operating pressure, in addition, there is another characteristic - test pressure, so convectors must be purchased taking into account such values.
Particular attention should be paid to the test pressure, the reason: it is an order of magnitude greater than the working pressure. The important point is that in different systems such characteristics vary significantly.
For example, old Khrushchev systems are tested under pressure of 5-7 atmospheres. This parameter in new building systems when testing performance can reach an impressive 12-15 atmospheres. Accordingly, the capabilities of convectors must meet the specified values.
If this is not provided for, then damage to the equipment cannot be avoided. As a result, you will have to spend money on buying a new one, repairing a heated room, and in the worst case, compensating for damage to neighbors.
Operating temperature and dimensions
You should also pay attention to the maximum coolant temperature that the convector can withstand. For example, if an autonomous heating boiler is capable of heating water to 95 °C, then there is no need to buy products that can only operate at 70 °C.
An important characteristic is the size of the devices, and their correct selection will allow you to heat the room more efficiently, avoid glass fogging and other problems. For convenience, the industry produces convectors of different depths, lengths, and heights.
The equipment can also be vertical or horizontal, which allows it to be placed almost anywhere, but the buyer must decide on the size.
The size of the convector can be any, the main thing is to choose it correctly, otherwise installation will be difficult
Shut-off valves and thermostats will increase efficiency and create the most comfortable microclimate. This equipment allows you to turn off part of the device at high temperatures in a heated room. Moreover, this happens in automatic or manual mode. But there is also a drawback: all kinds of additional equipment can significantly increase the cost of the product itself.
How not to get confused by technical specifications?
Although all manufacturers include passports with their devices, which indicate their names and power, people often make mistakes in their choice. The reason lies in the fact that an entire line of products consisting of several dozen products can be sold under almost the same abbreviation.
A clear confirmation of this is the family of popular convectors KSK-20, where more than 40 units are produced under the same name, differing only in size.
Moreover, there are products of the same size, in which the plates (ribs) intended for heat exchange are placed at a greater distance from each other, and this significantly reduces productivity. And such subtleties sometimes confuse potential buyers, who may make the wrong choice in the variety of products.
You also need to remember that devices of the same power and size can be flow-through or end-of-line. Convectors belonging to the first option can operate in any heating systems (autonomous, centralized), and products classified in the second group are built only into autonomous systems.
All of the above indicates that the buyer will need some theoretical knowledge to make the right choice.
Furniture items
A few examples of furnishing a kitchen combined with a living room:
- 1. Sofa. It becomes an object that zones space. The sofa is placed with its back facing the place where food is prepared. In small rooms (less than 20 sq m) a corner is placed, which is placed against a wall installed perpendicular or parallel to the kitchen.
- 2. Set. According to designers, minimalist models without elaborate details look modern. The service, vases or glasses are placed on an open shelf. You can buy a fashionable display case for them. Furniture is placed near the wall. If the space is large (20 sq. m, 25 sq. m or 30 sq. m), then in the central part you can install an island, which also has sections for kitchen appliances.
- 3. Furniture set. The style should be combined with the design of both rooms. In small rooms, a compact table and chairs made of transparent material or painted in light colors look good. You can add a table with a round top to your living room interior. In spacious rooms, the kit is installed near the wall or in the central part. An elongated rectangular dining table would look good here.
Review of popular models
The market offers an impressive number of models of all types of convectors from various manufacturers. Moreover, domestic companies are actively operating in this area. For example, in the niche of inexpensive heating equipment they are traditional leaders.
So, if the buyer needs reliable, affordable wall-mounted devices, then he should buy the KSK-20 products, proven by time and a large number of users, which are produced by the famous Tolyatti plant. He has been making popular and inexpensive heating units for decades.
The KSK-20 convector is an efficient, reliable and inexpensive heating device
These convectors can cover the needs of all categories of users, as they come in different capacities, sizes, and configurations. For example, the length of the devices is in the range of 60-160 cm, and the weight starts from an insignificant 8 kg, which allows you to place the devices on any walls or partitions without the risk of damage.
The power of such heating equipment ranges from 0.4-2 kW, which allows you to heat both a small living room and a large industrial or commercial premises. High-quality steel is used for manufacturing, which ensures the device has a service life of at least 25 years.
Such convectors can be used in any heating systems, because they can withstand exposure temperatures of up to 150 °C and operating pressures of up to 10 atmospheres. The high-quality powder paint that covers all products protects the device from minor damage and gives it a modern, pleasing appearance.
The only minor drawback of the KSK-20 is the absence of brackets in the kit that are used to attach it to a wall or other vertical surface. Some buyers pay attention to the poverty of the color palette - heating equipment, most often, can only be purchased in traditional white or gray colors, so it does not always fit perfectly into the interior.
If you need a more beautiful device, then you should turn to the product line of another domestic manufacturer - Techno. Thus, at his Moscow plant, various colors are used for decoration and products are decorated with various structural elements. For example, the Vita Bench KBZ model is in demand among buyers.
Its main feature is execution. The floor-standing unit is a bench, and the wooden elements can even be made from popular and valuable types of wood, which makes it a decoration.
At the same time, Vita Bench is a durable and efficient convector, which the manufacturer equips with a thermostatic valve. But the disadvantage of the presented model is the price - it is significantly higher than the KSK-20, which is similar in power.
Covectors can have decorative qualities and serve as decoration in hotels, offices, and homes.
In recent years, another Russian manufacturer of convectors has become known - Varmann. Reason: its products are distinguished by functionality, practicality, and high decorative qualities.
Thus, its line of built-in Qterm HK devices is equipped with air channels and tangential fans that allow air to be drawn only from the desired side. This function significantly increases efficiency and economy.
The fan speed is regulated by a microprocessor, and if necessary, the convector can be connected to a smart home system or using a control panel. The reason for this is simple - thermal power depends on the fan performance
High-quality materials used in manufacturing make it possible to withstand impressive pressure during the pressure testing period, reaching up to 16 atmospheres, and work stably with coolant heated to 90 °C.
The following article, dedicated to this interesting issue, will introduce you to guidelines for choosing a convector-type heater.
Installation of an in-floor convector
The installation of an in-floor convector begins with preparing a niche or box in the floor. It is more convenient to perform this work when pouring the screed. To create a niche, formwork is installed, which is removed after the concrete has hardened.
The size of the niche must be selected according to the size of the convector body:
- the depth of the niche is equal to the height of the body plus 20 mm;
- the width of the niche is equal to the width of the body plus 60 mm;
- the length of the niche is equal to the length of the body plus 60 mm;
- distance to window or wall – 250-300 mm.
Niche for in-floor convector
Installation in front of the window is carried out depending on the purpose of the device: when using a convector as the main heating, the heat exchanger is turned towards the room, to create a thermal curtain - towards the window.
Installation of an in-floor convector
Required materials and tools:
- drill or hammer drill;
- screwdriver;
- a set of keys;
- level and tape measure;
- pipe cutter;
- power tools;
- mounting polyurethane foam;
- cement mortar.
Step 1. Prepare a niche for installing a convector. Heating pipes and cables for connecting the fan heater are brought out from the connection side of the device.
Supplying cables and pipes to the convector installation site
A layer of heat and vibration insulation is placed at the bottom of the niche; it is important to ensure that the thickness of the material does not interfere with installing the device flush with the finished floor.
Thermal insulation of a niche for a convector
Step 2. Install the device body into the niche. There should be mounting gaps on all sides of the housing to allow the convector to be leveled.
Box installation
Fans are placed closer to the window so that the warm air coming out creates an effective thermal curtain and prevents condensation from forming on the windows. Models without a fan are turned with the heat exchanger towards the window.
Preliminary alignment of the box
Step 3. To level the device in height, there are nut screws located in the corners of the case. With their help, the installation of the convector in a niche is adjusted using a level.
Aligning the box height
Step 4. Drill holes for attaching spacer dowels near the head screws. To do this, use a drill or hammer drill.
Preparing holes for expansion dowels
Before fixing the box, check the installation using a tape measure and level. The body must be flush with the finished floor, so when checking, you need to place pieces of tiles or laminate used for finishing under the level.
Final alignment of the box
After final alignment, the spacer dowels are secured in the prepared holes using a screwdriver.
Fastening expansion dowels
Step 5. Mark and cut the pipes for connection to the heat exchanger. A pipe cutter is used to cut pipes.
Pipe preparation
A control valve and threaded fittings for connection to the pipes are attached to the heat exchanger. Install the heat exchanger in place.
Heat exchanger installation
Attach the heat exchanger to the pipes using fittings and tighten them.
Fastening fittings
Install the Mayevsky valve and bleed air from the system. To prevent drops of water from getting inside the housing, you can temporarily put a tube on the outlet of the air valve and lead it into any container. After de-airing is completed, the tube is removed and the Mayevsky valve is tightened.
Mounting the Mayevsky crane
Step 6. Connect the cables to the control unit, having first removed the cover from it. All connections are made in strict accordance with the diagram supplied with the device.
Preparing the control unit and cables
The electrothermal actuator is installed on the thermostatic valve, and the wires coming from it are connected to the control unit.
Thermostatic valve mounting
The ends of the wires are stripped to 8-10 mm and connected to the terminal blocks. The mounting screws must be tightened to ensure good contact.
Attaching wires to the control unit
The fan rotation speed is set at the factory; it is regulated using a block of potentiometers installed on the board in the control unit. If necessary, the rotation speed can be adjusted independently.
Fan speed adjustment
After connecting, close the control unit with a lid and tighten the mounting screws.
Installing the cover
Step 7. Install the control controller in a convenient place on the wall. The installation location must be chosen so that the controller is not exposed to warm or cold air flows, direct sunlight, or anything that can affect the sensor readings. Installation height – 1.5 m above the floor.
Installing the controller
Step 8. Before the final pouring of the convector, it is necessary to install spacers in the housing, otherwise, when the mounting foam and mortar harden, deformation of the box may occur. Spacers are made from scraps of board or plywood.
Installation of spacers
Fill the space around the box and under it with polyurethane foam. It helps dampen vibrations and provide better thermal insulation. Wait the time necessary for the polyurethane foam to completely harden.
Foaming the free space around the box
Before you start pouring cement mortar, protect the edges of the box with masking tape.
Insulating the box with tape
Fill the space between the floor screed and the box with cement mortar using a spatula or trowel and level it flush with the subfloor. After the solution has hardened, a finishing coating is laid.
Filling the space between the box and the screed with cement mortar
Step 9. Place the decorative lattice on the box. The material from which the grille is made can be different (wood, aluminum or plastic) and depends on the finish of the floor. If all operations are done correctly, the grate should lie flush with the finished floor.
Laying the grating
Conclusions and useful video on the topic
In this material, a specialist shares information on how to calculate the power of heating devices:
This video clearly shows how to install built-in convectors and what should be taken into account:
Convectors are a profitable and practical alternative to conventional radiators and, no less important, affordable. But the buyer must understand that the possibility of creating a comfortable microclimate in a home, office or workplace depends on his choice, which can be made with theoretical knowledge about heating devices.
If you don’t want to waste time getting them, then you can turn to specialists, this will help you avoid useless financial expenses.
We will be glad to read your story about choosing a water convector. Share the criteria based on which you personally made the purchase. Please leave comments in the block below, ask questions, post photos on the topic of the article.
Summary
A convector is a worthy alternative to a radiator. And if you need to heat a room with French windows or glass doors, then this is the optimal solution.
Manufacturers can make to order any color from the RAL palette, which also distinguishes convectors from radiators.
Another advantage is the ability to install forced convection fans and the absence of joints with gaskets that can leak.
That's all, write your questions in the comments, use the social network buttons!
Design of floor-mounted heating convectors
The underfloor heating convector has a simple design and consists of several components. First of all, it is a stainless steel body, which is installed on the subfloor on special adjustable legs that allow it to be leveled horizontally, and has holes for supplying heating pipes.
Inside the housing is the heart of the heating convector - the heat exchanger. The heat exchanger has a plate structure for better heat removal. Most of these heat exchangers are made of ordinary steel, but it is not the best material for such devices, as it is susceptible to corrosion and dissipates heat worse than its competitors - copper or aluminum.
The heat exchanger has terminals for connecting heating pipes. Additionally, such devices can be equipped with shut-off valves or thermostatic heads for semi-automatic temperature control.
The heat exchangers themselves are mounted in the housing in compliance with the necessary clearances provided for by the design. This is done to provide the air space necessary for proper circulation of air masses.
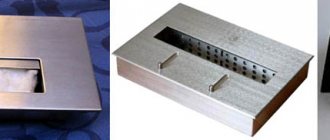
The design of the floor-mounted heating device is completed by a decorative grille, which covers the heat exchanger radiator, but allows air to pass through it. There are two types of convector grilles:
- roll;
- whole.
The following materials are used for the manufacture of such gratings:
- tree;
- stone;
- steel;
- aluminum;
- plastic.
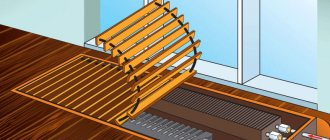
There is no fundamental difference between the roll-up and monolithic options, except that the roll-up grille can be easily rolled up, providing easy access to the convector for inspection or cleaning. However, when using trench convectors in walk-through areas, grilles made of more wear-resistant materials should be used, without using a large number of plastic moving parts.
When installing a built-in convector, the level of the finished floor is calculated in advance. This is necessary so that a part of the convector casing remains above the poured concrete floor screed, which will be covered by the final floor covering. As a result, the finishing surface, be it laminate, parquet or tile, should lie flush with the decorative grille in order to achieve comfort when walking on it.