The next article in the section is “apartment consumption”. So, as the heating season has already begun, many are interested in the power of their batteries. After all, the heat in the room and in the apartment as a whole depends on the power (you need to know this when calculating heating radiators at the level of designing a heating system). Today I will talk about the power of 1 section of a cast iron radiator...
Cast iron radiators come in various brands, but there are not so many of them and they can be listed on one hand. Everything else is just a variation of them. Today the most basic ones.
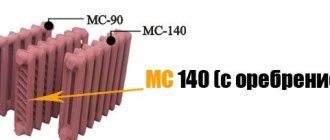
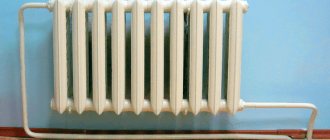
MS 140
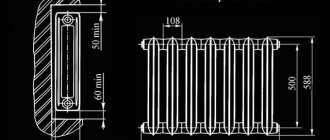
The classic and most common radiator is installed in many apartments in our country, as well as in many countries of the post-Soviet space. Section width 140 mm, height (between supply pipes) 500 mm. Additional marking MC 140 – 500. The power of 1 section of this radiator is 175 W of thermal energy.
However, there are many variations of this radiator
MS 140 – 500 with fins (collector)
The most energy-efficient version of the MC 140 radiator. The thing is that additional cast-iron fins are installed between the sections, which also provide additional heating to the room. The power of such a radiator is 195 W of thermal energy (which is 20 W more than the classic MC 140). However, such radiators have a significant disadvantage: you need to monitor the frequency of these fins; if they become clogged (with dust, for example), then the thermal efficiency drops by 30 - 40 W!
MC 140 – 300
As the name implies, this radiator has a width of the same 140 mm, but a height of only 300 mm. This is a compact type of radiator. The power of one section is only 120 W of thermal energy.
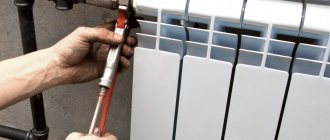
Installation
To begin with, let’s make a reservation that it is possible to install cast iron heating radiators with your own hands, but this will not be easy to do, because the heating structure is quite heavy. You will most likely need a partner.
The method of connecting the battery and pipe will not be the same as with aluminum or bimetallic counterparts, where the connection is made using threads. In the case of a cast iron device, gas welding is used. Before starting work, you should prepare all the tools that may be useful. Installation of cast iron heating radiators will require:
- gas welding;
- set of keys;
- level;
- tape measure and regular pencil;
- hammer drill.
As for the materials that will be needed to mount cast iron heating radiators to the wall, it is worth stocking up on:
- a set of radiators of the required size;
- seal;
- fittings (tees, plugs);
- Mayevsky crane;
- brackets (mounting for cast iron heating radiators).
Installation of a cast iron heating radiator
We carry out installation:
- To get started, you should disassemble the cast iron radiator that was originally installed. Take an angle grinder and slowly disconnect the heating structure. Before doing this, make sure that the heating system is turned off and the remaining water is drained from the pipes.
- The next step is to determine a place on the wall to place the device. By mounting the battery exactly in the center of the window, you will achieve the necessary circulation of air masses in the room. Take measurements along the width of the window. This will determine the center of the radiator installation. This is easy to do by drawing a central vertical and horizontal line. Do everything as accurately and carefully as possible, this way you will avoid the formation of air jams. Markings for brackets for cast iron heating radiators are also required.
- After the necessary markings, you need to install the brackets and “hang” the radiator on them. Use a drill to make holes according to the markings and carefully secure the dowels. Screw in the holders. If the installation is carried out correctly, the radiator will be firmly fixed on all four supports.
- Now it's time to connect the battery to the heating system. The cut section of the pipe must be shortened to the required length on one side. Remember about bending the pipe! On the other side, replace the plug with a shut-off valve. This action will ensure in the future to reduce or increase the flow of fluid. The valve must be screwed to the battery using sealing tape or tow. Close everything so that there are no leaks in the future. Bend the open pipe ends and connect them using gas welding, thereby ensuring a strong seal. The welding gap must be thoroughly cleaned with sandpaper. After this, cover the surface with paint.
- It's time to carry out a final check and test the design. Smoothly unscrew the tap and start the liquid. Take your time so that water does not fill the radiator quickly and water hammer occurs.
If desired, install a tap that will shut off the liquid supply, not forgetting about installing a bypass system. It will make it possible to switch off water only in your premises and you will not depend on your neighbors.
Thus, cast iron heating radiators are connected.
You can read about flushing cast iron radiators here.
New cast iron radiators
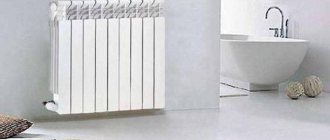
It is not uncommon now to see modern cast iron radiators, produced by both imported companies and our domestic ones. They look somewhat similar to aluminum radiators. The power of 1 section of such a radiator ranges from 150 to 220 W, much depends on the size of the radiator.
And that’s all, I think I gave you the layout of the usual cast iron radiators. Of course, the power may vary a little from manufacturer to manufacturer, but approximately the power remains within these limits.
By the way, you can read how to decorate a cast iron battery as “RETRO” , it turns out very beautiful and inexpensive
Kinds
A cast iron heating radiator, like any other, has a design of several similar sections. They are made in factories using the casting method from gray cast iron.
The channels, which are designed for coolant circulation, have either the shape of a circle or an ellipse. Already at the time of assembly, all sections of the future radiator are connected to each other using nipples, and the joints of the structures are once again sealed. Temperature-resistant rubber or paronite gaskets are used. This is how cast iron heating radiators are assembled at the factory.
Types of cast iron heating radiators:
- single-channel;
- two-channel.
Structures can be of different widths, depending on the number of sections, and have different weights and heights. The width dimensions of cast iron heating radiators depend on the volume of the room that will be heated, on the number of windows, as well as the thickness of the walls facing outside. It is clear that if a larger number of sections are used in the radiator, then more heat will be released. Height can vary from 35 centimeters to 1.5 meters. The depth of the heating structure also matters. It depends on whether the radiator will fit the interior. The depth can be 50-140 centimeters or more.
To carry out installation, you will need a bracket for cast iron heating radiators. The bracket must be securely fastened to the wall. It happens that structures of large weight are hung under the window opening on brackets and positioned in such a way that it recedes a short distance from the wall. Although currently on the heating equipment market you can find new models that are installed on the floor and have legs.
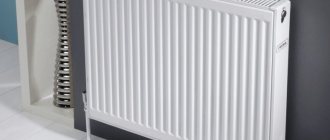
Another modern option is tubular cast iron heating radiators. These are aesthetic and efficient premium designs that meet all requirements and offer many advantages.
Cast iron heating radiators Konner
Video
The video contains instructions on how to disassemble, clean and assemble a Tefal iron yourself:
About the author:
Electronic engineer with many years of experience. For several years he was involved in organizing the repair of household appliances, including washing machines. Loves sport fishing, water tourism and travel.
Found a mistake? Select it and click the buttons:
Ctrl + Enter
Interesting!
Astronauts, while in Earth orbit, solve the problem of dirty things using an original method. Clothes are dropped from the spacecraft and burn up in the upper atmosphere.
Attaching the toilet to the floor on tiles: step by step
The installation process will vary slightly depending on the type of installation you choose. For example, to install a toilet with an open mount, you need to do the following:
- We install the structure in the intended location.
- Using a marker, make marks on the tile where the fasteners will be installed. The marker must be vertical, otherwise there is a risk of the marks shifting, which will cause incorrect installation.
- We move the toilet. In the place where the marks remain, we make holes (use a drill).
- We take a core and scratch the tile coating (this is necessary to avoid the drill from sliding on the tile).
- First we use a drill designed for glass.
- As soon as we have overcome the glass layer of the tile, we take a drill for concrete.
- We make a hole of the required depth. The size depends on the mounts purchased.
- The finished hole is cleared of debris.
- Fill the hole with sealant. This will protect the installation from moisture.
- After adding sealant to the holes, you can insert the installation.
- Now we install the toilet. It is also necessary to make a strip of sealant along its contour to protect the base from moisture.
- Elements are inserted into the mounting holes. We twist them.
- To protect the installation from water, as well as to give them an aesthetic appearance, plugs can be placed on the bolts.
- The remaining sealant is removed with a staple.
If we chose internal fastening, we do the following:
- Before fixing the product, it is necessary to make holes for water supply and sewerage.
- As in the open installation method, work begins with creating marks on the tiles.
- Drill the necessary holes. We place hidden fasteners on the floor.
- After installing the fasteners on the floor, they must be secured with bolts.
- We install the empty part of the toilet onto the fasteners.
- We secure the structure with bolts through the side holes.
- You should not tighten the bolts all the way, as there is a chance that you will have to slightly adjust the position of the toilet to secure it to the water and sewer line.
Anyone can install a toilet on tiles, the main thing is to follow the instructions.
Main advantages
Cast iron radiators, the price of which is one of the advantages, were invented quite a long time ago, but to this day they continue to be in demand, due to their operating efficiency and corresponding quality characteristics. In addition, a better option in this line has never been invented.
But any device, like a cast iron battery, has its own advantages and disadvantages, which will be discussed below. Among the advantages are:
- unconditional reliability;
- high heat capacity;
- Possibility of use in autonomous and central heating systems.
If you want to choose a truly high-quality and durable device, then you should prefer the MS-140M-500 - a cast iron radiator, the characteristics of which you could read above. It is ready to serve for more than 50 years, this is exactly the period that manufacturers give for the operation of this device. If you take proper care of the unit, it will last much longer.
These radiators are also preferred for the reason that cast iron has a high heat capacity. This characteristic is important when, after a shutdown, there is a need to retain heat indoors for a long time. These devices are ready to withstand pressures of up to 9-12 atmospheres, which is important for devices operating in central heating systems, where water hammer is frequent and can damage the integrity of batteries with thin walls. This is why the cast iron version is so common in apartments in multi-storey buildings.
When the assembly has been carried out correctly, the cast iron radiator will easily withstand water temperatures up to 130 °C. In this case, the coolant can be of any quality. MS-140M-500 is a cast iron radiator, the characteristics of which must be studied before purchasing the product; it has fairly wide internal channels that rarely become clogged. This feature makes it possible to prevent sections from breaking during hydraulic shocks.
Calculation of the number of sections
Accurately determining the number of sections in a heating battery is a long process. You need to take into account the region, the material of the walls, what kind of windows and doors there are, how many windows are in the room, what their area is, whether the room below is warm or cold, etc. If you need an exact calculation method, look here, but you can roughly calculate based on the area of the room. It is believed that on average 100 W of heat is required to heat 1 m2 of area. Knowing the area of your room, determine how much heat will be needed: multiply the area by 100 W. Then divide by the thermal power of the selected radiator model.
For example, in a room of 12 m2 we will install MS-140M-500-0.9 from the Bryansk plant. Thermal power of the section is 160 W. Calculation:
- Total heat required is 12m2 * 100 W = 1200 W
- How many sections are needed 1200 W / 160 W = 7.5 pcs. We round (always up - it’s better if it’s warmer) and we get 8 pieces.
Classic batteries: basic parameters
The Soviet MC140 battery with the following parameters is considered classic
:
- height 388/588 mm;
- depth 140 mm;
- width 93 mm;
- the volume of one link with a height of 588 mm is 1.5 l;
- the weight of one link with a height of 588 mm is 7.12 kg.
Knowing how much one radiator section weighs and its volume, you can calculate the mass of the MC140 heating device filled with coolant. The total mass of the filled section will be 8.62 kg, a battery of 10 links will weigh about 86 kg.
Wide selection of different battery styles
Old and new cast iron batteries
Cast iron finned radiators continue to work in many apartments and institutions built during the Soviet Union. Such a long service life is due to their technical characteristics. In the old days there were two types of cast iron batteries:
- Classic ones are the “accordions” that are well known to everyone. The volume of water in a cast iron battery of this type was 1.5 liters. With its empty weight of 7.1 kg, it instantly increased to 8.6 kg after filling with coolant. As a rule, one section of the battery had a thermal power of 170 W, and to heat a room of 20 m2, 11-12 elements were required, which in total weighed 85 kg without coolant, and 103 kg when filled.
- Vintage models were rare and looked presentable, but their weight was even greater - 12-14 kg without coolant. The volume of the vintage-type cast-iron radiator section was also 1.5 liters, but the thermal power was significantly less - only 150-156 W.
These were really heavy radiators that required regular touch-ups, and the sharp corners of their fins were a danger to children.
Modern cast iron batteries have parameters that are fundamentally different from the old “monsters”:
- The average weight of one section is 4 kg, which is half as much as Soviet heaters.
- The volume of water in a new generation cast iron radiator is 0.8 liters.
- The heat dissipation level of one section is 140 W, which is less than in old-style batteries. To heat a room of 20 m2 you will need 14 elements, but their weight together with water does not exceed 60 kg.
If you need to install cast iron radiators consisting of 12 or more sections, then it is more advisable to divide them into two devices. This will increase the efficiency of the structure, since the coolant will flow through the system faster. In addition, their installation does not require additional fasteners.
Technical specifications
How many kilowatts are in one section of a cast iron radiator, and what dimensions should the entire battery have? These questions are quite important.
Performance
Before installation, you should understand how many kW is in 1 section of a cast iron radiator. This will allow you to choose their optimal quantity for specific volumes. In addition, you should familiarize yourself with other important parameters, for which we will take the most common models as examples:
| Marking | Withstand pressure, atm. | Thermal power, kW | Heating area of the 1st section, m2 |
| MS-140 | 9 | 0,12-0,16 | 1,11-1,45 |
| World Cup1 | 9 | 0,075-0,11 | 0,66-0,9 |
| World Cup2 | 9 | 0,1009-0,1423 | 0,7-0,95 |
| World Cup3 | 9 | 0,1083-0,1568 | 0,95-1,38 |
Now, knowing how many kW are in one section of a cast iron radiator, it is easy to determine the required quantity.
Tip: if independently calculating the number of sections of a cast iron radiator causes difficulties, then you can always use one of the online calculators available on the Internet. There you will only need to enter the dimensions of your room and indicate the selected battery model.
It is also important to consider the method of connecting the pipes, which also affects the battery performance:
A clear demonstration of the effectiveness of different pipe connection methods
As can be seen in the figure, the most effective is two-way pipe connection. In this case, it is necessary to carry out the supply from the top on one side, and the outflow from the bottom on the other, which is fully consistent with the school physics course, from which everyone remembers that warm liquid rises and cold liquid falls. That is, the hot coolant will enter from above, cool down and exit through the lower hole, giving up its heat as much as possible.
If we neglect this rule, then we can observe the following result:
Heat distribution in batteries with one-way connection
Here we observe a cold corner, which significantly reduces the heat transfer of the system.
But the important technical characteristics of the cast iron radiator section do not end there. We have calculated the number of sections, but you still need to have an idea of the weight and volume of the structure.
Weight and dimensions
The mass and volume of a cast iron radiator section can be found from the following table:
| Marking | Volume of one section of cast iron radiator, l | Linear dimensions of one section, mm | Weight of one section, kg |
| MS-140 | 1,11-1,45 |
| 5,7-7,1 |
| World Cup1 | 0,66-0,9 |
| 3,3-4,8 |
| World Cup2 | 0,7-0,95 |
| 4,5-6,3 |
| World Cup3 | 0,95-1,38 |
| 4,8-7 |
Knowing the size of a cast iron radiator section, you can calculate its total area at any time, which will give you an idea of the space it occupies on the wall.
To do this we do the following:
- To do this, first find the area of the cast iron radiator section by multiplying its height and width.
- Then we multiply the resulting number again, but this time by the number of sections, which most often amounts to 7-12 pieces.
Let's substitute the values of the ChM1 brand: 370×80=29600 mm2, which is approximately 0.03 m2. Let's say the battery consists of seven sections, then: 0.03×7=0.21 m2. This is exactly the section of the wall that will be required to place the cast iron radiator in question.
It is better to calculate the wall area intended for battery installation in advance.
The weight of a working cast iron radiator will also be needed in order to correctly select brackets for its mounting. Let’s take the same brand and the average weight of one section: 4×7=28 kg. But taking into account how much water is in one section of a cast iron radiator (take the average value again), we recalculate and get: 28 + 7 × 0.8 = 34. Plus, you should also take into account possible temperature expansion of the material. As a result, it is best to select fasteners so that they can easily hold a structure weighing 40 kg.
Therefore
To choose the correct fastening principle, you need to find out how much a section of a cast iron battery filled with coolant weighs. For heating appliances made of cast iron, it is important to select the appropriate number of brackets for wall mounting. If the walls are made of porous blocks or the house is built from SIP panels, the number of fastening points is increased in order to more evenly distribute the load.
Correct calculation of radiators and reliable installation guarantee the uninterrupted functioning of the heating system.
Video on the topic: