Convectors are heating devices that can heat any room. Such devices differ in the method of installation and the coolant used for heating. Depending on the type of heat carrier, convectors can be water, electric or gas. The operating principle of a heating convector will differ depending on the type. The gas version can only be installed in a vertical position, while the convector heating system and supply of electric and water convectors can be mounted under the floor or on the wall. Installing heating convectors is an important issue that we will deal with.
Floor convector
General requirements
Please note that in front, at a distance of half a meter, it is also undesirable to place any objects - cabinets, bedside tables, sliding tables, armchairs and much more. The diagram for connecting the convector to the electrical network is as simple as three kopecks
In most cases, equipment is connected to the network via a wire with a plug. Therefore, next to each electrical appliance you need to install sockets - we mount them side by side on the wall and connect them to the house network. They should be located neither below nor above, but on the side, where they will not overheat from the radiated heat. The optimal installation distance is at least 20-30 cm from the place where the convector is mounted on the wall
The diagram for connecting the convector to the electrical network is as simple as three kopecks. In most cases, equipment is connected to the network via a wire with a plug. Therefore, next to each electrical appliance you need to install sockets - we mount them side by side on the wall and connect them to the house network. They should be located neither below nor above, but on the side, where they will not overheat from the radiated heat. The optimal installation distance is at least 20-30 cm from the place where the convector is mounted on the wall.
Deciding on the location for installation
The quality of operation of the in-floor convector depends on the chosen location. Silence, speed, power, efficiency - these factors are fundamental. The distance from the window or wall should be at least 8 cm and no more than 35 cm. The fan should be placed in relation to the window so that air flows are drawn in and used to heat the room. Air flows can be divided into two types: large and small. The large one is directed in the direction of the heat exchanger, and the small one is directed in the direction of the fan. The convector will work for heating when the fan is directed towards the window to draw in air. To remove condensation from windows, the fan must be located in the center and the heat exchanger in relation to the window. This will allow you to heat the room with a smaller flow and blow the window with a larger flow.
Installation of an in-floor convector: choosing the type of pipes
Expert advice: install pipes made of the same material as those present in the room. This will allow you to achieve better hydraulics in the system.
Pipes connected to the convector can be from:
- Cross-linked polyethylene - installation is carried out using a press tool.
- Polypropylene - requires a special soldering iron and adapters.
- Copper - requires a special heating pad and solder, angles and fittings.
- Steel - requires a welding machine and electrodes.
Niche for a convector built into the floor - device
The easiest way is to make a niche on the ground floor in the earthen floor.
- The niche must be covered with a layer of waterproofing. Moreover, the waterproofing of the niche must be combined with the waterproofing of the main floor.
- The size of the niche should match the size of the radiators. There must be a distance of at least 100mm from the walls of the niche to the edges of the radiator. The distance from the edge of the niche to the window should be 50-250 mm.
- The general design of the niche for the radiator is clearly visible in the figure. This is a diagram of a niche for a radiator on the first floor of a house.
- If a niche needs to be made on the second and third floors, it is necessary to provide for lowering the floor beams to the required height.
- The niche can be plastered, but it must first be insulated. It is better to use polystyrene foam. This is a rigid insulation that will further strengthen the niche. Insulation will reduce heat losses due to unnecessary floor heating.
- It is better to make the “trough” of the niche itself from galvanized steel. It will additionally serve as a heat reflector. You can cover the niche (instead of steel, with ceramic tiles).
- The edges of the niche need to be trimmed with a corner for laying a decorative lattice.
Expert advice
Convectors belong to the category of simple, promising heating devices. For those who want to purchase and install it correctly in a house, apartment, or office, a few tips from experts will be useful:
- Convectors are potentially dangerous electrical appliances. If you are not confident in your skills as an electrician, contact a professional. This especially applies to laying a dedicated power line to the device and installing in-floor models.
- Electricity can compete with gas. Plus - simplicity, freedom of installation of the convector - incomparably greater than when installing a gas boiler. You can reduce costs with a two-tariff meter (the night tariff is cheaper).
- You need to know exactly the required thermal power. You can install convectors at several points in the room.
Methods for adjusting temperature
Most electric convectors for heating are equipped with a mechanical control unit or an electronic one. With their help, it will be possible to control the heating level of the room, which allows you to save energy. The devices are also equipped with a control sensor and a power-on timer.
The first automatically turns the system on and off when the temperature reaches the desired value. After cooling, the device turns on independently or manually. This depends on the installed model.
The device can be programmed using the on timer. This is convenient when the temperature level in the rooms needs to be reduced during the daytime and increased at night.
An electronic thermostat and control unit allow you to set automatic temperature conditions, while in mechanical models it is set manually. There are models with remote control. The operation of the convector is controlled remotely using the control panel. Mobile devices have tip-over protection. If the convector accidentally turns over, the protection will work and it will turn off. The set temperature and the set mode are shown on the display.
Advantages and scope of application
Before praising floor heating convectors - water and electric, let us highlight the main drawback of these devices - the lack of infrared heating. What happens: the air in the room warms up quickly, but objects remain cold. Only after a few hours the surfaces will reach air temperature and people will feel comfortable in the room.
The remaining disadvantages of convectors are insignificant or far-fetched. For example, stories about drafts being created (is convection so intense?) or increased dustiness. Our opinion on the disadvantages: not all users will like the appearance of convection floor heaters. But this is a matter of taste.
Now about the real advantages of convectors:
- convection - slow air circulation - promotes uniform heating of the room;
- the device quickly enters the heating mode; at a water supply temperature of 45...50 °C, a warm air stream is felt above the grate;
- the convection radiator casing does not heat up and does not pose a risk of burns to children;
- the heater can be easily adjusted manually or automatically using a valve + thermal head assembly (in electric versions - a thermostat);
- relatively small size and weight;
- the homeowner can order the desired body color from the standard RAL line (applies to water heaters).
Convection radiators can be safely hidden behind the screen, the heat transfer of the device will decrease slightly
Addition. If you don’t like the design of a wall-mounted convector, but are happy with the price, you can hide the device behind plasterboard sheathing or a screen. Heat transfer will decrease by 10% - the same amount of infrared radiation that will block the drywall. But it is necessary to install a convection grille for air passage, as shown in the photo.
Where can convectors be used:
- for general heating of country houses and apartments;
- on closed terraces of cottages, in office premises with stained glass windows instead of an outer wall;
- in kindergartens and other preschool institutions;
- in industrial premises with ceilings up to 3 m.
Maintenance of a convective device comes down to cleaning the heat exchange plates, between which dust accumulates. The operation is performed as soon as the heater becomes dirty.
Convector test run
After all the above measures have been carried out, a test run of the gas convector is carried out. It is carried out according to the instructions supplied with the installed equipment.
The gas pipeline is connected to the convector using a special type of flexible connection. Voltage is supplied to the unit. The “Start” command is issued from the remote control. At the same time, the burner is ignited and the built-in fans are turned on.
At the initial stage, the operation of the equipment may be accompanied by foreign odors. This is most often caused by burnout of excess paint and lubricants in areas close to hot surfaces.
The stability of the installation is monitored. During operation there should be no smell of gas, smoke, or extraneous sounds. The direction of air supply is adjusted and the temperature regime is set.
The advantage of gas convectors is that there is no need to build a heating system and there is no water in the equipment. This protects against the occurrence of leaks and the costs of installing pipelines with heating devices. The main disadvantage is the length of time it takes to complete the installation of gas convectors, the presence of hot surfaces and the possibility of natural gas leakage.
Gas supply: main stages
The installation of the gas convector has been completed, now we need to get started with the gas supply. This stage is quite complex and responsible at the same time. To supply gas, do the following:
Scheme of operation of a gas convector.
- According to regulatory documents, the pipe leading to the convector must go along the street. There are two options here: the first is that the pipe has a pre-installed threaded connection, the second is that there is no such connection. If there is a thread, then you can screw on the gas valve yourself, which will shut off the gas supply to the convector. If there is no withdrawal, one must be made. To do this, call professional gas welders from your local Gorgaz or similar office.
- After installing the gas tap, it is necessary to run a metal-plastic pipe to the convector itself. Using a tape measure, calculate the length of the pipe, simultaneously determining the presence of fittings.
- You need to buy pipe and fittings. The principle of purchase is that the seller must clarify the availability of a certificate of conformity of these pipes and fittings for this type of work.
- Lay the pipe, secure it with clips every m. To install the clips, you need to drill holes in the wall.
- When installing the necessary fittings, carefully lubricate the pipe and the fitting itself with silicone, which will provide additional sealing. Silicone will also serve as a lubricant and will make pipe installation easier.
As a result of the work, you should receive a convector mounted on the wall with a gas pipe connected to it.
Now the last stage of installation remains. A test run is required.
Gas convector installation diagram.
Before starting, open the gas tap and go over all fitting joints and threaded connections with a brush moistened with a water solution of soap or shampoo. This way you will be able to notice inflated bubbles (if any), which indicate gas leaks. If this happens, immediately turn off the gas supply valve. After checking the joints, start the convector. To do this, hold down the gas button for one minute. This way the gas will have time to pass through the pipes and enter the combustion chamber. Press the piezo igniter, a spark should ignite the gas. A blue flame will flare up in the firebox.
Adjust the operation of the convector by setting a comfortable temperature. During the first few hours of operation, you may smell an unpleasant odor of burning oil. This is normal, since the convector is new and the combustion chamber burns out. If the smell lingers for a long time, then you should turn off the gas and check all joints and threaded connections again.
It is advisable that all work on the installation of gas convectors be carried out by a professional who has sufficient experience in performing such work. This is also due to the fact that installing a convector yourself may void your warranty on the device. The gas convector must be accepted into the balance sheet by Gorgaz. You must have a documented permit for the tie-in. In addition, all installation decisions, as well as the conclusions of the commission for acceptance of the device into operation, must be documented and signed in the appropriate manner.
What is a gas convector
It should be noted right away that a convector is not a type of boiler; it works not only on a different principle (it heats not the coolant, but the air in a certain room), but also has a slightly different area of application. Most often, gas heaters are used in small houses where there is no need for constant heating. They can only heat the room where they are installed.
What does a convector consist of?
The design of the device is not too complicated, it includes:
Diagram of a standard gas convector with a fan for forced convection.
- a heat exchanger that heats the air;
- programmer – a device for controlling and maintaining room temperature;
- control panel, which contains various indicators;
- gas valve to control gas supply;
- a fan supplying air to the valve and heat exchanger;
- a fan that provides forced supply of warm air into the room.
Gas convector - operating principle
As you can see from the diagram, everything is quite simple. The convector plays the role of a gas burner; cold air enters from below under the influence of convection, heats up and exits through the hole at the top.
The device works quite simply: the operating principle is based on the phenomenon of convection - warm air rises when heated and cold air falls. Gas models can operate using either natural or forced convection. In the latter case, a special fan is used to supply air.
Advantages and disadvantages
The quality of the device itself, as well as its performance, depend on the price. By choosing a cheap model, you will not save money, since the device may last you less than a year. Repairs in the current situation will not be cost-effective. Therefore, we will consider the advantages and disadvantages based only on high-quality devices. So, the pros:
- efficiency and quick heating of the room;
- easy installation of a gas convector with your own hands;
- there is no need to make a heating system (water);
- low price;
- unlike electric analogues, gas models do not burn oxygen;
- completely autonomous operation mode;
- not connected to electricity (except for convectors with forced circulation);
- It is possible to connect the heater to a gas cylinder.
But gas convectors are not without their disadvantages:
- if gas is used from a centralized system, then it is necessary to obtain permission to connect the device;
- it is necessary to punch holes in the wall outward where the heater will be mounted;
- considerable dimensions;
- if you decide to install several convectors, then gas will have to be supplied to each of them, and only from outside the building.
Types of convectors
Devices can be classified by their power, as well as by design. If everything is clear with power: choose the one that can heat the room, then with the types of performance things are a little more complicated.
There are two types of heaters:
Wall-mounted models can fit very well into the interior.
- Floor-standing – devices are installed on the floor and do not require special installation skills. Such a convector can heat a fairly large room (even an industrial one), but it is heavy and requires a special base.
- Wall-mounted are more compact models that fit well into the interior of the house. Often the devices are mounted under the window to create a thermal curtain from cold air passing through the glass. Convectors of this type have low power, so they are only suitable for heating rooms in houses up to 100 square meters.
When choosing a convector, you should also pay attention to the material of the heat exchanger. The latter can be made of steel, cast iron or copper. Nowadays, models with a steel heat exchanger are more common, but cast iron ones have greater efficiency due to the properties of the alloy, and are also able to last longer
Their only drawback is their heavy weight. Copper analogues are effective and durable, but expensive
Nowadays, models with a steel heat exchanger are more common, but cast iron ones have greater efficiency due to the properties of the alloy, and are also able to last longer. Their only drawback is their heavy weight. Copper analogues are effective and durable, but expensive.
Autonomous heaters
What to do if there is no central heating or gas in the garage, and the frequency of your visits to the premises does not allow organizing a scheme with a solid fuel boiler?
In this case, it would be quite logical to use electricity for heating.
Oil radiator
The simplest homemade oil radiator is a welded register already familiar to us with several modifications.
- There are no welds for connecting to the connections.
- The register, as a rule, is made portable, which implies the presence of legs.
- Jumpers between sections are present on both sides. Their diameter is made slightly larger than when assembling a register for water heating. The instruction is due to the fact that natural convection implies a minimum hydraulic pressure, and if so, the hydraulic resistance should also be minimal.
- A heating element or several parallel connected heating elements are installed at the end of the lower section.
- Oil acts as a coolant. Ideally, a transformer one, but even testing will do.
- The register is equipped with a small open expansion tank. As an option, the oil is not added a little to the top of the register, and the weld on its upper section is equipped with an automatic air vent.
Heater from a car radiator
Another interesting solution is a homemade garage heater made from a radiator.
The diagram is indicated by numbers:
- Radiator.
- Expansion tank.
- Forced air fan.
- A casing that protects the fan blades.
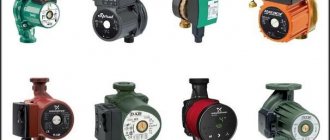
- Water pump.
- Oil supply pipe.
- Actuator.
- Fan drive belt.
- Electric motor.
- Frame stand.
- Drain tap.
- Block of heating elements.
- Blinds for adjusting the direction of air flow.
- Partially clogged radiator tubes are not a problem. They will miss the oil.
- Optimal motor characteristics are 300 - 500 watts at 1500 rpm.
- To heat the oil, heating elements with a total power of up to 3 kW are used. It is better to provide stepwise power adjustment by switching them on separately.
- Due to the small diameter of the radiator tubes, it is not worth using mining in this design. Transformer oil or antifreeze A-40 is suitable.
- The heater will operate most efficiently at an oil temperature of about 80C. The temperature is regulated by selecting the power of heating elements and fan speed.
Advantages and disadvantages of convectors
Wall-mounted convector-type heating radiators are convenient because they have fairly compact dimensions. More precisely, the convector itself has a fairly large area, but at the same time it is very thin - thus, installed in a room, it does not in any way reduce its usable space. Such radiators and heating convectors are mounted on the wall. Made of heavy-duty metal, they are, however, particularly light, which allows, if necessary, even to hang these types of convectors (of course, this is designed in advance). Almost all modern convectors of this type of heating system have a convenient regulator for controlling the heating level.
Floor convection radiators are larger in size compared to wall-mounted convectors.
There are quite a large number of models of convectors of this type on the modern market. Economical heating convectors can have hot coolant supply pipes not only from the side, but also from the bottom. In addition, almost all models have a small valve that allows the owner, if necessary, to remove accumulated air from the system without turning off the convector.
Built-in heating convectors, the technical characteristics of which do not differ from previous ones, have recently become increasingly popular. This is an excellent alternative to wall-mounted or floor-mounted heating radiators. The convector can be connected to a heated floor system and built directly into the floor. Thus, the heating process will be carried out continuously, but you will not be disturbed by a hanging or standing heating element.
Radiators for water heating
First, we will examine radiators designed for operation in central and autonomous heating circuits.
Register
The simplest and most affordable homemade heating radiators are made from pipes of large (100 - 250 mm) diameter, capped at the ends and connected by jumpers. These devices - the so-called registers - have a large internal volume and, accordingly, significant thermal inertia, which makes them an ideal solution for systems with solid fuel boilers.
How to make a simple horizontal register?
- Pipes are cut into sections of 1.5 - 4 meters
(depending on the expected length of the register). - Holes for jumpers are drilled or burned with a gas cutter
. An important point: the configuration of the jumpers should create a closed circuit inside the device, eliminating stagnation of the coolant in dead-end areas. - The pipes are connected by jumpers
- pipes of sizes DN20 - DN32. - Parallel to the jumpers, pipe sections of the same length are welded, but already welded to the blank walls
. They will add rigidity to the structure. - The ends are capped with bottoms cut from a steel sheet 4 - 5 mm thick
. - Nozzles are welded into the lower and upper sections
, which will subsequently connect the register to the supply line.
In most cases, a regular round water and gas pipe is used as register sections. It is attractive due to its low price per linear meter and maximum tensile strength with minimal wall thickness, which is ensured by a circular cross-section.
However, sometimes you can find homemade heating radiators made from a profile pipe - square or rectangular. Its advantages are the relative compactness of the register and a slightly larger surface area for the same cross-sectional area.
Convector
The simplest convector is a coil of pipe with plates pressed onto it, increasing the notorious heat transfer surface. The most accessible material is steel. New buildings often serve as sources of ready-made convectors for garage owners: apartment owners in them en masse replace the heating devices installed by the builders with sectional radiators that are more attractive in appearance and have greater heat output.
However, steel has a serious drawback - low thermal conductivity. In order not to be unfounded, we will present the thermal conductivity values for three metals that are most often used in the manufacture of heating devices.
It is obvious that when creating a convector it is advantageous to use non-ferrous metals: their thermal conductivity will sharply increase heat transfer, making the heating of the fins more uniform.
Homemade copper heating radiators come in all sorts of designs based on copper and aluminum plates. Aluminum fins are much more affordable compared to copper; some difference in heat transfer is compensated by its increased area.
To assemble the convector, solder intended for copper water pipes is most often used; somewhat rarer plates.
Advantages and disadvantages of convector heating
Let's take a look at what the main advantages of convector heating are and try to present all the advantages in the form of a list:
Installing electric convectors is one of the fastest ways to organize constant heating of a private home.
- Possibility of heating premises for any purpose;
- No impact on air (convector heating does not burn oxygen);
- Low impact on air humidity;
- Ease of installation of equipment (typical for electrical appliances);
- No negative impact on well-being (this is why a convector differs favorably from an IR heater);
- Large selection of heating equipment.
There are also certain disadvantages:
- Convector heating has little effect on air humidity. However, this is typical for many heating devices;
- Some people don't like the feeling of overheated air;
- Low efficiency in rooms with high ceilings;
- High temperature difference in the lower and upper parts of the rooms.
If we take into account electric convector heating, then it is characterized by another drawback - high cost. But if the house does not have a gas main, and you want the heating system to be inexpensive and easy to install, then you cannot do without convectors. We recommend installing electric convector heating in small country houses
In this case, you can get rid of unreasonable costs for laying pipes and installing a heating boiler
We recommend installing electric convector heating in small country houses. In this case, you can get rid of unreasonable costs for laying pipes and installing a heating boiler.
Video description
To find out which is more economical - an inverter heating system or heating using an electric boiler and radiators, see the following video:
Stereotype: Only for small houses
And in conclusion, regarding the prevailing opinion that convectors are only for houses with a small area with the number of heating points no more than 6. The objective disadvantages of a heating system with an electric boiler are characteristic of both small houses of 80-100 sq.m., and houses of a larger area. This means that the disadvantages of one system and the advantages of another are scaled to houses with a larger area of 200-300 sq.m.
What types of convectors are there?
Based on the principle of working with energy carriers, there is a wide selection of such equipment. But now most convectors sold in stores have an electric heater. There are models that run on gas - gas convectors.
Electric convectors are best suited for heating apartments because they are compact in size. Convector heating of a dacha or country house is more profitable to operate, creating it on the basis of gas convectors - gas is much cheaper. Of course, provided there is gas in the house.
According to the installation method, convectors can be divided into:
- Floor-standing;
- Wall-mounted;
- Mounted into the floor or baseboard.
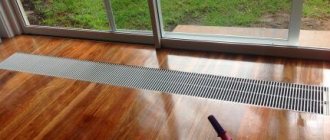
- Floor convectors are installed on the floor, may have wheels for moving along the floor surface, or can be rigidly installed, without the ability to move. Photo with a floor convector is just below.
- Wall convectors for heating are mounted directly on the wall using special brackets.
- The third type of convectors can be mounted into the floor or into the floor plinth.
Connection diagram
Water convectors are specialized equipment, so their installation is best left to professionals, especially when it comes to installing in-floor or basement types. You are only allowed to install wall-mounted water convectors yourself. In this case, it is necessary to follow a strict sequence of actions.
- It is necessary to mark the wall - using a level to determine the location of the convector itself, the place of water connection and, if necessary, electricity. Here you can either attach the radiator itself to the wall, or make markings with a ruler using the data in the product passport.
- Then the wall is drilled according to the applied markings and screwed into the dowel holes.
- Carry out the installation of pipes and electrical cables.
- The back of the convector is screwed to the wall with screws that are included in the kit. In this case, first they simply attach it to the screws, then measure the accuracy of fastening with a level, and only when they are convinced of this, screw the installation panel to the end.
- Now you need to secure the heat exchanger unit to the installation panel. For this purpose, it is allowed to use only those screws and fasteners supplied by the manufacturer.
- Now the electricity cable is connected to the terminal box. In this case, the main connection parameters are the manufacturer’s instructions and electronic circuit diagram. You must act strictly in accordance with it.
- Install the fan and, if necessary, adjust its position using a special device - a potentiometer.
- Now you can start connecting additional fittings. A thermostatic valve is installed at the inlet of the pipes, and a special threaded connection is installed at the outlet. It is imperative to check the tightness of the entire structure using an air compressor.
- Now you need to connect the pipes to the heating system. This must be done in strict accordance with the project.
- Finally, you can begin to assemble and install the water convector itself. To do this, in accordance with the diagram, install the frame, grille and thermostatic head, and attach the walls of the radiator.
- Using special adjusting screws, calibrate the location of the device on the wall, focusing on the level.
In principle, the installation of a built-in underfloor water convector is carried out in approximately the same way. Only first, when performing a rough screed, special built-in boxes are made in the floor, into which the radiator itself will later be placed.
Without any skills, it will be quite difficult to install such a water heating convector yourself for the first time. Therefore, here you either need to call a specialist, or be patient and act as carefully and slowly as possible.
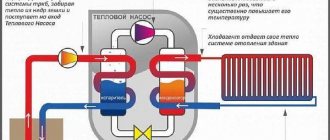
What is convection?
The phenomenon of convection was taught at school as part of the physics curriculum. This is the transfer of energy by jets of liquid or gas. As you know, warm air always rises and cold air sinks. Another striking example is water that is heated in a kettle. When the cookware sits on a lit burner, the warmer liquid rises from the bottom, which ensures uniform heating overall. This process is called natural convection. Convection can also be forced. This is the work of a fan, pumps, etc., under the influence of which the transfer of liquids and gases occurs.
Electric convector power calculation
When calculating the required convector power, you should adhere to the following rule. For every 10 sq. meters you need 1 kW of heat. Provided that the ceiling is about 2.7 m high. Ideally, each window should be equipped with a device of the same length as the width of the window opening. The second option for calculating power is the following ratio: per 1 cubic meter. meter of room should be from 35 to 40 W of heat, taking into account the heat losses that occur in corner rooms, rooms near the basement and attic. For such rooms you need to take devices with a power reserve. Otherwise, the heater will not provide the required temperature and, as a result, will work continuously.
What to look for when choosing
The key criterion when choosing a heating device is its thermal power. To accurately determine it, you will need to perform thermal-hydraulic calculations, take into account the area of the room, ceiling height, number of floors, quality of thermal insulation, and so on. This is done by heating specialists, whose services cost money.
Many private developers neglect this issue and rely on average statistical data. As a rule, to ensure thermal comfort, 1 kW of power per 10 m2 of area is sufficient. That is, if the room area is 25 m2, the convector should be 2.5 kW. In many ways, everything depends on the location of the room and the quality of the double-glazed windows (the required power can vary from 1.9 to 3.5 kW).
In addition, the final power of the convector depends on the thermal pressure - this is the difference between the surface temperatures of the device and the air in the room. Current sanitary standards state that the optimal value is 70 °C. In practice, there may be shifts, so the power must be adjusted. Many manufacturers take this feature into account and provide customers with calculation tables that indicate heat transfer levels at a certain temperature drop.
The next step in choosing is the type of convection. As noted earlier, devices can have natural or forced (with a cooler) circulation. Additional equipment increases the final cost, but increases thermal efficiency by 2–3 times.
Products with natural circulation are suitable for rooms with an area of no more than 15 m2 or in cases where several heating devices will be installed. Models with fans are optimal for larger rooms. It is important to note that their dimensions are the same, but their efficiency is different.
We decide on the overall dimensions:
- Length. If the window size is 2 m, it is necessary to install equipment with a length of 1.4 to 2 m (that is, from 70 to 100% of the length of the window itself).
- Width. It all depends on the manufacturer. As a rule, models with natural circulation have a width from 20 to 25 cm, and with forced circulation - from 27 to 32 cm.
- Depth. There are also different options here, depending on what the manufacturer decides. On average, the depth varies from 5.5 to 20 cm. For the most effective work, the following range is recommended: from 9 to 12 cm.
The power of the heating device can be adjusted.
This is done in the following ways:
- Manual. In this case, the system is supplemented with conventional ball valves, valves or thermostatic heads.
- Semi-automatic. At the entrance to the heat exchanger, a thermostatic valve is installed, connected to a remote regulator.
In order for the device to effectively perform its task - to heat the room, you need to be careful when choosing it, make all the calculations and take into account the features.
Operating principle and classification of convectors for home heating
Convector heating of a house can work from different heat sources. It can be:
- Electric heating element. Used in convectors of the corresponding type.
- Metal heat exchangers. They are found in gas convectors for home heating.
- Water convectors. In such heat exchangers, the coolant is heated using a central boiler room or a gas boiler.
The air that comes into contact with the heat exchanger is heated and directed upward. Thus, a directed movement occurs when the warm masses rise to the ceiling, and the cold air flow rushes down to the heat exchanger. The convection process can be accelerated by installing vertical fins that direct air flows.
In heating equipment running on natural gas or electricity, special fans and thermostats that create forced convection must be additionally installed.
Conventionally, all types of convectors can be divided into several categories.
Water convectors
Water convector device
Reviews on home heating with convectors of this type are largely positive. Water heating is found in any residential and administrative building where there are convectors. They are a heating device that consists of a metal pipe and fins that are attached to it. This design is how the coolant moves.
Most citizens call this heating central water, but not convector. Although it is the last option that is correct, since the process of convection is observed.
If we talk about water convectors for heating a private house, they can be built-in floor type. These devices are designed for installation under window openings or in the passage area. Such models can also be used not only in residential buildings, but also in offices and administrative buildings.
Convector heating, operating on the water principle, is effective in systems that have a circulation pump and its heating temperature of at least 80 degrees. In other cases, their work will be ineffective.
Electric convectors
Electric convectors can be of different modifications and power
These modern models of convectors powered by electricity are quite easy to use and efficient. But for regular heating of a private house with convectors, you should choose more powerful models that have protection against voltage surges and overheating.
Electric convectors are mounted on the wall surface and connected to the power supply. The absence of coolant prevents its defrosting, thereby allowing you to use heating at any time. As reviews show, it is better to use convector heating at home in the evening, when all the residents return home. This results in significant savings in heating costs. In addition, most modern models have timers with which you can set the required operating time throughout the day.
It is necessary to select the optimal number of appliances taking into account the area of the house itself. On average, heating is 10 square meters. m of room will require a 1 kW convector. Future costs can be calculated by knowing the cost of 1 kW and the operating time of the heating system.
This is the best option for heating with convectors in a wooden house, cottage and other country property, since there is no need to use a gas main. In addition, this heating system can be used for irregular operation. It is not only reliable and very effective, but also has a high safety class.
Gas convectors for home heating
The gas type convector can use a gas line or cylinders for operation. This is a fairly efficient and affordable heating system. One drawback is the need to install a special chimney.
Judging by the reviews, convector heating at home is more efficient and economical than using a gas boiler. The savings lie in the absence of the need to lay a powerful pipe system and install radiator batteries. This system is well suited for both permanent and temporary residence.
It should be taken into account that when air masses move, dust regularly moves. This may cause discomfort for people with allergies or lung diseases.
Installation process
Dimensions of the in-floor convection heater and the niche for it.
If you want to install an in-floor convector yourself, we recommend that you think about the location for its installation during the construction stage of the building - this will make it easier to organize a niche of suitable depth. Moreover, the niche itself should be 1-1.5 cm larger (on each side) than the metal box of the device
. At the same time, you need to make sure that the upper part, where the decorative grille will be located, is on the same level as the future floor covering.
Once the niche is ready, you can begin installing the equipment. We fasten the in-floor convector box using the included fasteners. We check the correct installation using a building level - the heater should be located evenly in the niche, without distortions. Further installation involves connecting to a heating system or electrical network - for this, plastic pipes, flexible hoses or metal pipes of suitable diameter are used.
If you are installing a water convector, provide thin, shallow niches for laying pipes/hoses. When installing an electrical appliance, we recommend laying the connecting wires in cable ducts or pipes so that they can be replaced without problems. We recommend wrapping supply pipes with coolant in thermal insulation.
The radiator pipes will also be covered with screed.
At the next stage, we fill in the concrete screed - our DIY installation of the in-floor convector is nearing completion. The result of this stage should be a subfloor, with a metal box protruding slightly from it. Next, we complete the final leveling of the floor and begin laying the floor covering. At the last stage, we place a decorative grille over the box - it is best to choose it in the same tone as the color of the floors.
Do-it-yourself installation of in-floor convectors is complicated by the fact that you need to choose the correct dimensions of the niche so that the metal body of the device is located at the correct depth. Recommendations on this issue can be found in technical data sheets. The worst thing is if you have to carry out the installation in a house that has already been built - it is not a fact that it will be possible to make a niche in the subfloor, as this may affect its strength. In this case, it will be necessary to increase the height of the subfloor in all rooms.
Caring for installed floor convectors is very simple - just remove the decorative grille and remove the dust accumulated inside. Do not use aggressive detergents for this.
Operating principle of the convector
According to the laws of physics, cold air is heavier, so it is at the bottom.
The principle of convection is to pick up cold air masses from below, heat them inside the unit and move them to the top, from where warm air is blown upward.
This is how the room is heated. The flow moves continuously, so within 3 - 4 minutes the room becomes warm. Then the air masses cool again and fall down, where they again fall into the lower openings of the convector.
As can be seen from the figure, the operating principle of an electric convector and its design are quite simple.
It consists of:
- body made of metal;
- heating element (heating element);
- various sensors (temperature, convector position, overheating sensor);
- control panels;
- thermostat;
- gratings.
The body is usually made of light alloy metal. It performs a protective function and is made lightweight specifically to reduce the weight of the product. Two gratings are inserted into it. One of them is located below. Through this hole, cold air is sucked in by the convector. The second is located in front of the heater in its upper part. Already heated air exits through it.
Air can enter the electric heater either naturally (convection, when air rises when heated) or forced. Fans are often installed in devices to increase the air supply, thereby increasing the efficiency of the convector. This operating principle of convector heaters reduces the load on the heat exchanger, which increases the reliability and durability of the device.
The temperature sensor is installed in the lower part of the heater. Typically, it takes a temperature measurement every 45 seconds, after which a signal with the result is sent to the control unit, where the electronic thermostat turns the device on or off (depending on the sensor readings).
Types of heating elements
The heart of the convector is the heating element. Electric models typically use three types of heating elements:
- monolithic;
- tubular with aluminum fins;
- needle.
It is recommended to install models with a monolithic heating element in the bedroom, as they do not make any sounds and will not interfere with rest.
A special feature of a heater with a monolithic heating element is its noiselessness. In this case, the body is made solid (cast). The heat loss of this device is minimal, so it has a high efficiency rate.
In the case of a tubular heating element, the heating element is a steel tube in which a nichrome thread is stretched, and the internal space is filled with insulating backfill (heat-conducting). Fins made of aluminum are fixed to the tube, which provides the device with high heat transfer and increases the degree of convection. Heaters of this type have a long service life and can be installed in the bathroom, but sometimes they make a cracking noise.
Needle heating elements consist of a dielectric thin plate on which a heating chrome-nickel filament coated with insulating varnish is installed. Convectors with such a heating element heat up and cool down almost instantly, but they should not be used in rooms with high humidity levels. The main advantage of devices with needle heating elements is their affordable price, but they cannot be called durable.
Convector electrical circuit
As can be seen from the figure, the circuit of electric heaters of this type is quite simple.
It is enough to connect the device to a 220 V network using a cord, then press the switch button (it completely disconnects the device from the electrical network, so you don’t have to remove the plug, but use the button). The control panel is usually a temperature controller. Also included in the circuit is a safety sensor that opens the circuit when overheated, and a thermostat that turns the convector off or on depending on the ambient temperature.
Design features
Externally, the unit is a rectangular solid body covered with a grille. The floor version looks like a small bench, the wall version is a panel of small thickness, and the built-in ones can be seen only thanks to the grille.
The classic casing is made of stainless steel. But, taking into account the design features of the room and the wishes of the clients, the body can be made of wood, marble chips or MDF panels.
Ascetic on the outside, the inside of the water heating convector is more complicated. Their “heart” is considered to be a heat exchanger, which is a flat copper pipe or a coil-shaped pipe. The lamellas are attached perpendicularly to it using a tight fit method.
The place where they are connected to the pipe should exclude the slightest gaps that reduce heat transfer. Copper is most often used to make plates; steel and aluminum options may be found, the main thing is that the thermal conductivity is high.
Connection to the riser or central pipeline is made through special threaded entries inside, which are located at the end of the device or on the side. Modern heating water convectors are equipped with tap valves or manual/automatic valves to release excess air that impairs heat transfer.
If the kit includes an electronic thermostat/thermostat, it will control the operating rhythm of the device. The heating process periodically stops when the set temperature is reached and starts again when the air cools.
To enhance air circulation, a fan is used, which is either already built-in or will have to be purchased. This useful addition (1-2 pieces) is found only in.
How convection helps you stay warm
Unlike conventional batteries, which warm the air by radiating heat from their surfaces, water heating convectors operate differently. They mix air masses, replacing warm air with cold air and creating a pleasant atmosphere. At the same time, there is no feeling of dryness and a specific unpleasant smell of burnt dust.
Hot water from the heating system enters the heat exchanger and heats the plates. Considering the thermal conductivity of the material used, as discussed above, the parts heat up very quickly. Through the holes in the grate, warm masses rise unhindered, being displaced by cold ones.
The built-in fan stimulates this process, and in a matter of minutes you can already feel the result. At the same time, the efficiency increases to 95%, which makes it appropriate to use water convectors in spacious rooms with large window and door openings.
In accordance with the requirements of GOST 20849-94, water heating convectors must have the primary inherent property - tightness and strength, which is checked by a test water pressure of 1.5 MPa. The heating elements and casing must be coated with an anti-corrosion, heat-resistant compound.
Among other things, water convector heating is relatively inexpensive, given its growing popularity. Installation of a wall, floor or plinth structure by specialists will cost you almost half as much as an in-floor structure. This price is justified by the complexity of the preliminary work on constructing a niche in the raised floor.
Brief characteristics of typical convectors
Their technical characteristics are important for water heaters; it is on their basis that a specific heater model is selected. The characteristics of most standard convectors are within the following limits:
The characteristics of most standard convectors are within the following limits:
- the maximum permissible pressure during operation is 16 bar;
- pressure testing – 25 atm;
- water temperature can reach 130 °C;
- maximum case heating – 60 °C;
- the heat exchanger can be 4 or 6 rows;
- the volume of water in the heat exchanger is 0.7–0.9 l;
- throughput per hour from 90 to 170 liters;
- power from 100 to 200 kW;
- weight ranges from 14 to 21 kg.
Temperature difference
If you do not perceive the feeling of air temperature well, then this minus will not be the most critical for you. But if you feel the temperature change literally by a degree, then you will not like the scheme with convector heaters - there will be a large temperature difference between the upper and lower parts of the room, which is a clear disadvantage. The feeling of the difference is the simplest – people’s feet are cold.
We recommend purchasing convector heaters, the outlets of which are located on the front wall, and not at the top end - they provide more uniform heating.
Low heating rate
Electric convectors with a fan warm up the room much faster.
A noticeable disadvantage, but it will be noticeable only during startup periods and when the temperature on the regulators changes - convector heaters provide slow heating. But you can fight this disadvantage - to do this, it is enough to purchase convectors with built-in forced convection fans. The fans are switchable, so there will be no discomfort at night.
Low efficiency with high ceilings
Not the brightest minus, since in most houses the ceiling height is up to three meters, and less often - 3 meters. With higher ceilings, convectors lose their efficiency - the temperature difference between top and bottom is too high, and convection is difficult. In such rooms it is best to use high-power infrared devices. As for convectors, buying them will be a waste of money.
Convectors generate dust
Models with a built-in filter generate less dust, but they also need to be cleaned periodically.
If you install convection heaters in your home, be prepared for dust moving around the premises. For healthy people this is not critical, but it is better to get rid of dust. As for allergy sufferers and small children, a dusty atmosphere is harmful for them. If you decide to heat with convectors, do not neglect regular wet cleaning and dust removal from the equipment
You can also pay attention to models with built-in dust filters
Other cons
In conclusion, let's look at a few more small disadvantages:
- When convector heaters operate, weak drafts are formed - some sensitive people notice them;
- Convectors may crackle - this is the effect of thermal expansion of materials, but it is not noticeable in all devices;
- An unpleasant odor may appear - most often it is noticeable when you first turn it on. If the smell is constantly heard, the problem lies in the cheapness of the materials from which the equipment is assembled - do not skimp on heating.
Troubleshooting
As you can see, there is nothing complicated in the design of a gas convector. Due to its simplicity, this equipment serves for a long time and with high quality. But sometimes it happens that incomprehensible interruptions arise in its work. If you notice that the flame burns unevenly or is difficult to ignite at all, the problem is often a clogged nozzle.
Simply put, the hole through which the gas escapes becomes clogged with soot or other contaminants. In this case, you can easily clean it yourself. All you need for this is a thin needle. Use it to carefully clean the hole.
Very important: before starting work, be sure to shut off the supply of blue fuel to the equipment. For this purpose, a special tap is provided on the supply pipe.
It is absolutely forbidden to work with the device when gas enters it!
It is absolutely forbidden to work with the device when gas enters it!
If after cleaning the problem does not disappear, then the most reasonable option for further action would be to call a specialist from a specialized organization. Remember that gas equipment has a high fire hazard. All more or less serious work with it should be carried out only by craftsmen who have the appropriate license.
If you decide to repair the gas convector yourself, but do something wrong, this is fraught not only with subsequent fines from the gas service, but also with the possibility of a fire. You should not take such responsibility upon yourself; be sure to invite specialists to troubleshoot serious problems. Good luck and a warm home!