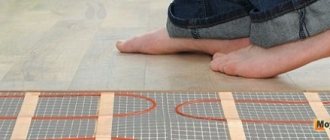
During construction or renovation, specialists are increasingly abandoning the classic heating scheme in favor of an innovative floor heating system. Heated floors are a modern, convenient, effective way to make your home warm and comfortable at any time of the year, without disturbing the style of the interior. This technology is widely used in residential, office and industrial settings.
Heated floors
Design and principle of operation
A water heated floor is a room heating system in which the coolant circulates along a circuit located under the floor covering. Please note that the pipes are not always screeded. There are “decking systems” in which the contour is not poured with concrete.
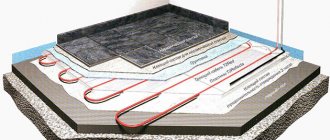
Upon closer examination, the water heated floor cake consists of the following elements:
- Prepared base;
- Screed (5 cm);
- Thermal insulator (5 cm);
- Pipes (2 cm);
- Screed (4 cm);
- Floor covering (2 cm).
Depending on the pipes used, there may be several layers of waterproofing. The base is a subfloor in the basement or on the first floor of a private house. The first layer of screed is required precisely in the absence of a flat surface.
A 5 cm thick thermal insulator is a standard solution. But if possible, it is better to increase the thickness to 10 cm. This increases the efficiency of the entire system by 10-15%. Especially if the water-heated floor is installed on the first floor. The best material for this layer is extruded polystyrene foam.
Pipes in the vast majority of water heated floors are used with a diameter of 16 mm.
The second layer of screed covers the entire system and serves as a giant heat accumulator.
The thickness of the water heated floor cake varies from 18 to 23 cm. And the weight of 1 m2 of this system reaches a quarter of a ton! Such harsh conditions significantly limit the spread of water-heated floors.
The circuit is connected to the pump and boiler through an adjustment and control system.
Where can I use it?
Due to the sufficient thickness and mass of the entire system, its use is limited to private housing construction. It is extremely irrational to install water-heated floors in apartments.
The main reason is difficulties with connecting the power. You can connect to the central heating system only after permission from the regulatory authorities. And it is almost impossible to get it. Even if it exists, the main leitmotif – autonomy – will disappear. We know of options for installing electric and even gas boilers in an apartment, but these are isolated cases that only confirm the rule: water heated floors are used only in private homes.
Advantages and disadvantages
The advantages of water heated floors are fully revealed only when using cheap energy sources, such as gas, coal, firewood. Heating the coolant with an electric boiler is approximately 7 times more expensive than using gas equipment.
The gigantic heat capacity of the water heated floor system is another plus. A room containing ≈ 100 kg/m2 of heated concrete cannot cool down quickly (only the top layer of screed is taken into account).
But there are also disadvantages. First of all, this is monstrous inertia. It takes time and energy to warm up such a layer of screed.
Inertia leads to the fact that temperature control of a water heated floor is very conditional. Control equipment takes temperature readings from the coolant, floor surface and air (in some thermostats). But the changes made through the thermostat appear very slowly.
What is a heating cable?
Resistive and self-regulating cables are used to install heated floors. Resistive products are characterized by the presence of constant resistance and a stable level of heat transfer. This wiring can be single-core or double-core: the number of cores affects its switching circuit. The connection of a single-core cable is carried out by inserting both ends of the bay onto the thermostat. If a two-core cable is used, then only one end is connected.
The mechanism of the self-regulating cable includes the ability to adapt to the temperature of the surrounding space, adjusting the volume of outgoing heat. Each section can be adjusted, which is not affected by the condition of the nearby cable. It often happens that an object is placed on the floor surface: this leads to an increase in the temperature underneath it. The self-regulating cable reacts to this by reducing the heat generated in this area by increasing its resistance (the current strength and heating temperature are reduced). At the same time, neighboring areas are operating as normal. After the object is removed, the surface temperature equalizes.
The difference in characteristics explains the fact that the cables are laid differently. In the case of self-regulating products, there is no need to make a discount on the location of furniture items. Resistive models are installed with greater care: when developing a laying scheme, they preliminarily designate the areas where furniture will be located or objects suspended at a low height. Heating cables of this type may only be installed in free areas. Therefore, the main disadvantage of resistive cable floors is their fear of overheating, which can cause them to burn out.
Installation of water heated floor
The task is quite difficult, but doable. You just need to level the base first. This is a very important requirement, given that leveling will still be required and it is more effective to do this with the first layer of screed. Why?
For example, the height difference in a room is 3 cm. If you immediately lay the pipe and only then level it with a screed, it will turn out that in one corner the height of the cement mixture will be minimal - 4 cm, and in the other 7. This means that during the operation of heated floors, with They will heat 4 cm of concrete on one side and 7 cm of concrete on the other. Such an uneven load has a very detrimental effect on the entire system as a whole and leads to rapid deterioration of the floor covering.
See also: Warm floors under laminate
Therefore, the first and important step is to level the floors to the horizon level. To prepare concrete floors you will need:
- Beacon profile;
- Laser level;
- Construction square;
- 5-10 kg of gypsum;
- Primer;
- Mobile concrete mixer;
- Cement;
- PGS;
- Polypropylene fiber.
Work progress:
The floors are swept and primed. While the soil dries, beacons are set up. To do this, install a laser level in the middle of the room so that the projection of the horizontal beam is at a height of 15-20 cm from the floor. Then, using a square, measure the height from the floor to the beam in different corners of the room and, based on the results, determine the highest point. In this place, the height of the screed will be the minimum allowable - 4 cm. In other places - according to need.
To install beacons, gypsum is diluted to a thick sour cream state. Then small piles are made from the resulting mass along one wall, in increments of 60-80 cm, and a beacon profile is laid on them. By placing a square on it, level it with the horizon, placing it at the desired height. There should be 50 cm from the wall to the first beacon. Between adjacent beacons the distance varies depending on the length of the rule (guide by 1-1.3 m). Please note that the plaster sets quickly, the work is carried out “without a smoke break”.
After about 30-40 m, you can pour the screed. Cement is diluted with ASG in a ratio of 1:5. Polypropylene fiber is added at the rate of 80 g. per 100 liters of mixture. Fiber is an element of dispersed reinforcement, qualitatively increasing the strength of the coating. In addition, after hardening, the new surface will be perfectly smooth.
Pour the resulting mixture so that each subsequent portion overlaps the previous one by 10-15 cm. The screed is leveled according to the rule, with orientation along the beacons.
After filling the entire surface, time is required for the technical maturation of the cement-sand screed. Calculation is approximately the next 1 cm of thickness – 1 week.
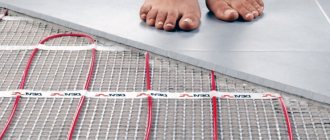
Do-it-yourself electric heated floor under laminate and linoleum
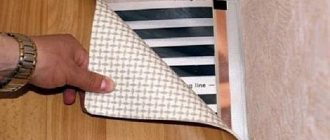
For this type of coating, it would be optimal to use a film heated floor. With a level base (a prerequisite for normal operation, if the floor is curved, a preliminary leveling screed is required), installation takes little time and does not require screeding or other wet work.
Installation process
Installation also begins with marking the heated area (do not place it under furniture, appliances and low-hanging objects) and installing a thermostat and floor temperature sensor. Next, the heat-insulating foil backing is rolled out. Since there is no tie, it can be used without any worries.
Roll out the heat-reflecting foil backing
The strips of material are rolled out close to each other. It can be fixed to the floor using double-sided tape or attached from above with staples from a construction stapler.
Faster to fix with a stapler
The joints of the strips are taped with tape. Moreover, it is advisable to also take a foil one - to minimize heat loss.
Tape the joints
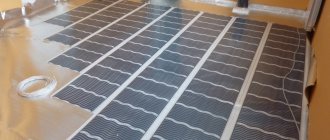
Next, roll out the heating film. It is cut along the lines marked on it into pieces of the required length.
There are special cut points on the film
The film strips are laid close to each other or with a small gap, but not overlapping. Overlapping of copper bars should not be allowed under any circumstances.
The stripes roll out one next to the other
They are fixed to each other using tape.
The joints are taped
Next you can proceed with the electrical connection. The connection diagram is shown in the photo.
Electrical diagram for connecting a film heated floor
First, bitumen insulation (included in the kit or purchased separately) is used to cover the tires at the cut points. Take a piece of insulation, remove the protective coating from one side, and apply it so that the entire surface of the bus, including the contacts, is completely covered. Half is folded over to the other side and pressed carefully.
We isolate the tire cuts
On the side close to the thermostat, contact clamps are installed (included in the kit, but can be purchased separately or soldered to a copper busbar). The contact consists of two plates. One is placed on the tire, the second under the film.
Installation of contact plates
The installed plate is crimped with pliers. Check the strength of the installation by lightly tugging the contact.
We crimp the contact with pliers
We take electrical wires with copper conductors, according to the diagram above, insert one or two conductors into the clamp at the contact plate and also crimp them with pliers. If you have soldering skills, it is better to solder the connection.
Crimp the inserted wires
The next step in installing an electric film floor is insulating the conductor connection points. For each connection there are 2 bitumen insulation plates. One is laid from below, the second from above. Also make sure that the buses and contacts are completely covered.
Insulation of strip joints
The installation of the heated floor temperature sensor is also different. It is simply glued to the black (carbon) strip with a piece of tape.
Attaching the floor sensor to the carbon strip
To prevent the sensor from sticking out, a window is cut out in the substrate.
Cut a window for it in the backing
The same windows are cut out for insulated contact plates and wires. This is necessary so that the laminate or linoleum lies flat, without bumps.
Cut out windows for contact plates and wires
We seal the laid wires with tape.
We lay the wires and seal them with tape on top
Stacked wires
We connect the conductors to the installed thermostat (installation is no different from that described above), test the system, setting the heating to no more than 30°C. After checking whether all the strips are heating up, whether there is a spark or a characteristic smell of melting insulation, turn off the warm unit.
The further procedure depends on the type of flooring used. If it is laminate, you can immediately lay out the underlay and begin laying it. Only the substrate must be special, designed for heated floors, just like the laminate itself.
If linoleum is to be laid, a thick polyethylene film is rolled out onto the film electric heated floor.
Lay the film
A rigid base is laid on top - plywood, gypsum fiber sheets. They are attached to the floor with self-tapping screws, but you have to be careful not to get into the tires. And you can already lay carpet or linoleum on top.
Laying the heat insulator
Extruded polystyrene foam and cross-linked polyethylene foam, only these two materials can be used for thermal insulation in a water heated floor system.
Before laying the heat insulation sheets, a damper tape 10-12 mm thick is glued around the perimeter of the room. It serves not only to compensate for the thermal expansion of the screed, but also to prevent heat from escaping into the walls. In height, it should protrude beyond the boundaries of the top layer of the screed.
The heat insulation sheets are laid out staggered and always on top of the waterproofing layer. For waterproofing, it is best to use polyethylene film with a thickness of 0.2 mm.
If you decide to make the thermal insulation thickness 10 cm, then it will be better if you lay two layers of slabs 5 cm thick. Be sure to have a spacing between the layers.
There is an option to use special slabs designed for organizing water-heated floors as a heat insulator. Their difference is in the bosses on one of the surfaces. A pipe is laid between these bosses. But their cost is unreasonably high. In addition, not all pipes will be supported in such slabs. For example, polypropylene and polyethylene pipes are too elastic and will require additional fixation.
The pipes are not attached to the heat insulator. The fastener must pass through the foam layer and be fixed in the screed. This is a very labor-intensive process considering the amount of work involved.
Mounting tapes are a more acceptable solution, but it is very difficult to lay a pipe on them in a spiral (snail).
The best option would be to fix the pipes on the mesh. In this case, the mesh will serve specifically for fastening pipes, and not for reinforcing the screed.
There are special meshes made of biaxially oriented polypropylene, or you can use a simple masonry mesh.
See also: Film heated floor
FAQ
How expensive are electric heated floors?
Contrary to popular belief, their electricity consumption is not too high. It can be compared to the consumption of an oil cooler. At the same time, the operating mode of the heated floor is selected based on weather and climatic conditions, which allows you to save on heating on warm days.
There is information that infrared systems create strong electromagnetic radiation. How dangerous is it?
This issue has been thoroughly researched and tested many times. Radiation from a heated floor is 20 times lower than the sanitary standard. For example, the radiation from a TV is much higher, so there is nothing to worry about.
Is it possible to change the length of the heating cable?
No, you can't do this. The cable is cut into sections of a certain length, designed to connect to the network and create a given load. If the cable is shortened, the wiring will be at risk of overheating. In addition, the RCD may trip and energy consumption will become too high.
How long do heated floors last?
If these are products from well-known companies, only the warranty period can range from 15 to 50 years. Of course, you can count on such durability only if you follow the installation technology and rules of use.
Is it necessary to install a thermostat?
Yes, this is required. Otherwise, you will have to endure the heat or freeze with the heating system running. Installing a thermostat will not only allow you to adjust the heating mode, but will also make it possible to save on energy consumption on warm days.
Selection of pipes and their installation
The following types of pipes are suitable for water heated floors:
- Copper;
- Polypropylene;
- Polyethylene PERT and PEX;
- Metal-plastic;
- Corrugated stainless steel.
They have their own strengths and weaknesses.
| Characteristic Material | Bend radius | Heat transfer | Elasticity | Electrical conductivity | Life time* | Price for 1 m.** | Comments |
| Polypropylene | Ø 8 | Low | High | No | 20 years | 22 RUR | They bend only with heat. Frost-resistant. |
| Polyethylene PERT/PEX | Ø 5 | Low | High | No | 20/25 years | 36/55 RUR | Can't withstand overheating. |
| Metal-plastic | Ø 8 | Below the average | No | No | 25 years | 60 RUR | Bending only with special equipment. Not frost-resistant. |
| Copper | Ø3 | High | No | Yes, requires grounding | 50 years | 240 RUR | Good electrical conductivity may cause corrosion. Grounding required. |
| Corrugated stainless steel | Ø 2.5-3 | High | No | Yes, requires grounding | 30 years | 92 RUR |
Note:
* pipe characteristics are considered when operating in water-heated floors.
** Prices are taken from Yandex.market.
The choice is very difficult if you try to save on yourself. Of course, you don’t have to consider copper ones - they’re very expensive. But corrugated stainless steel, at a higher price, has exceptionally good heat transfer. The difference in temperature in the return and supply is the largest. This means that they give off heat better than their competitors. Considering the small bending radius, ease of operation and high performance characteristics, this is the most worthy choice.
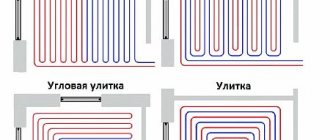
Pipe laying is possible in a spiral and snake. Each option has pros and cons:
- Snake - simple installation, almost always a “zebra effect” is observed.
- Snail – uniform heating, material consumption increases by 20%, installation is more labor-intensive and painstaking.
But these methods can be combined within one circuit. For example, along the walls “facing” the street, the pipe is laid in a snake pattern, and in the rest of the area in a snail pattern. You can also change the frequency of turns.
There are generally accepted standards that professionals are guided by:
- Step – 20 cm;
- The length of the pipe in one circuit is no more than 120 m;
- If there are several contours, then their length should be the same.
It is better not to install pipes under stationary and large-sized interior items. For example, under a gas stove.
IMPORTANT: be sure to draw the installation diagram to scale.
Laying begins from the collector. Unwinding the coil, fix the pipe according to the diagram. It is convenient to use plastic clamps for fastening.
Corrugated stainless steel is produced in coils of 50 m. To connect it, proprietary couplings are used.
The last element laid between the turns of pipes is a temperature sensor. It is pushed into a corrugated pipe, the end of which is capped and tied to a mesh. The distance from the wall is at least 0.5 m. Don’t forget: 1 circuit – 1 temperature sensor. The other end of the corrugated pipe is led out to the wall and then along the shortest path is brought to the thermostat.
Temperature
Using a temperature sensor and programmer makes it possible to independently enter the desired mode.
However, each type of heater has its own limit:
- Heating cables can withstand +100 degrees, with a maximum operating temperature of +65 degrees.
- The mats have a maximum temperature range of +80-104 degrees. The operating temperature depends on the material of manufacture: +60 degrees for cable mats and +55 degrees for rod mats.
- The operating temperature of film infrared systems is about +55 degrees.
Since the thermostat can change the temperature over a wide range, it is impossible to indicate the exact energy consumption. However, in any case, these systems will be more economical. Rod heaters are famous for the lowest level of energy consumption; In second place in terms of efficiency are film ones.
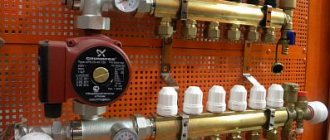
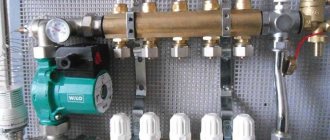
Control system and circuit testing
The control system for water heated floors includes:
- Pump;
- Boiler;
- Collector;
- Thermostat.
The arrangement of all elements in compliance with technical parameters is a very complex thermal engineering task. A lot of parameters are taken into account, starting from the number of fittings and the length of pipes, and ending with the thickness of the walls and the region of the country. In general terms, you can focus on the following data:
- The pump can only be used as a circulation pump. The “wet” type of pump is more reliable than the “Dry” type and less demanding to maintain.
To calculate performance, use the following formula:
P = 0.172 x W.
Where W is the power of the heating system.
For example, with a system power of 20 kW, the pump capacity should be 20 x 0.172 = 3.44 m3/h. Round the result up.
The pressure is calculated using a more complex technique. After all, the pipes are located horizontally, and the pump characteristics show vertical pressure. Use the following formula: H = (L * K) + Z/10. Where L is the total length of the circuits, K is the pressure loss coefficient due to friction (indicated in the pipe passport, converted to MPa), Z is the pressure reduction coefficient in additional elements
Z1 – 1.7 thermostat valve;
Z2 – 1.2 mixer;
Z3 – 1.3 valves and fittings.
Using an example, it looks like this, let’s say there are 3 circuits, 120 m each. In total there are 18 fittings, 3 thermostat valves, 1 mixer. Pipe – corrugated stainless steel ø16 mm, loss coefficient 0.025 MPa.
H = (120*3*0.025) + ((1.7 * 3) + (1.3 * 1) + (1.2 * 18))/10 = 9 + (5.1 + 1.3 + 21 .6)/10 = 11.8 m. The result is rounded up - the pump head is 12 m.
- The boiler power is calculated using the formula W = S * 0.1. Where S is the area of the house. There are also a lot of correction factors, depending on the thickness and material of the walls of the house, the climate of the region, the number of floors, and the presence of adjacent rooms.
Please note that the outlet water temperature should be more than 30 – 35˚C. To withstand this temperature, a mixer is installed in front of the collector. In it, water is mixed to the desired temperature before entering the circuit.
- The collector regulates the water supply in each circuit. Without it, the water will follow the path of least resistance to flow, that is, along the shortest circuit. The adjustment is carried out by servo drives, according to data from the thermostat.
- Thermostats monitor the temperature in controlled rooms by taking readings from temperature sensors.
Before crimping the circuit, it is washed and only then connected to the manifold. Water is supplied at normal pressure, but the temperature is increased by 4˚C per hour, up to 50˚C. In this mode, the system should function for 60-72 hours. IMPORTANT: constant monitoring is required during crimping!
At home, without the use of special equipment, it is impossible to pressurize with high pressure.
If the inspection does not reveal any installation flaws, then you can proceed to further operations.
Screed
IMPORTANT: the top layer of screed is poured only when the contour is filled. But before this, the metal pipes are grounded and covered with thick plastic film. This is an important condition to prevent corrosion due to electrochemical interactions of materials.
The issue of reinforcement can be solved in two ways. The first is to place a masonry mesh on top of the pipe. But with this option, cracks may appear due to shrinkage.
Another method is dispersed fiber reinforcement. When pouring water-heated floors, steel fiber is best suited. Added in an amount of 1 kg/m3 of solution, it will be evenly distributed throughout the entire volume and will qualitatively increase the strength of hardened concrete. Polypropylene fiber is much less suitable for the top layer of screed, because the strength characteristics of steel and polypropylene do not even compete with each other.
Install the beacons and mix the solution according to the above recipe. The thickness of the screed must be at least 4 cm above the surface of the pipe. Considering that the pipe ø is 16 mm, the total thickness will reach 6 cm. The maturation time of such a layer of cement screed is 1.5 months. IMPORTANT: It is unacceptable to speed up the process including floor heating! This is a complex chemical reaction of the formation of “cement stone”, which occurs in the presence of water. And heating will cause it to evaporate.
You can speed up the maturation of the screed by including special additives in the recipe. Some of them cause complete hydration of cement within 7 days. And besides this, they significantly reduce shrinkage.
You can determine the readiness of the screed by placing a roll of toilet paper on the surface and covering it with a pan. If the ripening process is over, then in the morning the paper will be dry.