The question of whether a stove is needed for a garage arises immediately after the warm days are replaced by cold weather. And although antifreeze is poured into the car’s cooling system, the cold negatively affects the battery, which simply does not want to start the car in winter. At the same time, the engine takes a long time to warm up, the oil thickens, and it is unpleasant for the garage owner to be in it. Therefore, in this article we will look at stoves that can be used in garages, talk about their types, pros and cons, and also give examples of designs.
Which garage stove to choose Source neauto.ru
To disassemble garage stoves, you need to understand that conventional stoves used to heat homes will not work here. We need a unit that would evenly fill the space with heat, penetrating even into the inspection hole. Today, manufacturers offer a fairly wide range of garage stoves, but do they all cope with their responsibilities? After all, the garage has a completely different square-to-cube ratio. Briefly about this.
Features of garage heating
Not every vehicle owner has a good, warm, durable box. Usually car owners have an iron box. This is the cheapest, fastest way to protect your car from bad weather. Such buildings protect only from precipitation and wind. But from a heat retention point of view, they are useless.
Hot air evaporates instantly from such a structure. How to solve a problem? How to weld a stove for a garage? There are several ways. When choosing, you need to understand that heating a residential building and a garage building is not the same task. The question is not even about insulating the room. According to the laws of physics, using the theory of the law of the square of the cube, we understand that it will take more fuel to fire a small box than to heat a house.
For example, for a cottage with 3 floors, we will spend 10 kW, and to warm the box it will take us about 3 kW. If we want to get a box temperature of 15 degrees, we need a 2 kW boiler. When we want to maintain an optimal temperature of 8 degrees, a power of 1.3 kW will be enough for us. Fuel consumption for a commercial building is more than 2 times greater than for heating the same area of residential buildings.
Heating the entire box, including the walls and floor, is an impossible task. Too much heat will be wasted. Even insulation will not save you. Because heat will be absorbed by the concrete floor and it will escape through the concrete roof. A reasonable option would be to warm up a specific work area. It is advisable to concentrate warm air in the center of the room. There will be a kingdom of cold air around this zone. It will be cold above, below, all around. This will create the best comfort for work.
The center of the areas will be warm, and energy consumption for heating will noticeably drop. This effect is called a warm fur coat. It occurs due to natural air convection. Hot air is squeezed on all sides by a cold flow. The heated air tends to rise, but it is not let in by the cold air, pressing down. Hot air masses spread evenly to the sides, warm up the walls a little, and descend into the inspection hole.
This effect can be created by low-power heat generators, which will be very economical in terms of money. Such devices create a fairly intense flow of warm air masses, which is enough to heat the workshop.
With the development of various technologies, such a method for heating outbuildings as infrared heaters has appeared. But they have a drawback. They are not suitable for metal buildings. The metal does not reflect this radiation, and the heat goes outside. Brick walls are also not suitable for these purposes. A DIY garage oven would be the best solution, while a DIY potbelly stove is a budget solution. Wood-burning garage stoves are self-contained, require little space, and operate on wood waste. You can see a lot on YouTube with your own eyes. We'll look at some options.
Using insulation: pros and cons
Economy-class garages are almost never insulated on the outside for a very simple reason - it is too expensive for a room that is not constantly used. Yes, this is not always possible, for example, in garage cooperatives, buildings are placed very close to each other, the gap does not allow installation of insulation.
To insulate a garage, you can use materials such as fiberboard, which extinguish when caught on fire. The use of plastic in such a room is unacceptable
But the internal thermal insulation of a garage can also be problematic. When installing insulation material directly on metal walls, a so-called dew point occurs at the point of their contact, i.e. place where condensation accumulates. Almost always, when in contact with moisture, insulation becomes unusable quite quickly.
And for the structure itself, such a situation can be disastrous. Insulation can be installed in a metal garage, but it is better to install a suitable material at some distance from the wall, about 20-50 mm.
You should retreat 50-70 mm from the floor. It is best to use washers as a profile to avoid creating closed contours under the coating.
With this installation option, condensation will also appear, but thanks to air circulation under the insulation layer, the moisture will gradually evaporate without causing any noticeable harm to the structure.
However, for a garage that is constantly heated, this option is not suitable, since the indoor humidity will be excessively high most of the time. This will put both the health of people and the condition of the vehicle at risk.
When insulating a metal structure, it is necessary to leave a ventilation gap between it and the insulating material for regular drainage of condensate
As a material for such “ventilated” insulation, it is recommended to use slabs, for example, fiberboard, chipboard, that is, wood materials that self-extinguish when ignited. Recommended thickness is about 5 mm.
Flat ondulin or its analogues are perfect. These materials have the ability to reflect infrared radiation, which provides effective heating.
But plastic, even with attenuation properties, is strictly not recommended to be placed in the garage. When ignited, such materials emit toxic fumes, which can cause poisoning to people who escaped the fire. It is also prohibited to use slabs containing asbestos as insulation.
When insulating a cold brick garage, it is recommended to first plaster the walls with vermiculite to protect them from moisture. The walls of a metal garage should be painted in two layers, having previously primed the base.
The walls of an insulated garage must be treated with a water-repellent compound to protect the building from the destructive effects of condensation
Types of furnaces
There are many different options for heating boxes. The most common of them: - To bake a potbelly stove in the garage. Making a potbelly stove with your own hands is quick and easy. — Wood-burning stoves made of brick. Wood-burning garage stoves. — The stoves are being worked on. Diesel stove for the garage. — Long-burning stoves. Wood-burning garage stoves. — Gas stoves (gas stove for the garage).
Advantages and disadvantages
All options have their strengths and weaknesses. A combination of heating types can be carried out. The opportunities and benefits of such a combination will definitely be there. To produce a heating device for a utility unit, you can use the components that you have on hand. See photos and drawings below in the article.
Brick may have problems
A brick oven is labor-intensive to make. Of course, it will heat well. But there are downsides. Such a model will heat up for a long time, then give off heat for a long time. This is good if you come for a long time. And if you stopped by for a short time, then there is zero sense in such a design. Another disadvantage of such a heat generator is the inability to create a thermal coat. This model will not provide a powerful heat flow. It is worth starting this unit in advance, 2 hours before the start of work.
Potbelly stove is simple and reliable
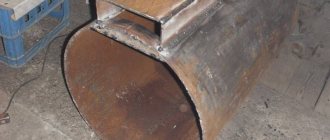
A simple piece of hardware is beyond any competition. How to make a potbelly stove for the garage? No dancing with a tambourine is required here. It is not difficult to find metal materials at hand. Old barrels, sheet iron, household gas cylinders. The main point is to find thick metal. At least 4 mm in thickness. When the product is made from a pipe, the diameter must be at least 30 cm.
The chimney is best made from a good pipe, the wall of which should be 3 mm or more. If desired, legs can be attached to the stove. Some hobbyists equip their creations with wings. The area of hot metal thus increases, and the room heats up much faster. There should not be any foreign objects that could easily catch fire at the installation site of the product. Below, under the firebox there should be no wooden flooring or boards. Place a piece of non-flammable material, such as asbestos.
Under certain circumstances, the stove can become red hot. It is easy to get burns from such heating. Be careful. In this case, burns are inevitable. Especially when a group gathers in the back room for a bottle of wine or vodka. If you are making a stove from a cylinder, be extremely careful. There have been many accidents during work involving cutting the cylinder. Such situations arose when people started sawing a cylinder with a grinder. Craftsmen advise pouring water inside before cutting the surface. The water will push the remaining gases out. For more information on the production of units from old cylinders, see our following reviews.
Waste oil furnace
Waste oil is an affordable, free type of fuel for technical buildings. Finding it in warehouses, car depots, and auto repair shops is as easy as finding water in a swimming pool. The efficiency of such a fuel unit is off the charts and breaks records. Making a stove during mining is more difficult than a potbelly stove, but it is much better. This product consists of 2 sections that are connected by a pipe. In the lower level, the waste burns, releasing a small amount of energy, and the combustible gas enters the second level, where the combustion of the combustible gas occurs, releasing a significant amount of energy into the surrounding space. The first level is made from sheet iron of any shape. Oil will burn in this chamber. The burnout intensity is controlled by the air mixture supply damper.
A pipe is inserted into the first housing, through which gases will flow upward into the second housing. This is a thick-walled pipe. The second camera will be mounted on it. The second level body is made of thick-walled alloy. Otherwise, it will quickly burn out under the influence of high temperatures. At the top of 2 chambers a hole is cut out for the chimney. The raw materials for the heat generator will be all petroleum products: diesel fuel, waste oil, kerosene and many other types. You should not burn flammable compounds in such a firebox. Gasoline, acetone, and solvents, if handled carelessly, will cause a serious fire in the utility unit. Such substances should only be used to ignite the main fuel, in small quantities.
You must understand that it is prohibited by law to legally install these heating units in cabins. Each owner of such premises is responsible for fire safety. After all, if a fire occurs, not only things, but also the owner’s car will burn. Adjacent boxes may be damaged. And they have expensive cars. Think with your head before you do anything.
Long burning furnace high efficiency
The action of such a boiler is similar to the combustion of a boiler during mining. But there is a huge advantage here. The stove runs on solid waste. This could be firewood, scraps, old unnecessary furniture. Wood and waste are placed in the first chamber. With a small supply of air, smoldering occurs. A flammable gas is formed and enters the second chamber. Chamber 2 provides a powerful flow of thermal energy.
Fuel is added to this structure 1 or 2 times, depending on the need to frequently be in the utility unit. This design can be simply welded from a 200 liter barrel. The main thing is that the walls are thick. For efficient operation, a piston rod is made that presses the wood for more efficient operation of the heat generator. This design must have a hole for supplying the air mixture. A chimney is welded to the hole. The chimney is higher than the boiler body (required!). Fuel is loaded from the side. The blower regulates the intensity of combustion of raw materials. A large ash receptacle is not required here. The wood burns almost completely. The efficiency of this design is high.
How much diesel fuel does Chinese Webasta consume?
What is the fuel consumption of this miracle garage heater? At maximum power of 5 kW, you will need from 400 to 500 grams of diesel fuel. 150 grams per hour is the minimum consumption.
These indicators can be considered quite acceptable for most motorists. You will not have this stove working 24 hours a day. Moreover, after reaching the calculated temperature, “climate control” starts.
You can also attach a GSM module to this stove. Then, in general, the launch will be carried out at any time, from anywhere on Earth, directly from a mobile phone.
You wake up for work in the morning, point your finger at your phone, and while you’re getting ready and eating breakfast, your garage is already heated and your car is warm. They came, turned the key, started it without any problems and drove off. Babble!
But it’s advisable to fill it with clean and high-quality diesel fuel. Otherwise, you can ruin the device. It will gradually begin to smoke, and eventually you will have to disassemble and clean the combustion chamber and the grid with the spark plug.
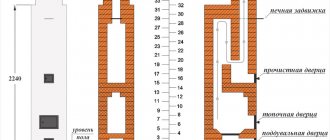
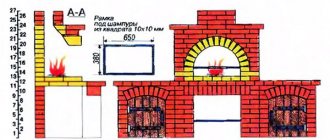
Step-by-step instructions for making a brick stove for a garage
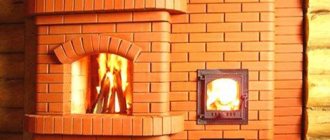
A brick oven for a garage is a compact heat generator. To build a medium-sized brick stove you will need: - Bricks - 300 pieces. - Stove door. — Grate. - Grate door. - Valve. — Cast iron stove.
For the product they take ordinary brick. To assemble the firebox, refractory bricks are taken. Silicate samples in the manufacture of fireboxes are a useless element. It is better to line the firebox with fireclay bricks. Was it worth laying the foundation? If the entire system weighs more than half a ton, then definitely. If the mass is less, then there is no need to fill the foundation. In our case, we will pour the foundation.
Brick laying is carried out according to the existing order. First, lay out the starting row - the base. Then, according to the order, they lay out row by row. We place the necessary iron parts of the structure in pre-designated places. The parts are attached with ordinary wire, which is then laid in rows of bricks. On top, if necessary, you can install a stove for heating food. At the end, according to the order, we lay out the chimney.
Next, we make the seams on the walls. An important point is drying the finished product. It is done gradually. In various sections of the firebox, light garbage, paper, newspaper, and wood chips are burned for about half an hour. This way the stove gradually dries out from the inside. When there are no wet marks left outside, and there is no condensation on steel products, you can start burning wood. Simple conclusions arise. You need a garage oven made of bricks in case of constant activity (for example, a car service).
To maintain a constant temperature, the easiest mode. It is enough to throw in a few sticks of firewood or add coal. Oxygen is burned into the room in a minimal amount. The cost of such a design, when made by hand, is low. The temperature in the box remains stable for a long time. As a result of the efforts, a wood-burning stove for a brick garage was obtained.
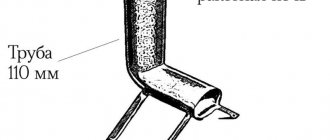
Chimney outlet through the wall
There are two options for venting the chimney: through the garage roof or through the wall. Now we will consider both options in detail.
Exiting the chimney through the wall has a number of advantages:
- It does not require high-quality waterproofing of the pipe passage, unlike the passage through the roof.
- Relatively simple and convenient installation.
The disadvantages include:
- Worse draft compared to direct installation of the chimney.
- The presence of turns and bends makes cleaning difficult.
- It needs more insulation.
Schemes for installing a garage stove through the wall (2 options):
Installation Tips:
- Chimney installation begins with the stove. After preliminary assembly, the location of the chimney passage in the wall is marked. Next, the technological hole itself is prepared. Afterwards, the final installation of the pipes is carried out in the garage with the elbow or tee leading out to the street.
- It is advisable to use a tee with an inspection removable cover for ease of cleaning. It is worth noting that if the walls of the garage are made of wood, a fire passage must be constructed from a steel box, where the space around the pipe is filled with non-combustible material.
- Installation of the chimney pipe on the wall is carried out using special fasteners strictly vertically; a fungus is installed at the end of the pipe to protect it from moisture. The length of the chimney depends on specific conditions, the main condition being sufficiently good draft.
Do-it-yourself gas stove for the garage
Anyone with the appropriate skills can assemble a gas heater with their own hands. To begin, prepare the necessary materials and tools: - Iron sheets 0.8 mm - Iron mesh (chain-link will do). — An old iron sieve. — Gas burner with safety valve. — Gas cylinder. — Metal fittings.
Let's start by preparing a sieve to fit the dimensions of the future stove. Place the sieve on a sheet of iron. We outline it with a nail or marker. We mark the sidewalls along the edges of the sheet. The length of the rectangle should be such as to encircle the sieve and the future bottom of the stove. Using metal scissors, cut out the marked contours. At the back, we will place the burner. We make markings, then drill and attach the burner. Next, we connect all the parts together. A chain-link mesh will be attached to the plates on top of the sieve.
We attach the legs to the body using rivets. Screw the hose to the burner valve. We release gas from the cylinder. It is necessary to take into account some nuances. If you have main gas nearby, then you will spend some time coordinating everything with the gas service. You will need to make a project, install ventilation in the utility unit if there is none, make the necessary foundation for the building from non-combustible materials. You will be forced to maintain the dimensions from the stove to the nearest combustible structures.
There should be 1.5 meters to the floor of flammable material. The nearest wooden wall should be more than 70 cm. The ceiling should be at least 1 meter. If you have a wall-mounted boiler, then you can only mount it on a solid wall. According to fire safety rules, there should be no clutter in the passages. If there is oil on the floor, then a cement slab or iron sheet should be placed on the floor. When operating such a stove, it is important to consider the following points: - Check that the ventilation in the room is working properly. — After each use, you must close the gas supply valve. — The cylinder must have a reducer that will protect against backlash.
Fuel pumping
Before the very first start, it is necessary to pump the fuel. To do this, simultaneously press the two lower buttons - OK and down arrow.
The words “H” and “OF” will light up on your display.
Switch to ON.
After this, the pump starts in a jerky manner with clicks. The corresponding icon is displayed on the screen.
To turn off pumping, set everything to OF mode by pressing the down arrow. The first step when pumping is to fill the filter.
Eventually the liquid in the tube should reach the end of the fuel hose.
Pull it and clamp it with a clamp at the corresponding inlet into the stove.
Upon completion of pumping, we proceed to the first launch.
Wood burning stoves made from scrap materials
Wood-burning potbelly stove, a classic stove for many decades. It is as simple as a Kalashnikov assault rifle. The potbelly stove consists of 2 sections. The first, larger one, is used for storing firewood. This compartment must have a door of the required size. The second section of the potbelly stove is used to accumulate ash. It also has a door for removing ash. This door in the ash pan serves as an ash pan.
There is a chimney in the upper compartment of the potbelly stove. You can choose any shape or size of potbelly stove. The main thing is to follow the principles described above. Often, old sheet metal barrels are used to make potbelly stoves. Some craftsmen refuse to make separate doors. They make one big one. A metal sheet is welded on top of such a barrel. It turns out to be a stove for cooking. This design is interesting, but not a durable design.
After all, barrels are made of thin metal, and it will burn out over time. Regulating the draft through one large door is quite difficult and ineffective. The design of such a stove is quite large. A potbelly stove of this design is a fire hazard. Potbelly stoves are also made from cans, cylinders, large oil pipes and other ready-made metal structures.
Video: homemade stove for a garage made of sheet metal
Final points
The main task of heating in a garage is to maintain a comfortable environment for humans. It is not necessary to warm the air to +25 degrees Celsius in winter; according to sanitary rules and regulations, working with the car is allowed at lower temperatures.
The best wood-burning stove for a garage is selected solely based on the conditions of its use, tasks, goals and preferences of the owner of the room. Before making your choice, you need to analyze all possible options and choose the most suitable one.
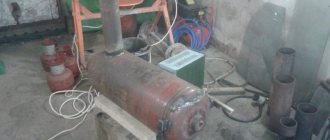
How to make a potbelly stove during mining
It is not always practical to have a supply of firewood in the utility room. There is a lot of used oil in car workshops. Having an oil-powered potbelly stove on hand is a big deal. You will receive free heat, compared to firewood, which you need to buy and pay for a car to bring firewood.
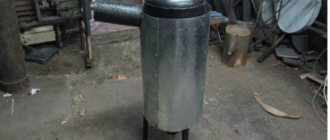
Testing stoves have general principles of operation. The small chamber is filled with used oil. The oil is set on fire. Bring it to a boil. Oil vapor rises through the pipe. Mixes with oxygen. In the second compartment, oil vapors are burned. According to the materials, the upper chamber of the furnace and the pipe should be as heat-resistant as possible. They account for the highest temperatures. A large-diameter pipe is used as the basis for the mining stove.
There are pipes with a diameter greater than 30 cm. They are well suited for these purposes. The wall thickness will be as follows. Lower chamber from 4 mm. Upper chamber from 6 mm. Cameras are made of arbitrary height. To transition between the chambers, take a good boiler pipe with a diameter of 100 mm or more with thick walls. This pipe will hold the upper chamber on itself. After making the stove, it is coated with heat-resistant paint.
The furnace for the garage being worked on is not described in detail here. There are many descriptions on the Internet. We have only indicated general points.
Heater equipment
What is included with the device?
- plastic tank for diesel fuel 10 liters
- set of wires with chips for connection
- fuel line hoses
- exhaust pipe
- installation platform for the stove body
- guide pipes and tee for air flow distribution
- air intake and exhaust hoses
- air filter
It is necessary so that when air is drawn into the heater and its combustion chamber, excess dust and other particles do not enter.
- muffler
It is mainly required when installing the device in a car. Useless for the garage.
- set of clamps, bolts, etc.
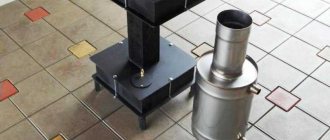
- Well, the stove itself with a fuel pump and a remote electronic control unit
There is also a key fob for remote start.
There is a fan on one side of the stove. From below, air is taken in and exhausted through metal pipes.
The fuel line is connected right next to them.
Preparatory work
Preparatory work involves:
- determining the dimensions of the future device;
- choice of material;
- location of the device.
Only after this the main work begins.
Drawings and dimensions
Each structural element is pre-thought out, determining the dimensions:
- It is important to choose the correct pipe diameter. The drawings note that its diameter should be 2.5 times the volume of the firebox. The volume of the firebox is measured in liters, and the volume of the pipe is measured in millimeters.
- It is advisable to install a metal screen around the stove at a distance of 60 mm. As a result, the heat will remain longer. In addition, such a design will protect against fire.
- The floor under the stove must be finished. Install a metal sheet that should protrude 50 cm from all sides of the heating device. This stage should not be neglected. A sheet of metal will protect against fire and retain heat.
- The chimney consists of two parts: vertical (1 meter) and inclined or completely horizontal (3-4 meters).
Given these dimensions, it will be possible to build a safe and useful heating structure for the garage.
Chimney outlet through the roof
Diagram of the outlet of a stove chimney for a garage through the ceiling/roof:
As in the case of installing a chimney through a wall, when installing through a ceiling, preliminary assembly is first done in order to accurately mark the future passage through the roof. Once the installation hole is made, the steel penetration through the roof is installed.
Next, in the same sequence, the pipe is assembled and the passage through the roof is laid with non-combustible material. The passage of the chimney through the roof requires reliable waterproofing so as not to encounter leaks in the future. As in the first option, you should protect the pipe from moisture getting into it and insulate the outer part of the pipe to reduce the formation of condensation.
Operating rules
Once a year it is necessary to clean the chimney.
Theoretically, you can light the stove with anything that burns. But the best option is firewood, which can often be collected for free in sufficient quantities.
The following rocks burn with minimal fuel release:
- birch;
- cherry;
- acacia;
- apricot;
- willow;
- aspen;
- oak.
It is recommended to avoid conifers such as spruce, pine and larch. When they burn, creosote is formed on the walls of the chimney, which can ignite under high heat.
Cleaning must be carried out in the firebox and chimney. This should be done monthly for constant use, and every 20 fires for periodic use. The best option is a plastic, copper or brass brush. You need to start cleaning from the top, gradually moving down as the lumen becomes clearer. If complications arise with the mechanical option, the carbon deposits can be burned off with potato peelings or aspen firewood. It’s even easier to use specialized household chemicals.