We tell you how to make a homemade turbo stove using simple and affordable materials that many people have on hand (for example, from a pipe of a suitable diameter).
In any case, getting all the necessary “components” to assemble the stove is not a problem.
We offer different design options to choose from. They differ in the types of materials used and the complexity of production.
To make a rocket stove with your own hands, you don’t really need any drawings. But if necessary, they can be easily found on the Internet.
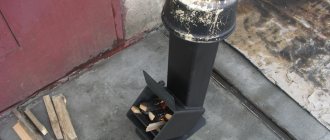
You can see what the simplest design of a homemade turbo stove looks like in the diagram below.
The reaction furnace is made from a metal pipe with a diameter of 110 mm. The legs can be made from a construction corner.
All rocket stoves (including homemade ones) can be divided into two main groups:
- stationary - ideal for a summer house and a private house, as well as for a garage;
- portable stoves are compact stoves that are designed for hiking and outdoor recreation (they are also called camp stoves).
In addition, rocket stoves differ in the type of fuel used. Wood-burning stoves are widespread. But there are also “rocket launchers” that can run on fuel pellets.
You can see the benefits of using a rocket stove in the picture below.
Perhaps one of the most important arguments in favor of choosing a rocket stove is its efficiency and versatility. In addition to the fact that the stove itself requires a minimum amount of fuel for productive operation, the fuel itself may even be of the lowest quality.
For example, you can use not only dry firewood, but also brushwood, damp branches and even grass.
Mexican welder's homemade rocket furnace
The author of the YouTube channel Neri herreria tv shows in detail how to make a rocket stove with your own hands.
The main material is profile pipe 100x100 mm.
You can also use a smaller profile (for example, if you want to take the stove with you outdoors).
Let's start working on making a turbo stove. First of all, using a grinder, we cut three blanks from a square profile pipe of different lengths:
- 57 cm;
- 30 cm;
- 20 cm.
The longest piece is the vertical part of the furnace. The shortest one is horizontal.
A workpiece 30 cm long is installed at an angle of 45 degrees - firewood will be loaded through it.
First, we cut two holes in the long piece (the lower hole is at a distance of 7 cm from the edge of the pipe).
The author decided to make the grate out of reinforcement. We cut the blanks to the required length, and then weld them inside the vertical part of the furnace with a small gap.
Then we weld together the vertical and horizontal parts of the furnace.
To do this, a piece of corrugated pipe (20 cm long) is welded to a workpiece 57 cm long at a right angle.
After this, we weld the third section of profile pipe 30 cm long, cutting off one edge of it at an angle of 45 degrees.
At the end of the horizontal corrugated pipe, it is necessary to install a damper made of sheet metal to regulate the air supply to the combustion chamber.
You will also need to install a door at the end of the loading chamber - it can also be made from sheet metal.
The author installs a valve at the bottom of the vertical pipe (in order for the combustion process to last, it is necessary to reduce the amount of air entering the combustion chamber).
To do this, you first need to weld two guides from the corner. Then we cut out a piece of metal of a suitable size and insert it between the edge of the corrugated pipe and the guides.
Now is the time to make the support legs. For this we need round pipes of different diameters.
We cut four blanks from a larger diameter pipe and weld them to the bottom of the furnace, as shown in the photo below.
After this, we cut off four more blanks from a pipe of smaller diameter - the legs themselves. We insert them into the seats.
To fix the legs in pipes of larger diameter, slots are made and then nuts are welded. We screw wing bolts into them.
As a result, the legs are removable, which is very convenient when transporting the rocket stove.
To make the structure more rigid, the master decided to weld a support post from a piece of round pipe between the horizontal part and the loading chamber.
We make a stand for dishes (pots or frying pans) from scraps of fittings. In the upper part of the vertical pipe, you need to make four cuts with a grinder so that you can install the stand.
The rocket furnace is ready. We clean the welds and paint them with heat-resistant paint.
The step-by-step process of making a homemade rocket stove with your own hands is shown in the author's video.
ESTUFA (ROKET - Cohete) - Como hacerla - Paso a Paso
The design turned out to be relatively light and compact. Due to the fact that it can be disassembled, you can easily place the stove in the trunk of a car.
Materials for production:
- * profile metal pipe with a cross-section of 100x100 mm (a total length of 65 cm is required),
- * sheet metal 2-2.5 mm thick,
- * round metal pipe with a diameter of 20-25 mm (it is needed for the legs, so you can use what you have on hand),
- * threaded rod M 10 (also for legs, you can, like the author, use bolts with cut off heads),
- * metal rod with a diameter of 8-10 mm (you can use steel wire and reinforcement),
- * piece of piano loop,
- * latch,
- * bolts for attaching the hinge and latch,
- * heat-resistant paint in black and silver colors.
Tools:
- * Bulgarian,
- * welding machine,
- * vice,
- * drill,
- * magnetic angle for welding,
- * round needle file,
- * marking tool (square, tape measure and marker).
Camping mini-rocket stove made of profile and round pipes
Another idea was shared by the author of the YouTube channel Make it Metal. His version of a homemade rocket-type stove is somewhat reminiscent of the previous version, but the design itself is simpler to manufacture.
For this project we will need two types of steel pipe: round and square (profile).
In addition, you will need other materials:
- sheet metal;
- steel corner;
- bolts (or studs) with nuts.
First of all, we cut off a piece of profile pipe of the required length (the dimensions in this case are at your discretion). This will be a loading chamber for firewood.
We cut a hole in the corrugated pipe so that the vertical part of the jet furnace (round pipe) can be welded.
Next, cut off two corners and cut out a piece of sheet metal of a suitable size. We weld the corners to the profile - they will act as guides.
Then we insert a valve made of a metal plate. We weld a threaded rod to the valve, onto which the handle can then be screwed.
Or you can do it simpler - weld a piece of round or square rod perpendicular to the stud.
The author decided to make the grate from a steel plate. We cut off a piece of the plate, bend it at the end at the desired angle, and then drill holes.
Next, we cut off a piece of round pipe, trim one edge at an angle, and then weld it to the profile pipe.
You need to weld nuts to the bottom of the rocket stove, into which we screw furniture bolts (these will be the support legs).
At the last stage, all that remains is to weld a platform for dishes made from a steel strip to the vertical part of the rocket stove.
For a more detailed introduction to the process of making a homemade jet furnace from a profile pipe with your own hands, we recommend watching the author’s video.
Rocket Stove Mk3 and 2000 Subscriber winner!
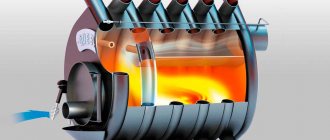
Operating principle
This device is made on the basis of a heating rocket stove. The mechanism of its operation is as follows. There is a bunker, which is a fuel compartment in which solid fuel burns. Combustion products enter the horizontal section of the pipe, and then into the vertical section. At the initial stage of the furnace operation, intense heating of the chimney is observed. When a high temperature is reached, the device enters operating mode. This happens when the gases formed during the combustion of wood in a vertical pipe ignite and produce good heat.
Robinson's device is a somewhat simplified rocket stove. This is explained by the different purposes of the units. The first model does not require space heating, but only water heating and cooking. But the principle is the same. Firewood smolders in the bunker, which heats the chimney, where the gases then burn out. In this case, the chimney must be quite long so that no combustion products remain.
In order for the reactive furnace to operate efficiently, the following rules must be observed when installing the structure:
- The chimney must be at least twice as long as the horizontal or inclined section.
- The length of the fuel compartment must coincide with the horizontal section. Typically the firebox is installed at an angle of 45°, although there are designs with an angle of 90°. But they are less convenient in terms of fuel loading.
- The cross-section of the chimney should not be smaller than the fuel compartment itself.
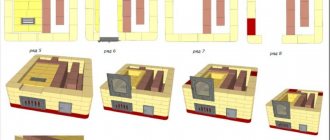
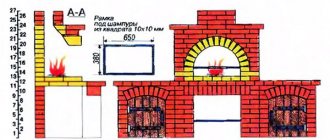
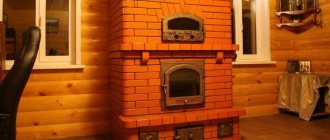
How to make a rocket stove using Japanese technology from bricks
The author of the YouTube channel Ogurki shared a simple and very interesting way to make a brick rocket oven.
Moreover, without any cement mortar or construction adhesive - and literally in 5-10 minutes.
To make a Japanese rocket stove, you will need 29 bricks. In addition, it will be necessary to prepare a flat area on which the brick oven will be located.
For example, you can make a base from building blocks or, as an option, you can separately lay out a platform from the same bricks.
Moreover, it is important to use not ordinary brick, but fire-resistant one. The fact is that ordinary brick will quickly crack and crumble from contact with fire.
Let's get to work. After we have prepared the base, we assemble the stove from brick.
For reliability, we tie the vertical part (on which the dishes will be placed) with steel wire so that the bricks do not fall apart.
The grate is not used in this furnace design - there is no particular need for it.
By default, the first hole (lower firebox) is used for loading firewood, but you can also add firewood through the second hole, which is higher (for example, if the firewood is long and there is no time to cut it).
The advantage of this rocket stove is that it does not require a permanent place on the site.
I need to prepare something - I assembled it in 5 minutes and cooked it. Then I quickly took it apart and put the bricks into the shed. In general, very convenient.
You can view the step-by-step instructions for making a brick rocket stove in the author's video.
DIY rocket stove + drawing. Japanese technology. Part 2
Exploitation
A stove of this type, like any top-combustion heat generator, operates with maximum heat output only when the chimney is well heated. Therefore, before loading the main portion of fuel into the combustion chamber, the device must:
- warm up the chimney well. For these purposes, you can use any quickly flammable fuel, such as paper balls, sawdust or shavings. It should burn not in the firebox, but in the ash pit. The level of heating of the chimney can be judged by the attenuation of the sound or a change in its tone. Next, you can start adding the main fuel to the firebox. It is no longer necessary to set it on fire; it should flare up from the coals remaining from the burnt “fast” fuel;
- manually regulate the flow of air into the combustion chamber. A rocket stove in a garage is not capable of adjusting itself to changing environmental conditions and the quality characteristics of the fuel, so it must be adjusted manually. After loading the main fuel batch, the ash door should be opened completely, and when a characteristic hum appears in the furnace, it should be closed enough so that the tone of the sound in the furnace is reduced to a rustling sound. As the wood burns, the door needs to be closed more tightly, achieving the same rustling sound. If this is not done, then excess air will enter the furnace and cool the intermediate gas mixture. In this case, the pyrolysis process immediately stops and the oven begins to make a roaring sound.
Only dry wood can be used as fuel for such a stove, since the appearance of an excessive amount of moisture when burning wet wood can provoke reverse draft and interfere with the creation of the temperature necessary to begin the pyrolysis process.
To ensure the safety of users during operation, the following rules must be observed:
- do not use liquid fuels for kindling and do not add them to the stove during the burning period;
- avoid contact between open areas of the contact body and the surfaces of the furnace, since the cylinders and its other metal parts will become very hot during combustion;
- It is prohibited to place the device near flammable surfaces;
- Clean the chimney at least once a week, and preferably after each use of the device.
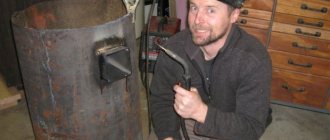
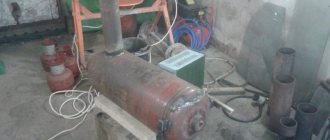
Rocket stove from a gas cylinder
In this case, we will consider another stationary version of the reactive furnace. However, we will no longer use bricks, but metal.
To make a rocket stove with our own hands, we will use a 27 liter propane cylinder and a profile pipe.
First you need to prepare a propane tank. Unscrew the valve and fill the bottle with water.
After this, we cut off the support shoe and handles with a grinder. We make markings, and then cut out a rectangular hole in the central part of the cylinder.
We make the cooking surface of a rocket stove from a gas cylinder from sheet metal.
To do this, cut out a piece of the required size, make cuts along the edges and then bend it with the letter “P”. We weld the part to the cylinder.
Next, use a grinder to cut out a hole for the chimney, which is a metal round pipe (diameter is at your discretion).
After this, we cut three blanks from the profile pipe, and then weld the jet stove.
First, we weld two professional pipes at an angle of 90 degrees. Then we “cut” the third piece of the profile at an angle of 45 degrees.
Next, we weld an H-shaped stand from three pieces of profile pipe. We weld it to the bottom of the stove.
At the end, all that remains is to clean the welds and paint the stove. But not ordinary, but heat-resistant.
The step-by-step work process can be seen in the author's video.
가스통 난로 만들기 완성 4-4 (Finished making a stove)
We also recommend reading how to make a universal rocket stove for your country house or private home from a gas cylinder with your own hands. True, it cannot be used in a garage.
DIY jet stove assembly for heating
Construction of the furnace begins with preparatory work. First you need to decide on the place of construction. It is chosen based on the requirements that relate to solid fuel structures: wood or coal.
Once the location has been decided, it is necessary to properly prepare it for construction. The wooden floor under the stove is being dismantled. They dig a small pit and compact the bottom.
The barrel or cylinder also needs to be prepared for installation. To do this, cut off the lid and tap. Then the structure is cleaned. Next, prepare the solution.
Stages of construction of a jet stove with a stove bench:
- The bottom of the dug hole is lined with fireclay bricks. Formwork is made along the contour of the recess. Reinforcement is performed.
- Lay out the base and fill it with concrete. A day later, when the concrete has hardened, further work begins.
- The base of the stove is made of fireclay bricks. The side walls are raised and a lower channel is made.
- The combustion chamber is covered with brick. There are two holes left on the sides. One is intended for the firebox, the second is for the vertical pipe (riser).
- The metal body is equipped with a flange into which the horizontal channel of the stove will flow. All seams must be airtight and well sealed.
- A side outlet is attached to the horizontal pipe, which serves as an ash pan.
- A fire tube is made from brick. As a rule, it is square.
- The flame tube is equipped with a casing. The gaps are filled with perlite.
- The installation of the cap is done from a cut-off part of a barrel or cylinder. It is equipped with a handle.
- Equip the furnace body with brick or stone.
- Equip the front part of the stove. Lay out the required contour.
- A prepared barrel is placed on the base. The lower part must be sealed with clay.
- Using a corrugated pipe, a channel is formed connecting the firebox to the street.
- The heat exchanger pipes are connected to the lower pipe.
- Installing a chimney. All elements must be sealed using asbestos cord and fire-resistant coating.
Next, you should give the stove the shape of a stove bench. The external chimney is equipped with a fire and tar trap. When all the materials have dried, you can test the structure.
Compact camp stove made of profile pipe
We bring to your attention another option for a homemade rocket stove, which can be used both in the country and outdoors if you often travel by car.
Despite the fact that the principle of operation of this stove is the same as all previous options, it looks a little non-standard.
This is due to the fact that the author decided to modernize the classic rocket stove and make a more practical option.
The trick is that in addition to the hob, this design also has an additional compartment that can be used for baking various vegetables.
The first step is to decide on the dimensions of the rocket stove.
Then we cut off the blanks from the corrugated pipe. We weld the U-shaped cooking surface and clean the weld seams with a grinder.
The hob has two holes at the end. A firebox with a grate will need to be welded to one hole, and a piece of pipe on which the chimney will be installed to the other.
After this, we cut off sheet metal blanks and weld them between the walls of the hob - and in the end we get that same additional compartment for baking vegetables. To make the cooking process faster, you will need to make a lid.
We weld four nuts to the bottom of the rocket stove - the legs, which act as bolts, will be screwed into them.
The final touch is painting the finished product with heat-resistant paint.
You can see the step-by-step process of making this oven in the author's video. The idea belongs to the author of the YouTube channel mansoo lee.
Making oven stoves
Advantages and disadvantages
The long-burning rocket stove has gained particular popularity and demand due to its positive characteristics:
- Affordable design and easy assembly. The simplest version of the stove can be made at home from available materials in a few hours.
- Effective heat transfer using various types of wood fuel - firewood, chips, branches, bark and shavings.
- Wide functionality. Possibility of using the device for space heating, cooking and water heating.
- Complete combustion of fuel with the possibility of afterburning pyrolysis gases. This allows you to increase efficiency and at the same time avoid carbon monoxide poisoning.
- Possibility of refilling fuel without interrupting the work process.
- There is no need to create forced draft in the chimney system. High level of self-regulation of the operating modes of the device.
An ergonomic stove can be installed in any room, and lightweight structures do not require additional reinforced foundations.
Despite the significant advantages, such a unit is not without some disadvantages:
- Lack of possibility to automate the combustion process. Homemade stoves require constant human control over the placement of fuel material.
- There is a high probability of getting burns due to significant heating of the metal structure.
- The device is not intended for heating large residential buildings and stationary bath complexes.
- The design of the stove requires the use of well-dried fuel, since excess moisture can lead to back draft in the chimney.
- Unaesthetic appearance of the finished device.
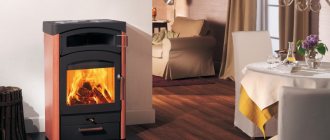
How the design works and choice depending on the place of use
A store-bought or homemade tent stove actually has the same operating principle. When fuel burns, heat rays are emitted from the heating device. Their volume depends on the material of the stove, the degree of heating, the direction of warm air flows and the shape of the stove. The only difference is in the fuel - wood, gas, gasoline, kerosene.
The place of operation determines the feasibility of using different types of devices. For expeditions in the forests, it is easier to heat with firewood, logs, brushwood and other delights of the forest - wood-burning models are chosen. And for fishing on lakes and rivers, it’s easier to take a gas cylinder so as not to be distracted by running into the neighboring forest for logs.
Don't miss: Features of the design and operation of the Buleryan stove