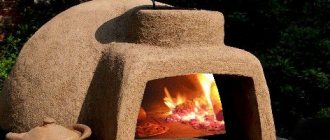
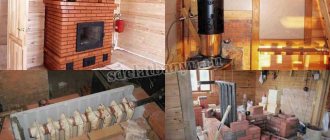
How to build a stove with an open heater in a bathhouse
The design of a stove with an open type of heater is simple to implement. Its dimensions are 102 by 62 cm. This is enough to obtain a functional family steam room with steam and heat in nine square meters of bathhouse.
In this embodiment, lining is not performed, so the stove is built from high-quality M150 brick, achieving very thin seams.
This option is not expensive, but also short-lived - the seams are restored every two years, lubricating them with fresh mortar. The stones are placed on a slab located above the furnace firebox. The stove can be metal or cast iron.
This furnace has two design options:
- with a remote container or located at the top;
- with water heating from a pipe laid through the firebox.
Each construction process begins with preparatory work.
Since a brick stove weighs more than 500 kilograms, and during its operation the bathhouse floor may sag, it is necessary to build a foundation for the device.
Foundation
Step-by-step instructions for constructing a foundation for a furnace:
- Knowing the dimensions of the oven, they draw markings on the ground with a margin of half a brick.
- Dig a pit with a depth of 0.5 to one meter.
- Avoid being too close to the base of the bathhouse itself. If the ground moves, friction will become a destructive force for the stove and the bathhouse itself. A distance of 5 centimeters is allowed. Upon completion of the work, the gaps are sealed with river sand.
- The bottom of the pit is leveled and compacted.
- The choice of binding solution is dictated by the quality of the soil: if it is dry, then prepare a lime-cement mortar (6:1) with a certain amount of river sand. To prepare a lime binder mixture, sand and lime are mixed (2:1). Cement mortar is made by mixing sand and cement (3:1).
- 10 centimeters of sand and crushed stone are placed alternately at the bottom of the pit. Then they are compacted.
- Waterproofing material is placed on top, placing the film higher on the walls.
- Pour the mixture into the pit and leave until completely hardened. This will take about a week.
- After the surface has hardened, a freshly prepared liquid solution is poured onto it, which will spread strictly horizontally.
The stage of laying the furnace begins after 14 days, when the base of the furnace is completely dry. The solution is prepared from lime, clay and sand (1:1:4).
Building a brick oven with your own hands
The fuel part is lined with refractory bricks and equipped with a grate, the rest is made of ordinary red brick.
The masonry of all sauna stoves has the same technology, but in each case the seams are made responsibly. The tightness of the seams is the key to preventing harmful carbon monoxide from entering the room.
Work order:
- Before laying the furnace, a waterproofing sheet made of roofing material is placed on the prepared base in two layers measuring 5 centimeters larger than the dimensions of the foundation.
- To prevent the brick from drawing moisture out of the binder mixture, it is saturated with water before use, immersed in it for 1-3 minutes.
- Prepare a homogeneous and viscous masonry mortar from sand and clay, taken in equal quantities.
- The mortar is placed on the entire plane of the brick in a thin layer to create a sealed, filled joint of no more than 3 mm. Three-millimeter wire guides between the planes will ensure a high-quality seam. After pressing, the wire is removed and excess mixture is removed from both sides.
- When completing each row of the furnace, check the angle values.
- Bandaging (displacement) of bricks in the next new row is required.
Important! You cannot use heat-resistant and ordinary bricks next to each other, since the different heat capacities of these materials threaten the rapid destruction of the furnace.
Recommendations
Important points:
- Constantly monitor dressing rules.
- The thickness of the solution layer is about 10 mm.
- Seal the seams of the oven to ensure tightness.
- Check the horizontal and vertical levels every two rows.
- It is permissible to use a cement mixture when laying the bottom line; the temperature below is not too high, and the cement will strengthen the structure itself and protect the furnace from moisture.
- After laying two lines, install a blower and continue continuous laying.
- After erecting the walls of the blower, install the door and cover it with a grate, which will be the bottom of the firebox.
- Provide an ash pit (mobile or stationary).
- Build a combustion chamber 0.6 meters high. This is enough to create the highest possible temperature at the top of the flame.
- The required furnace firing depth is 80 cm.
- The dimensions of the space for stone backfill for the bathhouse are determined at the rate of 60 kg for each square meter of the steam room.
At the next stage, the fittings are installed: hinges, grilles, doors. When installing the doors, pieces of two-millimeter wire are placed in the seams. Continue laying from the door.
How to fold?
If the fireplace fuel duct goes into another room, then it will be necessary to make a special opening in the wall in advance. The ideal solution is to create such an opening during the construction of the bathhouse, but if necessary, it can be done after construction. The process of creating a portal for a bathhouse with your own hands consists of the following stages:
- construction of openings in the wall of the room where the fuel channel will be led;
- filling the opening with fire-resistant bricks, the dimensions of which must correspond to the dimensions of the fuel channel;
- finishing with decorative materials, thanks to which it will be possible to create an optimal design for the bath.
In the process of creating a portal with your own hands, one of the most difficult tasks is choosing the size. Everything here depends on the power and size of the oven itself. The wishes of the owners also play a role, since the height of the portal can be greater than the width.
Experts advise leaving a gap of at least 3 cm. In addition, it will need to be processed using high-temperature resistant materials, for example, basalt wool. In no case should you use glass wool, which is not able to cope with high temperatures.
In this case, close attention must be paid to the quality of the selected basalt wool, which must be made without the addition of other components, since during the heating process they can release harmful substances into the air. This is not only harmful for sauna users, but can also harm the wood itself.
That is why special solutions are used for insulation, which are distinguished by their ability to withstand extremely high temperatures. Among the main recommendations regarding creating a portal for a stove with your own hands are the following.
- The ideal solution is sand-clay. The proportion should be 1:2, and the clay should not be very greasy.
- The best solution would be to use water with a minimum concentration of salts. This is why most experts recommend rainwater.
- If you need to get a mixture that is homogeneous, then it is best to add fine sand to it.
As an additional element, you can also create a special screen made of stainless materials, the thickness of which will be at least 4 mm.
Oddly enough, infrared radiation is considered the main cause of fire in bathhouses, and a protective screen will reduce this probability to zero. The most optimal option today is to create a screen with a mirror surface, which is capable of reflecting not only heat rays, but also directing heat to the desired location. It should be noted that if the stove is located at a distance of more than 1 m from the nearest flammable elements, then there is no need to install a screen. Infrared streams in such an atmosphere will simply dissipate, and there will be no effect from them.
It is best not to place the screen very close to the wall, since metal tends to collect heat. A rather interesting and unique solution in the steam room would be the use of heat-resistant cladding, which also plays the role of a protective screen. This will not only save money and get a fairly safe element, but will also transform the appearance of the room.
Thus, the portal is considered the optimal solution for providing protection against fire of the furnace. Brickwork made of figured or universal red stone should be done carefully using only high-quality materials. First, you need to write everything down step by step, and then use the order and apply it according to the calculations.
How to quickly and beautifully assemble a brick portal for a sauna stove without the skills of a stove maker, see below.
Types of brick heaters
Based on frequency of use, they are divided into two types.
Permanent action
The heating equipment has thin walls and a small layer of stones. The heating of the stones is maintained at 300–350 degrees. Temperature stability is achieved using a connected automatic control system.
The main types of fuel are electricity and gas.
In electric heaters, heating can be reduced (increased) by changing the current, in gas heaters - by adjusting the volume of supplied fuel.
Both types are equipped with automatic protection, which, when the desired temperature limit is reached, turns off the power or, on the contrary, increases it when the fire begins to go out.
Installation and operation of devices occurs only with the permission of the fire inspectorate.
Heat the stove until the stones are sufficiently heated and steam is formed.
It looks like a closed electric oven; on top of it is a metal box with stacked stones. Heating is carried out by heating elements - they enter from below through a layer of stones.
Improved models have a soft heating system. The arrangement of stones does not come into contact with ventilation air; they are heated separately.
It is important to pay attention to the fact that as the layer of stones increases, the production of heat and, accordingly, steam increases. In factory models it is allowed to change the volume of stones from 5 to 60 kg
To obtain dry steam in saunas, minimal stones are needed.
Periodic action
It is customary to lay out such stoves with thickened brickwork. The volume of stones used is large. Durable brickwork protects the outer wall from overheating, allows you to retain heat for a long time, maintaining the temperature inside the room at the proper level.
The reinforced firebox heats the stones below up to 1100 degrees, the top layer - up to 600 degrees (become crimson). Soot and dust are completely burned out.
For solid fuel
In such heaters, the firebox and smoke circuits are separated from the stones by a cast iron plate or wall. The partition prevents combustion products from entering the bathhouse, and soot does not settle on the stones. The average heater can heat a steam room with a volume of up to 10 cubic meters. m, maintaining the room temperature up to 140 degrees. The device has double side walls; air is exchanged and heated through their gaps.
Compact (small-sized)
It’s easy to get a homemade small-sized version from a laundry stove. Only instead of water, stones are placed in the tank. And water, when needed, is heated in a bucket, placing it on top of the stones.
The downside of the small size is the thin walls of the firebox. The solution is to cover it with brickwork, leaving gaps for air exchange.
It is recommended to assemble it yourself from steel sheets 3–5 mm thick.
With built-in water tank
Ovens with double walls are considered the most efficient. The gap between the walls is used to heat water. In addition, you can place an additional water tank next to the stove.
It is located at the top or bottom of the structure.
Above
To increase the rate of heating of the stones, cast iron scrap can be added to the bottom layer. The slab can be installed either as a single piece or as a prefabricated one. The recommended plate thickness is from 10 mm. In order for the stove to warm up faster from below, it is necessary to make smoke circulation along the back of the brickwork. To do this, they take steel plates and divide the internal cavity into two channels: lowering and lifting. Insert them into the gap between the bricks. On the 8th row, the plate needs to be bent so that it can be seamlessly sealed between the bricks.
At the top of the stove, the stones protrude, so the lifting channel is designed in the form of a zigzag. Due to this shape, heat transfer increases. A damper is placed at the top of the channel. A tank of water and stones are covered with a small steel or iron lid.
From below
In such a device, the dimensions of the firebox are increased. The volume of the chamber for stones is larger – 50 liters. For ease of kindling there is a damper at the bottom.
Since the end of the tank faces the firebox, on the sides and below it comes into contact with hot gases, the heating of the water accelerates significantly.
To lay the top bricks, the container is closed from above for most of its length. A steel plate will suffice.
When the lower damper is open, flue gases immediately exit into the chimney without entering the smoke circulation. Therefore, as soon as the stove has reached the desired temperature and a stable combustion process has been established, the damper from below is closed. The stones with the tank are covered with hinged lids.
It is easier to make a partition from a cast iron boiler. Its surface will be washed by flue gases, so the stones located inside will quickly heat up. The firebox is lined with refractory bricks, so coal can be used as fuel.
Installation of a chimney pipe
How to fold a stove with a chimney after completing the construction of brick walls? The furnace construction manual provides for the preliminary selection of a pipe, which in type and functional features must correspond to the design of the future furnace. For a lightweight design, it is recommended to choose a small pipe made of lightweight and heat-resistant material.
When choosing, you should take into account the appropriate wall thickness of the chimney pipe, which cannot be less than ½ the thickness of the brick. The diameter of the passages for the chimney pipe should be of a similar size.
The length of the upper part of the pipe, located above the roof, should not be less than 55 cm. To equip the smoke exhaust duct, a connecting mortar based on cement or lime is used. The clay-sand mixture is not suitable for such work, since under the influence of precipitation it will quickly wash out and form condensation on the inner walls of the pipe.
The chimney pipe with a minimum number of bends must have a total length of at least 5 meters. The finished design can be equipped with a special gate valve.
Kinds
There are 4 main variations of sauna stoves:
- "in white";
- "in black";
- "in gray";
- with a stove.
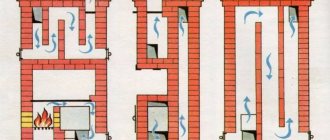
Black stoves do not have a chimney and have been used in villages across the country for many decades. All fumes and smoke escape through the steam room itself - naturally through the cracks and gaps of the roof. Of course, this creates the best steam and aroma in them, and it becomes very pleasant to wash, but at the same time you have to wait until all the wood burns out. When choosing black stoves, it is recommended to treat the internal walls of the bathhouse with a special solution that can prevent the formation of soot residues. Black baths have a very high efficiency, and therefore, when using them, you can save on fuel.
Next in complexity are stoves that are heated “gray-style.” They have a chimney, and therefore the bathhouse warms up much faster. However, you still have to wait until all the fuel burns, as soot is deposited on the stones. The walls are not stained with soot, but when liquid is applied to the stones, a small amount of soot microparticles appears along with the steam from the furnace. This design can be direct-flow or with channels. In the first case, the stones placed above the firebox end up on fire, and the gases escape into the air through a pipe, and in the second, through two valves.
White stoves heat the room for up to 12 hours, but do not pollute the stones, therefore they are considered the most environmentally friendly. The process occurs as follows: the fuel heats the overlying metal plate, and from it the stones, which will store heat for several hours. This heating method appears to be the most expensive - a large amount of firewood and other materials are consumed. Previously, the box in which the stones were placed was made of ordinary black iron, but now it is made of heat-resistant stainless steel. Traditionally, in white baths there are two separate spaces: a dressing room and the steam room itself. To warm both rooms, one side of the stove opens into the dressing room.
In the fourth case - with a stove - the stones and a tank of water, the placement of which can be changed, are heated by two cast-iron stoves. One of them is placed above the firebox, and the second - above the chimney. The slabs should be fenced on three sides with a brick screen, which will ensure high water temperatures. Such furnaces are usually built independently.
According to the type of fuel used, furnaces are distinguished:
- wood;
- heated by coal;
- natural gas;
- diesel fuel;
- wood chip briquettes;
- electricity.
Based on the type of construction, they are divided into furnaces:
- with an open heater (typical for a Finnish sauna);
- with closed heater;
- combined.
Intermittent heater stoves are usually chosen by large families, when many people go to wash, but the duration of the steaming process is short. They have thick walls that retain heat for a long time and provide the necessary service life of the bathhouse. The smoke passes through the stones before entering the chimney. The volume of stone backfill in such a heater is much larger than in continuous heaters.
Continuous sauna stoves have minimal wall thickness and the volume of stones located in an insulated metal box above the firebox. Their main advantage is the ability to use the steam room during the heating process. Stoves with a closed heater are also safer. Heating is carried out inside the housing through the wall, which is common to the heater and firebox. The stones retain heat much longer, and the air in the steam room has a stable optimal temperature. It will take about 4-5 hours to warm up the air in such a bath.
Separately, it is worth highlighting such a variety as a stone stove-fireplace for a bath. This design has an attractive design, but has low efficiency. If you install a fireproof glass valve, you can protect yourself from flames and enjoy relaxing in a warm room. This is why fireplaces are often installed in dressing rooms. Modern technologies make it possible to design mini-heaters. This design quickly warms the bathhouse, but even after the fuel has completely burned, the room remains heated. Its length and width are usually 2 bricks.
With or without a blower?
Now about the blower. If a brick stove is being built for a bathhouse, is there a need for a vent in it? Let us first explain what a blower is. This is a kind of channel that brings air under the grate, and through it into the firebox, supplying the fuel with the oxygen necessary for its combustion. A door is used to regulate the intensity of air flow (draft).
The draft exists when there are two openings - at the bottom of the stove and at the top of the chimney. Therefore, their sizes are related to each other. In addition, there is a certain relationship between the volume of the firebox and the draft - if the draft is too strong, the wood will burn quickly and at a higher temperature.
When installing a brick stove for a bathhouse, you can abandon the ash pan and lay out a blank floor. This doesn't mean you won't have any cravings at all. It will be due to the slightly open fire door. In principle, the stove will work, but the dimensions of the combustion door are large enough to allow fine adjustment of the air supply. At the same time, the efficiency of the stove becomes lower than it could be.
But this is not the only argument against a blind hearth. A big punishment for the owners will be the danger of burning coals falling out when the door is open, as well as the need to frequently work with a poker, because the firewood never burns out completely. Upon completion of the combustion process, you will still need to pull out the firebrands and immediately extinguish them in a bucket of water.
If we talk about the sufficient dimensions of the grate and the cross-section of the chimney pipe, then both can be approximately equal to the area of one standard brick. This is enough for normal traction.
A separate publication is devoted to tips on choosing the size of the oven.
By the way! The draft will be better if the blower is located low. For example, you can start laying it out from the second row.
We build a stove with our own hands
Before you begin manufacturing and installing the stove structure, you should choose a suitable location for it, observing fire safety rules. The optimal distance between the stove and the rest of the room structures should be at least 25 cm.
Stove with tank on firebox
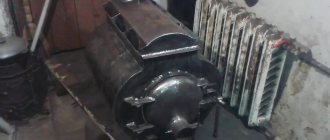
To make the simplest version of a metal stove structure, you only need an iron barrel and welding skills. Let us consider schematically the manufacturing process of this furnace:
- We make a grate for the furnace: we use fittings or scraps of pipes of small diameter. We place it on the edge of the pipe and weld it.
- We lay the bricks edgewise directly on the resulting device, and place a stone on top.
- The base of the structure for the stone is made of steel strips.
- We place the metal barrel directly on the brick, creating a combustion zone.
- Instead of one of the side covers we place a grate. In the opposite direction we prepare a hole for the passage of the chimney.
- We place the water tank and heater in the middle of the structure.
- In the bottom of the heat exchanger in the center we make a hole with a slightly larger diameter than the outer section of the chimney.
- We install the chimney on the stove and place a water tank on the pipe. To secure the container and seal the bottom, we scald the junction of the tank and the pipe.
This option is suitable for those who do not care about the appearance of the structure or the stove is intended for a small bathhouse.
Oven with remote tank
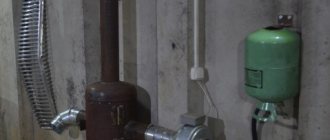
This option is more practical compared to the first. The tank for such a stove can be removable. To make such a design, you will need a potbelly stove with brickwork around the perimeter and a firebox with a heating register.
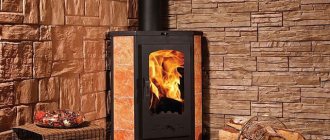
Metal stove for a bath
As in the first option, sheet steel with a thickness of no more than 5 mm is used. But stainless steel can only be used for the register and water tank, due to its low heat transfer.
When making a sauna stove with a removable tank, the tank is mounted on the wall so that its lower edge rises approximately half a meter above the register. We use reinforced rubber hose and clamps as connectors.
So our article has come to an end. It was intended to introduce the main types of stove designs with a water tank and heat exchanger, as well as to become a help to those who like to make things with their own hands. Good luck!
Possible difficulties
Fitting and cutting - in practice, these operations take too much time. Therefore, it is easier to calculate the length and height of the “front entrance” in order to use only whole bars, boards and other piece products.
The presence of a door at the firebox can make access difficult. If it is removable, it is better to dismantle it, carry out all the work calmly, and then install it again.
Vertical and horizontal deviations arise not only due to lack of experience, but also due to uneven floors or walls. So it is imperative to carry out constant level checks - it will help to avoid mistakes.
Main characteristics of a brick sauna stove
The most important characteristic of a brick kiln is power. This characteristic is directly related not only to its size, but also to the quality of the brick and mortar used for masonry
The sauna stove is built from red heat-resistant brick of the M150 brand, and the firebox is lined with refractory fireclay bricks.
Important: it is not recommended to use fireclay bricks for laying stove walls, as they are not able to retain heat for a long time
The thicker the walls of the oven, the longer it will retain heat, but the longer it will take to heat it up. Masonry mortar is prepared by mixing sand and clay, without adding cement, since the seams will collapse when exposed to high temperatures.
The design of a brick sauna stove provides for a closed heater and space for installing a water tank. The stones placed in the space of the heater warm up well, and after watering them with water, the steam room is filled with steam having a comfortable temperature and humidity.
A well-built brick stove remains hot for at least 8 hours, and the heat in the room remains for more than a day. The brick sauna stove warms up for 4-5 hours.
Since the walls of a brick kiln have a lot of weight, and the heater included in the design increases it even more, the first stage of construction is always the foundation.
Preparation of the solution
Before finishing the stove in the steam room of the bath, it is necessary to prepare a masonry mortar. To do this, you need to choose the optimal ratio between clay and sand. This can be done by mixing a small portion and rolling it out into a thin cylinder. Then they fold it into a ring and look at the walls. If no cracks have formed, then the solution is of the highest quality.
Modern craftsmen use a different composition to finish a sauna stove. It includes Portland cement, sand and tile adhesive. All ingredients are mixed and work begins. With this composition, the brick holds quite tightly, which guarantees the durability of the masonry. But cement in the solution can have a negative effect when heated. So the choice will remain with the owner of the bathhouse.
Tags: bathhouse, framing, oven
« Previous entry
What kind of stove to build in a bathhouse?
A simple stove with an open heater is the most common type of heating device in a Russian bath. A small room is often the only compartment intended for washing and steaming, so you can build a brick sauna stove in any convenient place. The dimensions of the structure can be 3.5x4 or 4x5 bricks, depending on the size of the room. A tank is installed to heat the water. It can be placed either on top of the stove or on the side of it.
For modern baths, you can choose a stove with a closed heater, with simultaneous heating of several rooms, etc. Often, a separate boiler room is built to service the heating device, and only “clean” parts are located in the steam room and washing room. The choice of stove design for a bathhouse is always made by the owner himself, depending on his needs and the layout of the bathhouse.
Main characteristics of a brick sauna stove
The advantages of a do-it-yourself brick sauna stove over a metal structure are that it maintains the temperature in the room for a long time. During heating, the brick walls act as a heat accumulator and release it into the space for more than 1 hour, gradually releasing it into the space of the washing room or steam room. Depending on the design, they can heat a larger area.
Even a heated brick does not heat up to the same temperature as thin steel walls. A brick stove heats up strongly only from the top, and the side surfaces are fireproof even in wooden buildings. Simple red brick does not emit harmful substances into the air and is odorless. This is also considered one of the advantages of environmentally friendly material.
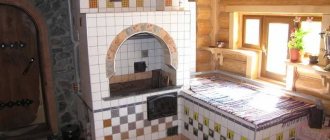
A neatly laid out brick wood stove is an element of the overall decor of the bathhouse. It can be stylized as an ancient Russian one or beautifully tiled with ceramic tiles.
Choosing bricks for laying a stove
The main material for laying a brick sauna stove must be of high quality. Its choice must be approached most responsibly, since the quality will affect not only the beauty of the structure, but also the longevity of its operation. Poor-quality, under-burned or over-burned stone will crack due to the temperatures that arise during heating.
For work, 2 types of material are most often taken:
- red solid or facing for the outer walls of the product;
- fireclay (fire-resistant) - for finishing the firebox inside.
When using the facing variety, the constructed stove does not need to be plastered and a decorative coating does not need to be installed on it.
You can choose red solid and facing bricks for the stove according to the following characteristics:
- no visible chips or small cracks on the surface;
- straight edges and smooth planes;
- absence of mica film on the surface;
- a ringing sound when tapped with a hard object (a dull sound indicates the presence of cracks or insufficient firing).
You need to select material in reserve. When laying out a stove for a Russian bath, the master breaks the brick into halves and quarters, and when splitting, part of the material breaks.
Fireclay brick is yellow in color and visually consists of grains that differ in shade. The main selection criteria are smooth edges and absence of cracks.
What mortar is needed for laying the stove?
Clay compositions are used as masonry mortar. Like stove stones, they are divided into fire-resistant and simple. Refractory is best purchased at a hardware store along with fireclay bricks. The dry mixture is diluted with water according to the instructions.
It is also more convenient to buy the composition for laying simple bricks in the form of a dry mixture. If there are clay outcrops on or near the site, you can save on purchasing ready-made mixtures. Clay is dug where it does not contain soil impurities. You can determine the quality and suitability for masonry in a simple way:
- knead some clay dough of soft consistency;
- roll a ball and throw it onto the floor from a height of about 1.5 m;
- Oily clay does not form cracks along the edges and needs the addition of sand, while too thin clay will become covered with large cracks.
General description of the design
In fact, this is a special frame made around the heating source. U-shaped, it, as a rule, visually stands out from the general background, although it can be made of the same material as the masonry. Its other common names are “gate” or “front entrance”, given precisely because of its appearance.
It can go both into the living room - a separate kindling room - and into the rest room. In the latter case, the aesthetics of execution are especially important.
An already finished structure cannot be adjusted in any way - if changes are needed, it will have to be built anew. Therefore, it is worth paying special attention to its design: to calculating the dimensions and quantity of materials.
When a portal needs protection
In the event that the room is small, and the heating equipment is too powerful and therefore not only heats itself up, but also overheats everything around, including the surrounding air. In such a situation, the frame must be made of heat-resistant material to prevent its rapid failure. At the same time, you will protect yourself from burns and excess heat.
Operation of a brick sauna stove
The temperature in the steam room will reach the required value approximately 3-4 hours after the start of kindling. If between bath procedures the stove has time to cool down significantly (downtime is more than 3 days), it must be started with an accelerating firing (fuel is added to 1/3 of the maximum load), which will dry and warm up the masonry. If this is not done, microcracks may appear in the walls of the structure, which are especially dangerous in a bathhouse - as was said, in conditions of heat and high humidity, the negative effect of carbon monoxide is much stronger.
If it is idle for more than a month, the accelerating fire should be repeated three times, gradually increasing the volume of fuel portions from ¼ to the maximum.
Such a stove can be used both in a Russian bath and in a sauna. In the case of a sauna, the intensity of the firebox is increased slightly, and the heater is not watered with anything.
Upon completion of work
To completely dry a newly built stove in a bathhouse, it will take at least 14 - 15 days. Upon completion of the masonry, the draft is checked. To do this, open all doors and plugs. When firing for the first time, the oven is not heated to full power. Wood chips, in this case, will be the best type of fuel.
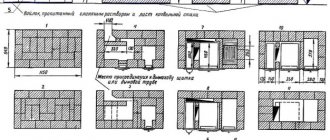
Schemes and sizes
Purchasing ready-made grates and doors will speed up and simplify the process of making the stove, but then the holes in it must correspond to their size. Hand-made parts will be the size you need. The simplest method of making a stove is to use a gas cylinder.
A drawing for making such a stove from an old cylinder
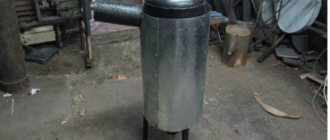
Making a stove using a pipe as a body is also not difficult, since the air flow flowing around the walls of the body improves heat transfer. A body with virtually no seams is more reliable, will last much longer, and a round firebox is more convenient to clean. To calculate the length of the remote firebox, you need to know the thickness of the adjacent wall.
Drawings of a metal stove with a body made of 530 mm pipe, the firebox door is located in the adjacent room:
A three-in-one furnace with a vertically located boiler is also made from 530 mm pipe. The difference between this stove and previous versions is not only in its location relative to the floor. It contains three sections: a firebox, a heater and a water tank, located vertically, one above the other. The firebox heats the stones, and from them the water is heated. The heating of stones and water uses the temperature of the chimney, it is located inside the heater and water tank. The volumes of the chambers can be changed at your discretion, but you must understand that as you increase the size of the firebox, you will need to add firewood less often, since they will burn longer. A large heater will take longer to warm up and maintain its temperature for longer.
Drawing with dimensions of a vertical oven with three chambers
For the stoves of the first two options, you can install a water tank and a heater on top, only next to each other, and not on top of each other. So the number and size of the chambers in your stove will depend on how much and at what temperature you like to steam and how much water you need at the desired temperature.
The body of a stove of almost any design and size can be lined with brick on the outside, but it is easier if it has a simple configuration. The main thing is that it is made of structural or heat-resistant steel of large thickness. The inside of any firebox can be lined with bricks, but this is much more difficult. Immediately provide a larger firebox, taking into account the brickwork, and eliminate the increased fire hazard in the manner described above.
A boot-shaped sauna stove can also, at your discretion, have the dimensions you need of both the stove itself and its sections. The design of this stove is carried out by welding parts cut from sheet iron (5 to 10 mm thick), a stainless steel water tank and a heater located inside the chimney.
Materials for portal design
Marble is not afraid of sudden temperature changes, so it lasts longer.
Materials adjacent to the stove must be non-flammable. For the stove portal in the bathhouse, non-combustible materials are selected, or flammable materials are separated by heat-reflecting screens. The following apply:
- brick;
- metal;
- stone;
- glass;
- tile;
- tree;
- drywall.
In addition to brick and metal, gates using natural or artificial stone masonry are popular. Decorative stone makes a simple stove look like an elegant fireplace. Several types of hard rock are used:
- elements away from the door can be laid out from sedimentary materials - slate, marble, shell rock or foam blocks;
- cladding options with river pebbles, embedded in the solution, look great.
Stone products are heavy and increase the load on walls and supports, so the foundation must be massive.
When finishing wooden baths, wooden portals are used, made of moisture-resistant plywood, parquet boards, and chipboards. The tree is decorated with carvings and ornaments. Wooden materials are attached to a metal base, which provides additional rigidity to the structure. Over time, the wood darkens and warps. To avoid this, material made from dense rocks or well-dried raw materials is used. Sometimes inserts made of brick, stone, concrete are installed, and heat-reflecting screens are used.
The use of laminated wood will reduce deformation. Darkening of the material is prevented by varnish coating in 2-3 layers.
Wooden boards, plywood and drywall are attached to the frame with self-tapping screws. The frame is made of metal or slats. Self-tapping screws are disguised. It is easy to assemble a figured portal from these materials.
The use of ceramic tiles depends on the vision and taste of the owner. The main advantage is easy surface cleaning and resistance to soot contamination.
Masonry of furnace walls
The brick must be wetted before laying. Then apply the required amount of solution.
The brick fits tightly into place. The mortar displaced by the brick is removed.
There is no need to plaster the internal surfaces with clay; excess mortar is unacceptable here. Once dry, it peels off and clogs the chimney duct.
Furnace casting is installed directly during masonry and fixed with wire. To ensure that the doors fit tightly to the masonry, they are wrapped around the perimeter with asbestos cord.
The cord will seal the contact points and will not allow the cast iron door, which expands when heated, to destroy the masonry.
Project selection
This stove project is suitable for most types of baths.
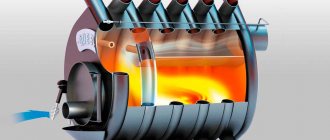
The dimensions of the structure will allow you to heat the room (10-15 m2) up to 50 degrees, and when steam is supplied, up to 90 degrees. A tank with a capacity of 180 liters is built into the stove and satisfies all the necessary needs for hot water for a comfortable washing process for all family members. To allow the heater to cool down for a longer period of time after finishing the fire, iron pipes are provided (6 pieces, next to the water tank).
The pipes also support the stones above the firebox. The pipes heat up quickly, and after the heating process is completed, they gradually release heat. There is a hole above the cobblestones through which water will be supplied to generate steam.
Having decided on the project, you need to begin the assembly process itself. Assembling a stove with your own hands is not difficult. Based on the masonry drawings, the process will take a little time.
Construction technology
Construction of a furnace is not a quick process. The work takes on average at least 1 month. The period directly depends on the qualifications of the specialist and the speed of installation. Most of the time is spent preparing the foundation and hardening it.
The main stages of work are:
- Preparation and pouring of the foundation;
- Preparation of tools and solution;
- Construction of the masonry of the main part of the furnace;
- Construction of a chimney;
- Finishing work.
All stages are carried out sequentially, observing the time limits for hardening of the solution.
Ceramic tile
Perhaps this is one of the universal materials that are often used for any purpose. This tile gained its popularity due to its relative cheapness and good characteristics. The only limitation of this material is its maximum heating temperature. The tiles do not have any locking connection or hook that would help the material resist deformation at high temperatures. That is why it is not recommended to use it for stoves that become very hot during operation. But for a fireplace this is a suitable option.
Ceramic clinker tiles cope much better with this task. In addition, it can imitate any type of finish. There are products with imitation brick, tile, wood, granite or marble. In addition, clinker tiles are more wear-resistant, stronger and more durable. And the coating can be matte or glossy.
If you want to have an original and inexpensive finish for your fireplace or stove, you can combine the option with decorative brick and ceramic tiles. This neighborhood also looks beautiful.
An important point: when finishing the stove with tiles, you need to choose a high-quality glue or composition that is not afraid of high temperatures. Otherwise, no matter how high-quality the tile is, it may fall off due to cracked adhesive. You shouldn't skimp on this.
But you can learn how to properly tiling a stove with your own hands from this video. This will help you complete the task quickly and efficiently, while saving some money on hiring workers.
Video
Watch the video for recommendations on building a sauna stove using the Kuznetsov system:
Kuznetsov’s stoves are distinguished by a variety of shapes, allowing you to select a specific version of the stove in accordance with the layout and design features of the bathhouse, as well as the personal preferences and wishes of the customer.
The order of the stove for the bath, or the pattern of laying bricks, is the most important element with which you can correctly lay the stove, while having minimal skills in performing stove work.
It is worth noting that, despite the abundance of ready-made metal stoves on sale, the traditional wood-burning heater still holds the palm in Russian baths. At the same time, the ordering of a brick stove for a bath, properly maintained, allows its design to be reliable, which will have a positive effect on the service life of your stove.
Wood burning
First of all, the owner will have to decide on the type of fuel his stove will run on. However, we must remember that the most popular sauna stoves are wood-fired. There are several types of fuel for which modern manufacturers develop their stoves:
- Electrical. The most common and diverse, they have a large number of functions and temperature conditions;
- Gas. They are considered the most environmentally friendly, require connection to a gas pipeline, but allow the use of an ordinary cylinder;
- Combined. To kindle them, you can use one of two types of fuel or both at once. Most often you can find gas-wood and electric-wood models;
- At work. Used refined oil is used as fuel. Similar designs are found mainly among homemade heaters;
- Wood-burning. Classic designs with high efficiency, high fire safety ratings and the most aromatic useful steam.
The first three options are lightweight and portable, but their fire safety level is too low.
That is why preference is given to solid brick sauna stoves.
The downside is that the bathhouse will also have to be built to last, that is, placed on a foundation.
But this design will last a really long time, will retain heat well and will warm up even a very large steam room.
The heater has a lot of advantages, some of which can only be experienced during operation.
For example, it is believed that brick structures are safe - there is no need to worry about short circuits or gas attenuation. At the same time, you can safely pour not only water on the stones, but also aromatic oils that are good for health.
How to choose
Brick stoves for ordered saunas also come in different types. The first difference is in the distribution of stones. Open stoves pleasantly please the eye with a hearth and rapid heating to 150-200 degrees Celsius. The design does not imply the presence of protective masonry, so steam is created by directly pouring water onto the stones.
These positive aspects are also a disadvantage - open stoves quickly lose heat and require constant addition of fuel. Closed heaters require a significant amount of stones, but maintain heat for up to 50 hours. Steam is released through a special door placed flush with the top layer of stone. While the wood is burning, the stove itself remains closed.
Important! The design of the heater also affects the final result. The features of the firebox, the amount of steam and the general condition of the steam room depend on the construction method.
- The metal plate heats all the stones, so preheating is required. But the heat lasts for a long time, and the bathhouse itself remains clean. This type of stove is called “in white”;
- Due to the design without a chimney, the ceiling and stove are covered with a layer of soot and soot, so you need to wash it when the fuel has completely burned out. This design is called a “black-style” bathhouse, and is currently practically not used;
- There are “gray-style” fireboxes, when the stove has a chimney, but still smokes and leaves soot. In this case, you also need to wait until the wood burns out - otherwise you may suffocate;
- Sometimes the stones and heating tank are placed on two cast iron plates. In this case, the tank is located in a kind of casing made of brickwork, which allows the water to remain heated to the desired temperature.
It is up to the owner to choose the type of kindling, but it is worth remembering that brick stoves for wood-burning baths with “black” kindling are no longer popular - it is better to spend money on a full-fledged chimney than to suffocate and constantly wash the ceilings of soot.
Date: September 25, 2022