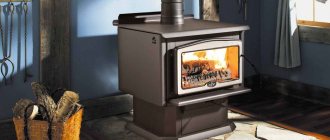
An excellent option for organizing an autonomous heating system in a private house or bathhouse is a stationary stove with a water heating boiler.
Such a device is practical and economical, has high heat transfer and efficiency, which allows you to effectively heat rooms of various sizes in a short period of time.
It is quite easy to organize such a system yourself, without involving expensive specialists.
Types of stoves with built-in boiler
The design can be made of metal or brick with different placement of the heater, with a boiler for heating water for washing, if we are talking about a bathhouse. The dimensions are not limited: the choice of parameters is determined taking into account the dimensions of the room, the building materials, as well as the local climate.
It is necessary to consider the design features of two types of furnaces with heating boilers:
- The boiler is built into the chimney. This model has a long service life, the walls of the stove completely receive heat from the firebox, and the heat transfer rates are unchanged. Disadvantage: you cannot heat a large area.
- The boiler is located directly in the firebox. You can heat a large area of the room. It is possible to use different types of heat exchanger. Disadvantages: metal parts come into direct contact with fire, resulting in destruction. Due to the low temperature of the heat exchanger, condensation is generated, which later causes a lot of soot to stick to the surface, resulting in a decrease in efficiency.
Installing a water circuit in the chimney
The water circuit heat exchanger has a complex design. One of the options for its placement is to be built into the chimney. The furnace can be initially built with a coil, or it can be built into a ready-made structure.
Peculiarities
This method allows you to use heat, which quickly and practically uselessly flies into the pipe. Wherein:
- The decision to install this type of circuit is made at the furnace design stage. It is virtually impossible to integrate a heat exchanger into the chimney of a stove that has already been put into operation.
- Heat is not taken away from the stove; the firebox heats up to the maximum.
- The degree of heating of the coolant is regulated by the length of the coil. For a large house - a large coil.
- The service life of the coil built into the smoke duct is much longer, since there is no contact with fire.
- Requires a stove with a rather large and complex chimney, which leads to an increase in the size of the stove.
Masonry and brick
The principle of brick laying
Stove makers have enjoyed well-deserved respect since ancient times. Masters of their craft create stoves with a heating boiler, which always have good “draft” and an evenly heated surface.
There are several general rules that all specialists follow without exception:
- Combustion chambers are made of fire-resistant materials. Open fire can easily damage ordinary brick and even stone.
- You shouldn’t skimp on materials by laying quarter-brick walls. This reduces the reliability and stability of the entire structure.
- It is necessary to carefully monitor the tightness of the seams. Any gap will subsequently allow carbon monoxide to pass through, which is dangerous for the lives of the inhabitants of the house.
Sometimes home owners resort to a little trick by setting up separate chambers for heating and cooking in the summer. This is a completely justified solution that allows you to save fuel in the warm season.
Features of wood stoves
Wood-burning stoves reduce the cost of heating a home when it is not possible to connect to a gas pipeline.
However, the construction of such a furnace comes with its own requirements, which you should be aware of.
- It is necessary to prepare the place where the firewood will be stacked. After all, several cubes of wood may be needed for the winter season. For storage you need to choose places protected from precipitation.
- A stove for heating a house with wood requires constant maintenance - you need to clean the ash pan, keep the chimneys clean, preventing soot from accumulating.
- Heating a stove with wood means that from time to time you need to add new portions of fuel to the firebox. It will not be possible to heat in automatic mode.
But with all these features, it must be recognized that firewood is the way out when heating a dacha or house when there is no gas. Having purchased a country house, you can install a stove there, buy firewood and not worry about the heating method.
It is extremely rare for a gas pipeline to be laid in holiday villages. It is not required, since people do not live there permanently. However, it often happens that city residents move to country houses for permanent residence, especially when such villages are adjacent to the city limits. And then modern wood-burning stoves for heating a house will be indispensable.
Quite popular are stoves from the well-known manufacturer of heating stoves and fireplaces Teplodar. They are distinguished by quality and reliability. A wide range of heating equipment allows you to choose the best option for each individual case.
Advantages of the stove heating option:
- furnace equipment is one of the cheapest;
- installation of wood-burning boiler stoves for a home is simple; the only difficult part is the construction of a chimney;
- if the house consists of one room, then you can’t imagine better heating;
- if you position the stove correctly, you can heat several rooms at once;
- the wood-burning stove provides a very good microclimate in the room, good for health;
- It is possible to select a unit for water heating.
Laying the boiler and installing a horizontal heat exchanger in it
A do-it-yourself heat exchanger using any of the options is installed in a brick boiler. The latter is laid according to the same principle as a brick oven.
The dimensions of a solid fuel boiler must be proportional to the volume of the premises that must be heated by it. The values available in the article are given based on a house with an area of 90-100 square meters. m. with 6 cast iron radiators and a distribution of 2 pipes (25-50 mm).
The choice and design of the boiler piping should be based on many factors:
- How many circuits are there in the system?
- How complex is the system?
- Is there any other equipment available?
The entire boiler must stand on a solid reinforced concrete foundation.
The size of the foundation is selected based on the dimensions of the furnace. When laying a solid fuel boiler, the heat exchanger must be positioned so that the outlet pipe is the highest point. The height difference must be at least 10 mm. This is necessary to ensure that a plug of air does not form in the boiler while filling with water. This slope will also improve fluid circulation. Brickwork is done with your own hands, following the rules for bandaging the seams. The pipes should be approximately 2-3 cm lower than the brick wall itself. To prevent a decrease in efficiency, it is necessary to have a removable cast-iron plate on top of the boiler for easier cleaning. The smoke is discharged into a separate or main pipe. The pipe can be brick or metal.
How the system works
The simplest water circuit is with natural circulation of water flow. Its basis is a simple physical phenomenon: the expansion of liquids when they are heated. The unit that creates pressure is an expansion tank (a container for collecting water), installed in the attic or attic.
The water circuit is a closed system. The boiler heats the water in it and, expanding, it is directed through a pipe into a storage tank. The movement is carried out under pressure created by the cooled water constantly entering the boiler and passing through the entire system. Boiling water from the expansion tank is directed by gravity down through the pipes leading to the batteries. Having given off the heat, it returns to the tank and heats up again.
Installing a pump will help to significantly increase the pressure in the system and speed up the circulation of the coolant. At average outdoor temperatures, it can be turned off and the circuit will function on the natural movement of water. This will save you on your energy bills. Water enters the pump with the check valve closed. By turning it off (leaving it open), the entire volume of coolant is directed to bypass the pump.
Such a stove can be loaded not only with wood or coal. When using alternative fuels, it is possible to complicate the structure of the system by adding:
- granule storage tank;
- a mechanism that feeds pallets into the firebox (pneumatic or auger).
You can make the operation of the stove easier by installing an automatic system for regulating its operation and forced ventilation.
Radiator assembly
Assembling radiators is a simple process, because it completely repeats the process of disassembling them. The sections are connected by nipples that have left and right threads on both sides. This way, the sections at the top and bottom will be pulled tightly against each other when the nipple is turned. When the gap becomes 2 cm wide, you should wind the asbestos-impregnated cord and only then tighten the nipples completely.
When the entire structure is assembled, you should wait for the drying oil to dry, and then check the joints for leaks. that is, supply water under high pressure to the radiator. This will ensure the subsequent use of the radiator and there will be no leaks.
The return and coolant supply pipes must be connected diagonally to the radiators. Holes that remain open must be closed with plugs. It is better to take inch pipes. On one side of the radiator there will be a right-hand thread, so there will be no difficulties with connection. On the opposite side, use a coupling with a squeegee and a nipple.
What dimensions should the chimney have?
Chimney placement options.
The draft in the chimney channel will occur due to differences in the height of the inlet and outlet, as well as due to temperature differences. To ensure continuous operation of any heating device, you will need to make a strong draft
Before starting masonry, it is important to decide what type of heating device will be used, what dimensions it has and how many channels it is planned to make
The number of channels can be determined taking into account the power of the heating device, fuel and the special requirements of the device manufacturer.
If the diameter of the chimney channel significantly exceeds the calculated value, the draft in such a channel will greatly decrease. As a result, there will be frequent interruptions in the functioning of a gas boiler or other heating device. If the channel diameter is smaller, this may impede the removal of combustion products. It is for this reason that in most cases the operation of boilers stops.
To make brick channels, you will need to use ceramic brick grade M50-75. You can also use concrete blocks that have channels with a square cross-section.
If you plan to use ceramic bricks to make a chimney, then you should know that its minimum cross-section is 14x14 cm. If you plan to purchase material with a round cross-section, then the permissible diameter is 15 cm or more.
In a brick chimney whose height is less than 5 m, the dimensions of the channels must be increased to 14x20 cm or 18 cm in diameter. Such structures should be made in the walls between rooms that are planned to be heated. In this way, it will be possible to create a certain protection of supporting structures from cooling, which in most cases leads to a weakening of traction.
It is necessary to try to group the chimney channels so that in the device that will be installed above the roof, their number is maximum. In this way, it will be possible to reduce the cost of manufacturing work and significantly improve the performance of the chimney device.
What parameters should you use to choose an oven?
When the question arises of how to choose a stove that will run on wood, you need to know what parameters to focus on.
Power
The first thing you need to decide on is the power. The relationship is direct - for a large heating area a more powerful model is required. The standard formula suggests the following calculation: per 10 sq. m. you need 1 kW of thermal energy. If winters are very cold, then 10-20 percent is added.
8b3218f406ff3a172bc688b8596573ee.jpe
9ec3f6e0b2a78c622f262dda4418edae.jpe
Sometimes less power is enough:
- if your region of residence is southern;
- winter temperatures remain at off-season levels;
- The home has serious thermal insulation: thick walls, small windows with three-layer double-glazed windows and an attic with insulation.
On the contrary, in very cold northern regions it is expected that per 10 sq. m. area requires 1.2-15 kW of furnace thermal power.
In order for the stove to meet its declared power, all necessary parameters must be met, which relate to the size and location of the ash pan, grate, combustion and ash doors, the length and diameter of the chimney duct.
Laying a brick oven with a water boiler
Diagram of a solid fuel boiler.
Laying a brick oven with a water boiler is carried out in the following sequence:
- The foundation is poured under the furnace location.
- While the foundation is drying, mix a solution of clay and sand in a ratio of 1:2. Depending on the fat content of the clay, this proportion can be changed. Before preparing the mixture, the clay is soaked in water for 10-12 hours (large lumps of clay must be kneaded with your hands). Before starting masonry, sand and clay are thoroughly mixed.
- Waterproofing is laid on the dried foundation - usually roofing material the size of the future furnace.
- A layer of mortar is applied over the waterproofing, the first layer of brick is leveled and laid. It should be noted that it is better to use beautiful brick for the outer layer; it will look more aesthetically pleasing. The inner layers can be formed from defective or broken bricks.
- Each layer of brick is carefully covered with mortar.
- At the required height, a compartment for ash and the firebox itself are made.
- A sheet of metal is placed in the ash compartment to make it convenient to remove ash residues in the future. The blower door is installed here.
- Behind the firebox, in front of the chimney, a water boiler is installed. Brick ledges with metal corners are built for it. A level must be used to prevent air pockets from forming. A door for loading fuel is fixed in the firebox itself.
- A metal plate is placed on top of the boiler, a chimney and a cleaning system are formed. It would be useful to make a separate door for cleaning the boiler from carbon deposits.
- A metal sheet is fixed to the floor in front of the firebox in order to comply with fire safety regulations.
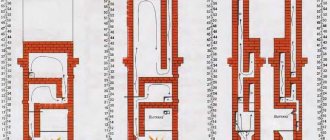
Boiler design diagram.
When you first light up a finished stove, you must ensure that the system is in good working order and that there are no leaks. The room must be ventilated, as often during the first heating there are unpleasant odors of burning industrial lubricants and heating clay. It is carried out for at least an hour with the maximum possible amount of fuel.
A brick stove with a homemade boiler is one of the best ways to heat small country houses, which will allow you to enjoy the warmth on cold winter evenings and save your budget.
Stove water heating device
The furnace for the heating system in question should ideally be calculated and built at the same time as the house. If a residential building has already been erected, then it will be difficult to install a brick stove structure in it. And often this turns out to be completely impossible due to the need to build a solid foundation and rebuild the rafter system.
A furnace for water heating in a private house can be made not only of brick, but also of steel in the form of a potbelly stove with heat exchange pipes around the firebox for heating the coolant
Stove-based water heating consists of:
- the stove itself (metal or brick);
- a heat exchanger inside or around the stove firebox, as well as in the form of a coil around the chimney;
- a circuit with coolant distributed throughout the house and an expansion tank in the attic.
Also, in some cases, this heating system is supplemented with a circulation pump and a hydraulic accumulator. However, this extended option is used extremely rarely, since it requires an uninterrupted power supply and leads to an increase in the cost of the entire circuit.
And the main advantage of water stove heating is the low cost of the device. It is not worth supplementing it with expensive and breakage-prone elements.
Water circulation diagram in the circuit
The water heating system in houses is built with natural (gravitational) or forced circulation of the coolant. If it is made on the basis of a wood stove, then it is best to give preference to the first option.
The wiring diagram with natural water circulation is cheaper than the forced analogue, and also, unlike it, does not require power supply
It is recommended to install water stove heating only in one-story houses with an area of up to 150 m2. In this case, it can be made gravitational without additional pumps.
If you need to heat a cottage of a couple or more floors, then it is better to do this using a more powerful boiler. The furnace for such buildings will have to be built simply huge, which is expensive to implement. Yes, and you will have to put considerable amounts of fuel into it each time. But doing this is highly not recommended due to the increased risk of fires.
A classic stove heating system with natural water circulation consists of:
- heat exchanger as part of the stove;
- metal pipeline circuit;
- radiators (usually replaced with thick pipes in rooms);
- expansion tank.
If you decide to do water heating in a country house yourself, then it is better to design it according to this scheme. Installation and calculation of this option is easier than with forced water movement.
A system with a circulation pump is more suitable for boilers; based on a stove, it loses its increased heat transfer efficiency
If the boiler is automated and constantly heats water as needed, then the wood-burning stove is heated once or twice a day. It is at these moments that the coolant in the furnace firebox heats up to release heat into the rooms. Afterwards, driving it with a pump through the pipes of the circuit is pointless. Nothing will heat the water in a cold firebox anyway.
When choosing a wood or coal stove, owners of private houses usually expect to receive an autonomous heating system. If you install pumping equipment in it that requires power from the electrical network for operation, then it will be difficult to talk about autonomy.
Oven - brick or metal
A brick oven takes longer to heat up, but it also takes longer to transfer heat to the space around it. The steel counterpart, on the contrary, heats up quickly and cools down just as quickly after the fuel burns out. This problem is partially solved due to the presence of large volumes of coolant in the water circuit.
However, the more water that has to be stored in the system, the more expensive it becomes in terms of materials.
A metal potbelly stove with a water coil for the heating circuit in private homes can be placed directly on a wooden floor without installing a special foundation
A steel furnace for water heating with a power of 5–15 kW - without fuel and water it is a structure weighing 100–300 kg. Such a potbelly stove can be safely placed on reinforced logs. Stove foundations need to be poured when the stove weighs more than 700–800 kg. Now, if it is brick, then you definitely can’t do without concrete work.
Compared to a metal stove, a brick stove weighs more, costs more and is more difficult to install. However, it has higher efficiency and less risk of freezing the circuit with pipe rupture due to the formation of ice inside. If you decide to do everything completely for yourself and permanent residence, then it is recommended to choose the brick option.
Pipes - stainless steel or metal-plastic
If the heating system is built on the basis of a hot water boiler, then it can be piped not only with steel pipes, but also with metal-plastic and polypropylene pipes. However, if the water is heated by a wood-burning stove, then the circuit with the coolant from it should be created only from stainless steel.
With a large load of firewood, the water in the furnace coil can quickly heat up to 100 degrees and boil; only steel can withstand such temperatures for a long time
Metal-plastic is designed to work with coolant heated to 90–95 °C. For a short time it can withstand heating up to 110–120 °C. At the same time, the automation of boilers and boilers initially does not allow the water to warm up to such degrees. For heated floors it heats up to 30–45 °C, and for radiators up to 60–65 °C.
However, in the case of a wood-burning stove, temperatures under a hundred are not only possible, but far from uncommon. It is not recommended to take risks and play Russian roulette by piping this stove with metal-plastic pipes. It is best to give preference to more reliable stainless steel.
In addition, the pipes coming out of the furnace from the coil for connecting the circuit pipes will definitely heat up to very high temperatures. They are separated from an open fire by less than half a meter. It is dangerous to connect any plastic pipes to them due to the risk of them melting.
Heat dissipation - radiators or register
Heat is supplied from the stove to the heating circuit in portions of several hours, while wood or coal is burning in the firebox. If there is not enough water in the heating system, the house will quickly dry out. Therefore, in villages, such heating is usually made from thick steel pipes, and not on the basis of radiators more familiar to city dwellers. The heating register for wood burning stoves is simply perfect.
The classic scheme of water stove heating with natural circulation involves direct contact of water with the atmosphere through an expansion tank, but air in the coolant is contraindicated for conventional batteries
A stainless steel pipe with a diameter of 80–120 mm laid throughout the house is a heating register, consisting of a supply from the stove and a return to it. In the room farthest from the firebox, these lines are connected together, and in the remaining rooms they are laid in the form of two pipelines along the outer walls.
The register does not look as aesthetically pleasing as the radiator. But the first option is much cheaper and easier to make yourself than the second. To implement it, you just need to have experience in handling a welding machine.
The heat transfer area for such a circuit is calculated by multiplying the PI number by the diameter and length of the pipe. Plus, in the calculations it is necessary to take into account the thermal pressure in the supply and return, as well as the vertical distance between the pipelines.
However, often such calculations are not made, but a pipe with a diameter of 80–100 mm is taken and laid around the perimeter of the entire residential building with a loop in the back room. In this case, heat transfer is adjusted “by eye” and experimentally as a result of adding a particular volume of fuel to the firebox.
It’s not for nothing that register circuits coupled with water furnaces are so common. You don’t even need to calculate them, just take a suitable pipe and weld it together.
Selecting a heat exchanger for the furnace
The heat exchanger in the stove can be made of copper, steel or cast iron. It is better to immediately exclude the copper option due to the high price. Soldering such a device yourself is extremely problematic.
Cast iron batteries should be installed inside the firebox with caution - due to temperature shock, individual sections may become detached from adjacent elements
Cast iron is superior to steel in terms of technical parameters. However, making a heat exchanger for a wood-burning stove out of it yourself seems problematic. You can only take an old battery for this. But here we must take into account that the seal between its sections will burn out in the firebox. And this is a direct path to loss of tightness and water escaping into the combustion chamber.
If it is decided to make the heat exchanger from a cast iron battery, then it is best to take the MS-110-300 or MS-90-300 models for this. They are small and will easily fit in the firebox. Their heating surface area for each rib will be about 0.14–0.16 m2.
Based on these numbers, you can estimate how many sections will be required for a particular circuit. For every 10 square meters of house area, 1 kW is needed, which will be approximately equal to 0.1 m2 of heating area of a cast iron heat exchanger.
The fins of a cast iron radiator are usually connected using heat-resistant rubber gaskets. In a stove firebox, such a rubber seal will burn out; it needs to be replaced with an asbestos cord
Another point about using a cast iron battery as a heat exchanger is the difficulty of cleaning it from soot from inside the firebox. From time to time the combustion chamber needs to be cleaned, and the raised ribs of the cast iron will greatly interfere with this.
The most optimal option for a heat exchanger is steel in the form of:
- a coil of several tubes;
- sheet steel shirts.
They are made from low-carbon steel St10...St20 with a thickness of 4–5 mm. If you take tubes, then with a diameter of 30–50 mm.
The easiest way to make a steel heat exchanger is from sheet steel - however, only the surface facing the inside of the firebox towards the fire will participate in heat exchange
The tubular version is more efficient in terms of heat transfer, but it is also more labor-intensive to manufacture.
To calculate the heat exchanger, use the formula:
Qy=K*(Tcp-Tk)
Where:
- K is the heat transfer coefficient of the material (15–20 is taken for low-carbon steels, and 50 for gray cast iron);
- Tcp – average temperature of the heating medium in the furnace (Tmax+Tmin)/2;
- Tk – average coolant temperature (Tsupply + Treturn)/2.
If wood is burned in the stove, then Tcp=(700+300)/2=500 °C and Tk=(80+60)/2=70 °C. As a result, Qy=15*(500-70)=6450 kcal/hour. That is, per square meter of the heat exchanger surface facing the fire will be approximately 7.5 kW/hour.
For coal, the calculations are as follows: Tcp=(1000+600)/2=800 °C and Tk=70 °C. Qy=15*(800-70)=10,950 kcal/hour=12,734 W/hour. A square meter of heat exchanger surface will give about 12.7 kW/hour.
Next, we divide the power required to heat a particular house by the calculated figure, depending on the plans for using a particular type of fuel.
For example, for a cottage of 150 m2 you need about 15 kW. If it is heated with wood, then a heat exchanger with a heat exchange area of 15/7.5 = 2 m2 will be required. This is the surface that faces the flame and heats up.
If a tubular coil is selected, then its length is calculated by the formula:
S=2*3.14*D*L
Where:
S – design area;
D – tube diameter;
L – required length.
The parameters of a steel sheet jacket are even easier to calculate; it usually consists of two rectangles on the sides of the combustion chamber.
Cast iron radiators as a boiler
You can build old radiators into a brick stove, and they will serve as a boiler. Cast iron built-in water heating elements have their own characteristics, for example, cast iron does not react very well to open fire. Nevertheless, this method is used quite widely. You can use the M-140 radiator, which can easily be found at demolition sites of five-story buildings. If you weld a dozen sections, you will get a heater with an area of 3 sq.m and 18 liters of capacity. A flat boiler with the same characteristics would require a lot of space. Such boilers can heat large areas.
Before the radiators are welded together, they must be disassembled, cleaned of dirt and thoroughly rinsed with a hot 6% hydrochloric acid solution. Then rinse again with water. Then change the cardboard spacers located between the sections, as they will simply burn out. Instead, use asbestos cord impregnated with graphite powder and natural drying oil.
The radiator elements should be assembled in a certain sequence. Screw nipples with their right and left threads into the sections to be connected, then wind an impregnated asbestos cord around them and tighten both nipples with a wrench, making sure that there is no misalignment of the sections. After connecting two sections, you can attach a third, then compress the radiator to check the quality of the assembly. Now you can install the risers.
You can position the cold water inlet and hot water outlet diagonally. The other two holes can be plugged to allow water to circulate through the entire volume. The radiator must be mounted in the smoke duct located behind the firebox. This will help avoid contact of cast iron with open fire: the boiler will be heated by hot gases.
You can increase the natural circulation of water in such furnaces by running a return line pipe through its foundation and the space under the floor, which will increase the temperature difference between the return and hot lines. The battery in the furnace is installed with a slight slope to allow air to escape and enter the system. For cleaning, you can build an additional door into the smoke channel itself.
Preventing heating system freezing
Using water as a coolant has one drawback - if the heating system freezes, the pipeline and appliances will be damaged. It is especially difficult to restore in this case the heat exchanger integrated into the furnace.
This problem is relevant for houses that may not be heated for a long time in winter. One way to prevent system damage is to use antifreeze designed for heating systems instead of water.
For residential premises, liquids based on propylene glycol are used as antifreeze, as a non-toxic substance, unlike ethylene glycol.
However, the idea of using antifreeze has its downsides:
- antifreeze based on propylene glycol is expensive (from 80 rubles / liter);
- the specific heat capacity of antifreeze is less than that of water (approximately 15%), therefore a larger furnace power and a large surface area of room heating devices are required;
- antifreeze has a higher dynamic viscosity than water, so a more powerful circulation pump is required, and natural circulation is impossible;
- when heated, antifreeze expands up to 40%, so it is necessary to use a large closed expansion tank;
- propylene glycol is very fluid, so it penetrates through connections in the heating system through which water cannot penetrate;
- propylene glycol is incompatible with galvanized pipes because antifreeze additives lose their properties upon contact;
- when antifreeze boils (which is likely when using furnaces), an irreversible chemical reaction occurs, as a result of which the entire system will have to be drained and antifreeze refilled.
For antifreeze, the heating system must be calculated in advance - its use in projects implemented for water is quite problematic.
Moreover, a project using antifreeze will be much more expensive than a water heating system. Therefore, its use has not yet become widespread in private homes with stove heating, and other methods are used to prevent freezing.
When choosing a liquid for a heating system, it is necessary to keep in mind not only the physical and chemical characteristics, but also its danger to others
Draining water from the circuit and jacket or register of the furnace is the most common solution to the problem when the owners of the house are absent for a long time. In addition to the additional work, the disadvantages of this method include access of air to the metal elements of the system from the inside and, as a result, the spread of corrosion.
Also, as a solution to the problem for a short period of time, they use the integration of a low-power electric boiler into the heating circuit. Its operation at a minimum level of energy consumption is able to temporarily maintain a positive water temperature.
A low-power electric boiler connected to the heating system is capable of maintaining a positive water temperature in case of prolonged absence of the owners
Boiler installation
When implementing plans to create a combined heating system, it is important to pay attention to some features. Water-heated brick stoves have many options, each of which differs in material, type of main element and other nuances. Ignoring technical and construction requirements will certainly lead to the rejection of the entire work
Ignoring technical and construction requirements will certainly lead to the rejection of the entire work.
The boiler must fit completely into the firebox. However, in practice there are incidental situations when part of the heat exchanger is located outside the stove. This is unacceptable, because the main task of the unit is to heat the coolant. The boiler is made in the shape of a “P” from pipes or sheet iron. All its elements are hollow and are designed to remove heat.
The preferred option is from pipes. It has a larger convection area and allows the flame to reach the cooking surface to cook food. In addition, attention is required:
Dimensions. It would seem that a massive product is needed that can heat a lot of water and provide heat to a decent-sized structure. But that's not true. The boiler itself is made of very modest dimensions - 75 * 50 * 30 cm (length, width, height). The convection surface of such a device is enough to heat a house up to 200 square meters. Installing a pump for forced circulation of coolant increases productivity by up to 50%. Boiler. Its shape is designed in such a way that the heated surface area is as large as possible
It is very important to install it in the center of the combustion center. This is the only way to achieve high efficiency of water heating. Peculiarities
A small gap must be left between the walls of the furnace and the surface of the boiler. The optimal distance is considered to be 5 millimeters. It is quite sufficient to level the free movement of the metal during thermal expansion.
The heat supply and outlet lines are carried out in strict accordance with the laws of physics. It is known from school that hot flows tend to go upward, while cold flows are always directed downward. Therefore, the pipe supplying hot water to the house is always adjacent to the boiler at the top point, and the channel with the “return” is at the lowest point. This arrangement eliminates the accumulation of hot steam, which poses a serious threat to the integrity of the system.
How to choose a project? Order
First of all, decide on the conditions in which the furnace with a water circuit will operate.
If this is integration into an existing OS, it is important to ensure interchangeability in the operation of existing communications. For the independent option, it is important to determine the area that the system will heat
For 100 square meters of a one-story house, a conventional stove is quite enough.
Another thing is if the area, number of rooms and floors is larger
Finally, it is important to understand whether the OS will be used all year round or only in cold weather. If people live in a house in the summer, and in winter it is idle, then after cold weather and frosts the system will require restoration work, which will entail additional costs
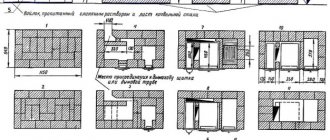
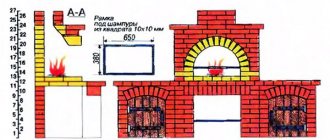
Photo 4. An example of the order of a brick kiln with a water circuit: the initial stages of construction from 1 to 20 are depicted.
What materials will be needed
For the furnace itself: concrete, mortar, refractory and red clay bricks, valves, fire door, grate, ash pan.
For the manufacture of a heat exchanger: metal pipes with a diameter of up to 50 mm or steel sheets 3 mm thick and a rectangular profile 60x40 mm.
For the manufacture of outlet and supply lines of the furnace: metal pipes. For distribution of hot water throughout the house: polypropylene pipes and radiators.
Required Tools
For laying the furnace, making a heat exchanger, installing communications and heating devices you will need:
- building level;
- roulette;
- Master OK;
- bucket;
- pliers;
- electric drill;
- welding inverter;
- wrench;
- screwdriver.
Other tools may also be required, since the laying of a furnace with a water circuit and the wiring in each case are carried out taking into account individual conditions.
Preparing the site
A furnace with a water circuit is located in a fireproof area that is waterproofed.
This area of the room should be well ventilated and access to the oven should always be open. Then make sure that the place for the stove is level and its walls rise up at a right angle.
It is important that the roof allows the pipe to be brought outside without obstacles. Then check how strong the foundation under the future structure is
After all, a stove is a heavy structure that requires a prepared base. The approximate weight of the stove is calculated by equating 1 cubic meter to 1350 kg. If a suitable location is identified, it is cleared and prepared for the construction process.
Attention! To achieve maximum effect, a stove with a water circuit is positioned so that it heats as much space as possible. This will reduce heat loss and reduce the cost of its production.
Building a stove with a water heating boiler with your own hands
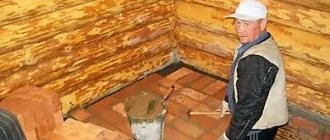
Construction begins with the foundation. Its lower part is filled with concrete, and its upper part is laid out with bricks. Then the laying begins. The first row is laid out dry, and then - on the solution. In this case, the masonry is made from the walls to the middle.
During the laying process, a heat exchanger is installed in the firebox, and the pipes coming from it are distributed throughout the body right up to the point of entry/exit of communications. When external communications are installed, water is released into the circuit and the system is tested for leaks. If the test is successful, the furnace with a water circuit is considered ready for operation.
Difficulties during construction and commissioning
The main challenge when building hot water furnaces is their integration into the existing building layout. You have to look for a convenient place in it, and then adapt it to the operating conditions of the furnace.
If you put the design of the system into perspective at the design stage of the building, you will be able to calculate all the nuances and make the efficiency of the heating system as high as possible.
It is better to test the elements of the water circuit (heat exchanger, pipes for hot water outlet and return inlet) immediately after manufacture and before installation.
If everything is already built and installed, and the heat exchanger suddenly leaks, you will have to dismantle the masonry and disconnect the communications in order to eliminate the detected defect.
Another problem when building a system can arise from pressure. The liquid moves through the water circuit under its own pressure. But it is not always enough for the coolant to reach remote areas of the room. Then an electric pump comes to the rescue to distribute heat evenly throughout all areas of the building.
Flat-plate heat exchanger
A popular option, which is used both for stoves in the bathhouse and for the home. They are the simplest to manufacture, the surface is easy to clean from soot accumulations, installation is possible both vertically and horizontally, and the efficiency is relatively high.
A flat boiler can have a high volume, so you can take hot water for washing directly from the heating system. An expansion tank with an increased linear size is installed, into which water constantly flows after the level drops below critical. This option is quite convenient and helps solve several problems at once, but there is also a condition - the room temperature in winter should not drop to minus.
Key disadvantage: a sharp decrease in heat transfer from the furnace walls. This type of heat exchanger is made in the shape of the letter “P” and is installed around the perimeter of the firebox, bypassing the door. As a result, it turns out that the temperature of the external walls is quite low, as a result, warming up the room takes much longer. This is critical only if the stove is installed in a bathhouse; for residential buildings, where the stove is constantly heated, increasing the warm-up time by several hours does not play any role.
Thus, when choosing a flat boiler, think about how you can increase the heating rate. One option is to enlarge the heater and place it directly above the firebox. Second option: using a metal chimney for heating, increasing its length.
Installing a coil on a pipe
This is an excellent and fairly simple way to increase the efficiency of the stove. Flue gases heat the pipe to extremely high temperatures. The outer coil, like the inner one, helps reduce the temperature and somewhat cool the outer surfaces of the chimney. An external water heat exchanger is especially often installed on metal chimneys. This is an excellent auxiliary device for heating small spaces.
This heat exchanger has two pipes. The top one is connected to a pipe going to the storage tank, the bottom one is connected to the heating circuit. It is easy to make such a structure, as well as attach it to a pipe.
Use copper pipe or ready-made modules.
Simple rules for an efficient heat exchanger
The operating principle of stove heating.
If the house has a ready-made brick stove, then organizing water heating with your own hands is a fairly simple task. To do this, it is enough to place a homemade boiler in the firebox in the form of a coil or any other shape. The main thing to consider is:
- The height difference between the fluid outlet from the heat exchanger and its inlet;
- It is necessary to ensure the maximum possible surface area;
- The heat exchanger should not interfere with the loading and combustion of fuel.
If you are building a stove with your own hands, then the boiler for a brick stove can be made as efficient as possible. To do this, several important conditions must be met:
- Combustion products must leave the chimney as cold as possible;
- Greater heat transfer of furnace gases inside the furnace increases its efficiency;
- It is best to place the heat exchanger in the chimney rather than in the firebox.
These rules may seem somewhat strange, because logically, the heat exchanger should be heated best by the open flame of the firebox. However, it is necessary to take into account other processes occurring in the furnace. From a physics point of view, flames are burning fuel particles. And if we take heat away from these particles, then they will not burn completely, which will reduce the usefulness of the stove.
Diagram of connecting the boiler to the heating system.
In addition, for better heating, the coolant must move towards the heat flow. Only in this way is the temperature difference between different parts of the coolant maintained, increasing the heating efficiency and ensuring better circulation within the system.
Another advantage of this arrangement of the heating tank is that less condensation forms on it, which contributes to the absence of corrosion.
Which stove to choose
Each type of furnace-boiler is appropriate for solving certain problems.
When heating utility rooms or greenhouses, there is no need to fence a multi-ton colossus of bricks. Most consumers in this case choose the simplest boiler.
Photo 1. The process of building a heating furnace with a boiler. A heat exchanger made of pipes is mounted in the firebox.
If the house already has a working brick Dutch oven, you can insert a heat exchanger welded from pipes or sheets of metal into its firebox. To do this, you will have to remove the door, expand the opening of the fuel chamber, insert the heat exchanger and put everything back in place.
When constructing a new furnace, the Kuznetsov boiler design is considered optimal. High heating efficiency is achieved by installing a heat exchanger in a hot hood, where the temperature is higher. The wood in the firebox of the stove burns in an optimal mode, and the hot gases heat the stove hood with a heat exchanger. The temperature rises gradually and remains stable for a long time without additional heating.
Laying a furnace with a boiler
If you decide to delve deeper into the topic, you may decide to install a Kuznetsov bell furnace, the operating principle of which is the free flow of gases, which does not require additional external energy. The drawings are available on the Internet. Here we will talk about a simpler design. So, first you need to pour a foundation, the depth of which is 50-70 cm. Sand should be poured onto the base in a layer of 10-15 cm, crushed stone, gravel or construction waste should be laid on top, and a space of 25-30 cm should be kept for pouring cement. It is best to prepare the solution for the foundation without using sand, replacing it with screenings, the ratio will be approximately 1:6. Roofing felt should be laid under and on top of the screed for waterproofing.
Then you should make a solution of clay + sand in a ratio of 1: 2.5, however, the proportions may vary depending on the level of fat content of the material
It is important not to leave lumps, and therefore the clay should be soaked in the evening. If the mixture slides off the trowel, leaving small streaks on it, then the concentration is appropriate
Before starting masonry, it is necessary to lay out roofing felt over the area of the poured foundation and cover it with mortar. The first row is laid out with a pallet completely made of bricks, where the furnace will then be laid. Then the first row of the furnace contour is laid out, then the next, etc. During laying you will need order.
Now the firebox, ash compartment and ash pit are made. The doors are secured using galvanized wire or a strip of galvanized sheet. It is necessary to trim the brick above the doors using a grinder, but it is best to make one of them with a wedge, so that the masonry will not crack. Make protrusions for the boiler on the brick in advance, which can also be cut with a grinder. Do not forget that the instructions require level installation, and therefore you should use a level. Then the firebox and the rear part of the structure are installed, where the chimney with cleaning is located. The pipe should protrude at least 50 cm above the roof.
You can make your own stoves for heating your home without being a pro in this matter. They are versatile and have a high heat transfer coefficient. The big advantage is their autonomy, since they do not depend on external energy sources. Such boilers can have any size depending on the area of the heated room.
Laying a heating and cooking stove
Before work, it is necessary to make a drawing of the furnace and a detailed order plan. You can use ready-made schematic solutions. The Kuznetsov stove with a radiator hidden in the chimney duct on the side of the stove is popular.
Kuznetsov furnace
Kuznetsov furnace:
Construction materials
To create a brick kiln, prepare:
- concrete;
- solution;
- fireproof fireclay, red brick;
- valves;
- firebox door;
- grate;
- ash pit.
For the heat exchanger you will need:
metal pipeline with a cross-section of up to 5 cm, sheet steel 3 mm thick.
Outlet and inlet communication lines are made of metal pipelines. The water circuit lines for supplying hot water throughout the house are made of polypropylene pipes and batteries.
Diagram, dimensions of the furnace unit
Technical parameters of the heating unit:
- length/width/height - 102x116x238cm;
- heat exchanger dimensions - 75x50x35 cm;
- battery power - 6 kW. You will have to add fuel twice a day. You can heat 60 sq. m at home.
Bake
External section of the furnace
Step-by-step instructions for laying a stove
Detailed instructions for installing a brick kiln:
- The furnace is being marked. The foundation is poured 50 mm below the future final floor covering. To increase reliability, it is worth performing reinforcement with rods. It is necessary to exclude contact between the stove foundation and the foundation of the house.
- Once the foundation is completely dry. He'll be ready. You can start laying bricks according to the order scheme. The first two balls are made of red solid material on a cement mixture. The purpose of the masonry is to level out the resulting unevenness in the foundation. The foundation is being laid.
Foundation
The layers are connected using clay mortar.
- The thickness of seam joints between individual rows should not exceed 5 mm. The smaller, the more uniform the surface of the structure will be. Heat dissipation is better.
- The jointing is carried out immediately after laying the brick.
Masonry
- Arrangement of the door to the furnace: before installing the door on the brick, an asbestos plane is laid. An annealed wire 0.4 m long is located in the corners of the frame. Fastening is carried out between brick rows. The circuit will make the door more reliable, otherwise the solution will crumble. It will fall out of the oven. You need to check the location of the door with a building level. An asbestos strip is placed on top.
- The firebox is lined with fireclay refractory bricks. A simple brick will crack and fall apart. The schematic representation of fireclay building material in the sketches is done in yellow.
- If you need to install a hob, grooves are left under the stove. Heat losses are minimized. Smoke is prevented. The tiles are laid using mortar.
- A self-created heat exchanger is placed in the chimney at the stage of laying the brick layer, which is equipped with a lower fitting. It is installed in the combustion chamber when the last firebox ball is being laid. The distance between the heat exchanger and the brickwork should be within 5-6 mm.
- Cleanout doors are installed in the chimney. They remove accumulated soot, otherwise heating will deteriorate. There should be enough doors to provide access to every section of the chimney duct.
- A damper or damper is made at the top of the chimney. The chimney structure can be made of brick, the same as the stove. You can purchase ready-made sandwich panels. It is necessary to follow the rules for contact between the pipeline and the roof. The brick chimney is made with a plow.
Stove heating has been used for many centuries. Heating systems have been improved. To heat the house evenly, a water circuit with radiators is used. You can make heating for a private home on your own. The main thing is to follow the instructions.
Manufacturing a brick kiln with a water heating system:
average rating
more than 0 ratings
Share link
Water boiler made of cast iron radiators
M-140 radiators are suitable for this type of boiler. They are quite easy to find, since large quantities of them are sent to scrap when radiators are replaced with more modern ones or old buildings are demolished. Each section of such a radiator has a capacity of 1.5 liters, and their area is 0.254 square. That is, if you combine 12 sections, the volume of the heat exchanger will be 18 liters, and the area will be 3 square meters. Such a boiler has a capacity of up to 100 square meters. So it’s quite enough for a residential building.
In order to use the radiator, you need to modify it a little. Initially, you should remove the cardboard gaskets located between the sections with your own hands. The best replacement for them would be an asbestos cord, which must be impregnated with drying oil with the addition of graphite. Thus, the gaskets will be protected from burning through at high temperatures.
In addition, before starting assembly, the sections should be washed from the inside using a 6% solution of hydrochloric acid, and then washed with water. This will clean the pipes from dirt and rust that has accumulated there during operation.
Fire safety requirements for stove heating at home
Stove heating in a wooden house is installed in accordance with the building codes set out in SNiP 41-01-2003. Stoves are subject to fire safety rules, which require measures to prevent fires.
A separate column is environmental legislation regarding stove heating, which limits the use of heat generators in urban areas. In particular, to connect a stove, in addition to meeting fire requirements, the building must have an appropriate number of floors (no higher than 5 floors) and a special ventilation duct for smoke removal.
In 1-2 storey buildings, the height of the chimney relative to the roof of the house must be at least 0.5 m. In densely populated areas of the city, the elevation of the chimney above the building is calculated separately, depending on the location of neighboring buildings.
How to secure the ceiling and floors
Fire protection is aimed at preventing accidental fire caused by the operating characteristics (high heating of the housing and chimney) of solid fuel stove equipment.
The activities cover the following work:
When burning, inside the combustion chamber the smoke heats up to 450-550°C. A brief ignition of soot raises the temperature to 1200°C. The surface of the chimney becomes very hot. Manufacturers do not recommend connecting galvanized and corrugated steel chimneys to stoves. The best choice is sandwich pipe or ceramics.
For stove heating in one-story wooden houses, a special penetration is installed. The ceiling in the area above the stove is protected with a metal insert. The penetration is made of non-combustible basalt insulation. A spark arrestor is installed at the head of the chimney.
Where the chimney passes through the attic, the rafter system is treated with fire retardants. The chimney is wrapped in thermal insulation material. Properly pass the ceilings of the chimney, providing for fire breaks. The minimum distance between the surface of the chimney and the ceiling is at least 25 cm. The gap is filled with basalt wool.
The operating rules for furnace equipment indicate the need for annual inspection and maintenance of the smoke removal system. Brickwork is checked for cracks, pipes for depressurization. Violations are corrected.
Measures to protect the walls around the stove
Fire safety measures include the need to install wall protection around installed furnace equipment. A gap of 1.25 m is left from the stove to the nearest surfaces, and at least 1.1 m towards the opening firebox.
The distance to the walls can be reduced after carrying out the following work:
- The surface of the wooden wall is covered with basalt insulation. For this purpose, 5 cm thick basalt wool is used.
- The insulation is covered with a metal sheet.
After the work is completed, the gap between the furnace body and the walls is reduced to 0.5 m.
Existing requirements for stove heating of a private house require the need to protect the walls around the chimney. Often, the distance between the chimney and the combustible surface is no more than 25 cm, which is due to installation features. The protection is carried out in the same way as the insulation of the walls surrounding the furnace boiler.
e71adf3b3dacca916e8f1fe3a6f21dc2.jpe c1e53f51c49549c4ac2e890c0ad65984.jpe
The fire safety requirements for stove heating in a residential building indicate the need for regular inspection of the condition of the device by an inspector from the Ministry of Emergency Situations and a stove fitter. A condition audit will allow you to identify potentially dangerous defects and eliminate them in a timely manner.
What is better for a country house – stove or boiler heating?
Modern heating standards impose identical requirements on both stoves and solid fuel boilers. The operating and safety rules, operating and heating principles are the same.
The thermal efficiency of boilers is slightly higher than that of stoves, but they are also more expensive. Owner reviews and comparisons of performance characteristics clearly indicate the following.
For complete water heating of a heated house, it is better to choose a solid fuel boiler. In buildings that are not constantly heated, it is better to install furnace equipment that operates on the principle of convection heating.
Calculation of power and temperature of a warm water floor
Heat exchanger construction
Installation diagram of the heat exchanger and storage tank.
You can easily build an effective boiler with your own hands. If it is made in the form of a tank, then high-quality steel is required, which can withstand thermal loads and corrosion due to the coolant. In addition, the manufacturing material must have high thermal conductivity to increase the efficiency of the system.
The thickness of the tank walls should be within 4-5 mm, which ensures its strength while simultaneously heating quickly. There are no standard sizes for such a heat exchanger; it all depends on the configuration of the existing or planned furnace. The main thing is that the height of the tank is at least 500 mm for better circulation.
If the heat exchanger is a coil or another circuit of pipes, then there are also some nuances. Pipes for the manufacture of such structures must be thick-walled and have no seams. If it is difficult to find a seamless pipe, then it is necessary to weld the existing seams to prevent possible coolant leakage.
The inlet pipe is best located at the top of the structure, and the return pipe is located in any convenient place. The pipes are not butt welded, but with chamfers to avoid unwelded areas that will leak in the future. The minimum distance between the knees of the structure is 5-6 cm, so that the heating of each knee is maximum. Before placing such a boiler directly into the oven, it is necessary to fill it with water and check for leaks, which are promptly eliminated.
When placing the boiler directly into the furnace, you should adhere to the level, but minor deviations are allowed.
Device Features
Having chosen stove heating as the main type, you need to correctly select the power of heating devices, their type and location in the house. And for this you need to take into account heat loss and the size of the premises of the house. Heat loss depends on many factors, such as the material of the walls and ceilings, as well as the level of their insulation, the size and type of windows. But, on average, we can assume that for 10 m2 you will need at least 0.3 m2 of usable oven area.
6401a06fee0e2c55d355e973d0fe658f.jpe
The location of the stove should be such as to make maximum use of its heat to heat the room and at the same time make it convenient to heat it. It is best if the furnace door of the furnace is located on the side of the door, facing a corridor or a special room. Its heating surface should provide maximum heat transfer, so it is best to place it at a distance of 20-25 cm from the wall and not block it from furniture or other objects. In a wooden house, the distance to walls and other combustible structures should be 40 cm or more. If wooden walls are protected by a heat-insulating screen, then - at least 25 cm.
If you choose stove heating with a water circuit, then the stove itself must be located based on the convenience of pipe routing and its efficient operation. The dimensions of the furnace itself, that is, its firebox, must be coordinated with the dimensions of the selected heat exchanger, or it must be made according to the size of the selected furnace design.
Smoke pipes
In order for stove heating to work efficiently, it is necessary to properly construct the chimney. Its height from the level of the grate must be no less than 5 m. Its cross-section can vary depending on the design and power of the heating device, and therefore on the amount of flue gases emitted. For a small stove with a heat output of no more than 3000 kcal/hour, it should be at least 14x14 cm, for a more powerful one - 14x25 cm. If you plan to build several stoves in the house, then it is not advisable to connect them to one chimney, especially if they are located on different levels. Traction problems may occur or reverse draft may occur.
Where the chimney passes through the combustible ceiling, cutting is carried out - thickening the masonry and insulating it with an asbestos gasket. At the point where it passes through the roof, the junction is sealed to prevent atmospheric moisture from entering through it. For slate roofing, as a rule, asbestos cord and cement mortar are used; for roofing made of metal tiles or corrugated sheets, special lower and upper abutment strips are used. To prevent moisture from getting inside, metal removable caps (caps) of various designs and shapes are most often installed on the heads of chimneys.
Brick chimney construction
Brick chimney laying diagram.
Laying should begin with the mounting tube. It should be laid out in compliance with the brick dressing. After this, a cutting (fluff) is formed. It needs to be laid out from 5 bricks. The channel will have dimensions of 270x140 mm. The external dimensions of the cutting are 450x590 mm. This can be achieved by inserting brick halves. To maintain the dimensions of the channel, you will need to insert brick plates inside. In this case, the channel will not change.
The next row will have dimensions of 650x510 mm. Brick plates 6 cm thick are mounted inside. At this stage, the cutting will begin to take its shape. In the next row, the external dimensions will be 710x570 mm. Inside you will need to install material 9-10 cm thick.
After this, the fluff ends. In the next row, be sure to observe the dressing. If you need to make a cut of greater height, you can install another row; the dressing should be done under the bottom row.
To allow the riser to exit outside, you will need to prepare a hole in the roof. Next, the riser should be routed through the roof. The rest of the work is done on the roof.
At the next stage, the riser is laid out. You need to carefully monitor the dressing of the brickwork. The riser must be placed several rows above the roof. After this, the otter lays out. The internal plates are selected so that the channel does not expand.
After this you will need to form the neck and head. The actions will be the same as in the case of erecting a cutting.
Important points in the construction of a furnace
In order for the water circuit to function with maximum efficiency, not only the heating water system must be properly designed, but also the furnace itself. Mere observance of order is not enough. Full compliance with furnace construction technology is important.
Foundation
Its type and thickness depend on the size of the stove. It is recommended to install a massive classic Russian stove on a solid strip foundation. For smaller modern heating structures, a concrete pad one and a half ten centimeters thick, sometimes on a frame made of reinforcement, is sufficient.
Brick
For external walls, ceramic refractory bricks are used. For the base - his own, possibly second-hand. Experts recommend that you always line the inner surface of the firebox with fireclay stone. For a more presentable appearance of the facade, it can be laid with facing bricks right away or this finishing can be done later.
Solution
The mortar for masonry is prepared traditionally: sand is mixed with clay, diluted with water and a little cement is added for strength. You can purchase a ready-made cement-based masonry composition with special additives.
Masonry
The main condition for a strong structure is the presence of high-quality ligation of seams. They must not coincide under any circumstances. It is ideal when the seams of the bottom brick row fall under the middle of the bricks lying in the next row. To do this, starting the rows, alternate whole bricks and their halves.
Stoves with a water heating body have a fairly simple and understandable design. They are popular due to their low cost and ease of use. And if you don’t like using natural gas to heat your home or don’t have access to a gas network, this heating option should be considered first. Built by a good craftsman, such a stove never disappoints its owners.
Benefits from combining the two systems
A traditional stove-heater consists of a combustion chamber, grates, ash pan and channels for smoke removal. All the attributes of a familiar Russian stove are known to every village resident. Modern boiler furnaces are practically no different visually.
But they have different characteristics:
- An ordinary rural stove can produce a little more than 6500 kcal of heat in one hour of full operation. This energy is enough to create a comfortable microclimate in a small house. For example, this heating method is suitable for a summer house.
- If you install a water boiler, its productivity will be 2.5 times greater. Naturally, the area of the heated room will also increase proportionally. The amount of fuel burned is the same. And savings are achieved through improved heat extraction. That is, less warm gases are released into the atmosphere.
- Next, a very important nuance becomes clear. If you combine convection (oven) and water (boiler) heating systems, the efficiency increases multiple. The point is that when both systems are running, their performance is additive. In other words, a tandem of two heating methods produces about 21,000 kcal per hour of operation. This is quite enough to heat about 300 square meters of living space.
- The positive aspect of this method of heat supply is the availability of energy resources. In most cases, firewood or a combination of wood and coal is used. The cost of these types of fuel is low, and acquiring them is not particularly difficult.
- The oven does not need to be lit all the time. Fuel is added 2 times a day. A comfortable microclimate is created in the house, regardless of the temperature outside the window.
- If the efficiency of a traditional stove did not even reach 50%, then the combined option reaches 85%. And for wood heating this is almost an ideal indicator.
- The price of materials is low. The cost is usually determined by installation work.
Principle of operation
The peculiarity of the operation of horizontal and vertical structures is that when fuel is burned, air is heated, which rises and is discharged through the chimney. At the same time, in the process of transferring heat from heated air, cold water is heated in the heat exchanger.
There is also another type of heat generator, in the form of a mine boiler. This design differs from others in the vertical location of the large loading chamber. At the same time, the fuel burns at the bottom of the shaft, and hot air and smoke exit through the second chamber, where the heat exchanger is located.
What is needed
First, you should decide on the dimensions of the future solid fuel boiler and select the most suitable design. Of course, knowing all the aspects of building brick heat generators, you can design and build everything yourself.
However, in the absence of proper knowledge, it is better to carefully read and choose an option from those presented on the Internet.
It is immediately worth noting the fact that when building a solid fuel boiler from brick with your own hands, you will have to deal with welding work, since the heat exchanger is made of pipes or sheet metal.
If you wish, you can buy a ready-made heat exchanger in a specialized store, then you can do without welding work.
Materials
So, from the materials for building a solid fuel boiler made of brick you will need:
- Cement and reinforcement for the foundation. If a brick foundation is planned, then additional amounts of broken bricks and pebbles will be required.
- Fireclay bricks and mortar for laying a furnace.
- Pipes and sheet metal for heat exchanger.
- Doors and grate.
- Water pump.
- Device for heating water.
You will also need tools such as:
- Welding machine.
- Grinder, gas cutter, electric drill.
- A marker that will be used to mark sheet metal.
- Level, pliers and tape measure.
In addition, do not forget about personal protective equipment in the form of gloves, goggles and a mask to protect yourself while working.
Preparing the heat exchanger
To build a brick boiler with your own hands, you first need to prepare a heat exchanger so that you can take dimensions from it for the combustion chamber. That is, you will have to either buy a ready-made heat exchanger or design it yourself.
For example, if you decide to make a horizontal type heat exchanger from pipes, you will need:
- First, prepare pipe sections of the required size.
- Next, holes are cut out of the rectangular pipe in the corner posts, with the help of which the transverse pipes will be joined. Holes are made with a diameter of 50 mm on a face of 60 mm. In total, each rack has 4 holes. 2 more holes are made in the front wall. One is done from below and is required for the return. The second one from the top is for hot water drainage.
- After this, you need to weld the racks to the transverse pipes at an angle of 90 degrees.
- The underwater and outlet pipes are also welded, and then the ends of the rectangular pipes are welded.
Also, a horizontal heat exchanger can be made of steel and pipes. The principle of performing all the work is similar to the option described above, except that in this case the corner posts, as well as the longitudinal pipes, will be replaced with hollow walls.
A vertical type heat exchanger not only provides the ability to transfer heat to the room, but it can also be used to install a stove with one burner. The location of the chimney will depend on its presence or absence.
Rules you need to know when building a chimney
Diagram of a brick chimney.
The structure for solid fuel boilers is made together with the walls of a private house. These elements are constructed according to a single principle, and it does not matter whether the channels will be used as ventilation or smoke. You will definitely need to build a foundation for the chimney. The base structure can be made of brick or concrete.
In all cases, a foundation project is prepared. During the design process, it must be taken into account that its height must be at least 30 cm, and its width must be such that the base structure extends beyond the border of the chimney device by 15 cm or more. If the chimney is made as an element of the external wall, then you need to know that the lower part of the chimney base must be placed at the lower level of the wall base.
During the construction of chimney structures, special attention should be paid to the quality of tightness. To make a durable brick chimney, you will need to follow the rules
The material should be laid so that the seams overlap the elements of the next row. In most cases, the same mixture is used as for the construction of load-bearing walls of the structure.
In the process of making a chimney for a solid fuel boiler, it must be taken into account that its internal base must be smooth.
Therefore, when performing construction work, you need to use a template. The walls between the elements must be at least half a brick thick. For ventilation elements, the thickness of the partition should be 2 times less.
At the end you will need to make a header. The extreme parts of the element must protrude beyond the structure by 10 cm or more. The outlets of the ventilation ducts must be created under the head; in most cases, 2 walls are used, which are placed opposite each other. This placement method will prevent air from being blown in.
Design and installation nuances
Stove heating is a potentially dangerous system, so special attention should be paid to its design and proper installation.
What should you pay attention to when drawing up a project?
Typically, a stove heating scheme is developed simultaneously with a construction project, since it is closely related to the layout of the premises. The location of furnaces should, if possible, be carried out in the area of internal walls. Access to the combustion part should not be hampered in any way and it is best that it can be approached from the corridor.
Particular attention should be paid to the fire safety of the system. Since a common cause of fire is excessive heating of wooden parts, an air gap or indentation must be left between the stove and wooden partitions
Also, the surface of a combustible structure can be lined with bricks or so-called cuttings can be arranged - insulating structures made of fire-resistant materials.
Preparation for installation of the stove begins with strengthening and thermal insulation of the area of the floor on which it will be installed. When installing a stove weighing more than 750 kg, a special foundation must be installed for it. It must be taken into account that the design differs from the traditional foundation for a house, from which it must be separated by a 50 mm wide gap filled with sand.
The stove model is selected taking into account the size and configuration of the room in which it will be installed. Brick layout options can be found in special reference books or on the Internet. The hydronic heating part of the system is designed in the same way as any traditional hydronic structure.
Installation features
As practice shows, a water heating stove can be installed in two ways:
- Design and fold for a specific register.
- Install a heat exchanger into an existing furnace.
The second option is considered the most time-consuming and complex. It involves dismantling the existing structure, installing a carefully sized register and re-installing the structure. The process may be complicated by the need to replace worn-out elements.
In any case, the thickness of the so-called “water jacket” should not be less than 4 cm, otherwise the water may begin to boil. This rule is especially relevant for systems with natural circulation; when installing a pump, the danger of boiling is reduced.
Stove heating with a water circuit is a successful variation of the traditional heating system
Building a country house with stove heating is quite simple. Properly designed and installed equipment guarantees long and trouble-free operation. Stove heating with coolant is considered especially successful, which is everywhere replacing traditional stove heating. Such a practical, economical and effective solution will provide warmth and comfort in your home.