Tool
A small stove is extremely simple to install, so any owner of a building can try himself as a stove maker. You just need to stock up on some simple tools in advance:
- Pickaxe;
- Hammer;
- Level ;
- Plumb;
- Trowel;
- Trowel - for external corners;
- The rule.
The skills of chipping a brick of the required length or chipping it at an angle come with experience. Therefore, in order not to experiment and not waste bricks purchased individually, it is better to use an angle grinder (grinder) with a disc for brick or concrete. This will allow you to get perfectly even workpieces, and not have to worry about trimming protruding uneven ends.
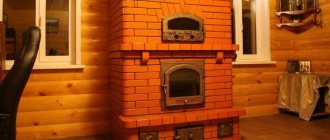
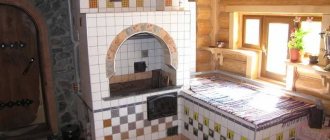
Heating and cooking stove "Malyutka"
For an insulated garden house, a small, compact, economical Malyutka stove with a height of no more than 2.2 m is convenient. If desired, the stove can be made higher by adding several rows between the 18th and 19th. The oven has a cooking chamber and two drying chambers. Due to its small size and mixed (flat and edge) masonry, only 250 bricks are required (up to the pipe).
The design of the stove is simple, and with little skill it is not difficult to build, but it requires a lot of shaped brick cutting.
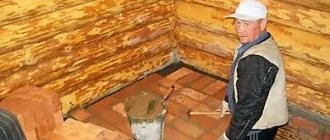
The stove is placed on a solid foundation, which should be 5-10 cm larger than its size. In a pit dug to solid ground, broken bricks and rubble stone are poured and filled with cement in a ratio of 1:5 with cement grade M-400. The foundation should not reach the floor level by 1-2 rows.
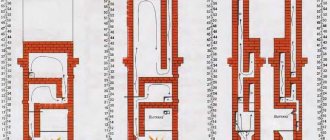
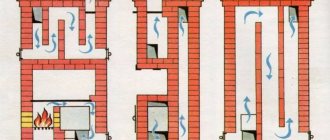
First, the brick is selected dry in each row, then placed on a clay-sand mortar. The rows are counted on the right side, from the side of the valves. The width of the gas ducts along the walls is not less than 7.2 cm. It must be taken into account that the summer flue in the rear wall is always hot. Above its valve, the gas duct is made square, for which the bottom of the 24th row is cut off (see section B-B).
Formation of heating equipment
First of all, you need to orient yourself with the place where the crumb oven will be placed, and also prepare an exact diagram with dimensions and order. The same rules for stoves will also apply to a small fireplace. Installation is done at a safe distance from the walls ( approximately 25 cm ), the stove should not be in a draft, and the chimney should not touch the ceiling beams. Safety principles must be fully implemented - insulated walls, floor and ceiling with fire-resistant materials.
For construction we will need:
- red stove brick (solid);
- refractory brick (for the combustion chamber);
- clay or cement mortar M300;
- reinforcing rod;
- ash flap;
- grate;
- fire door (if you choose a door made of glass, then the baby usually serves as a fireplace);
- cast iron hob;
- valve
Tools you need:
- trowel (leveling mortar, cutting seams);
- hammer and pick (for bricks);
- level;
- Master OK;
- a plumb line (weight with a cord) to control angles;
- rule (a wooden ruler with a cross-section of 1.5 x 6 cm and a length of 1-1.5 m, having parallel planes) for evenness of the masonry;
- roulette.
A good all-purpose stove will require a foundation. Rubble concrete will be economical. The pit must be at least 80 x 65 cm . Formwork made of boards is placed in it, covered with plywood or rolled roofing material and filled with concrete. Next lay broken bricks and rubble stone, everything is filled with cement (ratio 1 to 3). The last step is to cover the insulation with several layers of rolled roofing material.
To ensure the reliability of the foundation base, it is better to install a reinforcement grid. Lay out six rods 50 cm in length and six in width. The pitch should be approximately 10 cm, the connections are welded using electric arc welding. You will need two similar gratings.
concrete M300 as a fill . it is strong and reliable. Its hardening time is about 25 days.
If a stove made of brick is supposed to be light, without a constant intense combustion chamber, then the initial row of bricks should be laid on an insulating layer:
- polyethylene film;
- rolled roofing material;
- hydroisil, soft roofing material;
- dry sand 1 cm.
Furnace order
The first and second rows are leveled, each row is checked with a level.
3rd - place the blower on the front part, its dimensions are half the size of the combustion chamber.
The fourth is the installation of a steel window . from above it is covered with a grate.
Fifth – fixing the grate, circular laying.
The sixth is the beginning of laying out the combustion chamber. The window is slightly narrowed for comfort.
The seventh is installing the combustion chamber door. The combustion chamber must be firmly held in the masonry; for this purpose, the fastenings are wrapped with asbestos cord.
Eighth - a strip of steel based on a sheet is placed on top of the combustion chamber.
From the ninth to the eleventh - circular laying.
Twelfth, thirteenth - the formation of the rear wall, it lies on the dock, and two small grooves appear.
Fourteenth - the grooves become larger by half a brick, the other space is covered with bricks.
The fifteenth is a place for a canal . An oblong channel is left near the back and side walls. In the key masonry there is a compartment with a supporting brick in the very center (under the column).
Sixteenth - steel strips are laid on the column, they create another channel.
Seventeenth - the channels divide and create 4 channels under the walls and one in the very center.
From eighteen to twenty-two - continuation of channels.
The twenty-third and twenty-fourth channels, in addition to the central one, connect and create an L-shape.
Twenty-fifth - the channels, in addition to the central one, are covered with brick.
From twenty-sixth to twenty-eighth - the dimensions of the masonry are narrowed to the size of the pipe (chimney).
Twenty-nine - installing the damper.
From the thirtieth - the formation of a chimney and its output to the street.
During the laying process, dressings should be made one second or one fourth of the brick. After every six rows, the masonry should be wiped with a damp cloth. A In order for the corners to be even, it is better to install plumb lines on the ceiling surface (temporarily on nails). During laying, the brick must be placed flat and on edge for the stability of the structure.
Related publications:
Brick stove for a summer residence
Stove with water heating boiler
How to make a Russian oven
Pompeii oven
Exploitation
The first test run can be done on the day the work is completed. You will not find such advice in any instructions for building a Russian stove. It's all about a simple scheme, since it does not contain elements containing thick layers of solution, which means it can harden solely through surface evaporation.
Although the design provides for the presence of cleaning doors, this fact should not be abused. You should choose only dry logs as fuel. The use of coniferous species should be abandoned. If the inner surface of the firebox was lined with ordinary brick, then burning coal is fraught with the detrimental effect of high temperatures on the condition of the masonry or the brick itself. That is why the advice given above was to use fireclay bricks.
The baby model has gained popularity and earned respect for its qualities. With a small space, it plays the role of a full-fledged source, capable of providing warmth and maintaining it for a certain time, and housewives appreciated the ability to cook food.
What materials are used?
The “baby” stove is made of a special type of bricks that are resistant to high temperatures. Characteristics of materials:
- Fireclay brick. An indispensable item for laying the combustion surface of the stove.
- Private. It is not suitable as a facing material, but most of the structure is laid out with this brick, so the consumption for it is maximum.
- Facing. Suitable for finishing the front part of the fireplace, you can choose your own color.
To build, you will need to purchase a fire door.
For installation, you need to purchase the appropriate oven elements, without which the structure will not function fully. In addition to bricks, the work also includes (approximate list of basic auxiliary materials):
- grate;
- combustion door;
- valve;
- blower door;
- burner stove (cast iron);
- clay solution.
Return to contents
Features of the “baby”
Already from the name of this model it is clear that its dimensions are more than just modest. For example, the base area is only 0.4 square meters. m. However, the ability of the “baby” to give off and retain heat is very impressive.
The structure is laid out from bricks, which are laid either flat or on an edge. Since its weight is light, there is no need to build a foundation for it. It can be erected directly on a floor made of thick boards fixed to joists.
Built with your own hands, such a stove will replace a potbelly stove. Moreover, the functionality of the “baby” is much more interesting and richer. For example, a hob is additionally installed on it, and if desired, it can be equipped with a fireplace portal, since it has a smoke tooth.
The stove is installed incredibly quickly. Moreover, if you start work in the morning, then in the evening it will be possible to carry out a test fire.
About the heat exchanger
When building a brick stove with a water heating boiler with your own hands, you should take into account many factors and calculate the project as a whole. Any type of materials and structures have their advantages and disadvantages.
There are several ways to install a water register in a furnace:
- Inside the hearth;
- In the chimney;
- In the body of the stove, next to the hearth.
Depending on the location, choose the material for the heat exchanger and its shape:
- Copper - effective due to the high thermal conductivity of the metal, but due to the low melting point of copper, constant circulation of water in the system is necessary;
- Steel - heat-resistant steel with a wall thickness of 4-5 mm is used for boilers. For long service life of steel structures, it is not recommended to drain water from them.
- Stainless steel is expensive, but the most suitable material for a boiler. The only disadvantages include the complexity of manufacturing.
When choosing the type of material and installation location of the heat exchanger, it is worth remembering that by placing the water circuit in the fireplace, in the summer the entire system will heat up; to avoid this, you will have to remove separate batteries to remove excess heat.
When installing a heat exchanger in the chimney, additional dampers are added to the stove design, which do not heat the boiler during summer operation of the stove. It should be taken into account that the heat exchanger must be larger in volume than when built into the fireplace. In addition, the boiler should not reduce the throughput of the smoke channels.
Calculation of power and dimensions
For normal heating of the room, it is necessary to correctly calculate the register area and its power. For a brick kiln, an approximate calculation is sufficient; it is impossible to make an exact one, due to many factors and variables.
It is known from practice that heating 10 m2 of space requires 1-1.5 kW of energy. From one square meter of heat exchanger you can get 5-10 kW. To determine the register power more accurately, you need to consider:
- Location of the coil in the furnace;
- Type of fuel - wood, coal. When burned, wood produces less thermal energy.
- Approximate temperature in the hearth and location of the heat exchanger;
- Average water temperature throughout the entire circuit;
- The heat transfer coefficient of the material from which the coil is made.
As the fuel burns, the power of the heat exchanger will decrease, so it is better to increase the calculated coil area by 10-15%.
Simple, but long lasting
The described stoves are temporary in the full sense of the word - when the need has passed, they are completely dismantled, as simply as they were made. However, in a commercial dacha or in the outbuildings of a private household, you may need a brick stove with masonry mortar, which is comparable in thermal efficiency to a house stove (60-75%), but suitable for construction directly on the floor without a foundation. The first thing you need for this is oven mortar. Ready-made dry mortar for laying stoves or stove glue is, of course, technologically simple, but not at all price-wise, so you can study the material on homemade mortars.
The next point that needs to be taken into account is the weight load from the stove to the floor. An ordinary plank floor with joists can withstand 250 kgf/sq.m. m, but building a “real” such a light brick oven is unrealistic. However, it is still possible to place a brick stove without a foundation on the floor even in a light frame building, provided that the stove will only be on the ground floor, see below.
In terms of weight in this case, the well-known summer stove made of 200 bricks is more or less suitable (see figure below). It weighs (without fuel and utensils) approx. 890 kg, and its supporting area is 0.736 sq. m, i.e. its weight load is 1209 kgf. However, you can’t bring the materials for this stove in one car trip, the design is a bit complicated for beginners, and the oven (3 in the figure below) and the hot water tank (4) are unnecessary for a simple stove (other designations: 1 - fire door; 2 - blower door; 5 – cleaning door).
Cooking stove for summer kitchen
A simple brick oven, the drawings and order of which are given below. Fig., weighs 540 kg. The reduction in the number of bricks to 118 was achieved by eliminating the oven with a water heater, as well as a different, less convenient cleaning arrangement. Support area 0.468 sq. m; weight load 1154 kgf. Although the pressure from this furnace on the floor has not decreased much, all the materials for it can be brought in one trip by car, and the brick undercuts can be made with a hammer or a chisel. Thermal efficiency and heat output remained approximately the same, approx. 60% and 700 kcal/hour.
Step-by-step instructions for making a mini-oven
Taking into account the layout of the mini-oven for the dacha, let's get to work.
Masonry from 1 to 12 rows
The first row is laid out, and in the second it is necessary to provide space for the blower door. The rows must be coated with the solution. Before installing the blower door, it must be wrapped with asbestos, and the door will be secured with wire.
Next, a row is laid out using refractory bricks and a mixture of refractory clay.
During the laying of the row, a grate is installed. Starting from this row, right up to the masonry, it should be done with refractory bricks.
A firebox door should be installed in the row, with which the same work should be done as with the door for the blower (wrapped with asbestos, secured with wire).
We lay out the row according to the layout. Each layer must be coated with a solution. 8, 9, 10, 11 and rows are laid out in accordance with the layout.
Masonry from 13 to 24 rows
From the row we begin to form the combustion chamber and vertical channels. The main thing here is to carefully follow the procedures, otherwise you may violate the correctness of the design.
On the 15th row it is necessary to lay out a layer of clay-cement mortar. It will strengthen the bottom of the cleaning chamber, after which you can install the door itself.
Masonry from 25 to 35 rows
Further up to the row we lay the masonry in accordance with the instructions.
In the 25th row, the bottom surface of the second cleaning chamber should be sealed, also laying this row with clay-sand mortar, and then install the door.
Next, we lay the bricks in accordance with the order, forming a chimney channel.
In the 28th and 32nd rows, two valves should be installed, with the help of which the draft will be regulated.
Next we begin to raise the chimney pipe, as shown in the layout.
If everything is done correctly, after completing all the work you should end up with a compact model like this.
This model has the following dimensions: 51 cm width, 89 cm depth and 2.38 m height. Even beginners can make such a stove. In addition, if you do not have experience in the furnace business, then it is not recommended to make more complex models, since you can get confused in the procedures and damage the integrity of the structure, which will affect the quality of its operation and service life.
Small size and the ability to quickly and efficiently heat are the main reasons for the construction of small-sized brick stoves. These characteristics are achieved in a variety of ways, differing in masonry and design options.
What is this article about?
How to make it yourself
Preparatory stage of construction
At the preparation stage, you must have the following tools available:
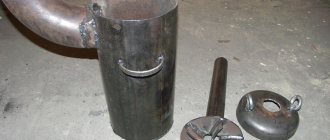
- welding machine;
- roulette;
- bayonet shovel;
- grinder;
- waterproofing;
- scrap;
- rod;
- water and sand;
- solution.
After determining the location for the building, you need to lay the foundation for it.
The first thing the preparatory stage begins with is determining the location of the future fireplace.
It is important to position the brick stove correctly to avoid energy loss. The walls of the structure are not located near the outer walls of the room, but placing the fireplace in the center of the room is also not recommended
Not in all cases, a “baby” brick kiln is built simultaneously with the building. Sometimes you have to lay the foundation on already finished floors. If the house uses a “warm floor” system, you have to lift the entire screed. After the place for the stove has been prepared, a hole up to 35 cm deep is dug and completely covered with waterproofing. Next, the reinforcement is laid and the solution is poured.
Step-by-step instructions for carrying out work
Brick is the priority material for laying furnaces. A small or large “tiny” stove, although it has simple construction drawings, a detailed diagram of the sequence of work will be useful in any case. Step-by-step instruction:
Before starting the ordering, the foundation is waterproofed with roofing felt.
- A layer of waterproofing is applied to the foundation. It is recommended to use roofing felt.
- The order starts from the corners, three rows for each.
- The verticality and horizontality of the plumb line are measured.
- The laying of the first row (solid layer) must be perfectly accurate.
- A thin layer of clay is applied to a row of bricks and three rows are placed around the perimeter. At the same time, the door is installed. Everything is done quickly and accurately.
- A steel wire is inserted into the fastening area, the ends of which are twisted and wound in order.
- Visible defects are eliminated using an angle grinder.
- Grate bars are installed.
- The next series involves the use of fireclay fire bricks and the installation of a firebox door wrapped in asbestos cord.
- All subsequent rows are laid flat. The ordering is completed with the expectation that there is room for a slight backward shift.
- The already installed door is covered and the stove is installed. It is recommended to buy a cast iron version for cooking.
- The last stage is to finish the outer walls of the oven. It is used most often in such cases of whitewashing. Before starting work, it is recommended to protect all walls in the house from dirt, since removing stains from whitewash is problematic.
Drawings and diagrams
There is a sufficient amount of material available for study on the Internet. Therefore, a detailed diagram of the furnace layout is not in short supply, and variations in the layout allow each user to choose the most suitable scheme. First, you need to figure out what basic provisions the step-by-step instructions contain, and then make your own adjustments. The improved model is used directly in work. Baking a “baby” oven with your own hands is not a sky-high fantasy, but a completely realistic plan. Thanks to the clarity and clarity of the drawings, every summer resident can independently equip a similar structure at home.
Foundation structure
Despite its modest size and light weight, a small stove requires a foundation. It can be done unburdened - just remove the fertile layer of soil.
But, it is necessary to bring the cement pouring plane to the “horizontal”
This is important because the furnace support area is very small: from 0.47 to 1 m2. At a height of 2000 - 2200 mm, the slightest misalignment of the base can lead to the collapse of the stove
The arrangement sequence is extremely simple:
- A hole is dug, 300=450 mm deep. The perimeter of the pit should exceed the perimeter of the furnace by 100 - 150 mm.
- A layer of sand 100–150 mm thick is poured onto the bottom.
- The sand is moistened and compacted.
- The next layer is broken brick or construction waste (stone) – 200–250 mm.
- The top layer is fine crushed stone (fraction 5–20 mm).
- After this, formwork is arranged (plywood, boards, slate, drywall scraps, metal sheets) - whatever you can find. The height of the formwork should be 50 mm higher than the level of the finished floor, so that there is no leakage of cold air from the subfloor.
- Pre-cut reinforcement bars are laid out on the crushed stone and fastened with annealed steel wire or welding.
- The solution for pouring is prepared from a cement-sand-crushed stone mixture in the proportion: 1: 1.6: 3.2. After pouring, the foundation slab is allowed to “mature”. In the first week after pouring, the surface is moistened by covering it with sackcloth or burlap, and watering it with water as the fabric dries. At the end of the first week, the fabric can be removed and the surface of the foundation slab can be covered with polyethylene or roofing felt.
Full strength gain occurs 30 days after pouring.
Preliminary work
Choose a suitable place for the baby. To prevent heat loss, the rough walls should not come into contact with the outer walls of the house. It should not be placed in the center of the room, as this will not promote uniform heat flow.
A baby does not need a powerful foundation like a large stove. It is possible to build a brick kiln without a foundation. A rectangular hole is cut under it using a grinder. If the floor is equipped with water or electric heating from the inside, then the screed must be removed. The hole must be deepened by 350 mm and ensure that the hole has as smooth edges as possible. Then they begin to create the pillow. To do this, the hole is filled with sand to a height not reaching 70 mm from the boundary of the floors, filled with water and left. Wait a few days until it dries completely. Then the pit is covered with roofing felt or roofing felt sheets.
Next you need to make the sheathing. You can take large cross-section rods and lay them in one layer. But experts recommend making it two-layer, using thinner reinforcement. Place 7 rods with a length of 800 mm at a distance of 100 mm from each other. 8 rods 700 mm long are placed on top strictly perpendicularly in the same way. They can be secured with wire or welding. Next, a second similar crate is placed in a similar manner. At the end, 9 rods are taken with a length of 250 mm. 4 pieces are placed in the corners of the frame, 4 on each edge and 1 in the center. The net is hidden in a cushion of sand.
Cement mortar is prepared for the foundation. The hole is filled with it, not reaching the floor location by 50 mm. This condition further prevents cold air masses from entering the lower part of the stove. When the concrete is completely poured, it needs to be pierced with reinforcement or a special tool to get rid of air. This procedure helps to increase the strength qualities of the foundation.
Next, the concrete must dry completely for at least 30 days. At 1 week you need to water the solution with water so that it does not crack. Cover the layer with burlap and pour water on it. After drying, remove the burlap and replace it with aluminum foil so that its reflection is at the top. This concludes the preparatory work. Next comes the furnace laying diagram.
The order of the furnace laying
First, choose a place for the oven.
Scheme of laying the stove - small
In the place where the stove is supposed to be located, place polyethylene film, roofing felt, waterproofing or glassine (780x530mm). After the bedding is laid, a layer of dry sand 1 cm thick is poured onto it and leveled. The first row, consisting of 12 bricks, is laid out on this sand without bonding. The row must be leveled to ensure correct horizontality. It is necessary to apply a thin layer of clay mortar on top and install a blower door. The door should be wrapped in wet asbestos cardboard or with cord. Next, the door is secured, after which the laying out of the second row begins.
Fireclay bricks are used to lay out the third row. A grate must be installed on top of the third row. It should be above the blower after the row is formed.
To lay out the fourth row, the brick is placed on its edge, and a stand for the internal partition is placed inside the chimney. The back wall of the oven is laid without clay mortar so that the brick protrudes slightly outward.
Now you need to start installing the fire door. Before installing it, it is wrapped in several turns of asbestos cord, and it should be possible to open it both from above and from below. The door needs to be secured with wire and fixed temporarily with two bricks (one on the back, the other on it, and the door on top).
The brick of the fifth row is laid flat along the contour of the previous row.
Option for laying a small stove
The sixth row of bricks must be laid edgewise. Then wipe the chimney with a wet rag.
The seventh is placed flat again, starting with the three-quarter, to ensure connection with the next row. The back part should consist of two bricks laid edgewise.
The eighth row closes the fire door; it is completed by two bricks laid on top. This row is laid out using beveled bricks, which should hang over the firebox. This is necessary so that the flame moves to the center of the hob burner when the stove is used as a fireplace with the combustion door open.
The ninth row moves back to keep the door open. Before laying the brick, you need to lay a moistened asbestos cord to ensure the tightness of the joints between the cast iron hob and the brick. The slab should not be laid directly on clay, since there is a difference in the coefficients of thermal expansion of the contacting materials (clay and cast iron).
On the tenth row, a chimney is formed; it should have a gradual expansion back. The design of the furnace must be taken into account, which does not allow the installation of a packed brick pipe due to upward expansion. When installing such a pipe, the center of gravity of the entire structure shifts. Therefore, an attached or packed pipe made of light iron is installed.
On the eleventh row you need to install a valve sealed with an asbestos cord lubricated with clay.
Scheme of laying brick rows for a small stove
Now a chimney is placed in the quadrangle, which needs to be connected to a light metal pipe. When the pipe is moved to the side, an overlap of 3 rows of bricks is made.
The knockout bricks are removed and the lower part of the chimney is cleaned of debris and moisture that entered during the work.
Now you can start whitewashing the stove. Milk and blue are added to the whitewash so that the stove does not turn yellow over time.
Next, a plinth is nailed to edge the bottom of the stove and prevent sand from spilling out from under the stove.
So the little brick oven is ready. The doors are left open for a couple of weeks to dry.
How to build it yourself
The baby oven is built with your own hands in stages. First you need to decide on the location of the furnace and begin forming the foundation. To do this, a bedding is laid on the selected place; it can be polyethylene or another oilcloth base. It is necessary to pour a centimeter layer of ordinary sand on it. Then you can start laying.
Order
1 row. Place 12 bricks on prepared sand; no fastening is required. The bricks are covered with a layer of mortar; immediately fasten the door for blowing in asbestos.
2nd row. Lay out on top of the first layer.
3rd row. Fireclay bricks are used. A grate is placed on top; it should subsequently be located above the ash pit.
4 row. The masonry is done with an edge, and a partition is left in the chimney. When laying the back wall, you do not need to use mortar; the bricks should protrude slightly to the outside. You can begin installing the firebox door, previously wrapped in several layers of asbestos. You need to wrap it taking into account that the door should open freely.
5 row. This row must be laid flat along the contour of the previous one.
6th row. Edge laying. The chimney should be wiped with a wet rag.
7th row. Like the 5th row, it is laid flat; you need to start with a three-quarter row.
8 row. Two bricks are placed on top to close the door. For this row you will need a beveled brick; it will serve as a kind of canopy.
9 row. Must be offset to support the open state of the door. Moistened asbestos must first be laid.
10 row. The formation of the chimney begins with it. It lines up expanding backwards. Taking into account the design of the crumb stove, it must be remembered that the installation of a brick superstructure is impossible due to the shifted center of gravity of the entire stove.
11 row. We proceed to the installation of a valve sealed with asbestos, lubricated with clay.
The next step is to remove the knockout bricks and clear the bottom of the chimney of debris.
The little oven with your own hands is almost ready, all that remains is to do the whitewashing. To prevent the oven from turning yellow later, you need to add blue and milk to the mixture.
Without properly organized heating, comfortable living in a private home is out of the question. However, there is often a need to install heating in other secondary rooms. In such situations, compact heating and cooking stoves of the “Malyutka” type will be an excellent solution.
Such a unit will be able to heat a small country house, workshop and other premises with an area of up to 25-35 m2. The baby stove is built in the shortest possible time from available materials. After reading the following recommendations, you can install the stove unit with your own hands without any problems.
Foundation arrangement
By building a foundation, you will provide your future structure with a reliable foundation. If you use any unprepared floor covering, then over time you cannot avoid its deformation. This will lead to damage to the integrity of the masonry, which may require complete disassembly of the stove to restore. However, the small mass of the device cannot but affect the requirements for the foundation; they are much less stringent than for traditional models.
A pit is necessary, but its depth can reach only 45 cm. The pillow is made of sand, which must be compacted tightly. You can use water for these purposes, only then you will have to dry it. The foundation volume is reinforced with metal wire and filled with cement mortar. To prevent cracks from forming during the long period of cement hardening, its surface is covered with porous material and gradually wetted over the first few days.
KROKHA OVEN, version N3 improved
IDEAS FOR THE HOME > PROJECTS OF STOVES, FIREPLACES, MANGALS
This heating and cooking
stove is a crumb, version 3 (improved).
was published in the magazine “Dom” No. 10 for 2008. The author of the article is A. Sushkov from St. Petersburg. The furnace has good heating in the lower part, and in the upper part there is a “hood” that slows down the cooling of the furnace mass after firing. Among other things, the design provides for a “summer” operation, which makes it easier to light the stove and allows you to use the stove for cooking without heating the room. The stove is equipped with a single-burner cast iron stove. The firebox and cooking chamber in this version of the stove are located on the wide side of the stove. The depth of the firebox is 50 cm. When building a furnace, the best available brick must be selected for the firebox, since there is no additional lining here. This is understandable, because this stove will not be heated every day, but only from time to time, when you visit the dacha and in appropriate weather. The stove has dimensions at the base of 64x77 cm or 2.5x3 bricks, and its height is only 203 cm. Moreover the height can either be reduced or increased depending on how much the ceiling in your home allows. At the same time, we should not forget that at least 35 cm must remain from the top of the stove to the ceiling. With the indicated dimensions, the heat transfer will be approximately 1760 W with a one-time firebox, and 2940 W with a two-time firebox. The size of the heated room at this power will be 18-22 m2.
MENU
×
- PROJECTS: FIREPLACES, STOVES, BBQ, BBQ
- Brick stove for a bath
- Simple heater stove for a bath
- Heater stove with water boiler
- DIY barbecue in the gazebo
- Barbecue complex for a summer residence part 1
- Barbecue complex for a summer residence, part 2
- Barbecue complex for a summer residence part 3
- Making a barbecue with a kitchen stove
- How to calculate the heat loss of a room
- How to calculate the heat output of a furnace
- Chimney diagrams
- Mini fireplace for a country house
- Corner fireplace “Annushka”
- Double bell oven
- Double-bell oven with oven
- Heating and cooking stove 2.5 x 6 bricks
- Heating and cooking stove 1020 x 770
- Heating and cooking stove for 65 70 m2
- Stove with water heating boiler
- Oven with drying chamber
- Heating and cooking stove "Shvedka"
- Stove "Swedish" for 2 floors
- "Swedish" stove with a stove bench
- Shvedka stove with three combustion modes
- Swedish stove with fireplace
- Oven crumb options 1 and 2
- Baby oven option 3
- Small-sized heating stove 2x3
- Heating stove 1880x640 “Ya.G. Porfiryev"
- Heating stove 51x89 cm “V. Bykov"
- Heating stove 51 x 140 cm “V. Bykov"
- Heat-intensive furnace
- Compact stove with fireplace
- Small stove with fireplace
- Stove with fireplace “E. Doctorova"
- Fireplace stove for a summer residence
- Homemade long-burning stove
LIKED THE OVEN PROJECT?
YOU CAN BUY ITS DRAWING IN WORD and PDF FORMAT FOR ONLY 75 RUBLES
!OR
ALL 35
PROJECTS OF STOVES, FIREPLACES, BBQ AND BBQ, DRAWINGS + ORDINARY LAYOUT FOR ONLY
490 RUBLES
!
BUY A FULL SET - 490 RUBLES (click - buy, then place an order)
BUY THIS PROJECT FOR 75 RUBLES (click - buy, then place an order)
Still have questions? Feel free to ask them, we’ll solve them!
Features of the structure of the Malyutka stove
The baby has a long list of advantages, the main ones of which are: low cost of construction, simplicity of design, high heat transfer. The compact size will make it easy to find the location of the new stove without a major redevelopment of the house. A do-it-yourself brick stove can serve as a fireplace in a separate room where it is necessary to increase the level of comfort. Wood, coal and anthracite can be used as fuel. The device has excellent heat transfer, capable of heating a room of up to 35 square meters with just one firebox. meters or two adjacent rooms with a total area of up to 50 sq. meters. The stove can be heated even with low-quality wood left over from spring cleaning or gardening. Due to the simplicity of the design, such a stove can be easily built with your own hands and even modified depending on emerging needs. For example, it is possible to add a hood, oven and additional surfaces for cooking. A few cast-iron coverings, fire-resistant bricks, and you get not only an inexpensive form of heating, but also a cooking stove for your dacha. The baby heating and cooking stove has the following parameters:
- height – 210 cm;
- base – 63 X 50.5 cm;
- chimney cross-section dimensions – 130 X 130 mm;
- weight – 1260 kg.
Preparing for work
Making a good, high-quality stove (stove) for a country house is an expensive undertaking. For housing that is not permanent for stay, a baby stove is best suited. It can also heat primary housing with an area of no more than 50 m². Its production can be mastered by a person even without special skills. It is built of red brick. The Baby is a new modification of the Swedish stove. In a baby, you can select the desired dimensions in width and depth, but keeping the height unchanged.
To build it, you need to purchase refractory bricks: fireclay and red ceramic. They are environmentally friendly materials, which is also important for your home. The beautiful color of fired fireclay will fit perfectly into the overall design. The baby can serve not only as a heating object, but also as a stove for cooking.
For work you will need to prepare the following materials:
Advantages of the model
Each project option is created to perform specific tasks. It is pointless to compare all models with each other, since under some conditions those characteristics that are not considered fundamental under other conditions may be important. Therefore, it is customary to highlight the advantages of the presented model. Our little brick oven is not without such a list.
- In order to install a Russian stove, you will need to sacrifice a significant part of the usable area. The very purpose of the baby suggests that high performance is not expected from her. But the compactness is appreciated by the owners of small country houses.
- The absence of elements made of heat-resistant materials is noted as a positive point. But in this matter, the choice remains with the master, since some professional builders still advise covering the firebox area with fireclay bricks.
- The simplicity of the construction scheme makes it possible to obtain a finished device at relatively low costs within a short period of time.
- Even when the stove operates in normal mode, fuel savings are noted, which will eliminate the need to stock up huge volumes of firewood.
- Some experts claim that this model does not require a foundation. Theoretically, a durable floor covering can withstand the load from the weight of the structure, but if you care about reliability not for one year, but for decades, then you should think about the foundation. In non-residential premises, the baby can be erected on a foundation using a concrete slab.
Examples of simple stoves
Date: September 25, 2022