Before you make a Russian stove with your own hands, you need to understand its structure, order, and materials. In addition, you need to decide on its type and purpose - whether it will be the main heating unit or an auxiliary one. Read to the end and you will have comprehensive information for negotiating with stove makers regarding the placement of the stove, foundation, choice of bricks, equipment and other issues.
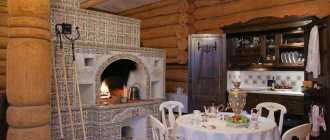
Stove with a large heated stove bench Source uznamania.ru
The working process of a Russian stove
Despite serious competition and a solid history, the design is still in demand among country property owners. Based on how the Russian stove is structured from the inside, it will be possible to focus on the dimensions from the outside and accordingly plan a place for it and lay the foundation.
Before you put together a Russian stove, you need to understand its operating principle - the design is a periodic heating device, that is, when burning wood, it accumulates heat, then releases it for almost a day. The structure can warm or languish like this for almost a day, which makes it possible to cook baked milk in it, steam porridges and soups, without controlling the process.
Before making a Russian stove, you should build a separate foundation that is not connected to the tape, since the structure is usually heavy. This is especially important when the house “dances” on heaving soil during freezing and thawing. In this case, the stove will move along its own amplitude along with its foundation, without destroying the finish or affecting the walls and openings.
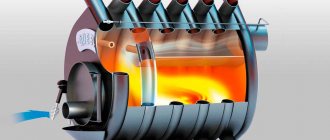
Cross-section of a Russian stove during heating and simmering Source 2proraba.com
Work principles:
- the entire structure stands on a brick or concrete slab;
- firewood for kindling is stored in the stove, where it dries very well and, when ignited, lights up instantly;
- the top of the sub-peck is made with a hemispherical arch, like a trough;
- sand, clay, broken brick - any heat-intensive material is poured onto it, and the front part of the firebox (cooking chamber) is laid on top of it under the stoves; it is placed without clay mortar.
If you ignore the topping, then you can forget about real hearth bread and pies. By the way, they are baked on cabbage leaves.
Next comes an injection with an overtube and a highlight in the form of a tapering nozzle. On the sides of the fold near the walls there are ash pits - recesses for smoldering coals (for the next kindling) and ash. Sometimes they are raked into a fringe - a part of a cast iron or stone slab (pole) protruding from the face (brow) of the stove.
To reduce costs and cleanliness in the room, there is no need to make an ash pan and ash pan. Previously, they were raked into a nook of the mouth, then the coals of birch, maple, elm, oak and aspen retained their heat for only a day.
Cooking in a cast iron pot over coals Source yandex.net
Most likely, this is where the belief came from that the Russian stove is quite picky when it comes to fuel. But this is not so - it works on any solid fuel, including:
- brushwood;
- dung;
- dead wood;
- sawdust
- straw;
- peat briquettes.
Thanks to this configuration, the combustion chamber acts as an economizer, where the following happens: the smoke circulation heats the air, which enters the firebox without removing oxygen from it and without interfering with combustion - mixing of heat flows should not occur. In essence, a combustion chamber is an energy recuperator (heat exchanger).
Before building a Russian stove, you should check the dimensions in advance - this is important so that the structure does not smoke, does not cool down quickly and does not use a lot of firewood. For the same purpose, perfectly smooth haila vaults are made. Moreover, they cannot be plastered, so the bricks are chipped from the inside and polished until glossy - then there will be no swirls in the slit.
Smoke from the stove goes into the chimney Source stroyfora.ru
We prepare materials
Currently, stove makers use a Russian stove design, which is equipped with a stove and a small stove bench. This design was developed by designers at the beginning of the 20th century.
To build a Russian stove, you will need the following materials:
- Solid burnt red bricks 250×120×65 mm – 820 pieces;
- fireclay (fireproof, grade ShB-8) bricks – 65 pieces;
- metal door for the blower;
- cleaning hatches “DP-1” - 8 pieces;
- grate “RD-6” - 1 piece;
- metal door for firebox 250×280 mm “DT-4” - 1 piece;
- cast iron two-burner hob 700×400 mm – 1 piece;
- valves “ZV-3u” 275×150 mm – 2 pieces;
- valves “ZV-6” 280×255 mm – 2 pieces.
The firebox is the heart of the stove
The firebox consists of two parts:
- firebox;
- bakery (cooking chamber).
In small stoves (124 x 178 cm) the bottom is laid out with a rise to the rear wall of 6-9 cm evenly, and in medium (147 x 213 cm) and larger (160 x 231 cm) with a break in the middle or far (2/ 3) parts. This is done to ensure that the dishes stand evenly on the surface. The crucible must have a slope underneath. By the way, Domostroy states that the height of the beds (beds) should be 142 cm.
Before you make a Russian stove, you should decide on its parameters. The dimensions may vary somewhat, depending on the size of the brick - an even amount should be laid out for all dimensions (length, height, width), taking into account the clay mixture. Stoves in which the firebox on the sides also narrowed 6-9 cm towards the mouth are heated better.
“Aerobatics” is considered to be the execution of the crucible arch in the form of a three-center barrel (smoothed dotted line in the first photo), and not hemispherical and the expansion of the crucible in the middle part. Then no sparks are formed, the stove does not smoke, the fuel burns completely - 100%.
Sectional diagram of a stove on a wooden base Source stroyfora.ru
Pros and cons of the design
The undoubted advantages of modern buildings are the following:
- high efficiency: even for the simplest units it is 65%, for complexly modified ones it is 85%;
- “omnivorous”, while when switching from one type of fuel to another, no change in heat transfer and a decrease in technical parameters were identified;
- availability and cost-effectiveness of materials: brick, clay and sand are used in construction;
- fire safety: the fire burns in the depths of the stove and coals and firewood cannot fall out;
- ease of maintenance and operation: with one morning heating, the heat lasts 24 hours;
- health benefits: the bed warms and heals the body and joints, and food cooked in a Russian oven does not have carcinogens;
- multifunctionality: in addition to the firebox itself, you can make a hob that opens into the kitchen and fireplace on the second floor.
Three hearths operate simultaneously - a firebox, a stove in the kitchen, a fireplace in the attic. Source yandex.net
The disadvantages include:
- quite large dimensions;
- the need for cleaning;
- inability to use gas;
- a separate foundation is required;
- heating a relatively small room - 50 sq. m.;
- after a long break, gradual warming up throughout the day is required.
It is believed that not all the secrets and capabilities of the Russian stove have been revealed yet.
Some tips for safe operation
- After a long period of inactivity, be sure to check all visible surfaces for tightness of seams. Any cracks that appear must be repaired with clay mortar.
- Before each fire, check for draft. If smoke from the furnace enters the room, the stove must not be used under any circumstances. Perhaps one of the valves is closed or the chimney needs to be cleaned.
- You can close the view only after the firewood has completely burned out.
- It is recommended to remove soot from the internal surfaces of the stove at the beginning of each season. In fact, the stove gets dirty very little and after construction it will not require cleaning for several years. However, it all depends on the smokiness and quality of the fuel used.
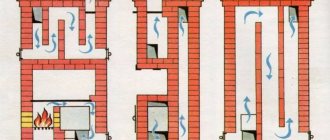
Types of construction
By design, the units are divided into two types:
- Traditional - with an under-bake (lower part) that cannot be heated, so it can be made from any material, including wood.
- Improved (modern) with channels in the oven, which allows it to warm up well. Often complemented with a hob, oven, fireplace.
Modern designs have the following dimensions:
- from 230 x 150 cm (large);
- 175 x 150 cm (medium);
- up to 175 x 150 cm (small).
In addition, they can be erected both indoors and outdoors.
A lightweight version of the Russian stove with a foundation on the site is used for cooking, the stove bench is used as a table Source mobilizacia.kiev.ua
See also: Catalog of companies that specialize in the installation of fireplaces and stoves, extensions to finished houses
Also, structures can have different geometries (shape of the pole, presence or absence of cornices) and finishes (brick, tiles or plaster). The most popular, judging by public surveys, is the improved version according to Podgorodnikov with a two-burner stove. In second place is “Housekeeper” - often due to lack of space. In the traditional design, the floor was not heated, and, as you know, warm air rises to the top, in the lower part of the hut it was cold, the lower crowns of the house froze and could rot. Podgorodnikov proposed making the basement out of brick with a system of channels.
Type 1 – simple
It takes up little space, heats the house well, and consists of a cooking chamber, oven and pipe. The presence of a two-burner stove allows you to quickly prepare food. For this design you will need:
- solid bricks – 1620 pcs.;
- solution - 72 buckets;
- samovar;
- plate;
- flap;
- 2 valves.
This is considered an ideal option for a small country house with an area of 32 square meters. m. You can make a flood for additional heating of the lower zone in the floor area.
Structure of a simple type stove Source fireplace.su
To increase the heat transfer effect, separate chimneys are installed near the walls of the flood chambers. You can also make a fire in the fire pit, equipping it with a stove for faster cooking.
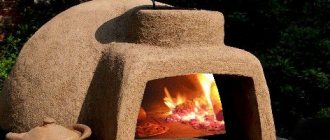
Type 2 – adobe
Perhaps the cheapest way to build a Russian stove with your own hands. Here, brick is needed only for the pipe and hearth, the rest is clay mortar. For a medium-sized Russian stove, it will require approximately 3.5 cubic meters. The correct consistency is checked in this way: they form a brick, place it on a stick perpendicularly - if the edges do not bend and the shape is preserved, then the thickness is required.
The process is as follows:
- the sand-clay mixture is laid out on a flat surface in a layer of 15 cm;
- the top is carefully leveled;
- Fragments in the form of bricks are cut from the resulting layer.
A modern version of a clay oven in a round adobe house Source gidkaminov.ru
Bricks are usually made 20-25 cm wide, then masonry is carried out, while home-made elements are tapped and leveled, removing excess clay with a scraper. Be sure to use a level to check the vertical and horizontal. A common mistake when laying yourself is to wet the bottom row with water - this leads to a weakening of the mortar and the appearance of cracks. If a break in work is required, the last row should be covered with damp rags.
The clay oven needs to be dried for 7-8 days, after which they begin to slowly heat it with dry wood. In this case, the clay will release steam and acquire the desired structure. After 5 days with daily heating, the structure will be ready for full use.
Type 3 – “heater”
These stoves can vary significantly in size, but what they have in common is that the room is heated evenly from floor to ceiling over its entire height. The surface of the “heatbox” is almost 2.5 times greater than the outer volume of a simple type.
Russian “teplushka” stove with a large heating surface Source msk-kamin.ru
This stove has many advantages compared to other types:
- less fuel required;
- In addition to firewood, you can also heat it with coal;
- Cooking occurs relatively quickly (30-60 minutes), it can be stored warm for up to a day, and cooking can begin even after the wood has burned, since the heat remains sufficient.
The design includes the following elements:
- the cooking chamber (upper) is located at the hearth level;
- heating chamber (lower) - in the oven, under the hearth.
Before you build a Russian brick stove with your own hands for a house with a stove, you should not cross out this option - the “teplushka-4” model provides for installing the stove in a shelf. Its dimensions are 120 x 120 cm, the "teplushka-2" is 168 x 129 cm, it does not have a stove, but does have a small hot water boiler.
Finishing: options, photos
The finishing of the stove should be given special attention, because the stove is a very large structure and will undoubtedly be the center of attention in any room. When finishing the stove, it is best to strive for the smoothness of all surfaces and the ability to keep them clean. Before carrying out finishing work yourself, you need, first of all, to assess the scale and complexity of the work, as well as compare the cost of different finishing methods. Before any finishing work, the surfaces of the oven must be cleaned of dirt and dust.
Finishing methods can be very diverse; let’s look at the basic and frequently used ones, which can be done without special professional training:
- Plaster. Plaster gives the stove a neat appearance, it allows you to correct defects made during masonry, and also fills masonry joints. The plaster solution is selected depending on the required quality of finish, purpose and humidity of the room. Clay-sand mortar is mainly used, and if necessary, lime, alabaster or cement is added to it. It is recommended not to exceed the thickness of the plaster coating by more than 1 cm.
- Mopping the walls followed by jointing the masonry joints. Work is being carried out to clean the walls of the furnace from mortar protruding from the seams, to fill the seams more completely and give them the desired appearance. When performing work, it is very important to promptly clean the bricks from the mortar with a damp cloth before it hardens.
- Furnace finishing with natural stone. Lately, this method has been gaining great popularity. Before gluing the stone to the stove, you should first lay it out on a horizontal surface in order to ideally select the size and color, after which the stone is transferred to the walls according to the approved plan. For laying natural stone, ready-made heat-resistant mastics are used.
- Tiling. This method is very labor-intensive and responsible. The lining of the stove with tiles must be done in parallel with the brickwork, row by row, and the first row of tiles is laid out first, and then the row of brickwork. The tiles should be connected to the main masonry with wire, and to each other with staples and pins. The tiles are placed on a clay mortar, which is placed in the rumps (special projections of the tiles on the back side). Depending on the desired look, the tiles can be arranged one under the other or intertwined. Before installing the tiles, they are laid out on a horizontal surface to select the ornament and cut to the required dimensions. There are 1.5 mm thick seams between the tiles horizontally, which are filled with gypsum mortar. Vertical seams are done flush. When installing tiles, you must strictly observe horizontal, vertical, vertical planes and angles.
Painting the stove with paints
The use of natural stone in the finishing of the stove
Artistic decoration with tiles
The stove is plastered and whitewashed with lime
The stove is neatly built of brick with jointing
After plastering or mopping the surfaces of the stove, it can be painted or covered with lime. Paints must be water or casein based. With the help of such paints, which can be multi-colored, you can paint the stove and give it a unique and inimitable design.
The metal elements of the stove are painted with special heat-resistant varnishes or paints.
Foundation
Before you build a Russian stove with your own hands, you need to carefully study the drawings and only then begin building the foundation and purchasing materials. Although it is better to lay the foundation for the structure at the stage of forming the foundation for the house. However, they should not be connected.
A separate foundation for a Russian stove with a gap of at least 5 cm - wet sand is poured here and compacted Source chertegnik.ru
If it happens that the stove needs to be built in an already rebuilt house, then you should cut the floor down to the ground, make formwork and pour concrete, if necessary, with reinforcement. Depending on the location of the furnace, there are the following nuances of constructing its foundation:
- If the Russian stove will stand against an internal wall with a shallow base, then both soles should be at the same level, and the upper platform for the stove remains 14 cm below the finished floor.
- If the furnace is planned to be placed against a load-bearing wall on a buried strip foundation, then the foundation pit for the furnace base is expanded, a sand and gravel layer is made with a tamper, and concrete is poured into the formwork. In this case, the gap between the two foundations of 5 cm is filled with sand, the sidewalls directed into the house are formed with brickwork. The depth of the sole should be at least half a meter.
The foundation for the stove is in the corner - on both sides of it there is the foundation of the house Source remont-system.ru
- If the structure is located in a cut-out opening in a load-bearing wall, then the interrupted lower crown should be connected with steel strips (6 mm thick and 60 mm wide) by placing them on both sides of the ends of the logs and tightening them with bolts (16 mm diameter). The resulting opening is framed with wooden posts; the resulting gap (cut) should be 5 cm.
When you have decided on the location and foundation, you can.
Drawing plan of a Russian stove from different angles Source kaminproekt.ru
Features of the arrangement of a small stove
A small stove in the Russian style is built in different designs. Each of its options has been tested in practice. Such models are built by adherents of Russian traditions. However, small structures are not used to fully heat rooms. They are mainly used for cooking.
One of the options for a miniature stove in the Russian style is a design with an enlarged furnace and an expanded entrance. This allows for accelerated drying of various vegetables and fruits. You can even prepare baked dairy products here.
A mini Russian stove, the ordering of which always begins with laying the first continuous row, is created on a reliable foundation, which, of course, is smaller in size than the classic version. Usually the concrete base is a monolithically poured slab.
At the next stage, the walls of the underfloor area are erected. They are needed for the construction of an arched vault and an opening of the same shape. Wooden templates are used during installation. Next, just as in the classic version, the space between the walls and the arched vault is filled with sand.
After installation, the stove vault is filled with sand Source builders58.rf
In principle, all further work is similar to the processes when constructing a large stove in the Russian style. During the construction of the miniature version, the walls, hearth and cross-pipe are also laid out. In this case, an expanded mouth is created in front of the opening of the compartment where baking is usually done.
The mini version of the stove is distinguished by the absence of complex smoke exhaust channels. Therefore, the construction of such a structure is usually carried out in a maximum of 4 days. If the ordering scheme becomes more complex, installation may take two weeks.
Video description
In this video, watch how a brick foundation is made for a Russian stove:
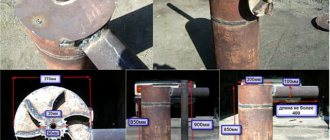
To lay a structure 165 cm long, 153 cm wide, 154 cm high and 238 cm high, you will need:
- red brick – 2000 pcs.;
- sand with clay - 1.7 cubic meters;
- samovar – 1 pc.;
- fire door 24 x 25 cm – 1 pc.;
- blower door 13 x 13 cm – 1 pc.;
- smoke valve 37 x 17 cm – 2 pcs.;
- grate 26 x 28 cm – 1 pc.;
- composite cast iron stove with 2 burners 53 cm long – 5 pcs.;
- damper 40 x 34 cm – 1 pc.;
- water heating box 40 x 28 x 16 cm – 1 pc.;
- view (inner diameter 22 cm) – 1 pc.;
- half-door 33.5 x 16 cm – 1 pc.;
- steel sheet for flooding - 1 pc.;
- strip steel or angle for blocking the mouth.
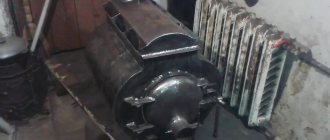
Russian stove with hot water boiler, shield and stove Source fireplace.su
Order:
- 1 – 153 x 165 cm: the outer sides are made of whole bricks, the middle is acceptable from halves and quarters.
- 2 – walls of various thicknesses form a well (see drawing). If you then make a hole in front of the stove, then you can store a poker, grip, and scoop in the oven (a laid out well).
- 3 – at this stage, the blower door is installed, cleaning, an ash pan and a channel (the unshaded area between the walls) are arranged. The corner of the channel is beveled and rounded, while the brick is ground down and ground down.
- 4 – like 3.
- 5 – like 4, cleaning and the blower door is covered with masonry. From the inside of the well, on the side walls, the brick is trimmed to obtain the heels needed for the vault (frequent shading).
- 6 – vault with a rise to the 8th row with installation of a water heating duct on the front side.
Russian stove with stove and heating shield Source pinimg.com
List of tools
To work you will need the following tools:
- Shovel.
- Construction and hydraulic level.
- Plumb.
- Master OK.
- A pick hammer or, if possible, an electric tile cutter for cutting bricks, as well as a mallet for adjusting the masonry.
- Jointing for making seams on the facade.
- Cord as a guide for laying.
- Ordering - to control the thickness of the seams.
- Rule for leveling the foundation when pouring.
Russian-style stove on the street
This option has recently been preferred by owners of country houses instead of a barbecue complex or in addition to it.
Before you build a Russian stove with your own hands on the street, you should prepare the foundation. It must be strong, made of concrete with reinforcement, so that the structure does not collapse or sag.
Red brick is used for the construction and fireclay is used for the vault. The stove is closed with a valve; a separate pipe runs along the back wall to the cauldron from the stove. The chimney can be made of facing bricks. The smoke is discharged through stainless steel pipes wrapped with basalt cardboard to avoid strong heating of the lining.
Before building a Russian stove on the street, you should prepare:
- red brick 800 pcs.;
- fireclay – 70 pcs.
It is better to cover the tabletop with tiles, the apron - from brick, it is good to equip such a stove with a damper with a thermometer.
It is advisable to install a stove structure or complex under a canopy or in a gazebo, since materials quickly deteriorate in the open air.
Briefly about the main thing
A classic Russian-style stove is a popular option for a heating structure with a large heating surface and equipped with a stove bench. Its design also includes a crucible, a hearth, an oven, a sub-pipe, an over-pipe, smoke exhaust channels, and a view.
A Russian-style stove can be miniature or medium in size. Large heating structures with a hob, fireplace, and oven are also being built. To build an effective stove, masters carry out masonry according to proven schemes. The stove structure with the hob is often adjusted. Miniature heated structures are also popular. This is a simplified version of the classic Russian-style stove.