Materials
Brick
The masonry of the Russian stove is made from.
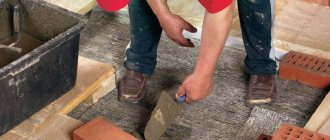
The brick must be well fired and of the highest quality - dense, smooth. A burnt brick (with a dark interior if broken) is absolutely unusable. Hollow brick is also not suitable: heat will not spread well throughout the body of the stove, its interior will overheat and the whole stove will soon begin to fall apart. You need to select the bricks for the hearth especially carefully: they must be even, smooth, and exactly the same height. In the old days, stove makers selected hearth bricks from purchased lots and stored them separately. Nowadays, the underside can be ironed after laying with a grinder with a bowl-shaped circle. In theory, this will not make the oven worse, but there is no experimental data.
The lining of the stove and the top row of the stove bench can be made of face bricks and lime mortar. Then the floors will never fail, and finishing the stove will not cause difficulties - masonry on clay with widened seams (see
below) although heat-resistant, it is not very strong and smooth, and the plaster and tiles do not hold up well on it
Solution
Not quite normal for a Russian stove; What is important here is the combination of heat resistance, high heat capacity and TKR equal to brick. The composition of the solution is as follows:
- Carefully sifted the fattest clay you can find - 3 parts by volume.
- Sifted and calcined river sand – 3-5 parts by volume.
- Pure water – 1 part by volume.
The solution should also be very fatty - thick, viscous. His condition is checked with two boards; A ball of fresh solution the size of a tennis ball is squeezed between them. A thin solution will crack immediately; average at about 1/3 compression, and good at half compression. A solution that is too soft and fluid is also not suitable; sand must be added to it, but not more than 2:1 relative to clay.
Good clay for laying stoves was once a serious problem. Now the structure of the Russian stove is being simplified: ready-made dry mixtures for laying stoves and, separately, fatty clay are on sale.
When drying, the greasy solution often cracks. In this case, the cracks are covered with a medium or thin clay mortar, but in no case with lime, gypsum or cement.
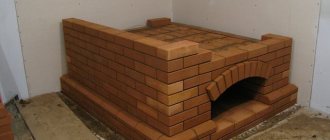
Foundation
The stove has impressive dimensions and weighs a lot, so it needs reliable support.
The work algorithm is as follows:
- Prepare the pit. Calculate the dimensions based on the stove base. On each side you need a margin of 15 cm. Go deep by 50-70 cm.
- Pour sand, pour water, compact it so that the thickness of the waterproofing becomes 15-20 cm. Pour more sand, pour water and level it.
- Lay out the roofing material in 2 layers.
- Install the formwork and cover it with film.
- Mix cement, sand and crushed stone 1:3:5. Use water to get a semi-liquid mixture.
- Pour cement mixed with gravel into the formwork, 20 cm high. Pierce this layer several times to let the air out, compact it.
- While the solution has not hardened, install the reinforcement. Height above concrete 5-7 cm.
- Fill another layer of 10-15 cm, when it sets, lay the reinforcing mesh.
- Fill the entire formwork with mortar and level it.
- Lay roofing felt in 1 layer.
If you are planning a small stove, then a guard base is allowed. Install it on the floor beams. Such a base is a frame made of timber or logs with 2 crowns. To strengthen the beams and stabilize the furnace, intermediate piles are driven into the center. Rubble is poured into the free space, with felt soaked in liquid clay on top. This base can support construction up to 700 kg. If the weight is greater, then a slab foundation is needed.
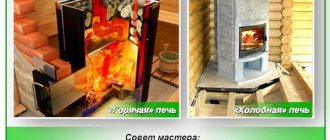
Traditional and modern Russian stoves
One of the characteristics by which Russian stoves are classified is size. Structures of 1500×2300 mm are considered large, and structures of 1500×1750 mm are considered small. There are also stoves built according to individual projects; their sizes can be any. Depending on the features of the device, traditional and modern ones are distinguished. They differ in the design of the oven. In the first, the lower part is not heated, in the second, heated channels are installed. Stoves can vary in shape, finish, location, number and functionality of additional elements.
Design diagram of a Russian stove with flooding
The world is changing, people's needs are changing, and accordingly, new furnace designs and additional opportunities for implementing complex technical solutions are appearing. So, recently models with the following improvements have become popular:
- Floodbox and slab. The hob is built into the stove structure and is a modernized hearth. The Russian stove with heating allows you to cook traditional national dishes, dry mushrooms, berries, and fruits.
- Russian stove with fireplace. The back wall of the stove is led through a partition into the next room, and a fireplace is equipped. A very convenient option for lovers of open fire. The dimensions of the stove itself change slightly, but there is no need for an additional foundation or a chimney system, and warmth and comfort are guaranteed.
- Tramp and rude. Initially, a large bed designed for three people was installed in the Russian stove. Today, stoves are rarely built in sizes that allow you to make a large stove bench. Instead, they put in an attached trestle bed.
- Side heating. Very convenient for heating adjacent rooms.
- Bottom heating. The improved design allows heating large areas.
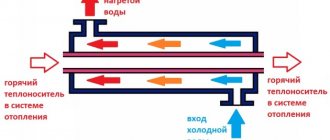
Home heating options
The choice of heating method depends on the layout of the building - side or bottom. The first option is the best solution for houses with several rooms, since the adjacent room is heated using a side heating panel. The second method is used to supply heat to one room, but having a larger area.
The walls of the sub-floor space are heated from below. Currently, in order to increase efficiency, designs are equipped with a bell-type combustion, which makes it possible to ensure uniform heating and stable draft. In such units, fuel burns completely and less soot accumulates in them.
How to make a Russian stove
- Specifics of the masonry of a modern Russian stove
- Installation of required appliances for the furnace
Russian stove with heating According to the time of its creation, the black Russian stove is considered the oldest. It was also called kurna. On the guardianship, as the peculiar elevation was called, a vault with thick walls was erected. Below it is a crucible (the space located under the arch). The food was placed, then firewood was thrown through a small mouth, in front of which there was a pole resembling a table.
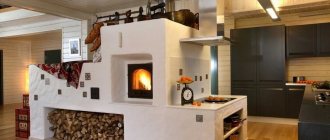
More and more often, stoves are found in private homes. They are used for heating, cooking and just for beauty.
From this stove, smoke poured first into the hut, and then through the window it found its way out. To permanently eliminate this drawback, they came up with an over-pipe (smoke collected there) and a smoke pipe. But even such a modernized stove did not heat the floor. As a result, a new furnace with flooding was invented. It is similar to the classic one, but the stove is placed in the hearth and there is a firebox, and the firebox is separate. From a Russian stove with flooding, chimneys run along several walls or along one wall. Usually they melted the flood, but in severe frosts they used a crucible to keep it warmer.
Chimney installation
The chimney required for the operation of a Russian stove is absolutely no different from the chimney of any stationary solid fuel unit, be it a “Dutch”, “Swedish” or some new-fangled bell-type stove, calculated using computer modeling. The design and arrangement of the chimney can be taken from the drawing below.
Chimney device for a Russian stove with orders
During the work process, we recommend following a few simple rules:
- The design and installation location of the pipe for removing combustion products must comply with the standards of the current SNiP.
- At the point of transition from the ceiling to the attic, the pipe should thicken.
- The lower part of the chimney is placed on the same solution as the stove.
- The internal cross-section of the smoke duct must correspond to the power of the heating device.
- Above the roof, the chimney is built using a mortar with the addition of cement.
- The places where the pipe passes through the ceilings are insulated using non-flammable and waterproofing materials.
During work, the geometry of the structure and the deviation from the vertical are constantly monitored using a level or plumb line.
Features of the device and operating principle of the Russian stove
The brick box is not placed on the floor, but raised above its level by 80-100 cm. This ensures ease of use of the oven for cooking. The chamber under the stove, intended for storing household utensils, is called the oven. It is covered with boards or equipped with a brick vault and covered with a layer of sand, on which the bottom of the upper chamber is laid - underneath. To build a hearth, a special 25x25 cm brick is used, which is called a hearth.
Hearth equipment is an important stage in furnace construction, because... This part of the structure has to withstand heavy loads. During cooking, heavy cast iron frying pans, pots of different sizes, etc. are moved across the hearth, so errors and miscalculations during its construction can result in unplanned repairs and affect the functionality of the structure as a whole. The surface of the hearth is carefully leveled and polished so that there are no irregularities or cracks left.
In the front wall of the firebox there is an inlet hole - the mouth (also called the brow), which is closed by a removable damper. Due to the location of the mouth below the arch of the firebox, the firebox warms up well. The arch can be of any shape - oval, barrel-shaped or semi-circular. A layer of sand on the roof is needed for high-quality heating of the couch.
Outside the firebox, below the hearth, there is a hearth where pots are placed and burnt coals are raked out. Above the pole there is a closed chamber - the overpipe. It got its name because of the location of the stove pipe above it. A damper for a Russian stove is installed to regulate draft, and a view is installed to block the pipe and retain heat. The stove allows you to ventilate the room without losing heat. To do this, close the view and open the door.
How a Russian stove works - diagram
Recommendations for use
The stove does not require maintenance. To avoid undesirable consequences, you must follow the rules for using a mini-oven:
- You cannot fire two fireboxes at the same time. In this case, the ash and combustion doors of the unused firebox must be tightly closed;
- Do not use flammable liquids such as gasoline or kerosene for kindling;
- keep the heater damper closed. If there is a need to open it, then first you need to open the ventilation duct valve;
- monitor the amount of ash. Remove it in a timely manner, otherwise there will be no fuel savings, because it will absorb heat and the heating of the rooms will deteriorate. It is better to do this procedure at least twice a week;
- you need to let the fuel warm up well for ten minutes, and only then start cooking food in the oven;
- It is not very practical to use paper for kindling - it burns quickly. It’s better to put wood chips or birch bark in the oven;
- Check periodically for any cracks in your stove. If any are found, they need to be repaired. If the damage is significant, then major repairs will have to be made. A clear indicator of a problem is a decrease in the heating temperature produced by the stove. The house has become colder - inspect the stove;
- It is preferable to carry out repairs in the warm season, when the stove is not used for heating;
- Before burning fuel, you need to close the doors of the ash pit and fireboxes;
- you need to clean the chimney in a timely manner;
- It’s better to start heating the stove during the day, then by the evening the whole room will warm up;
- It is preferable that the fuel be dry. And to ensure that it is not exposed to moisture and water and does not become damp, store it in a specially designated place. It should be dry and closed;
- It is desirable that the logs are approximately the same thickness and length. This is necessary because thin ones burn too quickly, and thick ones, on the contrary. The house will not be heated well enough in this way;
- stack the logs not randomly, but in a certain order. First, rake the coals with a poker closer to the door. Place a log across it. Then thinner firewood is laid obliquely, and thicker firewood is laid on top of it.
A brief overview of the advantages and disadvantages of the Russian stove
Among the main advantages of installing an oven of this type, experts cite the uniform distribution and long-term heat output, the usefulness and high culinary properties of dishes cooked in the oven at low temperatures. Russian brick stoves can last for decades - 30 years or more, and if they are positioned correctly, they can heat fairly large houses consisting of several rooms. A variety of finishes allows even a large stove to fit organically into any interior style.
Among the disadvantages are the low efficiency compared to stoves with complex smoke circulation and the complexity of the design; the construction of a Russian stove requires skills and special knowledge, without them it is difficult to complete this work.
The original decoration of the Russian stove allows it to fit into any interior style
Building a furnace
The complete diagram of the Russian stove is shown in the figure below, with a list of positions. To what is described above there is an addition - a choke. This is a gas-air heat exchanger: the smoke circulation through the wall heats the air that is taken in below. The vent of the choke opens into the room above, then there is a damper, and behind it the mouth of the choke opens into the chimney above the view.
In summer, the damper is open, and the air flow in the air vent removes excess heat from the flue gases, providing good ventilation of the room. In winter, the damper is closed; heated air enters the room and warms it.
The air vent is the simplest and most reliable way to get bottom heating from the stove without overly complicating its design.
- Podpeche;
- Undercoat;
- Six;
- Dushnik;
- Chelo;
- Gate valve;
- Chimney;
- Roof;
- flap;
- Mouth;
- Cutting;
- Warm stove;
- Hot stoves;
- Threshold;
- Backfill;
- Furnace vault;
- Crucible;
- Cheek;
- Porsok;
- Podpechek;
- Arch support;
- Arch of pharynx;
- Hilo;
- Estuary arch;
- Masonry ledge;
- Choke channel;
- The mouth of the chimney.
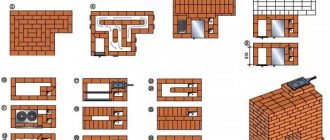
What is order?
The oven is laid out in horizontal layers of bricks – in rows. A set of instructions for laying each row is the order. Sometimes rows are called orders (first order, lay out orders, etc.). This is, generally speaking, incorrect.
For each type of oven, the order, of course, will be different. Modern orders are accompanied by drawings. You can start building a furnace only if its order is absolutely clear.
Design elements
Elements of the design of a Russian stove To understand the drawings, explanations for them and understand the order, you should study the terms used by stove makers.
- A firebox or crucible is a part of a structure in which fuel is burned and, in some cases, food is cooked by baking or simmering.
- The vault is a massive element that bounds the top of the furnace. The laying is carried out without voids. Due to the large mass of stone, the vault accumulates heat during combustion and warms the room for a long time in the period between laying firewood.
- Under (flat) - the bottom of the firebox, necessary to give the structure strength.
- Cheek (chip) - the façade of the furnace, combining the under, crucible and vault.
- The mouth is the opening of the furnace through which fuel is added and dishes are loaded.
- The sixth is a horizontal surface that makes it easy to work with dishes. Utensils are placed on the platform before placing them in the crucible and after removing them.
- The subrack is used to store utensils, fuel and other accessories. The element is located under the pole and does not heat up.
- The oven is the space under the hearth in which a supply of firewood is stored.
- Hailo is a device connecting the furnace and the chimney.
- Stoves are niches that increase the area of the walls and improve heat transfer. The recesses are used for drying herbs and small items.
- Threshold (tooth, gas threshold) - an arc-shaped ceiling of the arch to retain hot flue gases and increase the heat transfer area, thereby increasing efficiency. Sometimes the element is called a scutum or shield.
- The roof is the part of the stove on which the stove bench is installed.
- The hearth is a hollow space to increase the combustion time of flue gases.
- The subtop is a small oven located under the hearth or on the side of it.
Is it worth it yourself
Does it make sense to take on such complex work yourself? How much does the work of an experienced and reliable stove-maker cost? If 100% of the cost of materials, as is customary in general construction work, then it is not that expensive.
By no means, not twice as much against the material. You can come across offers to build a stove for 20,000 rubles, but this is obvious nonsense. Let's try to figure it out ourselves.
A stove maker works in mid-latitudes for six months, and always with an apprentice. Considering their employment at 100% of working time, the salary of a master at 25,000 rubles, and an assistant at 15,000, and the work completion time is 7 working days (this is a completely realistic period), we find that a simple stove will cost no less than 45,000 rubles, and a Russian stove with a stove and water heater (see figure) at 55,000-60,000 rubles.
But in a week it will be possible to heat it. There is only one condition: the master must tell where, when and to whom he has already installed the stoves, and they must be inspected personally. Good masters always stock up on recommendations, and if they hesitate and mumble, it’s better to turn to someone else.
To give a more complete idea of the complexity of the work, let's look briefly at how to lay out the simple oven described above. For example only; the detailed order of the Russian stove is a rather voluminous brochure.
Order
1-6 rows
We do not use screed to waterproof the foundation; we lay it dry - sweating is excluded. We start from the left front corner (pos. a-1 in the figure). Place a 3/4 brick in the corner with the poke outward. From it there is a row of 12 full-lengths to corner a-2. Seam – widened to 13 mm; This will be everywhere in the first 3 rows, because... in the 4th row a masonry ledge will be formed.
In corner a-2 - two 3/4 pokes and a double row of full-lengths to corner a-3. We arrive at corner a-4 in the same way as a-1 – a-2. Row 1 is completed by two full-length frames, forming an opening of 540 mm. We check the masonry using the rule and diagonals.
In the second row (pos. b) on the sides the pokes of the 1st row are covered with spoons. In the corners there are 2 three-fours, laid in spoons. The full-length frames framing the opening are covered with 3/4 pins with bandaging of the seams. The third row (pos. c) is identical to the first.
4th row - according to pos. on the brace. The arrangement of bricks is the same as in row 2. We narrow the seam to 5 mm to get a ledge of 25 mm on the sides. We check the masonry with a level.
5 row - according to pos. d. In d-2 and d-3, two 3/4; between them there are two rows of spoons. The side walls are bonded. We squeeze the walls of the oven opening under the heel of the arch. We place the circles on the supports and lay out the 6th row identical to the 4th.
First arch
When laying out the arch, in addition to the above, you must observe the following; for subsequent arches/vaults too:
- There should not be a single untied seam across the arch from heel to toe (on the left in the figure below).
- The seams from the top to the heels gradually taper from 13 to 5 mm.
- The circles with formwork are removed only after the solution has dried.
7-10 rows
The 7th row is laid out as the 5th; 8 - like the 6th (on the left in the figure) In the sidewalls from the inside, the pokes are cut to fit the heel of the arch. On the 8th row, we begin to lay out the sub-height: three rows of full-length splice stitches, counting inward from the forehead. The middle poke from below needs to be tucked under the arch of the arch. We place the 9th row as the 7th, but we lay out the 2nd row of the sub-stitch with spoons. We lay out the roof of the baking area.
Row 10 is special, in Fig. on the right: corners from 3/4, sides from spoonfuls; the rear is made of full-length buttocks. From the forehead inwards - 3 rows of full-length buttocks. There are 7 pieces in a row, laid flat. This will be the hearth with the bending hearth.
Bedding
We make the furnace backing from broken bricks and clay mortar. We tamp and stretch as indicated by the arrow. It’s better to do it yourself with a break and not try - not every stove maker can do it.
Rows 11-17
We lay out even rows as the 10th. In the odd numbered ones there are rows of butts on the sides; behind - spoon. The 15th and 16th are tucked under the heels of the arches. Upon completion of the 17th row, the laying of the walls around the furnace is interrupted until the entire front of the furnace is laid out, up to a vertical plane passing along the rear wall of the mouth.
Zev, squeeze, mouth, crucible
Arches and vaults are erected along the circles of the arches with formwork. The side walls of the bend will go into brick; the forehead and mouth are half a brick. The heel of the pharynx arch will be on the 15th row; the heel of the mouth arch is on the 16th. It will be especially difficult for a beginner to smooth the inner walls of the heil: from above you cannot see what you are doing, and from the inside dust and crumbs fly into your eyes. Therefore, the hilo needs to be processed from above, checking with a template.
18 and above
We place odd rows as 1 or 11; even - like 2 or 10, see fig. If the floors are laid on clay, then starting from the 19th row, the bricks from the inside are pressed in place to the roof of the furnace. But this does not always save the clay floors from falling through, so the best craftsmen build a box around the crucible, make a backfill of brick chips on the clay, level it and compact it, and over it they put a continuous lining of spoons, framed with ends with three-quarters at the corners. In order for the flooring to last forever and not push through the vault, what happens next depends on the prosperity and generosity of the customer: either a wooden board-flooring, or a row of facing bricks on mortar with bandaging of the seams.
The last method is not as simple as it seems: the arch is tilted anteriorly. Therefore, a row of bricks are placed flat on its locks lengthwise and with the seams bandaged relative to the key ones. Then they cut it onto a wedge so that the crossbar is flush with the walls.
The backfill will be double-sided, and the floors will lie on the wedge and walls. What's the point here? Let us remember the mechanics of construction: it is much more difficult to crush a vault from above than to break through it from the side. The load from the floors will be transferred to the lock, and from it along the arch to the cheeks of the stove. The arch of the vault will only work in compression and, if the floors fail, they will remain intact, and the floors are not difficult to restore.
If you undercut the bricks of the upper rows, then the load from the floors will give a lateral shear load on the vault. Building materials do not hold up well to shear. If the floors fail, the roof will fail and the stove will need to be rebuilt.
Evolution
The development of the Russian stove followed four intertwining branches: bottom heating, stove, economy, compactness. A huge contribution to it was made by I. S. Podgorodnikov, who developed the “Economka” and “Teplushka” series of stoves, which are still widespread today. The diagram of Podgorodnikov’s “Teplushka” is shown in the figure. It was improved by I.V. Kuznetsov; – in Fig. lower left.
The bottom line is that the firebox and cooking chamber are separated, and the oven is sealed. The flue gases are lowered through a hole into the furnace (on which a second low bench is installed, convenient for the old and young, and the firebox works in the most natural way as a stove. The accumulation of soot in the furnace is eliminated thanks to careful design calculations. How much work did this cost in the age of adding machines and slide rules? , it’s better for us not to guess.
However, such a stove took up a lot of space and acquired an increased fire hazard: the fire burned close to the mouth of the firebox. Further improvements until the 90s were of little use - the oven became too complicated. The following picture shows a cross-section of a compact housekeeper from the 70s - 80s. Its efficiency is above 80%, but not every stove maker will be able to put together such a labyrinth, and even a heating engineer with a diploma, much less an ordinary housewife, will not be able to immediately figure out the purpose and procedure for using all these doors and dampers. In addition, there are nooks and crannies that are inaccessible for inspection and cleaning.
With the development of computer modeling, the Russian stove took the path of qualitative improvement: all creative abilities could be turned into ingenuity and ingenuity. The following picture (right) shows a successful modern Russian stove. The “highlight” of the design is that instead of backfilling under the bakery (where, as it turned out, it still does not work as intended), they installed a winter firebox. Increasing the height of the bedding made it possible to bring the volume of bedding under the furnace to optimal.
Such a stove has only one drawback: to switch between winter and summer, you need to move not one, but two dampers, and in addition, install/remove a heavy plate that covers the mouth of the winter firebox. If you do come up with something with this stove, then such a stove can already be automated for the winter: the winter firebox can run on gas.
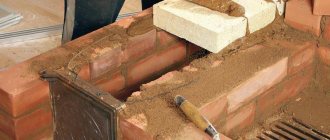
Installation of required appliances for the furnace
The devices that any Russian stove must have are installed and fixed as they are laid. When heated, metal heats up more than brickwork. Therefore, when producing a stove firebox, you should not be surprised at the deformation of the metal door frames. The outcome is that the frame expands and simply falls out. To avoid this, the firebox door frames are fixed with a gap (4-5 mm) between the masonry and the frame, which must be filled with asbestos cord. For reliability, the frames are strengthened with paws. The tabs are placed between the bricks and secured using brick and mortar. The frame with the cord should be inserted as tightly as possible into the opening. There should be no voids between the masonry and the frame.
The hole needed for the firebox can be closed using different methods. If the length of the brick exceeds the width of the hole, lay the brick into a strong lock. In the opposite situation, use a jumper.
Having finished laying clay bricks, it is worth starting lining the stove. The walls must be rubbed with dry red brick. This will help get rid of dried clay residue. Next, the seams are unstitched: they take a wooden spoon and give them the appearance of a half-roll. The unlined surface of a Russian stove has better heat transfer, but its appearance is sloppy and rough. Dust gradually accumulates in the seams. Therefore, the stove should be covered with tiles.
Ordinal description of the masonry of the RP with a fireplace.
Once again I want to remind you that the order of the furnace is not an engineering drawing and only shows the order of masonry, the location of the channels of the valves and other elements of the furnace. Proper bandaging is done by the stove maker himself on site each time differently, depending on the location of the stove in the space of dimensions and deviations of the brick and seams, on the choice of the shape and size of the stove fittings and the method of finishing the stove.
The Russian stove never went out at all. It slowly warmed up in its corner during industrialization, electrification, gasification, and was always the object of close attention of specialists due to its remarkable qualities. Nowadays the Russian stove is experiencing a rebirth; a significant role in this was played by its economy, omnivorousness and the ability to build with your own hands - no expensive materials or complex industrial equipment are required. What is it good for, what are its secrets, where can and cannot be built?
Dimensions of the building
There are three design models in total: small, medium, large. The final size of the structure directly depends on how many additional functions will be performed. In addition to heating the home, the stove carries out other activities, for example, when installing a hob, it becomes a cooking device, and the presence of a bed provides a free sleeping place.
Also important in drawing up a project for a future building is what parameters the stove will have for cooking, how many people the bed can accommodate, and whether there will be ledges for drying shoes. If a water tank is installed for subsequent pipe connections, then additional space, more materials, and pipe outlets for connection will be required.
In any case, all types of stoves contain the same components. The underarm is the place where the firewood is dried, the underflow is the bottom of the cooking chamber, otherwise called the crucible, inside which firewood or heat-resistant utensils are stored. There is also a view - a window covered with a door, which serves as a way to block the chimney, and in addition to it, a damper is installed that regulates the internal draft. The chimney has at its beginning a small niche called an overpipe.
Structure of the structure
Additionally, they assemble the stove bench by placing it behind the chimney, directly above the crucible, which is heated by the heat of the fire. If you plan to cook food using a stove, assemble a hearth, which, if the hob moves, serves as a place to keep the food from getting cold.
Modern modifications often include a water tank to ensure there is always hot liquid at home. Having the ability to warm up the flood part of the structure allows the entire building to reach a high temperature sooner, which means the house will warm up faster.
We increase the efficiency of the Russian stove due to the lower heating
As I already drew your attention to earlier, the lower flood in the Russian stove is a modern modification. A chimney channel runs into the lower part of a modern Russian stove, which serves to heat the lower part of the stove
This is a huge contribution to reducing the amount of fuel burned. Moreover, if you heat a Russian stove with a stove bench only through the main firebox, then your feet will simply be cold and you will have to walk around the house in warm shoes. But the lower heating of the Russian stove solves this problem easily and simply! This is how it looks in the photo of a Russian stove with a bottom flood.
Thus, we double the area of the heating source! Therefore, to heat the same room to the desired temperature, you will need half as much wood as if you had a classic Russian stove
. Well, now let's turn to solving the second problem - fast cooking. This solution follows from the first thesis.
A Russian oven with a stove is the best solution for cooking in such an oven. After all, it’s worth throwing a few firewood into the lower flood, and within 15 minutes the stove of the Russian stove will be hot enough to heat water or heat up food. Unlike the classic version, when you want the wood in the hearth of a Russian stove to burn out, only coals remain. This will take at least an hour. And such a Russian stove with a stove
- the most effective solution in 2022!
Russian stove for a summer residence
.
Now let's talk about sizes. I specifically want to post a photo where we are designing the dimensions of a Russian stove with a hob
. This is a photograph of the same Russian stove No. 180,
If you take any version of the Russian stove with a stove bench
- then such a design in depth (due to the couch) has a dimension of at least 2.5 m! It’s not easy to imagine a country house with dimensions of 5x5, that is, 25 squares, where 3.5 squares are occupied by a stove, because there is already not much space... and most importantly, a huge amount of brick and firewood goes into the stove, which is not always affordable for the owners of small houses. In our case, the customer and I came to the conclusion to completely abandon the couch, which would take up a lot of space.
The size of my Russian stove with hob and heating element
came out: 7 bricks x 6.5 bricks, or 1.7 meters x 1.6, which is quite acceptable for any small house.
Of course, my work is only a private solution for a specific customer. Here, for example, is another one of my Russian stoves with a stove bench and a stove, and a lower heating
.
I built this stove at the beginning of 2010, and I don’t have a photo of the stove bench, but the structure turned out to be huge. I hope you like my work, but the price for such a Russian stove will be much higher due to the large volume of work. Russian stove No. 182
If you are interested in my approach to work, then I am always ready to help solve any of your problems in the field of laying Russian stoves
, especially since there are not many stove makers in St. Petersburg with such real experience and their own photographs.
And there are many factors: firstly, this is not the most common task. For example, over the course of the entire year, 10-12 people may contact me with a request to lay a Russian stove with a stove
.
And many people by the price of a Russian
stove.
The price of work on a Russian stove
ranges from 180,000 - 350,000, the same range of materials, depending on the volume and type of brick.
In order to give any assessment of my work and the necessary materials, I need to fully understand the task. To do this, call me directly, I will identify all your needs, describe all the parameters for myself and be able to draw up an estimate for your Russian stove.
Drying
To dry a Russian stove with a stove bench and a hob, shavings, chips and small logs are used. The first combustion should be carried out with fuel in an amount of no more than 30% of the maximum volume. With each subsequent firebox, the volume of loaded firewood increases.
The drying time is influenced by the size of the oven, the degree of humidity of the brickwork and the temperature in the room. Typically, drying in the summer season takes a week; in the cold season, this period can last up to 25 days. All this time, the valves and combustion damper must be open.
You need to stop drying the oven at the moment when there are no damp spots left on its surface, as well as condensation on metal parts.
Construction of a Russian stove with your own hands
For construction you will need fireproof and ceramic bricks. Fireproof is used for laying the firebox, ceramic for the rest of the structure. It is also necessary to prepare templates for arches and vaults, and steel strips. In addition, you need the following cast iron elements:
- combustion, blower, cleaning, ventilation doors;
- grate;
- view;
- flap;
- stove and two burners;
- hot water box.
Masonry mortar: features of preparation and quality control
Masonry mortar can be purchased at a hardware store in the form of a dry mixture, or you can prepare it yourself. To do this, you will need refractory clay, sand, and for fireclay bricks, also fireclay powder. Brick pipes in the attic space are laid on a cement-sand mortar.
The main difficulties arise with the choice of clay. It can be of different structures, and the stove maker’s task is to find the right proportions for mixing sand and clay. Check the plasticity of the solution by rolling a small flagellum out of it and bending it. The better it bends before cracks appear, the better the solution. Another old-fashioned method: a ball of mortar needs to be squeezed with two boards until cracks appear. A good solution will crack when it shrinks to a third of its diameter.
When preparing masonry mortar, it is important not to make mistakes with the proportions. In any case, it is better to make it more fatty than too lean
Foundation and masonry of a Russian stove
It is better to design the foundation for the stove together with the house; later it will be difficult to build it in a finished building. Experts recommend choosing an independent slab foundation for the Russian stove and building it using standard technology. The protrusion between the edge of the foundation and the masonry (cut) is made at least 0.5 m. When the structure is ready, a two-layer roofing material is laid on it as a waterproofing material.
The stove masonry must be airtight. To achieve this, you need to choose durable bricks without cracks and make thin seams (up to 5 mm).
The oven is placed in brick, half- and quarter-brick. It is better to lay the outer walls in brick, and the inner walls in half a brick. Dressing of sutures - bonding and spoon laying alternately. A furnace is left in the lower part and covered with brick or concrete slabs. The masonry seams are treated and plastered, coated with cement, external surfaces can be finished with ordinary plaster for interior and exterior work. After this, finishing is done and the oven is ready.
The process of laying a Russian stove: erecting an arch
The special value of the national home lies in the spiritual enrichment of an urbanized society. In many ways, the return to the origins of stove construction is due to a tribute to fashion, because there are more modern and relevant models of heating devices. Folk style, an appeal to traditions is a natural process for a civilization whose life is far from the way of life of its ancestors. The Russian stove in the interior of the house is a symbol of restoring the lost connection of generations. A beautiful, functional, efficient stove not only heats the house, but heals the soul and body.
Mini stove finishing process
Incorrectly selected solutions may not immediately crack or even crumble the next day, but they will still not last long.
Building a stove with a firebox and a fireplace is a fairly long process. People often look forward to its end. The most labor-intensive and time-consuming part of the work is brickwork. However, even after the last brick is laid, it will be too early to consider the job finished. You will also need to complete the finishing that the mini-heater needs.
If the mini stove is very neatly built from beautiful facing bricks, has a smooth front edge and right corners, you can do without additional finishing. However, quite a large number of people have their own prejudices about the fact that brickwork should not be in the house at all. Consequently, the heated house is often provided plastered and whitewashed.
The traditional method would be to simply coat it with clay mortar.
This is done without the use of any special tools - clay is thrown on and smoothed with a moistened palm.
The surface after such a finishing process may not be completely smooth, with traces of handmade work. It is worth understanding that today this technique is widely used to create something unique in interior design.
Modern technology for applying plaster involves the use of special tools. among which there will be trowels that will be needed to apply the solution, trowels to level the applied solution, a grater with which the solution is compacted and the surface is leveled in a circular motion.
The heated building can only be plastered when it is 100% dry. Before moving on to this process, you should heat it. The solution will consist of clay and sand in a ratio of two parts sand to one part clay.
What tools will you need?
High-quality masonry of a stove in a rural house will require the preparation of some equipment.
The solutions are mixed inside a clean, spacious container, kneaded with a construction mixer or electric drill using a special attachment.
The construction of a solid foundation will require laying reinforcement, which means a welding machine is needed. You can control the surface using a building level, a plumb line, or a laser level.
Tools for work
A trowel is needed for direct work with the mixture; a pick is used to adjust the brick blocks to size, and the bricks are tapped with a rubber hammer or the back of the trowel handle.
Unstitching is done with a special device, but you can get by with a stationery knife.
Additionally, it is worth preparing a rule that is set perfectly level relative to the side surface of the structure for better control of even laying.
List of materials
Brickwork is a classic option for a furnace, as the material heats up evenly and slowly.
- single red brick M-200 – 1600 pcs;
- fireclay brick Ш-8 – 250 pcs;
- wedge-shaped fireclay brick Ш-44 – 100 pcs;
- smoke valve 26x26 centimeters – 2 pcs;
- smoke valve 13x26 centimeters – 3 pcs;
- damper (dimensions are determined by location) – 1 piece;
- two-burner hob (dimensions are determined as you go) – 1 piece;
- grate 20x28 centimeters – 5 pcs;
- combustion door 21x25 centimeters – 1 piece;
- blower door 14x25 centimeters – 1 piece;
- cleaning door 7x13 centimeters – 2 pcs;
- steel corner 60x60x5 millimeters - 1.5 m;
- steel strip 50x5 millimeters - 20 m;
- fireclay clay – 100 kg;
- sand, ordinary clay - the amount is determined according to the need for the material.