All lovers of country holidays dream of a stove in their cozy cottages. As you know, a brick stove is the oldest universal design for heating rooms. Its effectiveness and high performance have been proven for centuries.
It is not at all necessary to build a serious bulky structure. Sometimes a small-sized stove is enough, which you can build with your own hands. Models may differ in shape, size, type or design of the chimney, but in general, their construction will not take you much time and will not require serious stove-maker skills.
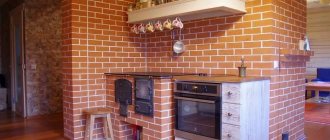
Schemes of small brick stoves
Compact stoves do not take up much space , which is especially important for small spaces. The heaters have a rectangular cross-section at the base. The height of the stoves depends on the height of the building and the chosen model. A brick chimney is often replaced with a factory-made steel pipe.
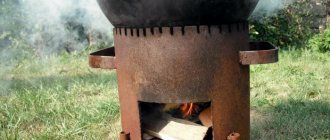
Heating and cooking mini-oven
In small stoves designed for heating the home and cooking, a niche for the stove .
An oven or water heating container can be built into another niche located above the firebox . Niche space is often used for drying things.
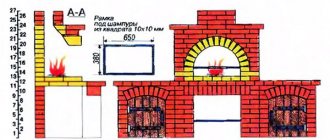
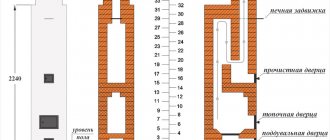
Let's consider a specific diagram of a compact stove with a base size of 0.64 x 0.51 meters (2 x 3.5 bricks) and a height of 2.15 meters (32 layers of masonry) .
This heater model is designed to heat small and medium-sized houses with an area of 25 to 40 square meters . Ceramic solid (ordinary) brick is suitable for masonry.
The oven is built in the kitchen (in the middle of the room or against the wall). The furnace of this model contains the following structural elements:
Metal elements for the heater are purchased at a hardware store. The list of factory parts includes :
Photo 1. Fire door measuring 30 by 30, made of polished cast iron and fire-resistant glass. It is possible to regulate traction.
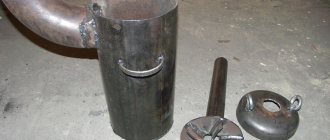
The oven and hot water tank are welded from steel sheet. Asbestos cardboard of the same size is placed under the firebox sheet For furnace work you will need:
Small heating device
Let's consider a specific heater circuit. The base of this model has the shape of a rectangle measuring 0.89 x 0.51 meters (2.5 by 2 bricks) . The height of the stove is 2 meters 38 cm .
Compact dimensions allow the heater to be installed in a corner or in the center of the room. If the dacha has a kitchen and a couple of living rooms with a total area of up to 40 square meters , the heater is built into the wall openings (interior partitions).
The main elements of this model:
A door with heat-resistant glass in a metal frame or a solid cast-iron door is built into the firebox portal. The furnace is built on a solid foundation buried in the ground. The foundation is made solid or columnar.
Important! The stove is made of ceramic and fireclay bricks. The firebox is made of fireclay bricks, and the lower and upper parts of the heater are made of ceramic bricks. The masonry is done using sand-clay and fireclay-clay mortars.
Types of furnaces
The principle of operation is that a brick kitchen stove heats up when fuel burns and gradually radiates heat into the room. Passing through the channels, hot air consumes thermal energy to heat the brick. For this purpose, a combustion chamber and a chimney are installed that discharges exhaust gases to the street.
Based on their design features, there are several types of furnaces presented in the table.
Heating stove without hob. Takes up little space, the channels are located above the firebox. The classic Dutch floor is covered with tiles.
Heating and cooking stove. The heated chamber above the stove is used as an oven. Channels for the passage of gases are located behind the firebox.
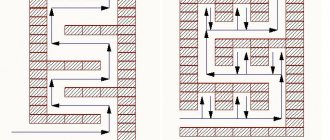
The design includes several vaults. The hot stream rises, cools and, falling down, moves to the next bell.
Flow diagram. From the firebox, hot air moves through the channels, heating the entire structure. In summer, some of the channels are blocked, and the stove is used only for cooking.
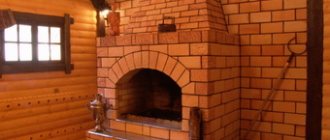
Borscht and porridge with a slight smell of smoke, delicious pastries - all this can be prepared if you have a brick stove with an oven. Special heat treatment of products over an open fire of burning wood and simmering in the oven gives the food a rustic flavor. Such dishes cannot be prepared on a gas or electric stove.
Schemes of brick mini-ovens
Small ovens occupy a small area, the dimensions of their bases range from 50 to 70 centimeters in width and up to 65–100 cm in length . The height of the heating structure is from 1.5 to 2.3 meters . A cooking floor, an oven, and a water heating tank are built into the oven. Stove makers have also developed devices intended only for heating a home.
Small heating structure
This is the simplest heating structure. We will analyze the model in the following sizes:
The mini-stove is installed in the middle of the kitchen or against the wall. The optimal heating area is 20-35 meters . Interior partitions are erected around the stove, which allows heating both the kitchen and the adjacent room.
Inside the device are:
The combustion door of the mini-stove ( cast iron or glass ) is selected depending on the aesthetic preferences of the home owners. A door made of heat-resistant glass, through which you can see how the wood is burning, gives the structure a resemblance to a fireplace. Two smoke valves are installed in the middle and upper parts . There is one door for cleaning the channels. To build this model of the device you will need:
Reference. Masonry mortar increases the volume of the device by the thickness of the joints.
The base and top of the mini-oven are laid with ceramic bricks on a clay-sand mortar. The firebox is made of fireclay bricks on a clay-fireclay mixture.
Three and a half bricks fit on the long side , and 2 standard bricks 25 cm long on the short side . The masonry consists of 35 rows .
Small heating and cooking stove
This is a mini-oven model for heating and cooking - a convenient and very compact structure. The optimal area for a heated room at sub-zero temperatures is 20-25 square meters .
The device has the following dimensions:
The structure is being erected in the kitchen. The device includes :
cooking floor has a hole that is closed with a disk and a circle. Solid flooring is also available for sale. In the niche for the oven chamber there is a metal oven or a hot water tank with a tap. If the niche is left free, it is used for drying things. To build a stove you will need :
What is a heating shield, and where to attach it?
In old photographs or newsreels, kitchen fireplaces are often found - the stoves of a restaurant and a private apartment differed in size, but not in design. In villages today it is easy to find them in a completely viable condition. That is, judging by its prevalence, this is generally a successful invention.
The general scheme of action is approximately the following: hot gases from the firebox are directed to the side, to the side. At the same time, they pass under the cast-iron cooking floor (with or without burners). The largest burner is located directly above the firebox. Next, the gases are lowered down. On the way, they wash a tin box with a door - an oven. The exit to the chimney is made below, under the oven.
In old English designs, the fire door was double - a blank door and a grate. When the door was opened but the grate was left in place, a piece of meat could be placed in front of it - the radiant heat passing through the grate worked like a grill. In theory, such a scheme is feasible today, but specialized castings are no longer produced. And if anything happens, you will have to come up with some kind of modernization of the standard door yourself. By the way, in most cases you will also have to make the oven yourself. You can find factory ones, but they are made of cast iron (which is not bad) and small (which is worse).
In addition to a standard stove and oven, you can add a water heating box - a tank embedded in the brickwork in which water is heated. It is only important to place it as far as possible from the firebox.
The motivation here is simple. Water boils at 100 degrees, and for cooking it is advisable to reach 200–250. Consequently, the water in the tank located close to the firebox will rapidly boil away and cool the stove - it is impossible to heat it above 100. And in this case, you will have to constantly change the water in the box and spend extra time on cooking. So we always place the water heating box at the very end of the circuit - the residual heat of the gases will be enough for the water.
So, after sequential heating of the stove, oven and - possibly - the hot water box, the gases are released into the pipe. But they still have a sufficient temperature that it would be stupid to just dump them into the atmosphere. It’s better to somehow harness this energy.
That's why they came up with heating shields - a smoke circulation system without its own firebox. In combination with a stove, such a shield produces a full-fledged heating and cooking stove, quite suitable for a summer house or a small living space located outside the city.
Moreover, the shield can be connected with equal success to a regular brick slab (or a slab to it), an industrial metal one, or a small fireplace stove in order to increase the overall heat transfer of the system. That is why the shield is mistaken for a separate heating unit. True, not at all independent.
The shield itself is extremely simple. The space inside it can be organized as a thermal hood, which is not entirely justified - the hoods suffer from weak lower and pronounced upper heating. Therefore, a conventional smoke circulation system is more often used. And most often - vertical. That is, they make a long channel, which is rolled up for compactness. And the elongated loop is placed vertically.
The internal cross-section of the shield channels must correspond to the cross-section of the outlet pipe of the stove connected to it. Or slightly higher. That is, if the diameter of the pipe is 120 mm, then the channels inside the shield should not be less than half the size of a brick - 120x120 mm.
IMPORTANT! A round cross-section corresponds in terms of throughput to a square, with side dimensions equal to the diameter. That is, the square and the circle inscribed in it have equal capacity. This happens because the flow of gases does not tend to climb into corners and goes only along the center of the provided path - along the path of least resistance.
The shield has one problem. Easily overcome, however. Each time it works at full strength - gases pass through the entire array. And, of course, this is not entirely convenient in the warm season - it is undesirable to accumulate excess heat in most regions at this time of year.
Therefore, many stove makers introduce a valve into the smoke circulation system of the shield, which allows gases to be released immediately after the stove directly into the pipe - the so-called summer move. But if you close this valve, the gases will follow the winter path - along the longest and most tortuous one.
How to make a small oven: recommendations and step-by-step instructions
Before starting masonry, preparatory work is carried out. They include the following steps:
Project selection
On the Internet and in furnace textbooks there are serial diagrams of a dozen mini-ovens.
The choice is great , but if the home craftsman has no experience at all, it is worth consulting with local professionals or with people who have successfully built similar stoves. When choosing a device that you plan to build yourself, several factors are taken into account :
Photo 1. Before starting construction, it is very useful to model the appearance, dimensions and order of the future stove.
If you plan to cook food , the option with a hob and oven would be preferable. The need for hot water in winter and in the off-season will close the hot water tank in the niche. In it, by removing the removable tank, you can dry shoes and other things . If the house always has electricity or a gas stove, choose a stove option without a hob and a niche for the oven.
clothes for a photo shoot in the field in summer
For regions where winter temperatures drop below 20 degrees and remain at this level for weeks, a large oven with heat shields . It is not recommended a mini-stove continuously for more than two hours in a row .
the design matters . It can be tiled or laid with bricks with a relief surface.
Materials
For the chosen mini-oven project you will need high-quality bricks. You should choose a smooth, grade 1 brick , uniform in color, without chips or cracks.
For laying bricks, it is better for a home craftsman without experience to choose a ready-made mixture at a hardware store. It is diluted according to the manufacturer's instructions.
If the master creates a solution from individual ingredients, you should purchase sand and clay . The ratio of materials is determined experimentally. The solution is scooped with a spatula and its working surface is tilted 45-50 degrees . The masonry mass of normal composition does not fall in clumps from the spatula and does not flow from it.
Tools
To work, you will need all the stove maker’s tools and a table on which you can stand when laying the top rows. The list of tools includes:
Important! The temperature in the room when laying the stove and drying it should be positive (from plus 5 degrees ).
To prepare the solution you need a large tank . To mix the paste, you need a wooden mixer (paddle) and a construction mixer .
Preparing the area for the oven
Before laying the mini-oven, prepare the foundation . This is necessary because even the smallest device with a brick pipe weighs 500 kg or more .
Such pressure on the floor boards will lead to deformation of the floor and stove walls. This can cause a fire on the roof and in the house.
There are several options for constructing foundations. Construction of a concrete base for a mini-oven includes the following steps :
Important! The stove is erected on a foundation that protrudes 10-20 cm . to leave 50-70 cm on the firebox side in order to mount the pre-furnace platform on it.
Order of masonry
Ceramic bricks are laid using clay-sand mortar on a prepared foundation:
Photo 2. Layout diagram of the first rows for a small heating and cooking stove. Next comes the chimney pipe.
Photo 3. Installation and fastening of doors for firebox and cleaning. Using a plumb line, the accuracy of the tub is monitored.
In addition, row 32 is the basis for the construction of a chimney . It can be brick or metal.
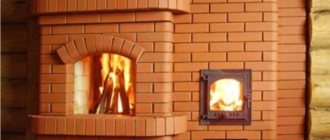
Photo 4. An example of a finished brick mini-stove with decorative finishing. The design is not intended for cooking, but will heat the house well.
The oven is not just for heat
The classic Russian stove is a multifunctional structure. The design of a Russian stove allows you to significantly expand your capabilities, not limited to just cooking.
Heating the room: the first most important function. The downside of an ordinary Russian stove is that the heat comes at the level of a person’s waist, that is, at least a meter from the floor. Evolution has touched this moment. And today the chimney is positioned in such a way that the entire surface works, and the air in the room is heated evenly.
A brick stove in the kitchen interior creates coziness throughout the whole house
Wood heating of a private house is a budget heating option.
Practical experience shows that birch firewood is better. Birch is a hard wood, and dense wood produces more heat.
Cooking food. Features of Russian cuisine are cooking, stewing and simmering. Therefore, the dishes turn out to be very flavorful and as healthy as possible. Russian cuisine consists of soups and porridges. When cooked in the oven, they retain all their beneficial properties. Here you can make preparations for the winter: dry mushrooms, fruits and berries. A Russian oven is also a mini bakery at home. It has more than 15 types of design. Some models have special ovens for baking bread.
If you cook in a Russian oven, then you definitely need to add grips and a poker to your kitchen utensils. Cast iron and clay pots are used for cooking. To move them inside you will need grips. The coals will need to be stirred periodically to maintain the temperature. A poker is used to perform this task.
The Russian stove also performs another function – health-improving. The sleeping place - the bed - is integral with the stove. Constant warm temperature has a warming effect. It is very useful to sleep on a constantly heated bed if you have colds or joint pain.
How to build a mini brick oven with your own hands?
All lovers of country holidays dream of a stove in their cozy cottages. As you know, a brick stove is the oldest universal design for heating rooms. Its effectiveness and high performance have been proven for centuries.
It is not at all necessary to build a serious bulky structure. Sometimes a small-sized stove is enough, which you can build with your own hands. Models may differ in shape, size, type or design of the chimney, but in general, their construction will not take you much time and will not require serious stove-maker skills.
Stove water heating device
Advantages:
- installing a conventional stove does not require large financial investments; red and refractory bricks, local clay and sand are used for masonry;
- if desired, you can combine the stove with a fireplace, thereby obtaining a beautiful decorative element and a room heating device;
- independence and autonomy of the heating system, which does not require access to communications;
- the ability to use a relatively inexpensive type of fuel;
- no preliminary preparation is required to put the structure into operation;
- only stove heating can fill a house with special living warmth and comfort;
- food cooked in a real Russian oven has a special taste;
- burning wood does not harm people and the environment;
- stove heating is the simplest way to heat a house, solid fuel is placed in the firebox and ignited, and as it burns, the next portion of fuel is added;
- Possibility of connecting stove heating to water heating.
Like any other type of building heating, stove heating, in addition to its advantages, has a list of disadvantages. You can buy fuel in almost any locality. To make a sufficient supply of fuel for the heating season, you need to equip a special storage space.
Flaws:
- installing a stove in a house takes up a lot of usable space;
- To fully warm up the building and maintain the desired temperature, you have to spend a lot of time; stove heating has a low efficiency index;
- fuel must be prepared regularly so that in cold weather there is something to heat the stove;
- the fuel in the stove burns out quickly, which requires constant monitoring;
- it is necessary to construct a chimney and carry out its careful insulation from structures characterized by rapid combustion;
- the room warms up unevenly; the further away from the stove, the lower the air temperature.
- when constructing a traditional oven, it is impossible to fully ensure that the premises comply with sanitary requirements;
- improper care of the stove and violation of operating rules can lead to large emissions of carbon monoxide into the room;
- The fire hazard indicator when installing a stove in a house increases significantly.
Following simple rules will help eliminate many of the disadvantages of stove heating.
First of all, the heating area increases significantly, the heat is rationally and evenly distributed throughout all heated rooms. The heating of the room involves the smoke channels of the furnace, walls and coolant. Heat transfer to radiators occurs only when the furnace firebox is operating. After combustion stops
in the radiators for some time.
The design of a water-heated stove differs from a conventional stove in the presence of a heat exchanger installed in the firebox. The simplest water system is connected to the register. The design of the heat exchanger may be different, but in any case it should warm up the coolant well and ensure high-quality circulation. To produce registers, metal pipes or sheet steel are used.
The stove water heating system is especially popular among residents of villages and villages where there is no gas pipeline. In this case, improved stove heating is the only way to heat the house during the cold season. This heating works even during a power outage.
Many owners of stove water heating install circulation pumps to improve coolant circulation and increase system efficiency. The combined installation of an expansion tank and a pump allows the entire heating system to operate uninterruptedly in any conditions. The main thing is to light the firebox and periodically add fuel to maintain the optimal temperature in the system.
Installing a stove heating system combined with water heating costs the home owner much less than purchasing a factory-made boiler.
Disadvantages of using stove heating with a water circuit:
- to maintain the optimal temperature in the house, the stove is heated every day;
- when using this type of room heating, it is impossible to install a stove in the basement in the same way as is done when using a factory solid fuel boiler;
- it is necessary to strictly follow the installation rules of the entire system to ensure sufficient coolant circulation;
- high temperature changes during furnace operation sharply limit the choice of material for the heat exchanger; only registers made of metal pipes or sheet steel can be installed in furnaces;
- This type of heating cannot be arranged using only forced circulation.
The process of constructing a small-sized furnace
The small-sized oven occupies only 0.4 square meters.
It is laid out from bricks placed on edge or flat. If you know the basic rules for building a stove, then you won’t even need a diagram or preliminary calculations to build it. Due to the relatively light weight of the mini-oven, it does not require a foundation, but in this case a thick, durable board, well secured to the joists, should be used for the floor.
Order of masonry
The first row of bricks is laid out on the sand (12 bricks are used without fastening) strictly horizontally, which can be checked with a level. On top of the first row we thinly apply a clay solution and install the blower door. Pre-wrap the door with a piece of asbestos cardboard or wrap it with cord. Secure it with wire.
The temperature expansion coefficients of clay and cast iron differ significantly, so it is impossible to lay a cast iron hob on top of clay.
It is better to install an attached or nozzle pipe made of light iron. This stove provides for the installation of a direct chimney.
Source
Required tools and materials
To build a small stove you need:
- 60 pcs. red stove brick
- 37 pcs. fireclay bricks
- 20 liters of clay solution
- one vent door
- one grate
- one firebox door
- one cast iron plate
- one valve.
The tools you need to prepare are:
- trowel
- pick hammer
- level
- plumb line
- roulette
How to make a stove for a cottage out of brick with your own hands: masonry rules and step-by-step instructions
Today there are many options for heating a dacha: centralized gas, boilers, electric heaters.
But if it is not possible to implement all this due to the area’s remoteness from civilization, a do-it-yourself brick stove for a summer cottage will be an excellent solution.
Reliable and durable - it will gather around itself more than one generation of household members, providing the house with warmth and filling it with comfort.
The services of a good stove maker are not a cheap pleasure. Therefore, if you decide to implement a brick stove project at your dacha, it will be useful for you to read this article, in which we will tell you about the operating principle, features and layout of the stove structure.
A brick stove can become not only a functional device, but also the main highlight of the interior if it is used correctly. Today there are many ways to beautifully veneer and decorate a stone stove.
Epilogue
In conclusion, I would like to add that no achievements of modern civilization will displace brick kilns from the life and everyday life of Russian people. After all, they are all quite easy to use, do not require expensive fuel and do an excellent job of all important functions (read also about how to make kitchen furniture at home).
Well, if an alternative solution is found in this regard, then the old Russian stove will remain as an exclusive and unique element of kitchen interior decor. For dessert, especially for you, we have prepared an interesting thematic video. Enjoy watching!
Gallery
Did you like the article? Subscribe to our Yandex.Zen channel
Great article 0
Types of furnace designs
No matter how much time has passed since the appearance of the first stove designs and no matter how far home heating technologies have come, the stone stove still does not lose its relevance. Compared to other types of heating (electricity, gas), it is more economical. At the same time, thick stone walls allow you to retain heat for another day after the firewood burns out.
According to their purpose, furnaces are divided into the following types:
Oven with hob
This type of design also includes a fireplace with an open or closed firebox. It is used not only for decorative purposes, but also allows you to effectively heat a room of 15-20 square meters. meters.
Depending on the selected material, wall thickness, masonry scheme, heating stoves may have different heat output.
The most popular type of stove is the one-brick design. This allows the walls to be heated to 60 0 C. The famous Dutch ovens are laid out according to this scheme.
In terms of dimensions, the heating stove can be wide and flat, or it can have an elongated rectangular shape. It all depends on the area of the room, the style of the interior and the personal preferences of the owners.
For cladding such a stove, tiles, decorative plaster, and decorative stone are usually used.
Round stoves, which are laid out according to the design of the famous Russian furnace engineer V.E. Grum-Grizhimailo, also look beautiful and unusual. The furnace operates on the principle of free movement of gases. To ensure tightness, the outside of the structure is covered with sheet metal. Such a stove can heat a large country mansion and will become a real decoration for any home.
Often this option is installed in country cottages where gas and electric heating are provided, but in order to save resources, owners sometimes use a brick oven.
Is it necessary to legalize the redevelopment of non-load-bearing walls?
The design of the stove consists of a brick body, inside of which there is a combustion chamber, an ash pan, and a chimney. There is a metal plate on top (an oven can be built in).
This is a more difficult project to implement, as it consists of:
The stove looks massive and is usually chosen for dachas where there is no other heating option.
In our country, heating and cooking stoves are the most popular, allowing you to heat the house and prepare a delicious dinner for the whole family.
Oven with drying chamber
By the way, ovens with drying chambers were first invented in the countries of Northern Scandinavia, where hunters and fishermen needed to dry clothes and boots in one night.
Many schemes of heating and cooking stoves have additional devices in the form of a comfortable bench, drying for firewood, an oven, and a water-heating tank.
About functionality and queries
A stove is, at its core, a tool. Very specialized. Therefore, when considering possible projects, it is important to understand that an infinitely universal tool does not exist in principle. And it is impossible to create it. Each is optimal for solving certain problems. And adding additional options to one degree or another reduces the effectiveness of the device in the basic, fundamental sector for which the tool was originally optimized.
Household stoves are divided into two groups: heating and heating and cooking. It is clear that only the second option is of interest as a candidate for installation in the kitchen. Still, heating alone is not enough in the kitchen. The ability to prepare food is also desirable. If not as the main platform, then as an additional one.
In theory, a stove array can fit a lot of useful things: a large stove for a cauldron or a multi-burner deck for all kinds of saucepans, a smokehouse, an oven, a bread chamber, a hot water box, a barbecue, a dryer, a kitchen hood and a host of other things limited only by imagination designer.
But, for each of these implantations you will have to pay something: increased volumes and weight, decreased reliability, loss of heat transfer, increased complexity of operation, the need for frequent preventive maintenance and other roughnesses that are not very pleasant from the user’s point of view.
There is a fairly simple way to more or less bypass all the technical bottlenecks in the project, condensing the functionality as much as possible and providing separate, independent services. That is, simply put, by arranging many specialized ovens not in one building, but as densely as possible, just like dorm rooms.
But such a solution is more suitable for a summer kitchen, in which, due to the available space, a garden barbecue oven with a lot of posts lined up in a row or somehow cleverly bent can easily fit.
Of course, if there is excess free space, then you can arrange a whole complex of stoves in a row, united by a single front wall. With formal unity, these will be independent structures that work independently of each other. The only things that will be common are design and geography.
The solution considered is, of course, possible. But it is of little use for more modest volumes - not every small kitchen will be able to accept a substantial mass of brick without compromising habitability - the space for maneuver will be sharply reduced. So you will have to think about something that runs from a single firebox, after which hot gases are directed in such a way as to warm up various services.
And here again there is a difficulty - you cannot direct the gases to heat everything at once. You will have to maintain some consistency, sort of set priorities. And then something will inevitably begin to heat up according to the residual principle - how much heat will be received after warming up other structural elements.
Another point that is not always paid attention to. Thermal power of the furnace. Therefore, you will have to think about whether the stove will become the basic heating method. If yes, then its heat transfer should correspond to the heat loss of the room.
It’s a little easier if this condition is not critical. That is, the stove is either provided as backup heating, or is not considered as a heater at all. But then the question of comfort arises again - a heated stove in a small volume, already heated, will create such an atmosphere that not everyone can withstand it. Therefore, here it is better to get by with something more modest, but wrapped in additional layers of thermal insulation.
We evaluate the possible location in advance. Of course, the stove in the corner seems to be the most optimal option for arranging the space, but again there are subtle places that are thought about in advance:
- corner placement is vulnerable from the position of optimal heat transfer and organization of air convection. Where the heating characteristics of the stove are important, it is still better to place it in the center;
- Corner placement is not always possible. Although, according to the kitchen plan, it seems to suggest itself. It is worth remembering that it is undesirable (especially during irregular use) to place the stove and its pipe against an external wall. Even if a pipe is adjacent to a wall, it is better if it is adjacent to an internal one. And if we are talking about a corner where both walls are street, then this is completely unacceptable. Under such conditions, even the most advanced system will refuse to work stably.
Which brick stove to choose for your dacha?
The choice of stove design determines the size and type of room. Large cottages will require a massive stove structure with thick walls, which will take a long time to heat up, but at the same time be able to maintain the temperature for a long time. Building such a stove is not an easy task. This will require some experience and knowledge.
But even a beginner can handle a small stove for heating a small dacha if you strictly follow the diagram and do not change the laying rules.
The first place in the popularity of heating and cooking stoves is worthily taken by the Swede, which enjoys well-deserved love and respect among Russian stove makers.
This design is a compact, ergonomic shape with a small cooking surface and a three-channel chamber. It is ideal for a small cottage, the length ranges from 880 to 1250 mm.
For the location of such a stove, the place most often chosen is between the kitchen and the living room. Thus, the stove performs a double function: it serves for cooking and decorates the living room with a fireplace.
Today you can find hundreds of different layouts for laying a Swedish stove with a hob on the Internet, so it won’t be difficult to implement it for your dacha. Many stove makers have added additional options to the standard masonry scheme, so each design is called by the name of its creator: the Buslaev, Kuznetsov stove, etc. But the principle of operation in them is the same.
Traditionally, a Russian stove can be called a bulky, massive structure, which is decorated not only with a hob with an oven, but also with a spacious bench.
This stove is not only a functional device for cooking, but also a place for relaxation. It allows you to warm up the room well, retaining heat for a long time, and has a beneficial effect on the human body, thanks to which the owners of such stoves are less susceptible to colds.
The building usually has two fireboxes (main and additional). Thanks to the special design of the oven, heating is carried out evenly, from bottom to top. Any solid fuel is suitable for kindling, and there are no particularly strict requirements for the materials for laying a Russian stove.
A special place among small heating and cooking stoves is occupied by the little V.A. Potapova, created by a famous engineer at the beginning of the 20th century. To lay it, you need only 211 bricks, and the dimensions of the stove are only 630 * 510 mm.
Moreover, this little thing contains a single-burner stove, a small oven for baking and a hood. This type of stove would be an excellent solution for a small garden house or one-room cottage.
In this article, we invite you to study the rules and main points of laying a small heating and cooking stove.
Cooking oven order
Features of stove masonry
In order for a stove in the country, laid with your own hands, to serve for a long time, each row should be checked for right angles and horizontal surface. The laying sequence is visible in the order drawing.
The cast iron doors of the blower and combustion chamber are secured using steel wire, which is embedded in the masonry. The cuts are made with a grinder. As a last resort, you can do it the old fashioned way - with a mason's hammer, but in this case there may be a lot of waste for scrap. The area for the grate should be slightly larger than the size of the grate itself. Then, when heated, the metal will not move the brick.
We lay out a stove for a country house with our own hands
The solution is applied to the wet brick. Experienced stove makers do this not with a trowel, but with their hands. A good solution spreads as easily as soft butter spreads on bread.
Important Note
If during laying the brick sank lower than necessary, it should be removed, the mortar cleaned and laid on a fresh one.
Otherwise, the new stove at the dacha will smoke heavily and leak soot. Unlike cement mortar, bricks cannot be moved in clay mortar! When building a stove for your dacha, try to make the inner walls as smooth as possible. Then soot will not linger on them, and it will be easier and less likely to need to be cleaned. The outside of the country stove should also be neat and beautiful. External seams should be carefully embroidered with a needle or finger. There should also be no gaps in the places where arches and horizontal partitions are formed. It is better to lay such rows slowly, one per day, so that the lower rows have time to set, and the upper rows do not creep.
Do-it-yourself stove laying
Step 1. Select a brick and prepare tools
Which brick to choose for laying a small country stove? We will need 2 types of bricks: fireclay (heat-resistant) for the construction of the firebox and red ceramic (at least M-150). You should not skimp on materials; the further performance properties, safety and efficiency of the furnace depend on this.
Fireclay brick can be easily recognized by its yellowish color and porous surface. The composition of this material includes refractory clay and crumbs. This material, in addition to its heat-resistant properties, is also valued for its ability to accumulate heat for a long time. Even after the firewood has completely died out, such a stove is capable of giving off heat for a long time.
Heat-resistant fireclay bricks can withstand temperatures up to 1500 0 C, so the combustion chamber must be made exclusively of this material.
The smaller the mass of fireclay bricks, the greater the number of pores it contains, which are created by aluminum oxide. Such a brick will conduct heat very well. The cost of this material is almost 5 times higher than the price of red brick, but there is no need to save.
But it’s also not worth laying out the entire stove from fireclay bricks; the outer part of the structure does not heat up much, and red ceramic bricks look more attractive.
When choosing bricks for the stove, pay attention to color and shape.
You can test the material. If you throw a brick from a height of 1.5 meters and it doesn’t break, take this batch. But a bad, overexposed brick can split into several parts. Such a brick makes a dull sound when falling.
Do not use sand-lime or hollow bricks. It's not even a matter of the ability to withstand high temperatures - they can handle that. Sand-lime brick does not conduct heat well and a room with such a stove will not be very comfortable.
The solution should be of medium thickness
For masonry mortar you will need sand, red oven clay and water. The appearance and durability of the oven directly depends on its quality and consistency. To prepare it, you should use red oven clay of medium liquid. When frozen, it should not fall off or crumble.
The masonry will be made with a thickness of 0.5 mm, in this case the precious heat will not escape quickly.
You can also use ready-made masonry mortar for construction, which is sold in stores. Usually it contains various impurities that add strength and heat resistance to the structure. In this case, it will be enough to dilute the dry mixture with water and bring it to a homogeneous state using a construction mixer.
The consistency of this solution should resemble thick sour cream. If the mortar rolls off the trowel, you need to add more dry mixture. If it turns out to be too thick, then it will be difficult to work with it and make thin seams. Add some cold water and stir again.
So, to build a furnace, we will need the following materials:
Masonry tools
Tools needed to build a furnace.
Important! When laying a furnace, much depends on the quality of the clay. Ideally, use red river clay of medium fat content, which has been in the open air for at least 2 years. Make exactly as much solution as you can handle in “1 go”. The solution quickly becomes thick and difficult to work with.
Step 2. Preparing bricks for laying the stove
Before starting to lay the stove, it is necessary to lay out all the bricks in advance and prepare them according to the ordering scheme.
This stage includes dividing the brick into ½ or ¼ parts and cutting off the corners.
Brick splitting techniques
Study the diagram carefully and see which pieces of bricks you will need for each row.
If necessary, you can number the brick so that later it is easy to navigate which row to insert it into.
turnkey timber baths are very cheap
How to properly split a brick? Before “beating off” the required part of the brick, according to the diagram, you first need to make a groove. This can be done using a hacksaw or file.
To make ½ brick, make 1 groove.
For 1/6 or 1/8 brick, make a groove on all sides of the brick.
Step 3. Choosing a location for the oven
This is a very important stage in laying the stove, which is advisable to carry out at the stage of building a house.
But there are times when the decision to lay a stove arises among home owners already in the process of using the dacha. In this case, determine the place where it will be easiest to remove the chimney.
Determining a place for the oven
It is also important to evaluate the distance between the stove and windows and doors. After all, cold air blowing from the doors can interfere with the natural circulation of heat in the house, reducing the efficiency of the stove.
In addition, the stove should not interfere with free movement around the room. It should become one with the space without creating inconvenience. In many ways, the placement of the stove depends on the purpose.
The heating and cooking model is best placed in the kitchen, and the fireplace stove will look beautiful in the living room.
When determining a place to install the stove, evaluate the following points:
An excellent place to place the stove is the corner of the room, unless there is an entrance door opposite the corner, from which cold air will blow out the flame.
Step 4. Construction of the foundation
To build a brick kiln, it is necessary to make a separate foundation. If it is laid during the same cycle as the construction of a house, completing it is not a difficult task.
If you decide to lay the stove after the completion of the general construction, then it will be necessary to remove part of the finished floor and go deep into the ground.
Why is it so important to perform a separate foundation? A brick oven, no matter what size it is, has a lot of weight, which will create a lot of pressure on the foundation. When shrinking, the house will sag. This should in no way affect the shape or design of the stove.
That is, the general foundation of the house should not pull the stove along with it, as this can lead to a violation of its sealing and deterioration of its technical properties.
Stove base
Preparing concrete solution
Ruboroid as insulation
Attention! Before laying bricks on the mortar, lay out all the bricks “dry”. First, it will allow you to see if you have enough material. And secondly, you will be able to see difficult moments at the draft stage that you will have to pay special attention to.
Step 5. Laying the stove
Attention! Before laying the stove, place the bricks in a bowl of cold water so that they absorb moisture. This way they will not draw water from the masonry mortar.
Soak the brick in water
Be sure to check each row for horizontalness with a building level. For verticality, use a plumb line, and for accurate angles, use a protractor. Here, on a thin layer of solution, a blower door is installed. The door must first be wrapped with asbestos cord moistened with cold water.
Fill this gap with sand. The entire area under the stove will be practically occupied by grates, which will ensure good and easy care of the stove, as well as complete burning of the wood.
We block the ash door with a brick.
Installation of the combustion door
We install the combustion door, having previously wrapped it with asbestos cord. To make it easier to install, place the door on a thick wire and support it with bricks on both sides. Then these bricks will need to be removed.
We support the door with bricks
Here we begin to form a smoke channel pipe, creating overlaps for two vertical channels.
We lay the base of the firebox, which is made of fireclay bricks.
In this row, two bricks covering the grate should be cut at an angle of 45 degrees.
It is necessary to make recesses in the bricks for reliable fixation with the slab and create thermal niches for the expansion of the metal. Immediately place the slab on a dry surface and number the bricks - this will make it easy for you to later lay the brick on the mortar and avoid making mistakes with the correct recesses for the slab.
We lay an asbestos strip on the brick (to expand the metal).
these bricks must be cut at an angle of 45 degrees
Overlapping for two vertical channels
Smoke damper installation
Step 6. Exit the chimney through the roof
This is a responsible step that should ensure complete safety of the furnace operation.
Follow the SNIP standards when installing a brick pipe through the roof. According to these standards, the gap between the roof and the chimney must be at least 13-25 cm.
Around the place where the pipe passes through the roof, it is necessary to insulate it with thermal insulation materials. This will provide reliable protection from cold air blasts and ensure reliable fire safety.
If the stove is being installed in an already residential building with a finished roof, it will be necessary to remove part of the roof. After installing the pipe, you will need to completely ensure the integrity of the roof in this place so that during rain or snow, moisture does not get inside.
To waterproof a stone pipe, a special plate is used, which resembles a kind of pedestal around the chimney. The joining of slate and metal plate is done using sealant.
Roof integrity must be ensured
If you want to simplify the task, then the chimney will not be difficult to make using steel sandwich pipes. They have a stylish look and are easy to assemble. In addition, they have much less weight than brick and will not create as much pressure on the foundation.
When determining the required height of the chimney, be guided not only by the height of the roof, but also by the height of the ridge.
The efficiency of heating the room and the presence of draft directly depend on correctly calculated parameters.
The edge of the pipe must protrude above the “ridge” of the roof by at least 0.5 meters, otherwise the turbulence that forms around the roof can prevent good draft and will constantly blow cold air into the chimney.
We complete the construction of the chimney with a metal grate. It will prevent debris from entering the chimney.
We put a metal cap on top, which reliably protects the pipe from precipitation.
Step 7. Furnace lining
There are many ways to beautifully veneer a stove for a summer cottage.
The decorative material can be clinker tiles, tiled tiles, decorative plaster, artificial stone, etc.
Or you can simply leave the stove in its original form, especially if you bought high-quality, beautiful brick.
Keep in mind that any facing material reduces heat transfer. Therefore, if you do not want to lose thermal properties, you can cover the stove with a thin layer of decorative plaster.
Step 8. Lighting the stove
After completely lining the furnace, you need to take a technological break for 10-14 days until the structure is completely dried. Leave the door wide open.
When you are sure that the masonry mortar is completely dry, you can carry out the first test firing of the stove. There is no need to rush and immediately, after laying, light the firewood.
Premature lighting of a damp stove can cause it to crack. For the first time, use ¼ of the firewood, add small logs. This will allow the structure to dry well from the inside. Do not exceed the maximum temperature of 60-65 degrees in the first week of operation.
For ease of use of a country stove, you can make a stylish firewood rack with your own hands, which will become a decorative and functional element in your home.
As you can see, if you follow a clear ordering scheme, it is not so difficult to build a beautiful and high-quality country stove.
Video: Laying a brick kiln “dry”
Below we provide a detailed master class on laying a brick stove for a summer cottage.
Where is the best place to put the oven?
With proper placement, there will be enough heat for the whole house and cooking will be comfortable. Even at the stage of designing a wood-burning stove for a brick home, you need to take into account its purpose. This will determine how it fits into the design of the room and how much space is left for a dining or relaxation area.
Heating brick stoves for the home are placed entirely indoors. If one or two sides of the masonry support the wall facing the street, then not only the house receives heat. To heat several rooms, the stove is placed in the wall between them. The front part will be in the room, and the laying of firewood and maintenance work will be carried out from the kitchen. A large Russian stove with a stove bench and stove has exactly this principle of placement.
If the stove is designed to heat one room, there should be a distance of at least one and a half meters between it and the wall. This is necessary for maximum heat transfer.
A brick stove requires more maintenance, but this is compensated by its unique advantages and capabilities.