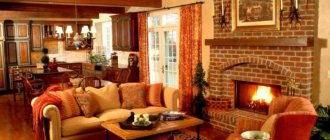
The hearth is the heart of buildings not connected to centralized networks. It generates the heat necessary for life and provides energy for cooking. The microclimate in the building and its service life directly depend on its productivity and efficiency, and these are very important factors in the operation of the unit, don’t you agree?
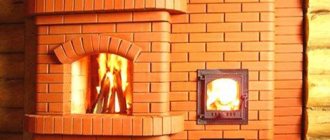
The article we presented describes in detail how to competently build a brick stove for your home. Schemes for building a home are given, and technological nuances are thoroughly analyzed. We offer carefully selected, scrupulously verified, practice-proven information on the selection and installation of brick stoves.
Beginning stove makers and country property owners who want to supervise the work of hired craftsmen will be helped by the information we offer, based on construction requirements. Photographic images and video tutorials will be an excellent help in mastering the material.
The design of a unit capable of warming and feeding
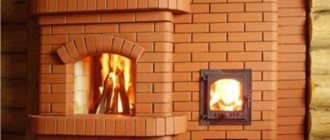
The industrial heating and cooking stove is very different from its classic predecessor. In it, the designers managed to combine the following functions:
- Heating unit
- Fireplace
- Hob
This allowed us to save a lot of space, fuel and costs for purchasing decorative elements. After all, a modern oven has small dimensions, is multifunctional in terms of cooking and can become the main element of any design.
Such units have become an integral attribute of country life, thanks to the successful combination of several functions. The fuel for them can be firewood, peat and even coal. Of course, wood-burning stoves are most often used, due to the availability and low price of wood waste.
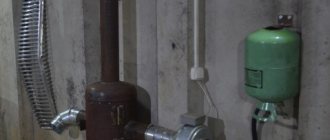
Heating and cooking stoves can be used to heat several rooms. In this case, air ducts or models with a water circuit are used, which are connected to the heating system. And even despite the fairly high cost, their use is economically justified, since by purchasing the unit you will not have to purchase another stove and fireplace. But there is also an opportunity to save money; if the heating and cooking stove is assembled with your own hands, then its cost will reach a minimum value.
This equipment also has its own peculiarity. Unlike standard devices, which are not capable of maintaining heat in a room for a long time, these models can operate for up to 10 hours in smoldering mode, thereby not reducing the air temperature.
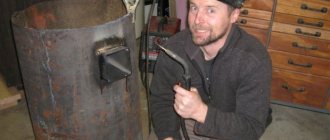
Structurally, they are a metal unit that runs on solid fuel. And the operating principle of this model is based on the process of pyrolysis. This allows you to use firewood economically with a guaranteed high level of efficiency.
But despite the peculiarities of their functioning, almost anyone can assemble heating and cooking stoves with their own hands. It won't take much time or cost much, so the choice is yours. The only thing you need to do is find the instructions for heating and cooking stoves online and carry out all masonry work in accordance with them.
Smoke circulation options for brick stoves
The efficiency of a wood-burning stove largely depends on the type of its chimney. Properly organized movement of smoke gases allows you to retain heat and effectively remove fuel combustion products without endangering the health of the occupants of the house.
This design could be:
- with horizontal channels;
- with vertical channels;
- combined.
Based on the direction of movement of flue gases, stoves with smoke circulation are divided into direct-flow and counter-flow. In the second option, the smoke, before flying out into the chimney, makes several revolutions inside one of the smoke chambers. At this time he is moving in two different directions.
The horizontal channel system is not used often. It heats the oven more evenly, but for each horizontal level you will have to make a cleaning door. A modification of such a chimney can be an option with pockets. These cavities will trap smoke for some time and increase the efficiency of the stove.
A horizontal chimney is simple to implement and less susceptible to blowing out than its vertical counterpart. The addition of pockets will make the oven more efficient
Vertical channel . The operating principle of such a chimney was described above as a characteristic feature of a “Dutch” stove. In such a system, less soot accumulates and is easier to clean.
But here the resistance to the movement of the smoke flow increases, so it is necessary to make such a chimney long enough to ensure normal draft. In the vertical version, the first channel warms up more than the others.
In order for the vertical smoke circulation structure to heat up more evenly, it is advisable to expand its central channel, a counterflow is formed here, as a result the room receives more heat
This temperature difference can cause damage to the masonry. To improve the situation, you can arrange a cross-flow option, in which the middle channel is made much wider than the outer ones. The cross section here will be larger, this will slow down the flow rate and make heating more uniform.
A bell-type stove is an alternative to a design with vertical and horizontal smoke circulations. Instead of channels, there is a spacious cavity in which smoke accumulates and, after cooling, moves down and leaves through the chimney. Even after complete combustion of the fuel, the gases in the bell continue to give off heat.
The chimney bell system allows you to retain more heat for a long time. A similar effect can be achieved by creating combined structures using various elements.
Unlike a vertical smoke circulation system, there is no danger of the gases quickly blowing out and the stove cooling down. The dimensions and configuration of the cap may vary.
When designing a stove, you can combine hoods with vertical chimney elements to obtain an effective design and increase efficiency.
What else is important?
The main fuel for fireplace stoves is wood. Logs can be of different sizes, and this must be taken into account. The larger their size, the easier and faster it is to prepare firewood and put it in the firebox. The manufacturer usually indicates the maximum allowable log length, and it is better if in your stove this value is not less than 300 mm. If you go to the store, be sure to take a tape measure with you. With it, you can not only estimate the size of the loaded firewood, but also estimate the volume of the firebox, which manufacturers often do not indicate in the specifications.
- Steel body
- Several modifications of different power;
- There are models with a hob;
- Long burning up to 8 hours;
- Heat transfer by convection;
- Firebox protection;
- Chimney connection from above or behind
- Steel body
- Hob;
- Heat transfer by convection;
- Chimney connection from above or behind
- Cast iron body
- Large firebox;
- Heat transfer by radiation;
- Large glass in the door;
- Clean glass system
- Steel body
- Many cladding options;
- Lining with fireclay bricks;
- There are models with a hob
- Steel body
- Air supply from outside through a separate pipe;
- Lining with fireclay ceramics;
- There is a rotating model;
- Clean glass system
- Cast iron body
- Lining with fire-resistant ceramics;
- “Clean glass” system;
- External air supply
- Cast iron body
- Long burning up to 10 hours;
- Clean glass system
- Cast iron body
- Heat transfer by convection;
- Additional side fuel loading
Fire-battery (TMF, Russia)
The Termofor company (after rebranding in 2022 - TMF) is a Novosibirsk manufacturer of stove equipment for home, garden and bathhouses. Positions itself as No. 1 in Russia. One of the company’s know-how is the development of the Fire-Battery steel stove. According to the manufacturer, when creating this long-burning model, all the shortcomings of existing designs were taken into account. Available in four modifications: the basic model without additional identifiers - with a cast iron burner, glass in the door; Light is the simplest model, without a hob and a viewing glass in the door. Both options may have an additional water heat exchanger for heating water, then the stove is designated respectively as Fire-battery B or Fire-battery Light B. The power of the equipment varies depending on the size of the housing and the number of sections of the slot convector, which can be 5, 7, 9 or 11 pieces.
The feature of the model is the fine tuning of the draft and a special lock in the ash pan, which prevents uncontrolled air leaks. You can enter the smoldering mode, in which the operation of the furnace from one load is extended to 8 hours. There is a jet to ensure complete combustion of fuel. The chimney vents either backwards or straight up. The model is durable, because it provides replaceable protection for the firebox - inclined intermediate steel sheets are installed in its lower part above the cast-iron grate.
Direct flow heating stoves
Before getting acquainted with this variety, it should be noted that additional design elements of any device also include various valves, doors, ceilings, and a blower chamber.
Stove heating or direct-flow fireplaces have a number of the following distinctive features:
- A chimney of this design is located in a vertical position;
- Russian brick stoves are laid using this principle;
- The disadvantages of the devices include low efficiency;
- Due to the vertical arrangement of the chimney system, most of the heated air masses are immediately discharged to the street at the time of combustion;
- It will take at least three hours to warm up a brick fireplace;
- If necessary, you can find a procedure on the Internet that allows you to build your own stove, complete with a hob on which you can cook food.
Solid fuel stove with heating function and hob for one burner
A small-sized heating stove is suitable for both a summer house and a country house. This variation belongs to the category of the most affordable and accessible.
Principle of operation
The operating principle of stoves operating on wood and electricity is based on the possibility of automatically turning on electric heating elements when the temperature drops (after solid fuel burns out). This happens as follows:
- Kindling and heating of the stove is carried out using firewood. Since the firebox is located at the bottom of the device, it transfers heat from the burning wood to the upper part of the device - to the heat exchanger. An increase in coolant temperature is detected by a sensor installed in the system line;
- when the temperature begins to drop due to fuel burning, the electrical circuit is automatically closed and electric heaters are connected to operation;
- from this moment on, the specified coolant temperature parameters are maintained by the heating elements, based on the readings of the air or water sensor;
- when loading the next batch of solid fuel, the electrical part is automatically switched off, as the coolant is heated
- already from the side of the combustion chamber.
This transition from wood heating to electric heating and vice versa ensures continuous heating of water in the heat exchanger, which allows you to maintain the optimal temperature in the house around the clock.
Wood and electric stoves come in two types:
- single-circuit - connected to the heating system and used only for heating;
- double-circuit - designed to heat the coolant in the heating system and hot water for domestic needs.
Counterflow heating stoves
Stove heating can also be counterflow:
- The device is equipped with a convective system;
- The air begins to warm up at the bottom of the combustion hole. After which it flows up through the lifting channels and again down through the lower ones;
- The layout of such a fireplace with air heating is quite simple and can be done with your own hands. In terms of cost, the unit, like the first type, can be classified as economy class;
- The stove heats up evenly, and the efficiency is high enough to heat a small house.
An additional effect is achieved by equipping the combustion opening with transparent fire-resistant glass
Interesting to know: to give the structure a more aesthetic appearance, we recommend finishing the exterior using facing bricks.
What to consider when purchasing?
Various wood-burning stoves for home and summer cottages are presented in a huge assortment on the market. In order not to get confused by all their diversity, you need to determine the purpose of your purchase. This is the only way to find your ideal stove of a suitable design.
1. Convection wood-burning models.
Suitable for quickly increasing the temperature in one room if you come to the dacha on holidays and weekends and want to immediately warm up. As a rule, these are steel wood-burning stoves that gain maximum power within half an hour, but also cool down quickly after burning out. In order for the device to serve for a long time, you need at least a firebox lining. Some manufacturers use cast iron, others use fireclay slabs. If the basic configuration does not have any of this, you will have to retrofit the stove yourself, otherwise it will not last even 5 years.
2. Heating and cooking.
Functional units that allow you not only to heat the room in which they are located, but also to cook or warm up food. The simplest and most inexpensive stoves such as potbelly stoves are suitable for temporary shelters or as an additional source of heat. But you can buy a serious option with an oven and a built-in water circuit for a private home with permanent residence.
Hybrid appliances that are used in the country all year round are encouraged to have “summer” valves. Only with their help will it be possible to continue to operate wood-burning stoves after winter ends, supplying all the energy to the stove and oven, and not to the heating circuit
However, some models do not allow lighting at all when the heat exchanger is empty, so pay attention to this
3. Country wood-burning fireplaces.
68054cf3a62e00071cf8c19f49d4754c.jpe
c74c3500c243e2caabd1a43932fc2e5a.jpe 98600ae633cd3b75e78e9d6666885efe.jpe
If you add a glazed door and a stylish design to the description of the previous devices, you will get a real stove-fireplace for a summer house. Today, such products are the most popular because they combine all the advantages of wood-burning models. They can be made of cast iron, heat-resistant steel, but combined units are more common.
4. Heating.
Cast iron stoves heat the house mainly due to infrared radiation coming from the walls. Heat-resistant glass on the doors of products stylized as a fireplace gives the same effect. They are perfect for constant heating of large rooms and serve as their decoration. However, this is not enough to heat neighboring rooms - slightly improved models are needed here.
5. Fireplaces with a water circuit.
Another type of decorative heating devices suitable for the main heating of a residential building. Such a serious task is best handled by long-burning stoves that operate around the clock on 3-4 stacks of firewood. What is important here is the large size of the firebox, the power on the heat exchanger and the ability to regulate the air supply.
Cost of models
| power, kWt | Dimensions, mm | Price, rubles | |
| Termofor Cinderella | 4 | 460x300x465 | 6 300 |
| Meta Neva | 6 | 870x640x490 | 24 900 |
| Germa | 13 | 1080x450x645 | 27 200 |
| EcoStove Torn | 7 | 460x610x410 | 28 980 |
| ABX Admiral | 7 – 9 | 1121x486x486 | 132 600 |
| La Nordica TermoCucinotta | 22 | 682x860x653 | 210 000 |
What mortar to use for masonry
The reliability and durability of the finished stove directly depends on the quality of the masonry mortar. The masonry will be carried out using a sand-clay based mortar.
There is nothing complicated in preparing the solution. Take clay, fill it with water and soak it. Sift the mixture through a sieve and then stir into “clay milk.” Finally, add some water to obtain a sufficiently viscous and plastic solution.
Remember, the reliability and strength of the stove directly depends on the correct preparation of the masonry mortar. If you do everything right, the stove will effectively heat your home for many years. Violate the technology or decide to save a lot on materials - the thermal unit is unlikely to be able to fully reveal its potential and stand for any length of time.
Mortar used for laying the stove
Choosing a stove for a country bath
The choice of a heating unit for a steam room has a number of features, and they need to be taken into account:
- The temperature of heated stones is 550-600 degrees. The oven is heated for 4 hours. Among the main disadvantages of the heater stove is its heavy weight and significant dimensions. And also in the cold season, additional heating will be required not only for the steam room, but also for the entire bathhouse.
- An easier way to heat a steam room is to install a stove made of steel or cast iron. Steel structures are inexpensive. Cast iron units retain heat remarkably well, and in addition, do not burn out. Metal appliances have a reservoir for stones. The more of them there are, the more evenly the heat is released and the longer it is retained (read: “How to install a stove in a bathhouse, tips for self-installation”).
Features of metal furnaces:
- they can be melted in less than an hour;
- they are small in size and light in weight;
- cool quickly because they have a low heat capacity;
- emit harsh heat.
Brick stoves installed in bathhouses are subject to certain requirements:
- their kindling cannot take more than 4-5 hours;
- brick stoves for a bath should have high heat capacity, not overheat the steam room and retain heat for a long time;
- It is necessary that the heat generated is soft and pleasant.
Which stove is better for a bath - types of heating sauna stoves Which stove to choose for a summer house, watch the video:
Purpose of the stove in the house
They come in several types.
Previously, when open fires were used for cooking, there could be two stoves in the house - one for cooking, the other for heating. In small houses, universal structures were laid out, simultaneously suitable for domestic needs and heating. Such stoves were built together with the house and were located between the adjacent wall, providing heating for two rooms. The scheme is quite complex and the process of its implementation is labor-intensive, but the conveniences are obvious. It was possible (especially for the summer season) for only the stove to be heated. This made life much easier, because such an attribute in the house needed constant care. It consists of a set of activities performed daily or once or twice a year. With intensive use, the coarse needs to be cleaned from accumulated ash. A large amount of it will interfere with normal air circulation, causing the firewood to not burn completely.
Another nuance in using a brick oven is the cracking of its finish. Experienced users advise not to overheat the surface. The normal temperature is 17-18 degrees, and the features of the brick allow you to retain moisture indoors. Such a microclimate can only be achieved by using a stove; other heating devices often dry out the air, and lower temperatures make the room feel damp and cool.
Constructive decisions
Fireplace stoves are made, in most cases, from steel and cast iron.
Steel - have impressive weight and thick walls. They heat up quickly and cool down just as quickly, designed for small spaces - dachas, country houses.
Cast iron - not much larger in weight, but they take longer to warm up, can heat large rooms, and are more expensive. Cast iron stoves and fireplaces are chosen mainly for home use.
Facing - ceramics, stone, less often - brick. They will quickly heat the room. A sufficiently large viewing glass will allow you to admire the play of fire.
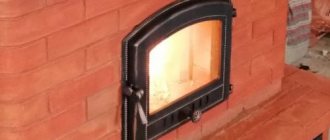
Doors can be straight, semicircular or three-sided. The opening mechanism can also vary - to the side or up. To ensure that the door glass always remains transparent, fireplace stoves have a clean glass option - an air flow is supplied to the glass from the inside, forming an air cushion that prevents soot from settling on the glass. Firewood is also inserted into the combustion chamber through the door. The efficiency of closed fireplace stoves is quite high - 80-90%.
You can control the combustion process and wood consumption yourself by increasing or decreasing the air supply. You can save even more on fuel by using fuel briquettes - compressed sawdust, which are much more efficient in their fuel qualities.
Some models have a built-in heat exchanger in their design. With its help, you can heat adjacent rooms by installing radiators, even if there is a blank partition. It is especially worth noting designs with a water circuit - this is a good solution for permanent residences.
Beauty, comfort, warm home. What else can stoves and fireplaces give you? Delicious dinner. Like a traditional Russian oven, you can cook and heat food in them and even cook shish kebab over an open fire. It’s up to you, of course, to choose a stove or a fireplace, or two in one.
6a438c8c5c28014ff21990d5f9fc2b1e.jpe
784a646852ee9c09e40f45d13d388294.jpe 98d3be78ccb442b6a30969b46295175d.jpe
Fireplace power
To choose the ideal unit for your garden or home, you first need to decide on the power. It will not be difficult to calculate this: based on calculations of 1 kW of energy per 10 sq.m. with a ceiling height of 2.5-2.7 meters.
For example, if the house area is 350 sq.m, you will need a fireplace stove producing 35 kW
It is also worth taking into account the number of window and door openings, rooms - heat in the room constantly circulates as it heats up and cools down. Do not forget about the climatic features of the region in which the building is located
Based on all these parameters, we calculate with a reserve and add another 15-30% to the estimated power (depending on the listed factors).
The most popular wood-burning fireplace stoves are models that have a secondary combustion system, which will dramatically reduce wood consumption. Ceramic cladding allows you to warm up the room even after the fire has died down. Glass also gives off heat. Dark cladding is less of a mark. The manufacturer has a line of stoves made of cast iron.
If all the calculations have been made and you have decided on the type of heating device, let’s consider the most popular models in this segment.
VIDEO: Operating principle and difference from the Russian stove
Preparatory activities before display
To properly install this stove, you need to learn about the key points of preparatory activities.
To install the stove you will need these tools and materials:
- Shovel and bayonet shovels.
- Metal rods.
- Formwork.
- Polyethylene.
- Cement solution.
- Sand.
After preparing all the material and tools, you need to start preparing the place for the stove. This process is carried out in several stages:
- Preparing the pit - the size should correspond to one meter in length (sometimes one and a half) and one meter in width. The depth should be eighty centimeters.
- Sand – the bottom of the pit must be covered with sand. Sand should occupy about fifteen centimeters of the bottom.
- Rest - it is necessary to give the coating some time to compact. You need to wait about two days.
- Formwork – you need to make formwork from plywood or any other boards you don’t need.
- Reinforcement is carried out using steel rods.
- Cement - the solution is distributed in an even layer, without bubbles and other unnecessary worries.
After all these activities, you need to leave it all for a certain period of time for the mortar and foundation to harden.
Negative qualities
Cast iron stoves are not without their drawbacks. Among them the following are noted:
- Fragility. This applies to almost all similar products. The material has a high fragility factor and therefore requires careful handling. He is afraid of strong blows and falls.
- Large mass. For example, a 9 kW oven weighs approximately 70 kg. In a private home, to install such a device, you need to make a reliable foundation.
- Instability to sudden temperature changes. When lighting the stove, no damage occurs, since the device heats up and cools down gradually. But if cold water accidentally hits a hot surface, the cast iron may crack.
- Price. Of course, the cost is much higher than other analogues. However, this is justified: the product is highly reliable and designed for long-term operation.
- Fire safety. Storing flammable materials near such a stove is prohibited. They can catch fire from the high temperature of the walls of the unit.
- Nuances of operation. The room in which the cast iron stove is installed should not have high humidity. Because of this, rust may appear. Any damage requires immediate repair. Models from foreign manufacturers are heated only with pellets or peat, so there is no need to put long logs in them.
Furnace fuel
The fuel for long-burning stoves is wood with a moisture content of no more than 20% - this can be whole logs of the same length, waste from the wood processing industry, wood chips and other lumber. In addition, pellets, fuel briquettes, and coal are used. For this type of furnace, it is better to choose brown coal, since other types are more energy-intensive, which can lead to burnout of the surfaces of the walls of the device, especially if the furnace is made in a combined version, that is, assembled from different materials, and steel is used as the walls of the firebox.
The quality of heating is greatly influenced by the moisture content of the fuel, since damp wood significantly reduces the efficiency of the device and also contributes to the formation of soot deposits on the walls of the chimney. In addition, the pyrolysis processes in such wood are defective.
Heating in the country and requirements for it
Heating of a country house differs primarily in that it is periodic. Most people go to their dacha only on weekends and holidays. It is not always advisable to heat a country house constantly and install expensive gas or universal boilers for this. It is easier and more efficient to use a wood stove or an electric boiler to heat the dacha.
- The following requirements apply to heating devices for summer cottages:
- quick heating of all rooms even from sub-zero temperatures;
- simple ignition of the stove or starting the boiler from a cold state;
- the ability to maintain a comfortable temperature for a long time with minimal maintenance;
- low price of equipment;
- small dimensions and weight;
- easy installation and installation.
Wood-burning stoves equipped with a long-burning function, as well as simple models of electric boilers, meet these requirements.
What to choose from: types of stove equipment for a summer residence
Information about the efficiency and features of popular stoves for summer cottages will help you decide on the choice of heating equipment. It is installed once and for many years, so the choice is approached thoughtfully and thoroughly.
The choice of stove must be approached carefully
Russian
A real Russian stove is a large and heavy structure that requires a spacious room. Today, the original Russian model has been modernized to suit modern conditions and has smaller geometric parameters, but still efficiently heats large areas.
Russian stoves are equipped with stoves, ovens and stove benches. The efficiency of brick structures of this model is high, at least 75%. The peculiarity of the stove lies in its design, consisting of a system of channels and a chimney. Therefore, it heats up quickly, accumulates heat and gradually releases it, thereby maintaining a stable temperature in the room.
The original Russian stove model has been modernized to suit modern conditions.
Dutch
The Dutch oven is one of the most efficient and therefore popular country stoves. Its design has its own characteristics:
- a winding system of channels located one above the other;
- lack of grate;
- variety of furnace body shapes: round, semicircular, rectangular, with protrusions;
- The walls are laid using 1 brick, which results in low weight.
The Dutch oven quickly warms up the room and retains heat for a long time. It features economical fuel consumption. Can be equipped with a stove and a bench.
3cd8b61881a6967e1f08dde8b9fb9536.jpe
The oven can be equipped with a cooking plate
Brick Swede
The Swede is an impressive and cozy stove, the efficiency of which is at least 60%. The structure is lightweight and therefore does not require a large amount of materials for construction. The Swede is one of the best stoves for heating country houses and residential buildings. Ideal for small buildings, suitable for year-round heating.
With water circuit
The main “minus” of any stationary stove is weak heating of remote areas of the building. The problem is solved by installing a heating system consisting of a heat source, piping and radiators. The system can be single-circuit or double-circuit, but in any case it requires a coolant with a constant temperature.
The system can have one or two circuits
Furnaces with a water circuit are designed to solve this problem. The design of this heating equipment includes a boiler - a container of water that is heated by the stove and fills the pipeline. Circulation is provided by a special pump. A stove of this type can be brick or metal. Regardless of the material of manufacture, this is the best choice for heating a summer house.
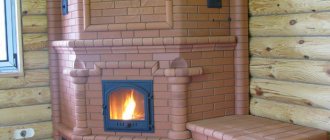
Stove-fireplace
The fireplace stove is highly decorative and attracts with the ability to feel the warmth of a live fire and enjoy it. There are a large number of models of structures of this type. You can choose the most suitable one in terms of power and visual appeal.
There are various designs of fireplace stoves on the market.
Small-sized potbelly stoves
A potbelly stove is a small metal stove for a summer residence, characterized by ease of assembly and installation. Most infrequently visited country houses are equipped with just such stoves. They are quite economical, easy to maintain, and can heat a small room well.
With hob
Models with hobs are the most convenient to use. The ability to cook food on a stove allows you to save electricity and will help you out when there is no electricity. Therefore, practical summer residents choose just such multifunctional heating equipment.
These ovens are very easy to use.
Long-burning stoves for summer cottages
Such furnaces are otherwise called “pyrolysis”, since they operate on the principle of producing pyrolysis gases and secondary combustion of fuel. The work flow is as follows:
- the firebox is filled with fuel;
- Wood chips and fire paper are placed on top of the firewood;
- they set fire to wood;
- when they flare up, they almost completely block the access of oxygen to the firebox;
- the resulting pyrolysis gas rises upward into the afterburner;
- in the chamber, the gas ignites with the release of heat, which ensures double use of one portion of fuel.
Such stoves are beneficial in all respects. They are more expensive than usual, but quickly pay for themselves.
Pyrolysis ovens - a profitable purchase
Special requirements
We repeat: the advantages are simple - compactness and the ability to build in an existing house without major construction work. But it is not so easy to place a more powerful firebox in a furnace structure of generally the same dimensions; from excessive heat load it will quickly become unusable. If special requirements are not met:
- Furnace foundation.
- Masonry mortars.
- Methods of laying the structure of the furnace.
- The choice and methods of installing stove fittings.
The design of the foundation for the rough is shown in Fig. The crushed stone cushion without sand bedding is leveled to the horizon before pouring. Pouring mortar M150 – cement M300 and sand 1:2. The gap between the rubble foundation and the flooring is 30-40 mm. Don't forget to support the cut joists! Leaving their ends hanging is a common but serious mistake. The dimensions of the foundation in plan should protrude onto the contour of the furnace by at least 100-150 mm.
Construction of the furnace foundation - rough
Note: the brick bed on the foundation under the furnace is laid out with bandaging in the rows and between the rows in the same way as the first 2 rows of masonry for the furnace structure, see below.
To fold the rough, 3 types of solutions are used, see fig. below. The bed on the foundation and the chimney are laid out on lime mortar as it combines sufficient heat and moisture resistance, but the rubble must be laid only on a completely moisture-resistant cement-sand mortar. It is highly advisable to use mountain or ravine sand with rough grains for clay mortar. Ordinary clay - purchased from the oven, guaranteed fat content and, most importantly, purity. Self-excavated clay, brought to the required fat content with sand, is of little use for coarse masonry.
Compositions of masonry mortars for coarse stoves
For rough masonry, stove bricks and, if the order (see below) is provided for, fireclay bricks are used; red worker is of the highest quality - light red in color (fully annealed), without burn marks, distortion and swelling. Dry molded brick is absolutely unsuitable. The masonry of the structure is roughly carried out following the trail. rules:
- If you are an inexperienced stove maker, each row of masonry is first laid out dry; detected defects in cutting/chipping bricks are eliminated.
- Before laying on the mortar, each brick is soaked until the release of air bubbles stops. You can’t dump all the bricks into a barrel indiscriminately!
- A 5 mm layer of mortar is applied to the bed and the base of the brick being laid.
- The brick being laid is laid with a smooth movement, slightly tilted, and moved towards the previous one so that there are no air bubbles left in the seam.
- The brick is pressed until the seam comes together to 3 mm; You can't knock!
- Between fireclay and ordinary masonry, the initial seam is 8-10 mm; after pressing – 6 mm.
- The seam between bricks and metal embedded parts (see below) is 10 mm.
- Excess mortar squeezed out of the seam is removed with a trowel (trowel).
- The recesses in the seams found after removing excess mortar are filled with mortar by pressing without transverse movements, but not by rubbing!
Those who prefer to learn visually can watch a video tutorial on laying heating and cooking stoves below:
Video: laying a heating and cooking stove
Incorrect oven door installation
Fittings and grates for roughing require cast iron; doors and latches - with an installation skirt and holes in it for diagonal wire whiskers. Welded steel or cast iron fittings with eyes for straight lugs (laid along the corresponding furnace wall) are unsuitable in this case. However, install the doors/latches as in Fig. on the right, in the rough it is impossible; This is not according to stove rules at all. For a Dutch country house with 2.5 bricks in plan, which is heated once or twice a season, it may be fine, but not for a rough one.
It is necessary, firstly, to crimp the mustache (galvanized wire 2-3 mm) with a twist so that it does not move. Press not too tightly at first, place it at the desired angle (at least 12 mm should remain from the far end of the mustache to the inside of the masonry). Then tighten carefully and shake the door/latch slightly. Didn't leave? Good. Then, secondly, you need to tightly wrap the skirt with asbestos cord (or basalt fiber), and only now put it in place. You can also watch the following videos about installing accessories into the oven.
Features of installing a cast iron stove
A few words need to be said about the features of installation work on installing a long-burning cast iron stove and preparation for it.
The installation of a cast iron appliance itself is not particularly difficult, with the exception of transportation - due to the large weight of the unit. However, before buying it, much less installing it, you need to carry out preparatory measures:
- To choose the right device, you need to collect some data - this is the size of the heated area, it is necessary to determine the power of the stove. In addition, you need to take into account the height of the ceilings of the rooms.
- Next, you need to draw up a plan of the room where the stove will be installed and the attic floors located above it. The last parameter will be needed if the chimney will go outside through the attic floor and roof.
- Having received all the data, you can go to the store to buy the device and all the additional accessories that are necessary for its installation. Very often, for such an installation, sandwich chimney kits are purchased - they are perfect for devices of this type.
The site for future installation of a cast iron stove must be prepared accordingly
- Next, you need to prepare the place where the stove will be installed. To do this, the walls and floors are finished with ceramic tiles, bricks, artificial stone, or the surfaces are sheathed with non-flammable material - this can be asbestos (for residential premises - not recommended) or plasterboard. Drywall must have a heat resistance designation - GKLVO. A screen can be installed on the wall using these materials. If necessary, the ceiling under the flooring is reinforced, and their surface is leveled with a screed, and then decorated with ceramic floor tiles.
- The stove is installed on a prepared surface, leveled to the building level. All chimney pipe connections are sealed with a special heat-resistant sealant. The material from which it is made is heat-resistant silicone. Additionally, it will be necessary to insulate all chimney penetrations through walls or ceilings.
- The section of the chimney located on the street must be insulated, or special sandwich pipes that already have an insulating layer must be used for its installation.
- If a cast iron stove will be installed in a wooden house, then in addition to arranging the installation site with heat-resistant materials. a number of certain rules must be followed. Such requirements include:
— the combustion chamber must be of a closed type with heating of gases no more than 400 degrees;
— the outer surface of the chimney should not heat above 85 degrees, and in passages through ceilings or walls, the pipe is separated from them by heat-resistant insulation with a width of at least 100-150 mm.
Do-it-yourself brick oven for a home: masonry process with photos
The question of how to build a brick stove for a home with your own hands continues to be relevant today, since comfort and warmth have always remained important conditions for a person to have a good rest after a busy day at work. Therefore, recently more and more city residents are moving from panel high-rise buildings to private houses, where it is possible to create a comfortable environment at any time of the year.
Do-it-yourself brick oven for your home
Due to the demand for various models of furnaces, engineers continue to develop new options suitable for buildings with different areas. It should be noted that even when all the “blessings of civilization” are present in the house, a small cozy stove will never be superfluous and will help out in various situations. For example, it can be heated on cold spring or autumn evenings, when it is humid or raining outside, without starting the heating system. Such a structure will help create an optimal balance of temperature and humidity in the house, which will be comfortable for a person. In addition, the oven will be an excellent assistant in cooking or drying vegetables, herbs and fruits.
Since there are a large number of different models of heating structures, you should choose stoves with the most accessible, easy-to-read diagrams for DIY installation, especially if you have little or even no experience in this craft. Naturally, it is necessary to take into account other factors that directly affect the efficiency of the stove - its power, dimensional parameters, functionality, and also the aesthetic appearance is also important. And in order to choose the right stove model, you need to consider the criteria that you need to focus on when determining the desired option.
How to choose the best oven option?
Choosing a furnace installation location
In order for the furnace to be fireproof, efficient, and its power to be used to the maximum extent possible, this structure must be installed correctly, taking into account some nuances.
- Firstly, it is decided how much area can be allocated for installing the stove.
- Then, you need to decide on a specific location:
— the stove is installed in the center of the room, dividing it into separate zones;
— built into the walls, between two or three rooms;
- erected near the wall, with a distance of 250÷300 mm from it, if you need to heat only one room. However, it must be taken into account that this option is the most losing, since most of the heat generated by the rear walls will not be fully used.
Several options for placing the stove in the house
- Having chosen an approximate location, you need to immediately mark it, starting from the ceiling, using a plumb line, since the chimney pipe must pass through the attic floor between the beams and rafters, and at a distance from them of at least 120÷150 mm.
- When allocating an area for the furnace, it is taken into account that for its foundation it is necessary to provide more space than its base, by 100–150 mm on each of its sides.
- To avoid any problems with regulatory organizations, when choosing an installation location, you need to take into account not only the recommendations presented above, but also the standards developed by specialists and specified in SNiP 41-01-2003.
Calculation of the required power and assessment of firewood consumption
A furnace will not be efficient and will not be able to heat your home if it is not powerful enough for a particular area. This also takes into account the winter temperatures of the region where the heated building is located, the number of windows and doors in it, the level of insulation of walls and floors, ceiling height and many other conditions.
For example, the higher the ceiling, the larger the volume of air will have to be heated, and the larger the glass area, the faster the heat will leave the house, which means you will have to choose a stove with increased power. Typically, for buildings with non-standard glazing and other parameters that do not fall under the average statistical level, calculations must be made by a specialist individually, based on the specific characteristics of the house.
But in general, you can rely on average values. Thus, for well-insulated houses with conventional glazing, with an area of 50 to 100 m², with a ceiling height of 2.5 to 2.7 m, the following thermal power standards per unit area (Wsp) are acceptable:
| Region of Russia in which construction is taking place | The specific power of the heating system, Wsp (W/m²) |
| Southern regions of the country (North Caucasus, Caspian, Azov, Black Sea regions | 70 ÷ 90 |
| Central Black Earth Region, Southern Volga Region | 100 ÷ 120 |
| Central regions of the European part, Primorye | 120÷ 150 |
| Northern regions of the European part, Urals, Siberia | 160 ÷ 200 |
This value can be found out more accurately from your local construction organization. And for those who like to do their own calculations, we can recommend a more detailed and fairly accurate algorithm.
How to accurately calculate the required thermal power?
Each room is unique in its own way, and heating two seemingly equal rooms may require different amounts of thermal energy. The methodology for calculating the power of heating equipment is set out in a special publication on our portal dedicated to the selection of heating boilers .
Having data for a specific region and the size of the heated area (S), the furnace power for it is calculated using the formula:
Wsum = S (m²) × Wsp (kW/m²)
For example, we can consider the power of a furnace for a brick house located in the central part of Russia and having an area of 75 m² .
Wsum = 75 × 0.14 = 10.5 kW
Typically, stove developers immediately indicate the thermal power of their designs. True, other units of measurement are often found - kilocalories per hour or megajoules. It’s not scary - they can be easily converted into watts and kilowatts:
| W | kcal | MJ | |
| 1 W | 1 | 0.859845227859 ≈ 0,86 | 0,036 |
| 1 kcal | 1.163 | 1 | 0,042 |
| 1 MJ | 277.77 | 238.85 | 1 |
In our case, for example, the calculated power in kilocalories will be equal to:
10500 × 0.86 = 9030 kcal/hour
Now you can calculate the efficiency of the future stove, which largely depends on the quality and type of wood used as fuel. At the same time, we must not forget that usually brick wood-burning stoves are not characterized by high efficiency. It is usually estimated at around 70%. If there is data for a specific oven model, then a specific value is substituted.
Each type of solid fuel has its own calorific value - the amount of thermal energy that is released when burning 1 kilogram. It is clear that only bulk fuels - coal or briquettes - are usually measured in kilograms and tons, and firewood is usually measured in storage cubic meters. This indicator thus depends on the specific density of a particular type of wood. Indicators of the energy potential (based on mass and storage volume) of the main types of solid fuel are shown in the table.
| Wood type | Average calorific value of dry firewood by mass, Qm (kW/kg) | Average calorific value of dry firewood by storage volume, Qv (kW/m³) (for coal and briquettes - kW/t) | The same applies to damp wood (which has not undergone at least a one-year drying cycle) |
| Firewood: | |||
| Beech | 4.2 | 2200 | 1930 |
| Oak | 4.2 | 2100 | 1850 |
| Ash | 4.2 | 2100 | 1850 |
| Rowan | 4.2 | 2100 | 1850 |
| Birch | 4.3 | 1900 | 1670 |
| Elm | 4.1 | 1900 | 1670 |
| Maple | 4.1 | 1900 | 1670 |
| Aspen | 4.1 | 1750 | 1400 |
| Alder | 4.1 | 1500 | 1300 |
| Willow (willow) | 4.1 | 1400 | 1230 |
| Poplar | 4.1 | 1400 | 1230 |
| Pine | 4.4 | 1700 | 1500 |
| Larch | 4.4 | 1700 | 1500 |
| Fir | 4.4 | 1600 | 1400 |
| Spruce | 4.3 | 1400 | 1200 |
| Coal and briquettes: | |||
| Anthracite | 8.1 | 8100 | — |
| Charcoal | 8.6 | 8600 | — |
| Coal | 6.2 | 6200 | — |
| Brown coal | 4.2 | 4200 | — |
| Fuel briquettes | 5.6 | 5600 | — |
| Peat briquettes | 3.4 | 3400 | — |
The calorific value of undried firewood is shown for contrast - how much generated power is lost. Naturally, you should still rely on firewood that has gone through the necessary drying cycle.
Preparing firewood is a serious matter!
In order for the stove to live up to its purpose and serve as long as possible, it should be “fed” with the right fuel. About which firewood is better , about its main characteristics, rules for harvesting, drying and storage - in a special publication on our portal.
The average daily weight consumption of fuel to ensure the necessary heat transfer is determined by the formula:
V(kg)= (Wsum / Qm) × 24 hours
To calculate the volume, everything is the same, but instead of the calorific value by mass Qm, Qv is substituted .
Knowing the daily consumption, it is easy to determine the weekly, monthly and even for the entire expected heating period - in order to have an idea of the upcoming costs of purchasing or procuring the required amount of firewood.
To facilitate independent calculations, below is a convenient calculator, which already contains the necessary ratios. The calculation is carried out for dried wood.
Calculator for calculating the estimated consumption of solid fuel
Go to calculations
Don’t be afraid of too high values - consumption can be significantly lower, since it is designed for the most unfavorable conditions. In fact, on fine, windless days or during thaw periods, significantly less fuel will be consumed. But you need to be ready for anything!
Types of brick wood stoves
Of course, you also need to decide on the type of stove - this criterion is selected depending on what the home owners would like to get from the structure being built, that is, on the desired functionality.
Heating brick stoves for the home are divided into the following types:
- Multifunctional heating and cooking stoves can be called the most popular. Depending on the capabilities implemented in the design, such stoves are used for heating a house, cooking, baking bread, heating water, drying fruits, vegetables and medicinal herbs.
Multifunctional heating and cooking stove
Designs have been developed equipped with a bed, which can easily serve as an additional heated sleeping place.
Heating and cooking models are usually built into the wall between the kitchen and living space. Thus, two problems are solved at once - heating two rooms and providing cooking.
- Stoves intended only for heating are not chosen so often. A pure heating model is often equipped with a water circuit, to which the water heating of the house is connected. Since this structure has a single function, aimed only at heating, they usually try to install it between two, three or even four rooms. The size and power of the structure are selected based on how many rooms are planned to be heated with one stove.
A typical example of a heating stove
It must be said that this version of the stove, if equipped with a large combustion door with transparent glass, can also be used as a real fireplace, since its design allows you to enjoy the play of fire through the glass or open doors of the firebox.
- Cooking stoves are usually compact in size and consist of a cooking section, which includes a stove and oven, and a chimney. One way or another, such a structure gives off heat to one or two rooms, depending on the location, but such a stove is not capable of heating a large area. Most often, such models are installed in small country houses used in the warm season, when even such a compact stove is quite sufficient for heating on cool days or nights.
The main purpose of such a stove is cooking.
The advantage of such models is its simple design, the diagram of which can be understood even by a beginner in the stove craft.
It should be noted that this small stove will not be superfluous not only at the dacha, but also in an ordinary private house, even if it has a gas supply.
Having decided on a stove model that will meet all the necessary parameters, you need to choose the right material for its construction.
Basics of masonry stove construction
Basic materials for laying the furnace
In order for the stove to have a respectable appearance and last as long as possible, you should purchase high-quality material for its construction, and it is unwise to save on this. The main materials are brick and mortar.
- For the main masonry you will need red solid brick. Its quantity is always indicated in the design of a specific furnace model. If finishing with any decorative materials is not intended, then it is necessary to purchase bricks with perfectly even shapes without chips on the edges.
High-quality red brick
For laying surfaces in contact with open fire, fire-resistant fireclay bricks are used, which can withstand temperatures reaching up to 1500 degrees. When heated, this material retains a high temperature for a long time, and thanks to this quality, the oven remains hot for a long time.
Heat-resistant fireclay brick
- It is equally important to choose the right mortar for laying bricks, since the strength, durability, and safety of the stove building depend on it. The traditional method for constructing stoves is clay mortar, which is often made independently.
Ready-made stove mortar in the form of a dry mixture can be purchased in a store.
Nowadays, in specialized stores you can find ready-made dry mixtures intended for the construction of heating structures. This composition contains all the necessary ingredients in the right proportions, and therefore the mixture is easy to use. However, the price of such compositions is quite high, and in order to save money, many craftsmen prefer to extract and purify the necessary components for the solution themselves.
The main ingredient of heat-resistant masonry mortar is clay.
How to find, select and prepare clay for laying stoves , and then make a high-quality solution, is described in detail in a special publication on our portal.
Foundation for the stove
A few words need to be said about the basis for the structure of the furnace, since the reliability and durability of the structure primarily depends on it.
The foundation can be made of different materials and according to different schemes, but in any case, its construction requires a pit that goes deep into the ground by at least 500 mm.
The second condition that must be met is that the base for the stove should never be combined with the foundation of the house.
The stove foundation can be a reinforced concrete structure, which is formed using formwork and reinforcement lattice, and then filled with concrete mortar.
Diagram of one of the furnace foundation options
Another base option consists of concrete, rubble stone and brick. By equipping this foundation, you can save on concrete mortar, since it will be required much less than in the first option. This base consists of the following layers:
1 – In a dug pit, waterproofing is installed on the bottom and walls - a clay castle. The clay layer should be 50÷70 mm.
2 – A sand cushion is poured onto the clay base and compacted well. Its compacted thickness must be at least 100 mm.
3 – The next layer is rubble concrete. To do this, rubble stone is laid in layers on a sand bed, which is poured with concrete mortar. It is very important to ensure that all cavities between the stones are filled with mortar. This way the entire pit is filled to the top.
The foundation must be raised above the ground surface by 150÷200 mm. To do this, formwork made of boards is installed along the edge of the pit. Then, a stone is placed in it and, in the same way, it is filled to the top with concrete, which is leveled using the rule and left to harden. The process of hardening and gaining brand strength is quite long and will take about 20–28 days, depending on the ambient temperature.
4 – After the foundation hardens, a waterproofing material is laid on top of it - roofing felt in two or three layers.
5 – The next stage is masonry from any type of brick or stone - from them walls are raised that are 80÷100 mm smaller than the perimeter of the poured foundation. The size of this part of the base should be equal to the base of the oven.
The internal space between the walls is filled layer by layer with rubble stone, and each layer is also poured with concrete mortar. This process is carried out until the brick formwork is filled to the very top. Then the surface of the solution is leveled and left to dry.
Two more layers of roofing material are laid on top of the finished foundation.
6 – It is recommended to lay the next layer 4÷5 mm thick with felt soaked in a clay solution, which will ensure a tight fit of the first row of the stove masonry to the base.
The foundation is left for 7-10 days to dry and shrink, and only then the furnace is laid.
Pre-laying the oven dry
It is recommended to lay the entire structure of the furnace dry, that is, without mortar, in order to understand the specifics of installing the bricks of each row and gain at least minimal experience in this work, especially if it is being carried out for the first time.
When building a stove without mortar, you need to take into account the thickness of the vertical joints and strictly follow the order. To maintain the thickness of horizontal seams, plastic or wooden calibration strips with a thickness of 5–6 mm are often used.
When making dry masonry, you need to immediately understand the configuration of the internal channels through which combustion products will be directed into the chimney. If a mistake is made in their location, you will have to disassemble the entire folded structure, since there will be no proper draft and smoke will enter the premises.
Having erected the entire furnace dry up to the chimney, the structure is dismantled. If desired, each of the rows can be numbered and stacked in separate piles, immediately adjusting the individual bricks to size and shape.
Such preparatory work will significantly speed up the process of laying the mortar, and in order not to waste time, it can be done during the period when the foundation is gaining strength.
Installation of cast iron stove elements
One cannot fail to mention the correct installation of cast iron stove elements. It is especially important to properly install parts that will come into contact with an open fire - this is the combustion door, hob and sometimes the oven.
Read the review of models of wood-burning cast iron stoves for summer cottages, as well as the characteristics and advantages, from our new article.
As you know, when heated, metal expands significantly, so for cast iron elements it is necessary to provide a seat size 5 mm larger than the size of the part itself in each direction.
Before installing the hob, asbestos strips are laid at the place where it is laid, which will create the necessary conditions for its operation.
Heat-resistant gasket under the hob
Before installation, the furnace door is wrapped around the contour with an asbestos cord, which will also create a thermal gap for the expansion of the metal when it is heated. In order to protect the steel box of an oven or hot water tank from burning, it is also wrapped with asbestos cord.
Installation of doors and metal chambers
The doors are fastened using annealed steel wire, which is fixed to special “ears” located on the back of the door frame, and the ends are embedded in the seam between the bricks. Temporarily, until the door is fixed with masonry, it is supported with stacks of bricks for stability.
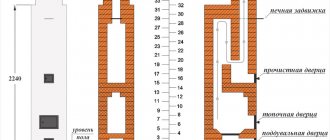
Project of a multifunctional two-bell furnace with ordering
General characteristics of the model
This project, available for implementation, is perfect for installation in a small house. The design of this stove is quite simple and is equipped with several functions, such as a hob and a drying chamber, instead of which it is quite possible to install a water heating tank. Those who decide to install a stove in their home are most often interested in compact, multifunctional designs that can heat as many rooms as possible.
If we compile a list of requirements for furnaces in modern conditions, the following criteria come to the fore:
- The stove must have several functions, that is, it must work not only to heat the house, but also have a hob.
- Compact structure is one of the main requirements for stoves installed today in small private houses. This is especially true for buildings on summer cottages. Therefore, the optimal oven size is 4.5 × 3.5 bricks.
- The heated area for which the structure is designed must be no less than 30 square meters. m.
- Basically, all owners like stoves with arched elements, as they have the most aesthetic and comfortable appearance.
- Simplicity of design is also important, especially for those who are doing this work for the first time.
- The presence of summer and winter operating modes is necessary so that you can economically use the oven for cooking during the warm season.
- It is desirable to have a drying chamber or hot water tank.
- The depth of the combustion chamber should be at least 500 mm, as this is the optimal length of firewood logs.
The presented furnace design meets all the listed requirements, and is based on the design of a two-bell furnace operating on the principle of free circulation of gases.
Diagram of gas movement in a two-bell furnace
This heating and cooking two-bell stove has dimensions of 1140×890 mm, with a height of 2024 mm, and has a heat output of at least 3800÷4000 kcal/hour - suitable for heating an area of 30÷35 m². The efficiency of such a two-bell design reaches 75 ÷ 80%, which is a very good indicator for brick kilns.
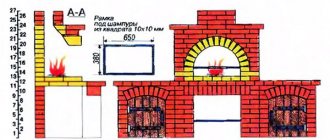
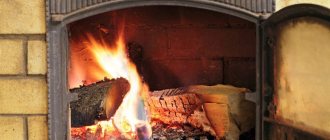
The depth of the combustion chamber of this stove model is 600 mm. It has walls lined with fireclay refractory bricks installed on a “spoon”. The heating structure is equipped with a standard size two-burner hob installed in a cooking chamber with an arched ceiling.
It is the arch that gives the stove an aesthetically pleasing appearance, although it somewhat complicates the work of the master
There is a drying chamber above the arched opening, instead of which some craftsmen prefer to install a water heating tank. An oven is not suitable for installation in this area of the oven, as it will not heat up properly.
It should be noted right away that if someone finds the masonry of the arched structure difficult, then it can be completely replaced with a flat horizontal ceiling of the cooking chamber. To do this you will need to cover it with metal strips and corners.
The stove design has a direct “summer” stroke, which allows it to be used in cooking mode without fully heating the stove, and, accordingly, the entire room, which is very convenient in the summer. In addition, the “summer” valve, depending on its position, increases or decreases the intensity of fuel combustion.
The advantage of this design is its uniform heating, which is very important for the durability and quality of the stove. All ceilings in the oven, except for the cooking chamber, are made without the use of metal elements.
Left-hand and right-hand oven options
The stove is presented in two versions with different locations of the chimney, respectively, and a mirror design, so you can choose from them the one that is more suitable for the specific layout of the house.
Sections of the furnace must be studied in order to have an idea of the configuration of the channels and the location of the hoods in this design
Find out how to build a Russian stove with your own hands with detailed instructions and video instructions from our new article.
Necessary materials
To obtain the desired result, both aesthetically and in terms of the efficiency of the structure, it is recommended to use high-quality bricks with rounded corners for the construction of some elements of the furnace. If for some reason it is not possible to purchase such material, then the corner brick can be processed independently.
So, to build this furnace, excluding masonry mortar, you will need the following materials:
| Name of materials and elements | Amount | Dimensions of elements, mm |
| Red brick M-200 (excluding pipe laying) | 722-725 | 120×250×65 |
| - of which with rounded corners (curly) | 172 | — |
| Fire-resistant fireclay brick, grade Ш-8 | 26-28 | 120×250×65 |
| Fire door | 1 | 210×250 |
| Doors for cleaning channels | 4 | 140×140 |
| Blower door | 1 | 140×250 |
| Summer damper for chimney | 1 | 130×250 |
| Fire valve | 1 | 130×250 |
| Stove valve | 1 | 130×130 |
| Grate | 1 | 250×300 |
| Single burner hob | 1 | 410×710 |
| Steel corner | 2 | 5×50×50×750 |
| Pre-furnace sheet | 1 | 500×700 |
Order and description of masonry work
| Illustration | Brief description of the operation performed |
| The first row is 31½ red bricks. The row is laid out continuous, and it must be perfectly even, as it sets the direction for further laying of the furnace walls. | |
| The second row is 31½ red bricks. This row is also continuous and is laid out in a dressing with the first row. | |
| The third row is 31½ red bricks. This row is also continuous, and the configuration of its masonry is identical to the first row. | |
| Fourth row - 22 red bricks. On this row, the blower chamber and the base of the lower hood begin to form. | |
| The fourth row is a continuation. On the same row, one ash door (140×250 mm) and two cleaning doors (140×140 mm) are installed. | |
| Fifth row - 22½ red bricks. The row is laid out according to the indicated pattern. | |
| Sixth row - 24½ red bricks. On this row, two bricks located above the ash chamber are cut diagonally from above - this is necessary to cover the front part of the ash chamber and its door. In the drawing, the brick sections are shown in orange. | |
| The sixth row is a continuation. Two bricks are laid, cut diagonally on the lower right side. These bricks completely cover the upper part of the ash chamber and its door. | |
| Seventh row - 19 red and 5½ fireclay bricks. The bottom of the combustion chamber is lined with fireclay bricks. Between the red and fireclay bricks, a layer of corrugated cardboard is made, 4–6 mm thick; the height of this material should be equal to the height of the entire fuel chamber. The cardboard burns out during the initial firing of the kiln, and a thermal gap remains between the bricks, which is necessary for the expansion of the fireclay brick when it is heated. After this, a cast iron grate measuring 250x300 mm is installed. The gap between this element and the fireclay brick should be at least 5 mm along its entire perimeter, also for thermal expansion. Two bricks from the back and front sides of the grate are cut obliquely, forming a ramp for combustion products and more intense combustion of fuel. A vertical channel is being formed, which will serve as an exit for smoke from the lower hood to the upper one. | |
| Eighth row - 15 red and 7 fireclay bricks. Fireclay bricks along the edges of the combustion chamber are installed on a spoon (rib). | |
| The eighth row is a continuation. A combustion door measuring 210×250 mm is installed on the same row. | |
| Ninth row - 18½ red bricks. The row is laid out completely according to the indicated pattern. | |
| Tenth row - 18 red and 7 fireclay bricks. The fireclay brick of this row around the fuel chamber is also installed on the edge. | |
| 11th row – 19½ red bricks. In this row, the fuel chamber door begins to close. For this purpose, two bricks are used, cut diagonally from the top - they are laid on both sides of the fire door. In the drawing, the sections are shown in orange. Previously laid fireclay bricks are crossed out with a diagonal stripe. For the passage of smoke in the fuel chamber, a passage leading to the lower hood is left. | |
| 11th row – continuation. The fuel door is closed with a brick cut from the bottom on both sides. | |
| 12th row – 19 red and 6 fireclay bricks. The row is laid out according to the diagram. The walls of the fuel chamber are lined with fireclay bricks installed on a spoon. A passage is left in the wall into the lower cap. | |
| 13th row – 22 red bricks. On this row, the formation of the cooking chamber takes place. The bricks that line the entrance to the cooking chamber are moved forward by 40 mm. Above the fuel chamber along its entire perimeter, a cutout or seat is made in the red bricks for mounting the hob. There must be a gap of 5 mm between the stove and the brick, intended for thermal expansion of the cast iron panel when it is heated. | |
| Row 13 – continuation. On the same row, along the entire perimeter of the area for the hob, asbestos cord or strips impregnated with clay mortar are placed in the cutouts, on which the hob will be mounted. | |
| 14th row – 19 red bricks. The walls of the cooking chamber are being formed. Their bricks will be placed on the hob and between them you need to create a gap of 5 mm by laying strips of asbestos. To prepare for blocking the exit from the fuel chamber, the brick is cut diagonally on one side from above. In the drawing, the slice is shown in orange. | |
| Row 14 – continuation. A brick cut from the bottom blocks the passage from the fuel chamber to the hood located on the left rear side of the hob. | |
| 15th row – 18 red bricks. The walls of the cooking chamber and vertical channels continue to rise. The work is carried out according to the presented scheme. | |
| 16th row – 18½ red bricks. The masonry is carried out in accordance with the order. | |
| 17th row - 16½ red bricks. First, this row is also laid out according to the diagram shown. | |
| 17th row - continuation. You will need 16 red bricks. Next, on the same row, an arched ceiling of the entrance to the cooking chamber is formed. In order to carry out this work accurately, a template is made from plywood with the dimensions indicated in the schematic drawing (radius - 259 mm). The bricks for the arch are cut into a truncated pyramid, the lower part of which should be 44 mm. Arched bricks are installed on edge and move forward relative to the oven walls by 40 mm, just like the bricks in the lower part of the cooking chamber on the 13th row. It should be noted that you don’t have to cut the bricks into a pyramid, but in this case, the seams between them may turn out to be too wide, uneven and sloppy. After the solution has hardened, the template is removed from under the arch. | |
| 18th row – 21½ red bricks. At this stage, the lower cap is closed (only the vertical channel is not closed) and an outlet is formed from the upper part of the lower cap. Along the perimeter of the exit hole, a seat is cut out in the bricks for installing a “summer” direct stroke valve. On the bricks adjacent to the arch, cuts are made diagonally from below so that they fit tightly together and create an even masonry seam. | |
| Row 18 – continuation. Next, a valve measuring 130x250 mm is installed on the same row. Its frame is placed on a clay mortar, while preventing the mortar from accidentally getting into the guide grooves. | |
| 19th row – 15 red bricks. At this stage, the base of the upper furnace hood is formed. The bricks laid along the arch are also trimmed - this procedure is carried out in each row until the arch is completely covered. | |
| 20th row – 16 red bricks. On this row, two sections of the masonry are left open - they are intended for installing cleaning doors at the base of the upper cap of the structure. | |
| Row 20 – continuation. Next, two cleaning doors measuring 140x140 mm are mounted on the same row. | |
| 21st row – 16½ red bricks. The work is carried out according to the presented scheme. | |
| 22nd row – 19 red bricks. On this row, the cleaning doors are blocked with bricks. The covering of the arch is completed - the bricks for this are hewn from below. | |
| Row 22 – continuation. On the same row, in the middle of the space above the cooking chamber, two metal corners measuring 50x50x750 mm are installed - they are pressed against each other with their back walls. They will become the basis for laying the next row of bricks. | |
| 23rd row – 27 red bricks. At this stage, the cooking chamber is closed. Only a hole is left for arranging the exhaust from the chamber. A vertical channel is formed above the “summer” valve. | |
| 24th row – 20½ red bricks. The walls of the drying chamber are formed. The brick adjacent to the exhaust duct is cut from above at an angle of 45 degrees (the cut is shown in orange in the drawing). | |
| 25th row – 20 red bricks. In this row, the brick adjacent to the exhaust duct is cut from above at an angle of 45 degrees and becomes a continuation of the slope of the brick of the previous row. | |
| 26th row – 20 red bricks. The slope of the exhaust hole must be continued, so the brick is also cut at an angle of 45 degrees. The rest of the masonry is done according to the scheme. | |
| 27th row – 20 red bricks. Above the exhaust and vertical ducts, along the entire perimeter, cutouts are made in the bricks to create a seat for mounting the exhaust valves from the cooking chamber and chimney - 130x130 and 130x250 mm. | |
| Row 27 – continuation. Valves are installed - their frames are mounted on a layer of clay mortar. | |
| 28th row – 21 red bricks. The opening of the exhaust duct moves towards the main chimney - for this, the brick installed in the front part of the hood is cut obliquely from below, and the rear brick is cut from above. That is, a passage is formed, located at an angle. | |
| 29th row – 20 red bricks. At this stage, the exhaust duct and chimney are combined. The brick adjacent to the exhaust duct is cut diagonally at an angle of 45 degrees from below. | |
| 30th row – 34 red bricks. The upper hood of the furnace is covered. The bricks are laid with an outward shift, relative to the main masonry, by 40 mm. The brick laid on the brick cut in the previous row is also cut at an angle of 45 degrees, forming a passage on a slope. Two bricks, laid on both sides of the entrance to the drying chamber, are cut at an angle from above and form a place for the middle brick, which will complete the covering of the entrance. | |
| Row 30 – continuation. A middle brick, pre-cut from both sides from below, is installed to cover the drying chamber. | |
| Row 31 – 32½ red bricks. The masonry of this row moves inward by 40 mm, and the perimeter of this row is equal to the main size of the stove. The bricks laid on the sides of the drying chamber are cut diagonally from the top. In this way, the basis for covering the space is prepared. | |
| Row 31 – continuation. Next, three bricks are prepared, on which cuts are made from below on both sides, as shown in the drawing. Then, these bricks cover the drying chamber. | |
| 32nd row – 23 red bricks. This row covers the area of the stove near the chimney duct with another layer. On the front side of the kiln, the bricks of the row are moved inward by 80 mm, and on the left side - by 1⅓ bricks. | |
| 33rd row – 5 red bricks. The chimney pipe channel is laid. | |
| 34th row - 5 red bricks are placed in a bandage to the previous row. This row becomes the basis for further laying of the mounted chimney pipe. |
The work of a stove maker these days is not cheap. So, after carefully studying the project and the order of masonry, you can try to carry out this process yourself. In addition to the fact that a decent amount will be saved, a certain skill in the stove business will appear, which will not be superfluous for any owner of a private home.
At the end of the publication, there is a video lesson from a professional with tips on how to properly lay a brick oven:
Video: laying a two-bell furnace - part 1.
Video: laying a two-bell furnace - part 2.
Stoves for heating summer cottages
The range of heating stoves is wide, it’s easy to get confused, so even before going to the store you need to clearly understand what functions the stove should have. To do this, it is worth understanding the capabilities of heating units.
96be7b255fe7a372957510ef0493aadd.jpe 70160cf0235ae453a8e2744ed1d3e6b1.jpe
Power
The most important characteristic, the wrong choice of which will make the stove ineffective. All heating devices have a certain thermal power, it is expressed in kW. For a normally insulated residential building, the calculation is usually made by area: divide the total number of square meters of the house by 10 and get the required power in kW.
For a country house, this calculation is not entirely suitable. When selecting power, the following subtleties must be taken into account:
- material of walls, floors and ceilings and its thermal insulation properties;
- seasonality - will the house be used in winter, or is heating needed only on cool days in spring, summer and autumn.
The greatest power of the stove will be required if the house is made using lightweight technology, and visits to the dacha are planned in winter, in frosty conditions. In this case, it is necessary to choose a stove with a power greater than the calculated one or install additional heating devices.
Long burning mode
Some wood-burning stoves can operate in a long-burning mode. It is due to a special combustion mode of fuel - pyrolysis. Pyrolysis stoves can operate on wood or pellets. When ignited, the firewood heats up, and the process of decomposition begins into a solid fraction - coals and ash, and a gaseous fraction - smoke.
Flue gases contain many combustible elements; in conventional stoves they are not completely used and exit through the chimney, heating it greatly and releasing heat into the atmosphere. Thus, the thermal resource is used at best by 60%.
In stoves equipped with a long-burning mode, flue gases are burned in a special zone, it is called smoke circulation. The smoke passes through these channels, and its combustible components burn, giving off heat to the walls of the stove.
For this process to proceed successfully, it is necessary to limit the flow of air into the firebox in order to cause smoldering of the wood and increased formation of smoke. It is adjusted using a valve on the combustion door, and the optimal mode is selected experimentally.
Body and firebox material
- The debate about which stove is better, cast iron or steel, has been going on for a long time. What is the difference?
- Weight. Cast iron models have thicker walls and a massive structure, so they are heavier, their weight can exceed 250 kg. If the floor in the country house is wooden, it may need to be strengthened, which will lead to additional costs. Steel models are approximately twice as light.
- Corrosion resistance. Cast iron is not subject to corrosion in a slightly acidic environment - for stoves used periodically, this is a big plus. The temperature difference during kindling leads to the formation of condensation in the firebox. Mixing with soot deposited on them, water forms weak carbonic acid. Steel structures corrode under these conditions.
- Burnout resistance. Due to their thick walls, cast iron models are more resistant to burning even at very high temperatures.
- Price. Steel models are 1.5-2 times cheaper than cast iron ones.
Inexpensive models popular among summer residents are usually combined. The highly heated and corrosion-prone surfaces in them are made of cast iron, the remaining structural elements are made of steel, which allows them to combine durability and low weight. The price of such devices is in the average range.
Additional functions
The main task of heating stoves is to quickly warm up the house
- . Depending on the model, they may be equipped with additional useful features:
- hob, solid or with burners;
- possibility of connecting a heating circuit, water or air;
- decorative elements that allow you to create a cozy atmosphere at the dacha - panoramic glass in the fire door, decorative inserts, forged grilles.
Whether these functions are needed or not is a matter of personal preference, but it is worth considering that their presence affects the price of the stove.
Methods and order of masonry
Making masonry
Furnace laying can be done in various ways. This can be masonry with empty seams or undercut masonry.
Attention: These methods differ radically. When laying under trim, the seams are completely filled, and such a stove is not plastered
The thickness of the furnace walls can be brick or half-brick.
For laying stoves, only red solid bricks should be used. In this case, you cannot use used bricks, slotted bricks or other building materials not intended for this purpose.
The masonry technology consists of several stages:
We cover the foundation with a layer of waterproofing. It could be a simple roofing material. We make the basement part. Its height is determined individually. Just don't make it too high. It is made with continuous masonry without voids.
Lay out the stove base
- The first row can be laid with bricks, without using mortar. After this, the bricks are leveled and the location of the front wall and the location of all the doors are determined. After this, masonry continues, but using mortar. As a rule, a solution of ordinary clay is used for laying stoves.
- Then you can install vertical beacons using plumbs and ropes or fishing line.
- Elements of the furnace, such as a blower, an ash pan or a combustion chamber, are located depending on the design of the furnace. As a rule, the ash pit is located after the third row of masonry, and one row after it is the ash pit.
- Then the firebox is laid out. The firebox door and blower are secured using soft wire.
- Next in line is the stove vault, which is formed after the second row of bricks laid above the firebox.
We make the combustion chamber only from refractory bricks
The combustion chamber is lined with refractory bricks. To increase the efficiency of the furnace, it must be equipped with various valves that regulate the flow of heated gases.
Technological order of masonry
The order of laying out the oven is as follows:
- The first row is laid out without mortar and leveled using a building level.
- Bricks are laid out at the corners using mortar and strictly horizontally. After this, the space is filled with bricks using mortar. This will be the first row.
- After laying out the first row, check the evenness of the sides of the oven using a tape measure. If there is a discrepancy, then they are corrected with the help of a mallet, knocking out one or another corner brick.
- After this, you can begin laying out the second row. The laying begins from the corners and continues along the entire perimeter. After the perimeter is laid, the middle of the second row is laid.
- Then, at the corners, between the first and second rows, nails 80 mm long are driven in and using a plumb line, the corner is projected onto the ceiling.
A nail is driven in at the corner projection site and a rope is pulled from below to the ceiling. This operation is performed with all angles.
- The stretched cords will serve as a guide for further work. Subsequent rows, relative to the vertical, will be controlled by stretched cords that define the contour of the future furnace.
- All subsequent rows are laid out in the same way, controlling horizontality using a building level. During laying, you need to make sure that there is no excess mortar, and the walls of the chimney should be wiped with a wet rag every 4-5 rows. In this case, you need to ensure that the solution in these places completely fills the seams.
- The brickwork seams for the stove are made as thin as possible, and the seams are filled 100%. Masonry with thick seams is less durable, as they may partially fall out.
- The laying of the stove is carried out with the bricks tied, otherwise it will not hold. The meaning of the dressing is to ensure that the vertical seam of the next row is located somewhere in the middle of the brick of the previous row. This does not always work out and the vertical seam “walks” from the center of the brick, now to the left, now to the right. This should be constantly monitored and the masonry adjusted so that the center of the vertical row does not extend beyond ¼ of the brick.
- The cut brick is laid outside the chimney duct, since the cut surface is considered weaker and can collapse under the influence of temperature.
Using fireclay bricks
Fireclay brick has excellent resistance to high temperatures and is therefore used to form the combustion chamber.
- Due to different coefficients of thermal expansion, the bricks of the combustion chamber are not tied to the bricks of the stove. There should be a gap of about 5 mm between them.
- When laying out a firebox from fireclay bricks, you can lay out the entire row or, after laying out, line the firebox with fireclay bricks.