Mineral wool is produced in two main types - roll and slab type. The slab version, unlike the roll version, has higher rigidity.
In each of these categories, ordinary mineral wool and foil wool are distinguished, which are moisture resistant and more durable. The choice of a specific type of material depends on the purposes for which it will be used. After all, the answer to the question of how to insulate a wall from the outside with mineral wool differs from how to insulate a wall from the inside. But each technology also has common features.
So, you should remember that before you insulate the walls with mineral wool, you need to install a frame for them. And in any case, you will need to install a waterproofing film.
Features of calculating the dew point in the house
To further secure the thermal insulation design and be completely sure that it will last as long as possible, you need to correctly calculate the dew point in the room. In most cases, humidity levels inside the room are an order of magnitude higher than outside, so streams of steam tend to escape outside. As steam travels this path, it passes the dew point, that is, the temperature zone at which condensation forms. If the dew point is as close as possible to the inner wall surface, then this does not threaten the mineral wool. If the point of condensation formation shifts inside the walls, then they freeze and humidity rushes into the room, damaging the thermal insulation material along the way. In such a situation, high-quality vapor barrier is vital.
What you need to prepare to insulate a house with mineral wool
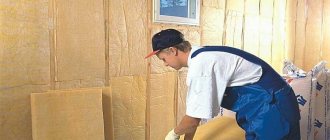
In addition to the mineral wool mats, you need to prepare two layers of film - waterproofing and for wind and water protection.
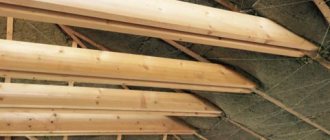
The first layer of film will protect the wood from moisture. It is placed on a protected wooden surface. The film must be vapor permeable. The second film is attached after thermal insulation. It protects against moisture that could enter from the outside. After this, the outer part is covered with any cladding, not forgetting to arrange ventilation. There must be a ventilation gap between the cladding and the insulation, which is why the cladding is often called a ventilated façade.
You will also need two layers of antiseptic, fastening brackets, mounting tape, timber for sheathing, anchor nails, a knife for cutting mats, protective gloves and a respirator for working with cotton wool. Siding or corrugated sheeting for cladding, or other material can be chosen depending on your preferences - the market offers a wide variety.
Installation methods
Whatever material you choose for internal wall insulation, it must be covered with a false wall. The only exception can be polystyrene foam, which can be plastered, but that’s not what we’re talking about.
Insulation of the loggia with mineral wool followed by cladding with plastic panels
Since the false wall is attached to a frame rigidly attached to the main wall, it should be used for installing mineral wool. There are two ways to do this.
Mounting on hangers
This method is convenient for installing rolled mineral wool.
The sequence of work is as follows:
- Having made preliminary markings, attach straight hangers for metal profiles to the wall. Fasteners are selected depending on the wall material. The hangers are installed one below the other in increments of 40-60 cm; the horizontal distance between them when facing walls with plasterboard is taken to be 60 cm.
Attaching hangers
- Bend both halves of the hangers forward, giving them a U-shape.
- Measure the height of the wall and cut a strip of mineral wool from the roll with a margin of 10-15 cm.
- Having applied the insulation to the wall with a slight overlap on the ceiling, pierce it with the protruding shelves of the hangers, as if putting it on them.
- Install the next strip so that the edges of the strips fit snugly against each other, leaving no gaps. To do this, you can make a small overlap, then slightly crumple the edge of the second strip and press it into place.
- Next comes the installation of a frame under plasterboard sheets, consisting of horizontal guides and vertical rack profiles. They are attached level to previously installed hangers on top of the insulation.
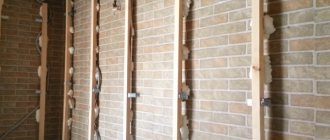
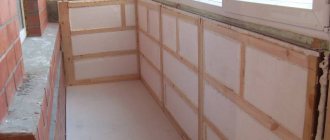
Photo of an insulated wall, ready to be covered with plasterboard
- The insulation should be covered with a vapor barrier film over the profiles. It is overlapped and attached to the profiles with small self-tapping screws.
The foil should face the inside of the room
After completing all this work, you can attach drywall to the frame, followed by puttying the joints and decorative finishing.
If you have already assembled the frame and only then decided to insulate the wall, you should not dismantle it. Rolled or slab mineral wool insulation can be slipped under the racks, still observing the principle of tight installation without gaps. But, since the mineral wool will no longer be held by the hangers, it will be necessary to secure it with horizontal inserts.
Laying into a finished frame
It should be noted that the previous method has one significant drawback: metal hangers in direct contact with the outer wall become cold bridges through which it is transferred to the inner lining. This is one of the reasons why it is preferable to insulate walls with mineral wool from the outside rather than from the inside.
However, this can be avoided if you use wooden blocks as frame elements. This material also has its drawbacks: wood is afraid of moisture, which can cause it to rot, and when temperature changes cause it to warp.
Treating the bars with antiseptic compounds and drying them well before installation helps to minimize the risk of such troubles.
Warming occurs as follows:
- Mount the frame from bars with a cross-section of 40x50 mm.
- Even if you are going to cover the wall with plasterboard, the frame should consist not only of vertical posts, but also of horizontal jumpers on which the insulation will rest.
- Lay mineral wool into the resulting sections of the frame, cutting it to size so that it completely fills the gaps between the bars without gaps.
Mineral wool can be easily cut with a regular sharp knife
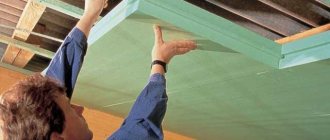
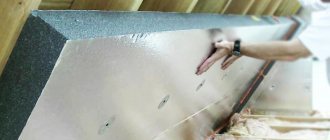
- As in the previous case, stretch a vapor barrier film or foil penofol over the frame, securing them to the bars with a stapler.
There should be no gaps between the vapor barrier strips
The same scheme is used to insulate frame walls with mineral wool. But, since this material absorbs moisture well, while losing its thermal insulation properties, it is necessary to ensure its waterproofing and provide an air gap between it and the outer cladding of the building.
Installation of mineral wool slabs in the frame
We step by step analyze the thermal insulation process
Insulating walls from the inside with mineral wool is not a very complicated process. However, to achieve the desired result, you need to know certain basics. Next, the process will be discussed step by step.
Preparation
Preliminary preparation of walls is the most labor-intensive process. You will need to do the following:
Remove the finishing coating (if any). If the walls are finished with panels (of any type), they can be carefully removed and used in the future. Level the rough surface. If the walls are concrete or brick, it is advisable to put them in order. The most effective and affordable method is a small cement screed. Lagging areas are removed. It is also necessary to achieve level alignment. The walls must be level so that the guide bars can be installed correctly. Then the surface is cleaned from dust and debris. Otherwise, the adhesives will not adhere. Now all surfaces are covered with protective impregnations and antiseptics
This is especially important for wooden buildings, where fungus and mold appear very quickly. When the impregnations have completely dried, a membrane film (or similar moisture-proofing material) is glued to the entire area. The sheets are laid overlapping with an allowance of at least 10 cm
This is necessary in order to prevent the formation of condensation at the joints. For fixation, you can use “liquid nails” or “Moment Universal”. After preliminary setting, it is advisable to shoot all the sheets with staples using a construction stapler. In this case, maximum bonding with the original surface will be ensured.
Creating a frame and laying insulation
Now a frame is created from bars into which mineral wool will be laid. The dimensions of the logs should be equal (approximately) to the expected thickness of the thermal insulation layer. When forming a frame, you must adhere to the following principles:
- The distance between the vertical posts should be 58 cm (the width of the mineral wool roll minus 2 cm). A small allowance is needed so that the mineral wool fits as tightly as possible, without gaps.
- Horizontal racks must be positioned so that they accommodate the joining of gypsum board sheets. Therefore, you will have to write out all the dimensions in advance and draw up a small plan.
- At the edges of the walls (adjacent to the ceiling and floor), bars must be located, regardless of the chosen scheme. This is the right thing to do, because it provides increased structural strength.
- Mineral wool is placed in the created niches. Since the distance between the bars corresponds to the width of the roll, trimming will be minimal. The mineral insulation is attached using a construction stapler. If we are talking about concrete or brick walls, then you will need to use a special glue.
- The entire structure is covered with another moisture-proofing layer. This measure will completely protect the insulation from the effects of condensation (since it will be hidden inside). However, it is not necessary, especially for rooms where there is no high humidity.
Fastening technology
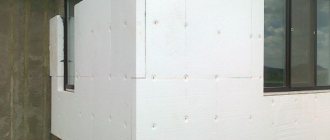
Do-it-yourself fastening of mineral wool slabs to a brick wall, lathing and under clapboard or brick must be done correctly, in a certain sequence and in compliance with all technologies. After calculating the required amount of material and determining the optimal type, you can purchase mineral wool.
Laying mineral wool on the walls outside the building can be done in the following ways:
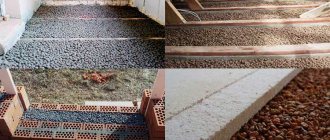
- well system;
- wet method;
- ventilated facade.
The “well” system involves an event in which mineral wool must be laid inside the wall in the gap and between the bricks. It is better to attach insulation to a wooden surface using a ventilated facade. In this case, a frame is installed along the entire perimeter of the structure. Laying the insulation is not difficult even for an inexperienced craftsman, and fastening can be done with dowels “fungi” or glue.
Step-by-step scheme for insulating a wall using mineral wool using the wet method:
- the surface is cleaned of dust and dirt, after which it is necessary to remove depressions and irregularities from it;
- the basement cornice is attached;
- using a special composition, a layer of mineral wool is glued;
- for reliability, the insulation is fixed with dowels;
- a reinforcing layer is applied;
- the surface is properly primed and plastered;
- Can be painted in any color you like.
If for some reason the wet method is not suitable for the master, you can install the mineral wool step by step using a ventilated façade.
- The wall is impregnated with an antiseptic. If there is rot, it is worth using special compounds.
- Remove slopes and platbands.
- The surface is dried throughout the day.
- Lay the membrane layer. In the case of a perfectly flat surface, it may not be needed.
- Self-tapping screws are used to fix wooden slats, the thickness of which must correspond to the dimensions of the mineral wool. The distance between the slats should be 20 mm less than the width of the insulation.
- Cotton wool is placed in the sheathing.
- Fix the material to protect it from water and wind. Fastening can be done using a stapler.
- To create a ventilated gap, counter battens are mounted on top of the sheathing. This type of cladding should be fixed at a distance of 60 mm from the insulating layer.
Upon completion of the above work, new trim and slopes can be installed.
Common mistakes when laying material
- Lack of site preparation before work. Some workers do not first protect windows, doors, and furniture from dust and dirt, after which they become dirty and deformed.
- Ignoring surface preparation before insulation. The presence of defects, unevenness of plaster, mold, efflorescence must be eliminated before insulation begins.
- There are no starting bars that take the load from the mass of the material.
- Incorrect order of installation of slabs. The best order for laying mineral wool is considered to be a checkerboard pattern. In this case, the fixation should be tight.
- Errors in applying the adhesive composition. Such a nuisance may result in bending of the insulation or marking its outline on the finished insulated façade.
- Lack of fastening.
- No weather protection layer. This moment can lead to slow drying of the walls, and the thermal insulation itself will be ineffective.
- Lack of filling of seams at the border of the insulation. As a result, cold bridges form in the wall.
- Ignoring the use of a primer before applying decorative plaster. The result of such an oversight can be improper gluing of the plaster, surface roughness, and the presence of gray gaps.
In order to save on heating in winter, provide housing with optimal temperature conditions in the summer, prevent the formation of mold and mildew, and also soundproof the building, you can use insulation. For this purpose, many craftsmen use mineral wool, which not only has high performance qualities, but is also characterized by an affordable cost.
Mineral wool is a popular, safe material that almost anyone can use to insulate a building.
You can learn how to properly insulate the facade of a house with mineral wool from the video below.
Methods and technology of working with mineral wool for plaster and siding
At the moment, there are several common methods of insulating the facades of private houses using mineral wool. Among them, the most popular are:
- “Wet” facade (under the plaster layer). Initially, the mineral wool must be attached directly to the building itself. After this, plaster is applied to it, which is subsequently painted or decorated in other ways, depending on the preferences of the building owner.
- "Ventilated facade. Often used for insulation under siding. In this case, an air gap is created between the mineral wool fixed to the wall and the outer cladding layer. Its thickness must be calculated using the appropriate formula. To create a gap, an appropriate metal or wooden structure must be attached to the house. Its main purpose is to fix facing materials. This could be lining, tiles, stone, fiber cement boards, etc.
“Wet” facadeVentilated facade
Penoplex is often used in combination with mineral wool. For example, the base is insulated with penoplex, and the walls with mineral wool.
Insulation of the facade of a private house with mineral wool can be done independently without the help of specialists. In order to do this, you need to take a responsible approach to the procedure, prepare all the tools in advance and understand the most important nuances of the work.
Preparation when working with mineral wool with your own hands
The preparatory stage involves performing certain work on the surface of the walls. Be sure to:
- remove peeling plaster;
- remove paint;
- get rid of solution build-up.
Places that have been affected by mold or mildew must be thoroughly cleaned. After this, they need to be treated with appropriate substances.
Preparatory work involves removing window casings, drainpipes and additional decorative elements of facades. After this, the walls must be primed. To do this, use a deep penetration primer.
Surface marking
In order to carry out the insulation process efficiently, it is necessary to mark the surface of the facade. To do this, you should install sags: horizontal, vertical and diagonal. First, pins or nails must be secured at different points on the facades. A nylon cord should be pulled between them as a weight gain. In this case, you should use a level. Weights allow you to identify wall unevenness and install insulation evenly in such places.
Installation of profiles for mini-slabs
Base profiles (or strips) are used as a guide that supports the first row of mineral wool on the facade. In addition, such elements help protect the insulation from rodents penetrating into it from below. For installation of profiles, driven dowels are most often used.
Fixing mineral wool boards
In order to install mineral wool on the facade, you need to use a special construction adhesive designed for such purposes.
It is prepared in accordance with the instructions. The substance should be applied to the mineral wool using a comb spatula. The glue should cover the entire surface of the sheet.
If we are talking about a ventilated façade, then before installing mineral wool on it, you need to secure special brackets in advance, where the guides will subsequently be attached.
The mineral wool itself is attached to disc-shaped dowels or mushroom dowels. Afterwards, holes are cut in the mineral wool so that it can be easily placed on the brackets. And finally, disc-shaped dowels are attached so that the “head” of the dowel holds a couple of mineral wool slabs at once.
For 1 square meter it is necessary to use up to 5-7 disc dowels. It is best to hammer them into the corners of the slabs.
Final work
The roll of mounting mesh must be fixed at the top of the wall. This can be done using pins or mortar. The material sheets must overlap each other by at least 10 centimeters.
It is allowed to perform rough plastering with a thickness of 3 to 5 millimeters. 2-3 days after this, you can begin applying the decorative layer.
How to choose stone wool?
Before purchasing stone wool, you need to find out the amount of material needed and calculate the load that will be placed on the insulation.
We have already said that the prices are high, but you can still save money. The cost will be influenced by the following factors:
- Density of wool;
- Manufacturer;
- Binder and rock category;
- The presence of another layer of coating;
- Quantity purchased.
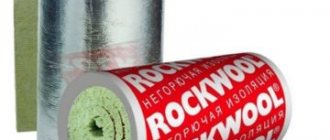
When purchasing, be sure to look at the instructions; they usually indicate the scope of use of stone wool and its technical characteristics. The most proven ones are TechnoNIKOL and Rockwool. The last company is located in Denmark; insulation materials from this country are of the highest quality, since strict certification bodies operate there.
When choosing, check with the seller how the fibers are arranged: horizontally, vertically or in a chaotic order. The first two types prevent the material from deforming, and the latter provides good heat and sound insulation.
Depending on the density, stone wool is usually divided into categories. Stone wool: wall slabs:
- Brand P-75. Suitable for horizontal internal surfaces that are not exposed to load, for insulating pipelines.
- Insulation for walls is wool grade P-125. Suitable for both horizontal and vertical surfaces. It is ideal for insulating ceilings, floors and the inside of walls.
- PZh-175. Stone insulation for walls made of metal profiled sheets or reinforced concrete.
- Insulation wool PPZh-200. The hardest stone wool. This type is used in engineering buildings, protecting them from fire.
Which mineral wool is best for wall insulation?
Insulating a house with stone wool begins with choosing a manufacturer.
Rockwool “ROCKWOOL” is popular both in the domestic and foreign markets. It has the following distinctive characteristics:
- Good level of strength;
- Mineral wool for wall insulation lasts from 15 years;
- The fibers are arranged in a chaotic manner;
- Helps save electricity, as the manufacturer claims;
- An additional layer that increases moisture resistance.
Stone wool "TechnoNIKOL".
- Produced only on the basis of basalt rocks;
- Additional layer for noise reduction;
- Light weight, making work easier.
Insulation for walls stone wool "URSA":
- Special packaging will make it easy to transport and work with the material;
- Does not contain formaldehyde resins, therefore it is recommended for schools, hospitals, etc.
Tips for choosing
Buying a truly high-quality product can sometimes be difficult. Therefore, you need to know some important points.
Pay attention to where and how the cotton wool is stored. Most often, it is stored in its original packaging and wrapped in shrink film.
Make sure there are no holes or cuts on the packaging. The cotton wool should not be in the open air, but under a canopy. If stone wool is packaged in cardboard boxes (they usually contain expensive insulation materials), then its storage location must be protected from moisture. Even after getting a little wet it will be unusable. Purchase goods only from trusted sellers. Give preference to those stores that are located closer to you - this will reduce the cost of delivery.
Estimated prices for insulation
The cost of a heat insulator and their installation depends on the area of insulation, the size and price of the slabs. With a total insulation area of 109.9 m2, a thickness of the slab layer of 0.1 m, the volume of the heat insulator will be 11 m3.
Since most insulation materials are sold in m3, knowing its cost, you can determine the total cost of purchasing slabs:
- Basalt wool, 1500 RUR/m3, total 16500 RUR.
- Mineral wool, 1070 rub./m3, total 11770 rub.
- TechnoNIKOL basalt wool, 2270 RUR/m3, total 24970 RUR.
- Glass wool Isover Warm House, 1250 rub./m3, total 13740 rub.
- Stone wool Mat Teploroll, 1280 RUR/m3, total 14080 RUR.
- Slag wool, 860 rubles/m3, total 9640 rubles.
- Ursa GEO Facade, 975 rub./m3, total 10,725 rub.
Factors influencing the cost of thermal insulation work for a house with brick walls:
- type of material;
- wall area;
- height of the house;
- finishing method;
- technical condition of the surface;
- season.
Drywall
Today it is difficult to imagine renovation without the use of drywall. It is multifunctional and is used for finishing walls, ceilings, creating partitions, and various decorative elements. Some types, due to their water-repellent properties, are used in finishing bathrooms and toilets.
Before using drywall, you need to understand its positive and negative characteristics in order to understand the specifics of handling it.
Advantages of drywall:
- Flexibility and lightness. The use of this material allows you to implement the most daring design solutions. It is easy to make various geometric shapes from it - from banal rectangular to complex semicircles, arches, columns;
- Thermal insulation properties;
- Fire resistance. Drywall doesn't burn. When it is exposed to fire, only the top paper layer suffers.
- Water resistance. Special types of gypsum boards have been developed that are recommended for use in rooms with high humidity.
Disadvantages of drywall:
- The main disadvantage is its fragility. A sheet of drywall can easily be damaged during transportation, installation, and subsequent operation;
- Soundproofing characteristics. Drywall does not have soundproofing properties. Behind a simple gypsum board partition all sounds will be heard.
Drywall
Requirements for insulation. Mistakes made when insulating
Let us consider in detail the requirements for insulation
.
To carry out insulation from the inside of a room, it is necessary to select materials that meet the established environmental friendliness characteristics. As a result, it is better to give preference to well-known manufacturers of materials for room insulation. It is unacceptable to select thermal insulation materials that may have a detrimental effect on human health.
Mineral wool laid from the inside must be covered with a finishing material, which is usually used as plasterboard sheets
But due to the fact that the material is in a confined space, it is not possible to monitor its condition and, as a result, it is important that it does not deform, which may affect the thermal insulation characteristics of the insulation
The selected mineral-based insulation must have a minimum thermal conductivity coefficient. High-quality insulation can be achieved not so much due to the thickness of the material as to its basic characteristics. The smaller this parameter, the thinner the layer of material will have to be installed under the drywall
, which is very important in small rooms.
_
Coefficient of thermal conductivity
- the ratio of the thickness of the tested material sample to its thermal resistance. (GOST 7076-99)
Thermal conductivity
- the ability of a mortar to transfer heat through the thickness from one surface to another. (GOST 4.233-86)
Now let's take a closer look at the mistakes that are made when insulating
.
In order for the insulation of the walls of the house, from the inside, done on your own with mineral wool, which will be covered with plasterboard on top, to last as long as possible, it is important to avoid common mistakes:
- laying mineral wool with various types of defects;
- an attempt to save money when purchasing thermal insulation material from little-known manufacturers;
- non-compliance with the sequence of thermal insulation work;
- there are gaps between adjacent sheets of material;
- improperly installed vapor barrier or its complete absence.
Homeowner forgets to install drywall
e sockets or switch, it often happens that when doing the work on your own.
therefore, this procedure must be carried out in advance. The insulation can be significantly damaged if installation work on installing electrical products is carried out later after the drywall
.
_
Homeowner
- owner of premises in a real estate complex - condominium, he is also a participant in shared ownership of common property.
Installation work
- equipment basic work on assembling and installing machines, units, devices and other equipment into the design position, securing it, connecting to it various communications supplying raw materials, water, steam, electricity, finished products, control and management equipment. (MDS 81-29.2001)
Installation
- energy the conventional name of an object in power structures for which a diagram is issued, for example, main circuits. (GOST 2.701-84)
As you can see, insulation with mineral wool
under drywall, the process is not the most complicated, the main thing is not to forget about high-quality vapor barrier and distribute mineral wool in an even layer from the inside over the entire surface of the walls. This procedure will make it possible to maintain heat in the house and eliminate the formation of drafts and other troubles.
List of the best materials
To insulate walls under drywall, the following types of insulation are used:
- Styrofoam;
- glass wool;
- isolon;
- basalt wool.
They differ from each other in technical indicators and pricing policies. Based on this, the choice of material should be made in advance, before work begins.
Extruded insulation
The material consists of foamed polystyrene granules. It is characterized by low density and light weight; slabs of various thicknesses can be found on sale. The material is popular because of its affordable cost, it is convenient to install even without a frame, and it is on sale almost everywhere, in most repair stores. There are also some disadvantages:
- low level of sound insulation;
- raw materials do not allow air to pass through and require ventilation;
- fragile and unable to withstand damage;
- Rodents can settle in the material, which will damage the insulation and require its dismantling and replacement.
Glass wool
The material is soft and flexible, relatively thin, which helps save space. The thermal conductivity coefficient is low, the cost is affordable. However, do not forget about the specifics of the insulation; its installation may be unsafe for health. When glass wool fibers come into contact with mucous membranes and skin, they cause a burning sensation and unbearable itching. Installation work should only be carried out using special clothing: a respirator, safety glasses and gloves. These inconveniences make the demand for glass wool not too high.
Izolon
A new type of insulation, consisting of polyethylene foamed with propane. It weighs little, has low density and contains a large number of air bubbles. This allows you to successfully retain heat in the room and increase the level of sound insulation. Its thickness is insignificant and saves useful living space. Some manufacturers produce isolon immediately with a thermal protection layer consisting of foil. If such a layer is missing, you can create it yourself by attaching construction foil to the isolon using glue.
Basalt wool
The cost is higher than glass wool and foam, but it is offset by other advantages. First of all, it is a natural material, which is created using a melt from rocks. Distinctive qualities:
- natural;
- does not cause allergies;
- high strength;
- fire resistant.
The composition includes a large number of stone fibers of small thickness. The presence of an air gap between them determines the excellent thermal insulation properties of the material. Another important difference from other types of mineral wool is its inability to absorb moisture, which allows it to be used even at high humidity.
Stages of thermal insulation of a wall
In order for the work process to proceed quickly and properly, you should prepare the necessary tools. This will significantly speed up the work on protecting the walls with insulation.
The following materials will be required:
- plasterboard sheets;
- self-adhesive tape;
- insulation;
- membrane to ensure maximum vapor barrier;
- screws, nails;
- hammer, screwdriver, hacksaw;
- yardstick;
- metal profiles or wooden slats for constructing the frame;
- fastening materials.
For 1 sheet you need approximately 30 pieces of self-tapping screws. It is best to buy screws 20 mm long.
As for the manufacture of the frame, the profile must be taken of 2 types: marked CD and UD. The length is selected based on the size of the room.
Frame design
It consists of drawing the perimeter and thinking through how the frame will be positioned on the wall. A simple pencil and a building level are enough.
Preparation:
- surface cleaning;
- smooth out all the unevenness and fill up the cracks and depressions;
- drying with a heater or blow dryer;
- getting rid of mold and mildew.
Sometimes it is necessary to treat the walls with a special waterproofing putty to prevent the occurrence of dampness. First, the layer is applied vertically, then horizontally.
Frame construction
Installation of a frame from profiles for plasterboard You need to mount the frame according to pre-made marks. To avoid contact of the metal structure with the wall, a tape prepared in advance is glued to the base of the profile. The frame parts are fastened to the wall using self-tapping screws and dowels.
Before laying the insulator, the surface is prepared in advance. Weak areas of plaster are removed or restored. To eliminate the possibility of the formation of fungus and mold, it is necessary to treat with a primer and an antiseptic.
Sheets of plasterboard are installed on a frame made of metal or wood. A metal frame will last significantly longer than one made of timber.
In the area where batteries are located, where installing thermal insulation is difficult, penofol can be used.
You can make a frame from bars under drywall
Assembling the frame begins with the installation of guides created from the UD profile. The slats are mounted on the ceiling and floor with a distance of 50-60 mm from the walls. A section of the rack profile is inserted into the guides. The ends are fixed using small self-tapping screws (“fleas”). The edges of the hangers are folded from the sides and connected to the slats. The pitch between the profiles must be observed so that there are 3-4 slats per sheet.
To improve the rigidity of the structure, it is necessary to make transverse bridges from the CD profile. The profile is cut so that its length overlaps the adjacent slats by half. Use metal scissors to cut off the shelves. Then the blanks are fixed with fleas onto the frame.
Vapor barrier device
Penofol is often used as a vapor barrier. Before attaching it, you need to make sure that the side of the material with foil is facing inside the room.
As for the vapor barrier material, which has a rough surface, its uneven side should also be directed into the room.
Insulation
The insulation should be cut using a special knife. The insulation should be cut into pieces, the size of which should match the parameters of the frame cells.
If you use foam plastic as a thermal insulation material, then it should be attached with special glue prepared with the addition of water. Each piece should fit tightly to the surface. If gaps appear between the parts, they are filled with polyurethane foam. After the glue has dried, the foam is fixed with dowel umbrellas. Dowels should be placed in the corners of the sheet and one in the center.
After laying the internal thermal insulation, they begin to sheathe the frame with sheets of plasterboard.
When the screw is screwed in, its head should sink slightly, by 1-1.5 mm, but without tearing the cardboard. To make fixing easier, it is better to buy bits with a limiter.
After the walls are completely covered with plasterboard sheets, the surface is finished in any usual way. Insulated walls can also be covered with wallpaper or painted.
How to avoid the disadvantages of internal insulation?
So, what tips can you find to smooth out the disadvantages of internal insulation? And are all the tips worthwhile?
Tip 1. A vapor barrier with one-way conductivity is placed between the wall finishing and the insulation. This is what they recommend doing when insulating the inside with mineral wool.
But let's look at the picture:
With internal insulation, the dew point shifts to the inner surface of the wall, and the insulation, mineral wool, begins to absorb moisture from the wall. And then, after a month or two, an unpleasant smell appears, bacteria begin to develop in the mineral wool... we don’t see it, but we feel the smell, but we can’t understand where it comes from.
But how can this be: after all, there is a vapor barrier that should not allow moisture to reach the insulation! Theoretically, this is true. But in practice it is not possible to ensure 100% sealing. Why? Let's remember how the vapor barrier and further cladding are attached? They install a profile for drywall, stretch the film... then they screw the drywall, GOING WITH SCREWS THROUGH THE FILM - and where is the sealed vapor barrier? And it’s impossible to ensure 100% sealing around the perimeter of the wall.
And the air in the wool itself has moisture, which condenses as soon as the wall has cooled sufficiently.
Conclusion: any insulation that allows steam to pass through is not suitable for internal insulation!
Tip 2. When designing insulation inside a house, you need to take into account the process of moisture transfer through the building envelope. That is, the vapor permeability of materials in the “pie” of the structure should decrease from room to street.
Difficult said? Simpler: a non-vapor-permeable material should be in the room, behind it should be a material with less vapor permeability, behind it with even less, etc.
For example, you need to insulate the walls of a panel house from the inside. Question: what? Mineral wool? Steam passes through mineral wool much better than through concrete (I must say: steam practically does not pass through concrete).
Conclusion: do not insulate panel (brick, gas-block, etc.) walls from the inside with mineral wool, but choose another insulation. Non-vapor permeable. For example, polystyrene foam or extruded polystyrene foam. (Actually, mineral wool for internal insulation is only suitable for frame houses and attics, which also have mineral wool inside the frame.)
Comment! The author believes that polystyrene foam for insulating the walls of a house inside is BAD! For good health. But if your opinion is different, then at least do this insulation correctly: the walls must be level (!) and the insulation sheet must fit tightly (without gaps!) to this flat surface (i.e., if we attach the insulation with glue, then the sheet must be spread over the entire surface, rather than putting several dots and/or stripes on it).
And yet the author insists on abandoning foam plastic indoors.
Tip 3. In any case, good ventilation should be provided. No comments here, because this is correct.
Conclusion
Now you know how to insulate walls from the inside under drywall, and you can handle the work yourself. Additionally, watch the video in this article. If you have any questions, write comments and I will be happy to answer you.
Did you like the article? Subscribe to our Yandex.Zen channel
March 13, 2022
Plasterboard systems, Decorative wall finishing, Walls, Wall insulation
If you want to express gratitude, add a clarification or objection, or ask the author something, add a comment or say thank you!
Step-by-step instructions for insulating walls outside with your own hands
After preparing the materials, the insulated area of the house is calculated. Step-by-step instructions for insulating a house with a ventilated gap are presented in the video
The video contains recommendations that will help you easily insulate a building.
When everything is ready, the mineral wool is installed using the following technology:
- The walls are being prepared.
- A vapor-tight membrane is installed.
- Wooden or metal slats are mounted.
- Insulation is installed in the installed slats.
- A waterproofing film is installed.
- A ventilated gap is created.
Preparation begins with cleaning the walls from plaster layers if the wall is concrete or brick. The wooden surface is impregnated with an antiseptic to protect against mold. Window slopes and platbands are dismantled.
The vapor-tight membrane is installed with the smooth side facing the insulation. Its installation is carried out to remove vapors from the wall of the building. The insulation can be installed without the use of such waterproofing, but only if the surface is perfectly flat.
Then vertical slats are mounted to the wall of the building using self-tapping screws.
To determine the distance between the slats, the width of the insulation sheets is taken into account. For example, if wooden blocks measuring 50x50 mm are installed, and the width of the mineral wool is 600 mm, then this distance will be equal to 598 mm. The installed material is easily compressed when installed between the slats, and then straightens out, taking its original shape.
Insulation is installed in the spacer between the slats. If necessary, the mineral wool is cut with a knife to the required size. If installation is carried out on a wooden wall, the material is secured with dowels. And if on a concrete surface or on brickwork, then the use of glue is allowed.
If necessary, you can use a second layer of insulation. It is necessary to ensure that the seams of the 2 layers of insulation do not coincide in order to avoid the occurrence of an air gap.
The waterproofing film is installed on top of the insulation. It ensures moisture removal from the material. The film is secured to the slats using dowels. The seams are additionally taped with special metallized tape.
The ventilated gap is mounted on top of the slats. For this purpose, additional counter rails are installed. Various finishing materials are then installed on them: block house or siding.
Mineral wool - concept and features
The word “mineral” indicates the origin of the heat insulator. It is made from natural ingredients: rocks, limestone, clay, basalt, dolomite. When they melt, fibrous material is formed, from which mineral insulation is made. There is only air between the fibers, due to which the wool has excellent heat and sound insulation characteristics.
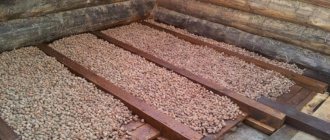
Insulating mineral wool is produced in the form of slabs and rolls. The peculiarity of slabs (mats) is that they are more rigid/dense and can keep their original shape. Rolls are suitable for floors, attic floors (they are horizontal) and for unloaded structures. Peculiarities:
- Strength from 0.08 to 0.06 kg/cm2. The difference depends on the type of heat insulator.
- Thermal conductivity coefficient is from 0.036 to 0.060 W/(m*K), depending on the density.
- Moisture absorption 6–30% when completely immersed in water.
- The density of mineral wool for wall insulation is from 35 to 100 kg/m3.
- Vapor permeability from 0.21 to 0.41 mg/(mchPa).
- Fire resistance is high. The material can withstand temperatures of 1000 degrees.
- Sound insulation from 0.7 to 0.9 Rw (dB).
- Thermal insulation material will last from 50 to 70 years.
Insulation outside and inside the house
External insulation involves installing insulating material along the outer perimeter of the house. Internal - along the inner surface of the walls.
Advantages of the first method:
- Additional protection of walls from exposure to adverse weather conditions.
- Extending the life of walls.
- Dew point shifts outward. The walls are no longer constantly wet and are not covered with condensation.
- Heating costs are reduced, but the interior space of the house is not reduced.
- A soundproofing layer is created that prevents the penetration of sounds from the street.
- It is possible to change the appearance of the house thanks to a wide variety of finishing materials.
Among the shortcomings are the following points:
- Insulation materials are not cheap. All the work will cost more than insulating the interior surface of the house.
- The frequency of work depends on weather conditions. During rain or sub-zero temperatures, work must stop.
Thermal insulation inside the house is carried out only in some cases. For example, if there is no access to the outer surface of the walls. This is possible on high-rise buildings. Another option is that you cannot or do not want to change the appearance of the house.
Insulation from inside the house
Mineral wool consists of small fibers that are bonded together with resins. Some experts do not recommend using this insulation inside a home. The recommendation is based on the fact that resins emit substances hazardous to humans.
However, as a result of research on this topic, it was proven that the amount of substances released is so small that the harm caused to the human body is so negligible that it should not be taken into account against the background of other sources of pollution.
The insulation retains heat well due to the large amount of air contained between the fibers. Mineral wool is capable of accumulating water in the composition, after which the thermal insulation characteristics are noticeably reduced. This happens because the liquid displaces the water.
Insulation of the internal surface of the house with mineral wool is usually carried out if it is not possible to carry out work on the outside of the house. The material will contribute to long-term heat retention in the home.
Advantages of internal insulation:
- There is no need to use special tools or climbing equipment if the apartment is on the upper floors.
- Work is carried out at any time of the year, regardless of weather conditions.
- It is possible to combine insulation with interior decoration. This results in savings on materials.
- The amount spent on work is less compared to external insulation.
Disadvantages of internal insulation:
- The dew point (the place where warm and cold air converge) moves indoors. This contributes to freezing of the walls. Condensation may form inside this surface. Consequences: the appearance of fungus, mold, constant moisture in the walls, decreased efficiency of thermal insulation.
- A frozen wall completely loses its ability to retain heat. The room will cool down and heat up faster than with external insulation.
- The humidity in the room increases. This is dangerous to human health. To resume normal gas exchange, it is necessary to ventilate the rooms frequently. This will increase heating costs.
- The usable area of the apartment will decrease.
- You will have to dismantle all elements of the interior decoration of the room.