A new type of foil-based insulation is increasingly gaining popularity in the construction market.
It has already become a worthy competitor to the long-proven glass wool and polyethylene. However, it has its own characteristics and requires certain knowledge to use.
Read on in the article to learn how to choose the right foil insulation and how to insulate the walls of a wooden house.
What kind of material is this?
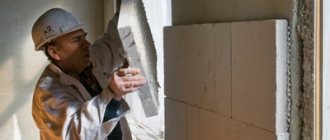
Foil insulation is a roll of insulation consisting of 2-3 layers . The first layer is the base, the main material that performs a thermal insulation function. The second layer is foil glued to the base, reflecting heat into the room and protecting the base layer from external influences.
The third layer is a self-adhesive base covered with a protective film. This layer is not always present in insulation materials; if it is not present, then additional special glue is purchased for installation.
How does it work?
Due to the reflective effect, the foil returns the heat generated from any source .
In other words, foil insulation only works if there is an open source of heat in the house. This could be a UV heater, stove heating, or fireplace. The heated air will not escape into the walls, floor and roof to the street; the foil retains the heat indoors.
It also has waterproofing properties. If you lay a layer of foil insulation under the floor with the foil facing the wood, the wood will stop accumulating moisture from the ground. This way, floor joists and boards will not rot for many years to come.
Do-it-yourself floor insulation in a private house under a screed. Instructions for use
Preparing the base
Before insulation, it is necessary to prepare the subfloors throughout the house. There are the following types of subfloors for screeding in a private house:
- priming;
- reinforced concrete slab.
To prepare the soil foundation for insulation, it is first necessary to carefully level and compact the surface of the earth. Then lay a 30 cm thick layer of inert materials: gravel or crushed stone. Next is a sand cushion 10 cm high.
Elimination of unevenness on a cement base by grinding
As for the preparation of the concrete base of the floor, it is enough to ensure the evenness of the surface by cutting off the convex parts with a grinder, wiping out cracks and holes with putty or mortar. The next step is to remove construction debris, dust and coat the surface with two layers of primer.
Floor insulation technology
Laying damper tape around the perimeter
- The joints between walls and floors are insulated with sealant or cement mortar.
- A damper tape is glued around the perimeter of the room to compensate for the thermal expansion of the screed during operation.
- Before insulating floors, it is necessary to install communications. Grooves are cut out in the insulation for the laid pipes and wires, and the heat-insulating material is tried on in place. The insulation should fit tightly to the damper tape, to each other and to the base of the floor without gaps.
- It is advisable to lay the insulation in a checkerboard pattern. This will help avoid temperature corridors. The thermal insulation material is attached to the base of the floor.
- Installation of waterproofing material over the insulation is carried out with an overlap. The sheets are fastened together with tape or construction tape.
Screed device
Laying reinforced screed on foam plastic
- When insulating the floor with polystyrene foam and penoplex, a reinforcing mesh is laid on top of the waterproofing, the mesh size of which is 10 cm. The mesh is laid with overlapping sheets, which are connected with wire. Reinforcement of mineral wool insulation can be done using a fiberglass mesh. It will also ensure the strength of the surface.
- Placing beacons from aluminum corners will ensure even pouring of the cement screed. The slats act as formwork.
- The screed mortar is prepared from a purchased mixture or by mixing sand, cement and water yourself in a ratio of 3:1:1.2. Cement and sand are mixed, a depression is formed, and water is poured into it. Gradually, the water is filled with the dry mixture, thereby mixing the components until a homogeneous mass is formed. To reduce dust, the surface of the mixture is moistened with water. The use of polymer binders will give the solution plastic properties. The technology for mixing the solution from a purchased mixture is specified in the manufacturer's instructions.
- A cement-sand mortar is applied and distributed evenly over all floor surfaces. The mixture is smoothed using a rule that relies on the beacons, ensuring the evenness and smoothness of the base. Having leveled the first strip of screed, you need to move on to the next part of the floor and so on until the end of the room. Gradually the solution will be laid over the entire prepared surface.
- The hardening period for the screed to gain strength characteristics is 14–28 days. To avoid cracks when the solution dries, you need to periodically moisten the surface.
- Now the concrete base in a private house is ready for laying any floor covering: ceramic tiles, laminate with underlay, linoleum and more.
Varieties
Foil is a mandatory element for all types of this insulation, so it is present on all models. Otherwise, thermal insulation differs according to the following principles:
- inner layer;
- thickness;
- the presence or absence of a self-adhesive base.
The inner layer comes in 3 types:
- stone wool;
- foamed polyethylene;
- expanded polystyrene.
It is these types that are used to insulate wooden walls and other elements of the house. The thermal conductivity, thickness, and flammability of the product depend on the inner layer. The foil itself has heat-repellent properties. It retains heat inside the house without transferring it to the inner layer. The foil also provides partial waterproofing.
Foil insulation is a soft material; covering it with wallpaper or plaster will not work. Drywall is suitable as an external finish.
These types of insulation are used both outside and inside the house . The choice of the appropriate option depends on the design of the walls. For example, models made of stone (basalt) wool and polyethylene are quite flexible, they can be laid around the corners of the building. Expanded polystyrene does not have such properties.
Basaltic
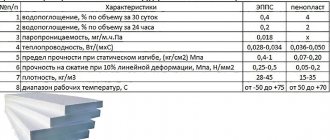
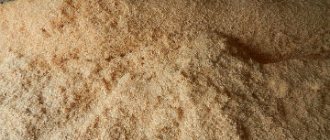
Stone wool is used as wall insulation without foil. It does not burn, does not melt, and does not cause damage to health. It may fall off during installation, so the option with foil on one or both sides provides protection from future fall off. Its thermal conductivity is 0.032-0.048 W/(m*K). Available in soft rolls 5-10 cm thick.
Polyethylene
Foamed polyethylene has a porous structure . Unlike basalt, it does not have natural components, so it does not become moldy over time. It practically does not accumulate moisture and does not collapse (crumble). Has soundproofing properties.
The quality of insulation is inferior to basalt; it is usually laid in 2 or more layers. Used for insulating walls, roofs, floors, sheds, incubators, etc. Thermal conductivity 0.049 W/m*K. Produced in rolls 1-100 mm thick.
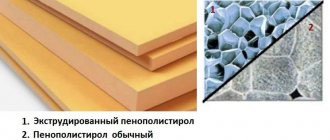
Made from polystyrene foam
The insulator, created from carbon and hydrogen , is a porous, fairly strong structure that does not deform or bend. Not attractive to fungus and mold. Polystyrene is used to insulate flat surfaces, in particular floors.
It has water-repellent properties and is safe to install, but the foam burns well, and only a layer of foil protects the insulation from ignition in a fire. Thermal conductivity 0.041-0.05 W/m*K. Available in slabs and mats 3-30 cm thick.
Types
On the market, this product is conventionally designated by types, which, without unwrapping the product from the packaging, can tell about some of its characteristics:
- Type A – a roll with foil on one side only.
- Type B – roll with foil on both sides.
- Type C – a roll with foil on one side and a self-adhesive surface on the other.
Criterias of choice
The quality of thermal insulation depends on the correct selection of insulation. Therefore, when purchasing penofol, you should pay attention to the following parameters:
- Product type. For basic insulation, only material with double-sided foil coating is used. The purpose of penofol relative to its classification is also taken into account.
- Thickness of the thermal insulation sheet. This parameter is selected for ease of installation. The optimal option is considered to be a thickness of no more than 5 millimeters.
- Material size. Before purchasing, you should calculate the required amount of penofol. The value is determined based on the size of the roll, which on average contains 9 -18 square meters.
- Manufacturing technology. Chemically cross-linked penofol has the best technical characteristics.
- Quality foil coating. The reflective properties of the insulation depend on the thickness of the aluminum coating and the purity of the material used.
- Uniformity of the material. The fabric should not have any stripes or stains. You can check this by unrolling the roll and looking through it at the light.
An important criterion for choosing penofol is its manufacturer. Reliable thermal insulation protection can be provided by material from well-known brands whose product quality meets the stated requirements.
Advantages and disadvantages
Each of the listed insulation materials is quite vulnerable without a foil coating. For example, basalt wool (mineral) crumbles during installation and gets into the respiratory tract and under the skin. If it is not installed correctly, it can become moldy and accumulate moisture. Water inside reduces thermal insulation properties by 50%. Insulators made of plastic and polyethylene burn well and release dangerous resins when they begin to smolder.
A layer of aluminum foil protects them from fire, as well as:
- performs the function of a steam, hydro and wind insulator;
- reflects heat without heating up;
- protects the inner layer from mechanical damage and destruction;
- ensures easy installation.
If you use each of the mentioned materials without foil, they will need to be additionally insulated from moisture, and you will need to buy rolls of waterproofing and vapor barrier separately. Foil is equally suitable for insulating interior spaces and exterior walls.
There are also disadvantages to foil insulation. For example, foil is not capable of allowing air to pass through , therefore, condensation can collect between the finish and the insulation. It is necessary to consider the air corridor.
In the case of wooden houses and log houses, where it is necessary for the wood to “breathe,” foil insulation can cause wood rotting. In this case, mineral wool will be the best option since it allows steam to pass through.
We properly insulate the bathhouse
Foiled polyethylene foam (thermal insulation) is very popular for insulating bath rooms and steam rooms. Correctly carried out installation of insulation significantly reduces the amount of fuel required to heat the bath to normal temperature.
Anyone who has ever heated a wooden bathhouse on a winter evening has observed how heat seeps between the logs, which in the cold turns into steam and rises. Even if the logs or beams of the bathhouse are laid on good insulation and the joints are additionally foamed with foam, this phenomenon cannot be avoided . Only insulating the inner surface of the walls and ceiling with foil insulation will help.
The entire insulation process can be divided into several stages:
- preparatory work;
- installation of insulation;
- installation of guides for attaching finishing trim;
- installation of "lining".
Instead of “lining”, planed boards can be used, but, as a rule, “lining” is more often used.
At the stage of preparatory work, the walls must be freed as much as possible from all unnecessary things. Remove benches and shelves if they have already been installed previously. There should be no nails or screws sticking out of the walls; if they stick out, they need to be dismantled or driven deeper.
After that, you can begin installing the insulation:
- First of all, the ceiling is insulated. Thermal insulation is cut into strips, the length of which is 20 cm longer than the length of the ceiling. This is necessary in order to create an overlap of the ceiling insulation with the insulation on the walls and prevent heat loss in the corners.
- The strips are fixed to the ceiling using the staples of a construction stapler. It is convenient and takes minimal time. The insulation is attached to the walls using the same principle.
- The joints of the material at the corners can be glued with tape or secured with counter slats.
- After the walls are sewn up, you can begin installing guide rails, which will additionally press the insulation, preventing it from breaking through.
Below we suggest watching a video on the topic: “How to insulate a bathhouse using foil insulation.”
Autumn and winter inevitably entail a decrease in the temperature outside the window and the desire to set the heating to maximum mode. However, the costs can be significant. There is a way out - to provide the home with good thermal insulation using foil insulation. What is the name of brilliant insulation, what features and advantages does it have?
Price
in the production of foil insulation on the Russian market :
- Jermaflex;
- Izolon;
- Penofol;
- Tepofol;
- Folgoizol;
- Ecofol.
| Firm | Characteristics | Price |
| Jermaflex | 1.2 m x 8 mm | 80 RUR/m² |
| Izolon | Type A, thickness from 2 to 10 mm, length 1 m | 140-260 RUR/m² |
| Penofol | Type A, thickness from 3 to 20 mm, length 36-12 m (the thicker, the shorter the meter) | 53-278 RUR/roll |
| Tepofol | Type A, thickness from 2 to 10 mm, length 2.5 m | 40-1200 RUR/roll |
| Folgoizol | Type A, thickness 10 mm, length 15 m | 1650 RUR/roll |
| Ecofol | Type A, thickness from 2 to 15 mm, length 25-10 m | 780-1030 RUR/roll |
Zoning
Designers do not advise giving in to fashion trends and copying design ideas without taking into account dimensions, location and other nuances. Before planning and arranging furniture, every detail is thought through.
There are several simple rules that experts advise you to follow:
- Let the room have natural light. To do this, remove excess walls (except for load-bearing ones).
- If the rooms in the apartment are small (12 sq. m or 16 sq. m), the layout of the kitchen combined with the dining room will be the right solution.
- If the ventilation system is not designed correctly, the smell of food will spread throughout the apartment.
Preparing tools before work
a layer of vapor barrier must be laid between the insulation itself and the wall .
If one-sided foil insulation was chosen, that is, the foil is on only one side, the main layer will come into contact with the wooden wall, and this is unacceptable, especially if the insulation is based on basalt wool. If the choice was made in favor of double-sided foil insulation, then a vapor barrier is not needed.
It is necessary to ensure air flow between the wall and the insulator so that the walls can be ventilated and moisture does not accumulate. To do this, you need to attach 20 mm thick slats to the wall. It would be enough.
Tools for work:
- construction stapler;
- foil adhesive tape;
- dowels and screws;
- screwdriver;
- insulation;
- vapor barrier.
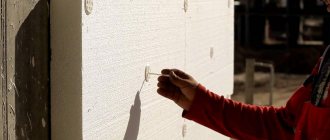
If a product with a self-adhesive side is chosen as insulation, then a stapler will not be needed. The adhesive side adheres well to slats and other surfaces. In this case, you will need a degreaser, such as a solvent.
Types of penofol
Manufacturers produce various types of penofol. Each type of thermal insulation fabric has its own structural and technical characteristics.
The most popular are the following three classes of penofol:
- "A". The material has a one-sided foil coating and is mainly used as additional thermal insulation for residential premises.
- "IN". Penofol of this type has a double-sided reflective coating. A product of this type can be used as the main insulating material.
- "WITH". This type of penofol is a self-adhesive sheet. One side of the material is coated with an aluminum layer, and the other is coated with a heat-resistant, waterproof adhesive. This structure will allow you to immediately fix the thermal insulation of the plane, which ensures convenient installation even in the most inaccessible areas.
In the construction industry, other modifications of penofol are also used, such as “R” - thermal insulation material with a one-sided reflective relief coating or “ALP” - insulation with a laminated foil layer.
Features of the insulation process
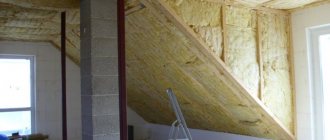
In wooden houses, internal insulation is used extremely rarely due to space saving , and also because the atmosphere of a wooden house is lost.
An air gap must be laid between the wall and the insulation. If this is not done, then a house that has stood for 100 years without insulation will rot in a very short time:
The slats are nailed to the wooden wall in steps of 50-60 cm.- Using a stapler, nail the vapor barrier film with the rough side to the wall.
- Foil insulation is placed starting from the corners so that the foil “looks” at the room and not at the wall.
- Thermal insulation tapes are also attached to staples or to special glue end-to-end. The insulation is not installed overlapping, as this results in loss of thermal insulation properties.
- The joint between the tapes is covered with aluminum foil. It is also used if the material is accidentally damaged.
- More slats are nailed on top and drywall is installed.
If self-adhesive material is used for insulation, then before gluing it is necessary to clean the walls from dirt and dust.
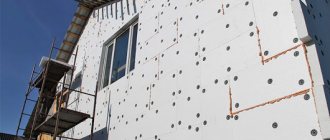
In this case, there is no need to attach additional foil to the wall. External insulation is performed not only to protect logs or timber from freezing , but also as sound insulation.
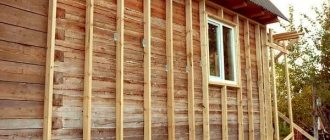
The purpose determines the choice of material thickness. Before installing insulation, the walls of the house must be dried. Therefore, work is carried out on a dry summer day, preferably in the middle of the season. The wood is cleared of layers of old paint, sanded and cleaned. Then caulk all the cracks and cracks. Be sure to treat the wood with antiseptics and fire retardants. The walls are being completely renovated.
When the external walls are ready, the slats can be installed. If we are talking about a log house where the surface is corrugated, then slats will not be needed. The air flow will be provided by the bends of the walls themselves.
Next, the insulation technology is standard:
- The vapor barrier roll is overlapped onto the slats using a stapler.
- Foil insulation is placed on top and the joints are sealed.
- Next comes a layer of windproofing.
- At the last stage, the cladding is installed.
The foil in the external insulation should be turned towards the street. Thus, the heat coming out from inside the house collides with the foil layer and returns back. At the same time, the tree itself does not sweat and continues to “breathe.”
Insulation of a frame house with foil insulation - in the video:
The most popular type of insulation with foil for interior finishing is aluform
Bestizol or alufom is a bubble base consisting of aluminum foil (outer layer) and polyethylene (inner layer) on one side. The foil acts as a reflector of solar and heat rays. The polyethylene layer has a cellular structure and neutralizes sound waves and shocks. The advantage of this material is low thermal conductivity.
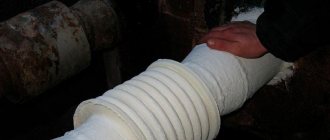
Bestizol can be used in both cold and hot weather. Due to its small thickness (1 cm), the material is used for hard-to-reach places:
- for winding ventilation pipes;
- air duct coverings;
- insulation of pipelines and other outlet communications.