The bathroom is a room where special comfort is required, because there a person appears in his most vulnerable state. To maintain the optimal temperature in the bathroom, a heated towel rail is installed there. A heated towel rail is a curved pipe that is built into the general heating system of the house, necessary to heat and reduce humidity in the bathroom. In this article we will tell you how to attach a heated towel rail with your own hands.
Where to connect and where to hang
You can connect a water heated towel rail to both the hot water riser and the heating system.
If there are both of these options, they usually choose DHW. There are three reasons for this: there is less hassle with permission to connect, you can connect at any time of the year (agree with the management company to turn off the riser and that’s it) and, most importantly, such a heated towel rail heats up all year round
If there is no hot water supply in the house, you will have to connect to the heating riser. This requires permission from the Criminal Code and a project. Buy a heated towel rail (preferably a simple design), go to the housing office with its passport (copy), write an application. If permission is given, order the project (you will also need a copy of the passport with connecting dimensions). Then, according to the project, you do it yourself or hire performers (plumbers from the housing office, as an option). Call representatives of the Housing Office for acceptance.
To ensure that the “towel” always warms up without problems, all connections are straight, without arcs or pockets
When determining where to install the heated towel rail, questions may still arise about what height it should be hung. If you have a choice, it is most convenient to place it so that it is at head level and below. This is if you install a U-shaped or snake. If we are talking about “ladders” of great height, the top bar is placed at the level of the heat of the raised hand (approximately 190-200 cm).
When choosing a location for installing a heated towel rail, you must also take into account the distance from the riser. In principle, the closer to the riser, the better - the greater the chance that it will work. But, it can be attributed to a meter or so only if the following conditions are met:
- low hydraulic resistance of the heated towel rail (simple shape and cross-section 1″ or 3/4″),
- sufficient pressure (2 atm or more)
- drain pipes of normal diameter (one step smaller than the riser).
At the same time, be sure to follow other connection rules. Then there will be chances that such a “remote” device will work normally.
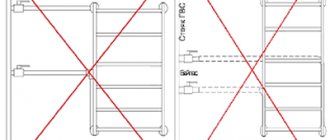
What not to do
All the above schemes work stably. As you noticed, all bends go straight, without bends in the form of an arc or rings. This is not accidental - air accumulates in all irregularities, which interferes with, and sometimes completely blocks, circulation.
This scheme doesn't work
The installation of the heated towel rail in the photo is incorrect. At least two mistakes were made:
- the bends are made narrower than the center distance of the heated towel rail;
- They are made with a metal-plastic pipe with loops.
This connection simply cannot work. Metal-plastic pipes are an excellent material, but not for connecting heated towel rails. Their fittings have a very narrow lumen, which has a bad effect on circulation. Plus, air accumulates in the loops, and the flow along the upper loop, even when supplied from above, will not flow - too much hydraulic resistance to the water must be overcome.
Unstable circuits
The following two schemes may work, but not always. At the bottom of the towel dryer, the water stagnates and, given any difference in height, cannot rise. No one can say specifically when it will work and when it won’t. Depends on the pressure in the riser, the diameter of the pipes and the design of the dryer itself.
Unstable connection schemes
With such a connection, even a working connection may suddenly (usually after stopping) stop working. Everything is simple: the pressure has changed, the pipes are clogged, the water from below is not “pressed”, the heated towel rail does not heat.
Another option for an unstable circuit is with a loop on top. Again, it will work under certain conditions. But sooner or later the highest point will become airy and block the circulation. The problem can be helped by installing an automatic air vent at the highest point, but if the pressure drops, it will not save you.
With loop on top
Not true at all
The photo below shows examples of what not to do. Schemes without a tap on the bypass are inoperative. What this threatens is known. In addition, after several years of use, they will stop functioning altogether. Most likely this will happen after the next shutdown - the system will become clogged with dirt. This is because the entire flow of hot water is directed through the heated towel rail. After repairs, the water carries a huge amount of dirt, which safely settles in the bends (in the lowest areas first). Within a few years everything becomes completely clogged. Fortunately, everything needs to be redone and connected correctly, but only flushing can help the fire.
Very bad idea
It is necessary to wash both the heated towel rail and the connections to it. To do this, remove the dryer and wash it in the bathroom, and wash the outlets one by one by connecting a hose to the free outlets, the other end of which is taken to the sewer. By manipulating the taps, pass a flow of hot water through one outlet, then through the other. After washing everything is put back in place. It may be possible to start the system after this.
Combined model - installation and connection of a heated towel rail
A competent approach and improvement of the existing water dryer is a way to save money. By equipping it with a cable with a thermostat inserted inside, we get a combined towel drying system, the operation of which does not depend on the time of year. The heated towel rail is connected only when necessary, and this is a significant saving. The safe operation of an electric dryer depends on compliance with several requirements. The power line of the tubular electric heater (TEH) is connected to a separate outlet, since its energy consumption is quite high - at least 1 kW. For this purpose, a wire with a cross-section of at least 2.5 mm is used. The connection diagram for the heated towel rail is carried out using an automatic fuse, which is an integral part of it.
Attaching a heated towel rail to the wall photo
Another important point that guarantees the safe operation of the device is grounding. Its fastening is usually provided by the manufacturer. All that remains is to mount the socket, from which we lay a three-wire wire into the distribution panel. If for some reason it is impossible to make it, it will be nulled.
https://youtube.com/watch?v=anol0K05TK0%3F
https://youtube.com/watch?v=NleLn-DIUX8%3F
Note
Installing an electric and combined heated towel rail in the bathroom yourself is a certain risk associated with working in hazardous conditions. To correctly complete all tasks, certain skills and knowledge in the energy sector will be required. The risk in this case is not justified and it is better to contact an experienced specialist if you are not confident in the high-quality performance of all the work yourself.
Connecting an electric heater
Installing an electric dryer is the simplest solution for apartments or private houses where recirculation of the hot water supply line is not provided. A heated towel rail with a power of up to 500 W can be installed at any allocated electricity limit. The installation is carried out independently, fortunately, you don’t have to lay pipes and cut into risers.
To connect the heater with a plug, you will need additional components:
- three-core copper cable 2.5 mm² or another cross-section specified in the product passport;
- socket with built-in RCD (leakage current 30 mA), designed for a current of 10...25 amperes depending on the heater power;
- standard socket.
Reference. PUE standards clearly require connecting sockets in bathrooms through a residual current device - RCD. If the line is already connected and powered through a differential circuit breaker with a leakage current of 30 mA, then a regular socket is installed. Its amperage is calculated using Ohm's law: divide the dryer's power in watts by 220 volts.
Diagram for connecting the dryer to the electrical network without installing an outlet.
How to properly connect an electric heated towel rail in the bathroom:
- We draw a route on the wall from the distribution box to the point where the outlet is installed. An important point: placing the electrical box in the bathroom is prohibited, only in the adjacent room.
- We use a grinder to cut through the groove and the socket. We lay the cable and install the socket box.
- We connect the wires to the electrical network in the junction box. We remind you: the 3rd core of the yellow cable is grounding and must be connected.
- We close the furrow and install a socket. We hang the heated towel rail after laying the tiles.
If the walls of the bathroom are already tiled, conduct the wiring in a different way - from the next room. At the point where the socket is installed, drill through the partition and insert the cable laid in the wall of the adjacent room into the hole.
Some heater models are not equipped with a plug and are connected directly to the cable. There is no need to install a socket, but a 30 mA RCD is required. Step-by-step assembly of the heated towel rail with all fittings and installation of the heating element is shown in the video from:
Among electric heated towel rails with a power of 500 W (the maximum possible power at any power consumption limits), the most profitable is the Atlantic NA 500W, both in terms of purchase price and operating cost.
This model is produced by the French concern Atlantic. The design was developed by a division located in Italy. The average price of the top-end heated towel rail Atlantic NA 500W is 15,700 rubles. Russian analogues, equal in power, cost 2-3 times more, and the price of European ones starts from 50,000 rubles.
Atlantic NA 500W with a width of 40 cm is suitable for installation in a small bathroom and is able to quickly heat a room of 5 square meters. m. An ultra-precise electronic thermostat and five operating modes provide significant energy savings, thanks to which costs will not exceed 200 rubles per month.
Some connection features
The most popular installation method is a threaded connection. It's easier to implement. More experienced craftsmen will install three taps: two on the heated towel rail itself, and the third on the bypass system. This will help in the future, if a leak occurs in the system, turn off only it, and not the entire water supply system. Bypass is especially important when installing using “American” ones. They contain silicone or rubber gaskets, which have a limited service life and therefore require periodic replacement.
The choice of fixation system depends on the model, technical capabilities, and the availability of the existing supply system. Installation with a threaded connection can be done with your own hands. But it is better to provide a bypass system and shut-off valves. This will help in the future to avoid big troubles when the fastening point is loosened. Additional fasteners will help securely fix the system to the wall, which will ultimately reduce the load on the fittings.
Bypass installation rules
When connecting in series to the bypass, it is prohibited to install a shut-off valve, so take 2 valves. In other cases, 3 taps are installed - one at the inlet, another at the outlet, and the third at the jumper. The bypass is placed between the inlet and outlet of the heated towel rail. When installing it, tees are used. To seal, use tow or tape sealants.
Bypass installation occurs sequentially:
- Tees are attached at the inlet and outlet of the outlet from the riser;
- Install a ball valve tee at the outlet of the outlet;
- Fix the second end of the jumper at the outlet of the tee on the return pipe.
Install ball valves on tees and connect them to the outlet and inlet openings of the device. All joints and connections are sealed with silicone sealant.
A heated towel rail is an indispensable fixture for the bathroom. With its help, the most comfortable atmosphere in the bathroom will be established; towels and clothes will always be soft and dry. Installation should always be carried out according to the instructions, then using the heated towel rail will not cause any problems or hassle.
Non-standard methods
In addition to the standard, well-known methods for installing shelves, original options using various available materials are used. These details not only allow you to conveniently and easily fix the structure, but also act as decoration.
Rings with hooks
You can hang the shelf using rings with attached hooks. The rings are attached to the wall, and the hooks are attached to the loops that are screwed into the structure in advance.
Water pipes
The method is useful in any room. Holes are made in the furniture fabric slightly larger than the diameter of the water pipe. The shelf is “put on” and fixed with a flange in the desired position. The design may consist of a single panel, or it may be an open shelving unit.
Belts
Shelves suspended on belts look original. To do this, take two leather products of the same length, fold them in half and drill them towards the wall. A shelf is inserted into the resulting loops. To prevent the canvas from moving, the straps must be screwed to the shelf with small self-tapping screws.
Ropes
Shelves hung on ropes will look great. A thin rope is used for this. 4 holes are made in the tree through which the rope is threaded. Knots are tied on both sides, thus fixing the shelf. The ends of the ropes are tied together and attached to the wall.
Hidden fasteners in books
The shelf is an old book with a metal corner screwed into it. The second part of the fastening is fixed to the wall. This shelf will hold several more books.
Step-by-step installation instructions
Since the heated towel rail is mounted directly into the water supply system, it is very important to ensure that the device functions correctly. If you make mistakes in your work, then not only the drying itself, but also the plumbing system may suffer.
If you make mistakes in your work, then not only the drying itself, but also the plumbing system may suffer.
In general, the installation process is not difficult. And it consists of the following: we supply water to one side of the device, and ensure its outflow from the other end.
- We choose the optimal connection option: to the heating system or to the hot water supply line.
- It is necessary to dismantle the old equipment. To do this, turn off the hot water supply.
After it leaves the riser, remove the old dryer.
If it is welded to the pipe, cut it off using a grinder.
The remaining area of the hollow object should be sufficient for cutting threads.
We install a jumper (bypass) and ball valves (valves). What does installing a jumper mean?
Ball valves are mounted at the ends of the heating device (if necessary, they will interrupt the flow of liquid).
The bypass is equipped with three valves.
Two of which are installed at the connection points of the heated towel rail to the jumper, and the third is inserted into the bypass.
This will allow the working fluid to circulate freely throughout the radiator.
It is very important to control the evenness of the pipes
We install the coil. First of all, we attach the brackets to the walls.
Then we hang a heated towel rail on them. Sometimes you have to knock down walls.
Then we connect the dryer to the valves on the jumper (bypass). Fittings and bushings can be used for these purposes.
After installation, you need to smoothly open the taps, the coil will fill with water gradually. This way you will minimize the risk of water hammer.
That's it, the work is finished. Are you wondering how much all this will cost? It makes no sense to talk about specific numbers.
Much depends on the complexity of the work being performed, the type of coil chosen, etc.
Please note the maximum distances between the wall and the heating device, which must be observed:
- 5-7 centimeters - if the diameter of the pipes is more than 2.5 centimeters
- 3.5-4 centimeters - with a pipe cross-section of less than 2.5 centimeters.
In order to avoid subjecting the walls to heavy loads that can be caused by thermal deformation of a hot galvanized water pipe. The structure cannot be fixed rigidly.
The coil is hung on mounting brackets.
After completing all work, you need to check all connections for leaks. If a leak is discovered, it must be repaired immediately.
Interesting connection with a heat exchanger
Some users speak positively about structures with a heat exchanger isolated from the main line. The solution consists of a sealed stainless jacket placed over the main pipe; a heated towel rail is connected to the drawer.
Trying on a heat exchanger insert
We observe circulation slopes
Distilled water mixed with antifreeze in a ratio of 10:1 is poured inside the closed circuit. The liquid separated by the walls is heated by heat transfer, and natural circulation occurs.
Filling the outline
Design advantages:
- Stable water exchange, independent of main line pressure.
- The device does not become overgrown.
- It can be removed for maintenance and can be replaced at any time; shut-off taps are not needed, just drain the liquid.
- Temperature self-regulation: as the air heats up, the flow slows down, heat transfer decreases and vice versa.
- The possibility of flooding neighbors due to broken fittings and connections is eliminated.
Among the disadvantages:
- The need for metalworking and welding operations.
Workpiece cutting
Heat exchanger welding
- Mediocre efficiency. The heat exchange area is limited by the height of the jacket; the temperature difference between the heating and heated media is more than 10 degrees.
- A plastic riser is not suitable for the device due to low thermal conductivity.
- Main water below 50˚C will not heat the heat exchanger to acceptable values
Actual thermogram
It is probably wise to spend money on high-quality reinforced polypropylene, fittings and fittings.
Water heated towel rail Nika 120x60 1005-77 0 RUR
Water heated towel rail Nika 120x60 1167-1188 0 RUR
Water heated towel rail Nika 120x60 cm 1342-1765 0 RUR
Water heated towel rail Nika 120x80 1340-1751 0 RUR
Water heated towel rail Nika 50x40 1026-330 0 RUR
Connection methods
There are several options for connecting a heated towel rail to the water supply system:
- Threaded. The simplest and most popular type. It allows you to change outdated equipment in the future. Weak point - over time, the fastening may weaken. But by tightening it in a timely manner, the problem can be eliminated.
- Flanged. Possibility of connection without threading at the outlet of the heating system. Weak tightness compared to other types.
- Welded. This is one of the most reliable types in terms of tightness. Disadvantages - over time, rust at the seam can break the seal, and if there is a leak, it is difficult to repair. And if the system is also connected to the heating system and the accident occurred during the season, then the difficulties in disconnecting and repairing will be added.
- Crimping. For this purpose, a sealing tab (crimp ring) is provided. Can be classified as stationary connection methods. Connection to a heating system is not recommended.
Common mistakes when connecting yourself
The main mistakes when installing a dryer yourself include:
Irregular shape and slope of supply pipes. The lack of slope at narrow connections and insertion of the pipe above the outlet level lead to stagnation of the coolant. The presence of loops (“humps” on the upper pipe and “dips” on the lower) makes the system inoperable.
Installation of shut-off valves in front of the bypass, without a jumper or on it. Shutting off the tap in the absence of an alternative path for the coolant leads to a complete shutdown of the hot water supply and a drop in temperature in the riser.
Bleeding air from a system connected to a heating riser. Many users do not specify the type of heater connection. Mistaking the cooling of the pipes for a sign of an air lock, they try to disconnect the pipe and bleed the gas. There is always water in the heating riser, so if it is dismantled without turning off the common tap, a flood will occur in the apartment.
Use of metal-plastic pipes for supply. To save space, some beginners install flexible hoses on the heated towel rail outlets. This leads to an increase in hydraulic resistance, airing of the system and stagnation of the coolant. In addition, fittings for metal-plastic systems have a thick inner part, which strengthens the connection, but locally narrows the diameter of the pipe.
The bypass is too narrow. Reducing the diameter of the jumper by more than 1 size step impairs circulation, reduces the water temperature at all water intake points that are lower, and negatively affects the pressure throughout the riser.
Errors in pipe routing not only reduce the pressure in the hot water system, but also increase the load on the dryer connections. If improper installation causes flooding or an accident on the riser, the apartment owner will be forced to pay for the damage to the neighbors.
Complex cases
There are a number of cases when attaching shelves to the wall requires care, some effort, or the use of more durable materials.
How to hang a glass shelf
Glass shelves are installed on brackets. The fastenings are fixed to the wall with ordinary self-tapping screws and covered with decorative overlays on top. The glass is clamped between two parts of the bracket using a compression mechanism.
On a plasterboard wall
To firmly install shelves on a gypsum plasterboard wall, it is necessary to make embedded parts from metal or wood at the installation stage. In this case, the fasteners will be screwed to a durable material and hold the structure tightly. If the wall is hollow, it is better to install the shelf using umbrella dowels.
Concrete wall
A special feature of a concrete wall is its strength, so installing a shelf will require drilling. To do this, use a hammer drill and a durable drill of a slightly smaller diameter than the dowel-nails that will be used.
How to properly install a heated towel rail in the bathroom: choosing a device
In order to correctly install the device, first of all, you should decide on the choice, because the features of placement in the bathroom also depend on the model.
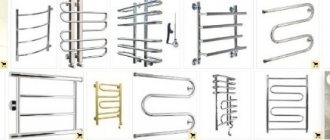
Today there are three main types of heated towel rails:
- Water devices;
- Electrical analogues;
- Mixed type devices.
Each type has its own characteristics, so we suggest considering the strengths and weaknesses of each separately. The most common heated towel rails are the water type, which are simply part of the heating equipment in the house. In the bathroom, pipes are installed through which hot water circulates during the heating period. If we are talking about the heating season, then you will be able to use the heated towel rail, but at other times of the year it will not be able to perform its functions.
The second type of devices is the most popular on the market - these are electrical analogues. The installation is carried out on the bathroom wall, and the installation height can be adjusted to suit specific needs. The device operates from a regular outlet and heats special metal rods on which you can hang wet laundry. For installation, it is enough to think through reliable fasteners and provide the device with access to electricity. Usually you can hang an electric heated towel rail with your own hands, but if the mounting involves connecting the electrics to the desired point, then it is better to entrust the work with the wiring to a professional.
Mixed-type devices are something between electric and water heated towel rails; they operate on electricity, but have access to a water supply system and can switch to water heating. The convenience is that at the end of the heating season you can switch to electric and continue to use the device.
Types of towel dryers
So, all wall-mounted bathroom heaters are divided into 3 types:
- Electric, operating from a 220 volt network. There are 2 types - with a heating cable inside or a liquid coolant and a heating element. Both options connect the same way.
- Water heated towel rails are connected to the hot water supply or heating system.
- In combined double-circuit devices, heat transfer is organized from 2 sources - electricity and the hot water supply network.
Note. The design of combined dryers is quite simple. The heater consists of 2 separate circuits - electric and water, which can operate simultaneously or alternately. Accordingly, the price of universal heated towel rails is 1.5–2 times higher.
Types of heaters for drying clothes and towels
The principle of operation of electrical appliances is as follows: the heating element or cable heats up to a set temperature, then the thermostat turns off the power. After the tubular body has cooled by 3–5 °C, heating automatically resumes. In heating element dryers filled with non-freezing liquid, air is discharged through the Mayevsky valve.
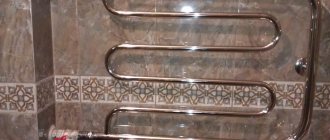
It’s easier with water dryers - they warm up to the temperature of the coolant flowing inside. The body is made of stainless or black painted steel, less often - of copper. Shape – in the form of a ladder, a coil, E-shaped, M-shaped. Since we are considering purely the installation of a heated towel rail, the shape and material do not play a big role, the only thing that matters is the connection method - side or bottom.
At what height is the correct height to hang a heated towel rail?
There are certain SNiP standards that regulate the installation of equipment of this type, such as heated towel rails.
The heated towel rail must be installed at a distance of 120 cm from the floor level and must be at least 60 cm away from all nearby objects, such as a bathtub, sink, shower and other plumbing equipment.
In this case, the heated towel rail can be placed directly above the washing machine, and in such a way that it does not interfere with the free opening of the lid of a front-loading machine.
If a ladder-type heated towel rail is installed, it should be located at such a height that an adult can have free access to the top rail of the dryer.
the system chose this answer as the best
There are no height requirements in any regulatory document; if I’m wrong, then indicate the document number and the chapter that says at what distance the heated towel rail must be installed from the floor.
There are only recommendations from specialists, and they mostly lead to two characteristics:
- Ease of use.
- Bath heating.
Although it is clearly stated everywhere that a heated towel rail is not a heating system, it is more designed to maintain the microclimate in a humid room such as a bathroom.
And since it does not apply to heating systems, it means there is no special law regarding its height on this side.
Read Corner between tiles and bathtub
Everyone refers to plumbers' directories, which were written back in the 50s and reprinted in more recent years.
So in these reference books there are recommendations for the bottom, which should be at least 60 centimeters, i.e. the lower, the more space it will warm up.
Nowadays they produce heated towel rails that are installed almost on the floor.
The requirements for installing a heated towel rail directly depend on its size, because contrary to its intended purpose, not only towels, but sometimes socks and nose caps are hung on it, and their size and configuration are very different.
Naturally, when installing a heated towel rail, you need to take into account the convenience of those who use it, that is, install it so that you can easily reach, for example, from the bathroom or shower for a towel, take into account that the things drying on it are not sprayed with water from the tap or shower, so that water can circulate freely around them. air and naturally so that they do not disturb others.
The height from the floor must be chosen so that it is comfortable for everyone, this is approximately 120 - 130 cm, and at this height the middle of the heated towel rail should be placed, both children and adults can reach it comfortably - the only thing that cannot be installed is the heated towel rail on the wall where there are electrical sockets , so as not to close it and for safety reasons it would be incorrect, reach for the plug from the hair dryer, pushing away the damp towel.
add to favorites link thank
There are some requirements, but to be honest, no one pays attention to them. Why? because modern heated towel rails themselves are quite small products, the requirement is 120 centimeters from the floor (from its horizon), but how can this be achieved if the heated towel rail is a meter long, and the height from floor to ceiling in the bathroom is only 2.20? (there are also such) answer: yes in no way (not to mount it to the ceiling)
I have been working in this area for many years and have never even heard that representatives from the Housing Office or another organization walk around with a tape measure and “look” for those same 1.20s. But if you want to do everything according to the law, then at least 90 cm from the floor, and if the heated towel rail is above the bathtub or washing machine, then at least 60 cm from them (not from the floor). Even Soviet heated towel rails (if a curved pipe can be called a dryer) were mounted at different heights, in other words, there is a norm, but no one bothers with this.
add to favorites link thank
General understanding of the operation of a heated towel rail
There are several types of such devices. The vast majority of them are designed to operate when connected to a pipeline through which heated liquid circulates. There are quite a few electric models on sale these days that only require a connection to the power supply. This is, so to speak, a “free-standing” category of heated towel rails, the installation of which does not require compliance with special requirements - it is only important to comply with electrical safety rules. By and large, installing such a device is not much different from connecting, say, a lamp or a heating convector.
The variety of heated towel rails is extremely large, both in terms of external design and operating principle.
The most “problematic” ones were and still are heated towel rails based on the water operating principle – it is with their installation that the greatest number of questions arise. The following discussion will be mainly devoted to devices of this type.
Combined type heated towel rails are subject to general rules when connected to pipework
Let’s immediately say that you can purchase a combined type model, which will work thanks to the circulation of hot water, but can, if necessary, switch to electric heating. However, connecting such heated towel rails to pipe circuits is subject to general rules, so we will not put them in a separate category.
How to understand the variety of heated towel rails?
The offered range of such devices is extremely wide, which can even be a dead end when choosing. A special publication on our portal will help in this matter - . ”
So, for normal operation of a heated towel rail, a flow of heated liquid through it is necessary. In multi-storey buildings, where hot water supply was organized on the principle of constant water circulation, this device, as a rule, was just an ordinary loop of a hot riser pipe, most often on the downward part of the “ring”, that is, with a flow directed from top to bottom. This meant that consumers received hot water at the required temperature, regardless of the floor of residence, and when the flow returned, additional heat was taken from heated towel rails.
From an early age, everyone is familiar with the heated towel rails found in most city apartments. Essentially - a loop on the return riser of hot water supply
Please note that the pipe forming the loop (one in U-type heated towel rails, or two in M-type) has the same diameter as the one on the riser itself, or even larger. This is a requirement to ensure normal circulation in the local DHW circuit, without interference or excessive hydraulic resistance.
It is clear that such heated towel rails now very often do not satisfy the owners in terms of their appearance. A decision is made to replace them with more modern ones that are most suitable in terms of their aesthetic qualities to the interior created in the bathroom. And this is where the “miracles” begin. Incompetent intervention by home craftsmen or even “poor plumbers” (of which, unfortunately, there are quite a few) leads to the fact that, at best, the heated towel rail does not work at all or heats up unevenly (this is especially true for “ladder” type devices). And in the worst case, the functioning of the hot water supply system throughout the entrance riser is disrupted, which entails administrative measures and, of course, aggravation of relations with all neighbors.
The fact is that ill-conceived decisions, most often based on the desire to hide the supply pipes or purchase a device of an original shape, without taking into account the peculiarities of its connection, lead to an imbalance in the hydraulic balance in the system. Therefore, later in the article we will offer options for connecting heated towel rails, from which you can choose the most suitable one. In addition, attention will be paid to controversial schemes that are obviously unworkable, or even completely prohibited for implementation.
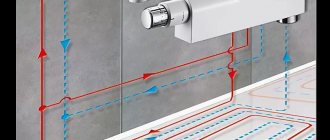
One more disclaimer before moving on to the diagrams. In the future, we will talk more about installing a heated towel rail in the hot water supply system. The fact is that in private houses or apartments where autonomous heating is organized, these devices are often an integral part of the heating system. On the one hand, it seems convenient, but on the other, in the summer, when heating the house is not needed, the device becomes “incapacitated.”
One of the universal options for organizing autonomous heating and hot water supply, with the inclusion of a heated towel rail in the overall scheme
Another option is to connect the heated towel rail to an autonomous hot water supply system equipped with an indirect heating boiler with an automated circulation circuit.
The schemes in both versions of autonomous systems can be very diverse, complex, but subject to slightly different rules. Therefore, this question will also be “bracketed”, since it relates to another section, more related to heating systems.
Prices for heated towel rails
Heated towel rails
Installation of a water heated towel rail
The DIY installation procedure involves connecting the inputs and outputs of the device to the heating system or hot water supply network. Moreover, the second option is the most rational, since hot water is available at any time of the year, while the heating system functions only in the cold season.
- Removing the old heated towel rail in the bathroom;
Before starting work, the hot water supply is shut off. This temporary measure is agreed with the relevant authorities in order to avoid unpleasant consequences. Having closed the valve, we proceed to dismantling. Unscrew all existing threaded connections. If the heated towel rail is an integral part of the water supply system or the thread is stuck, we use a grinder to separate it. We cut the pipe correctly, taking into account the margin provided for further threading
Next, carefully remove the dismantled part from the brackets
Do-it-yourself dismantling of an old heated towel rail
- Installation of cranes;
Taps are needed to regulate the intensity of operation of the heated towel rail. In addition, in the event of a breakdown, to eliminate malfunctions, they are used to shut off the water for further repair work. If the pipes have been cut and there is no thread on them, use a die of the required size to cut a new one. We restore the old threads in order to ensure a reliable connection of the parts. Only after this we begin to install the taps with our own hands. If necessary, a bypass system is installed at the same stage.
Connection fittings
- Installation of a new product;
At this stage, you will need fittings (angled or straight). To seal the connections, use linen winding or FUM tape for tapered threads
Next, we attach the heated towel rail to the wall using special holders or clamps and carefully attach the inlet and outlet to the fittings, carefully tightening the fasteners
It is very important to maintain the correct installation distance from the wall. The heated towel rail is attached to the wall at a distance of at least 3.5 cm for pipes with a diameter of up to 23 mm and about 5 cm for pipes with a diameter of 40-50 mm.
https://youtube.com/watch?v=ryeiqVJSpLY%3F
- Checking the quality of the installation;
After completing the work, you can supply water to the radiator. The water supply is smooth to avoid water hammer. After bleeding air from the pipes, close the valve and check (inspect and feel) all connections for leaks.
If the heated towel rail does not heat
Problems often arise after water is turned off for repairs or a summer break. After starting the hot water supply, it is discovered that the dryer is cold. The reason is an air lock that has become an obstacle to the passage of coolant. You can get rid of it using the Mayevsky crane.
You need to remove the decorative plug at the top of the heated towel rail, turn the valve and bleed the air. When water flows, close the tap.
The cause may be clogged with rust, especially if the pipes in the system are already old. To get rid of it, unscrew the connections, drain the water and rinse with strong water pressure from a hose. You can use a thin cable with a brush at the end, and chemical reagents.
Methods and subtleties of installing heated towel rails
Its functionality and service life depend on how correctly the coil is installed. Attaching heated towel rails to the wall, if the device is electric, is done in two ways:
- hidden - wires are hidden in the wall, under finishing materials;
- open – the device is plugged into the socket.
SNiP standards establish rules for installing electrical appliances in rooms with high humidity. The coil must be hung at a distance of at least 60 cm from water sources, be it a bathtub, shower, or sink. The distance from the floor to the device must be at least 1.2 meters.
Points to consider during installation:
- A coil is a compensating loop, which is not recommended to be connected to a general heating or water supply system, so as not to disrupt the correct operation of their operation.
- Heating is turned on only in the cold season, so it is recommended to connect the heated towel rail to a hot water supply system, which will ensure year-round operation of the device.
- Elements from different metals should not be used in the same design, as this will lead to corrosion. Teflon gaskets installed in places where parts come into contact will separate them and help avoid unpleasant consequences.
- For apartments, it is recommended to purchase products from domestic manufacturers, made in accordance with GOST, which will certainly fit the pipes.
The Soviet-style heated towel rail will have to be dismantled along with part of the riser.
Water structures have several connection methods:
- diagonal;
- top, bottom;
- lateral.
Detachable and telescopic brackets
For installing heated towel rails, these are the most suitable fasteners that meet the requirements of GOST. A simple bracket, a telescopic one-piece bracket and many others can be purchased at hardware stores. The appearance of the product is a ring on a leg that can be divided. The first part of the structure is screwed onto the coil outlet - no further actions are required with this element.
The leg is fixed to the wall using anchors, screws, and self-tapping screws. Then you just need to connect both parts. The brackets are made of brass, and to improve performance, protect against external factors, and increase attractiveness, they are nickel and chrome plated.
Telescopic brackets not only fix the heated towel rail on the wall, but also allow you to adjust the gap between them. A good option to simplify the installation of devices is detachable telescopic fasteners.
One-piece supports
These fasteners, like their detachable counterparts, consist of a ring and a leg. The difference is that both parts are soldered together, which causes inconvenience when mounting heavy structures. One-piece supports are rarely used.
Types of fittings
Fittings are supporting elements made of steel, chrome-plated brass. This is part of the piping system that is installed at the hot water inlets and outlets. They are selected according to the configuration of the device being installed, the location of its installation, and the requirements of the standards regarding the location of objects.
By design, fittings are:
- Bends are used to change the direction of hot and cold water supply outlets.
- The crosspieces are attached to the main pipes, providing two additional outlets for attaching devices.
- Tees are installed on the main pipe, creating an additional outlet on it. They are used when installing a coil if there was none before.
- The angles allow you to rotate the outlet and inlet by 90 degrees.
- Collectors create an additional branch.
- Couplings are used to connect two pipes with the same diameters.
- The caps seal the pipes hermetically.
- The fittings are designed for fastening flexible hoses.
- Plugs are used to plug unnecessary terminals.
- Reflectors protect connections from moisture and play a decorative role.
- Plugs cover unused outlets.
- Adapters are designed to connect two pipes with different diameters.
- Eccentrics compensate for the missing pipeline length.
- “American” is a detachable connection in the form of a union nut.
Types of fasteners
There are two ways to fix heated towel rails, which are practical, durable, and easy to install: using brackets and using supports.
Brackets
The manufacturer supplies the heated towel rail with the necessary brackets that can support the weight of the structure. Most often this is a chrome plated heated towel rail mount with a diameter of 25 mm.
Fasteners are:
- detachable;
- one-piece;
- telescopic.
The split bracket ring consists of two parts. The removable part is secured with two screws. The heated towel rail is simply inserted into the grooves, which greatly simplifies installation / disassembly.
Permanent fasteners - they are attached to the coil, and then the entire structure is fixed in the desired position on the wall. Installation and dismantling is inconvenient, since the entire structure will have to be kept suspended until it is completely fixed.
Telescopic brackets have a retractable tube with a fixing ring. They are dismountable, so they can be installed without outside help. Telescopic fasteners allow you to reduce or increase the distance from the heated towel rail to the wall during installation.
Connecting an electric heated towel rail
Unlike its water counterpart, installing an electric heated towel rail is completely unrelated to plumbing work. However, when connecting it, you still need to follow the rules:
- since the heated towel rail is a powerful electrical appliance, its connection should only be made to a line equipped with a circuit breaker;
- You cannot connect a heated towel rail on the same line with a water heater or washing machine;
- the heated towel rail must be grounded;
- If you plan to plug the device into an outlet in the bathroom, it must be moisture-resistant.
The heated towel rail in the bathroom can only be connected to a special socket.
The installation of the device itself is carried out using the same telescopic supports as in the previous case.
As you can see, installing a heated towel rail is not as difficult as it might seem at first glance. Of course, if you have ready-made pipes for connecting it in your bathroom. Otherwise, it makes sense to entrust this work to professionals, although if you have certain tools and special skills, you can handle this task yourself. Good luck with your renovation!
We fasten it ourselves step by step
If you have the tools and the proper skill, you can install the heated towel rail yourself, but the help of a family member will be very helpful. During the installation process you may encounter the most unexpected problems.
, so prepare in advance:
- grinder;
- adjustable wrench;
- screwdriver;
- key for American;
- level for even removal of holes;
- drill with a drill bit for glass and tiles.
Installation, replacement and fixation of the coil should only be carried out during periods of no heating. Otherwise, turning off the heating riser may cause damaged relations with neighbors.
The step-by-step instructions look like this
:
- Shut off the water riser.
- Fix the bracket to the wall using self-tapping screws or other elements (for example, a 6x40 mm dowel-nail).
- Place the heated towel rail onto the screwed brackets.
- Connect the riser with the water supply element to the coil. For these purposes, you will definitely need straight and/or elbow fittings
. “American” ones with a union nut are considered optimal. It would be a good idea to stock up on a ball valve. - Tighten the clamps, check the quality of the threads.
- Additionally, seal the resulting seams using plumbing tape.
If the installation is carried out on plasterboard, then we recommend strengthening the fastening points on the reverse side with a supporting plate or distribution profile to strengthen the support.
At this point the fastening process can be considered complete. If you choose the right design and meta settings, you will not encounter any particular difficulties.
Installation of a new heated towel rail
How to install a heated towel rail: stages
Installation and connection work is carried out in several stages:
- Cutting off the water supply.
- Removing the old coil. If it is connected with a thread to the riser, you need to unscrew it with adjustable wrenches. If the dryer is welded to the riser, we simply cut it off along with the pipe using a turbine.
- Installation of ball valves, jumpers.
- Screwing the Mayevsky tap into the bypass for comfortable ventilation of the system.
- Marking on the wall with a pencil places for future fastenings. Setting horizontal marks using a level indicator.
- Drilling holes according to special marks and driving dowels into them.
Necessary tools and accessories
To install a new heated towel rail in place of the old one you will need:
- 2 or 4 fasteners, depending on the number of leads on the coil;
- grinder with a metal disc for removing old pipes;
- adjustable wrench;
- screwdriver;
- roulette;
- level.
The set of tools that may be useful depends on the type of coolant, the selected fasteners, wall cladding and many other characteristics. For example, if you decide to organize the liner from plastic pipes, you will need a special soldering iron.
For proper operation of the heated towel rail, experts recommend installing ball valves at the junction of the coolant and the pipes. If a leak is detected, you can shut off the water without turning off the common riser.