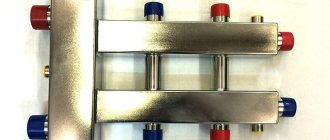
In this article we will find out when, when installing a heating system, you need to use a wall mount and when you need to use a floor mount for heating radiators. We will get acquainted with the types of fasteners, with the methods used for fixing heating devices and learn how you can install radiators with your own hands in each case.
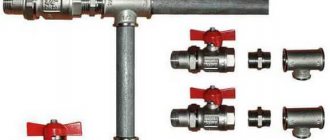
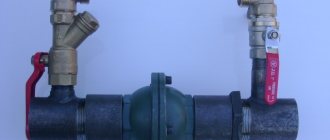
One of the ways to install a radiator.
Areas of use
In what cases each type of fastener is used is not difficult to figure out.
- Wall mounts are traditionally used for mounting heating devices on solid walls.
- In rooms with light partitions (slag and aerated concrete, plasterboard, plywood, etc.), floor installation is preferred.
However, the scope of application of floor fasteners is not limited to this.
It applies:
- In rooms with panoramic windows. Heating devices of small height form a thermal curtain that prevents windows from fogging up without blocking the view through them.
- In rooms where the entire wall area is occupied by hanging furniture, plumbing fixtures and other equipment. The floor battery can be placed not only near the wall, but also in the center of the room.
However: such an installation implies a hidden installation of the lines to the radiator. It is performed in a screed or under a subfloor.
- In rooms with a certain style. For example, a floor-mounted cast iron radiator will fit perfectly into the design of a room designed in retro or loft styles.
A cast iron battery on racks will organically fit into the loft style.
Is it worth it to install radiators yourself?
Many experts do not recommend installing a radiator in a city apartment yourself unless you have good skills in this matter. We are inclined to agree with this opinion for a number of reasons:
- Installing a radiator requires some time, even for experts. If you don't have experience, it will take much longer. And during the period of work it is necessary to turn off the heating throughout the riser. Although, of course, you can postpone everything to the summer, when there is no coolant in the system.
- In addition to time, as we have already said, experience is required. Connecting radiators to a heating system is a very important matter. If you undertighten or overtighten any of the connections a little, and after some time it may lose its tightness. You will flood not only yourself, but also your neighbors with hot water.
- Proper mounting of the battery to the wall is also very important. We will talk about this further.
Types, design and application of fasteners
Wall mounting
Here, manufacturers do not spoil us with variety: wall mounting brackets come in only two varieties.
- Angular (plate, cantilever). Behind these names lies only an L- or T-shaped steel plate with holes for screws. After marking the attachment points, the bracket is attached to the wall using a standard mount or (which is much more reasonable) anchor bolts; the heating device is hung by the collector on a plate with a recess perpendicular to the wall.
The product is suitable for lightweight aluminum batteries.
- Pin brackets are a curved rod with a pipe thread that is screwed into a plastic dowel. The dowel, in turn, is driven into a hole pre-drilled in the wall. This type of fastening is noticeably more reliable than the previous one and is designed for greater load.
This type of fastener has a greater load-bearing capacity.
Please note: it is better to hang massive cast iron heating devices on pin brackets.
crazy hands
If for some reason you do not have the opportunity to purchase a mounting kit for wall mounting of a radiator, the situation can be saved by ordinary smooth fittings with a diameter of 10 - 12 millimeters.
- The radiator is placed on any supports (bars, bricks, etc.) in the working position.
- Mounting points are marked on the wall. Their total number is selected at the rate of one per three sections of the heating device; In this case, both the upper and lower collectors need fastening.
- The wall is drilled under reinforcement with a diameter 0.5 mm less than the own diameter of the rods.
- The reinforcement is cut into pieces of approximately 25 cm; on one side (hammered into the wall) the chamfer is removed.
- The rod sections are hammered into the wall, after which the heating device is hung on them.
- The edges of the rods are bent upward using any pipe as a lever and cut in place.
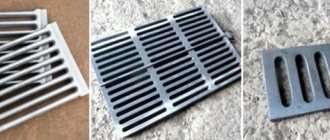
Floor mounting
Here are the most common types of floor brackets.
Bracket K10.100.
This floor mount for aluminum radiators is designed for fixed depth sections (100 millimeters). The heater is installed on a support with the lower manifold; the rear fins of the sections are fixed with a pair of screw clamps.
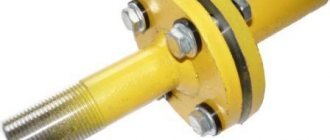
Bracket K 21.7.
Unlike the previous one, this product:
- It is adjustable in height, which allows you to install the heating device both at a minimum distance from the floor and with a gap below it.
- Universal: you can install an aluminum or bimetallic radiator of any size on it.
The retail price of the stand varies from 300 to 450 rubles.
Installing the heater on a rack is extremely simple:
- The upper holder is set at the desired height;
- The radiator is hung on it;
- The lower holder rises to the level of the lower manifold and is clamped with a screw.
Bracket K10.7.
Another device for fixing a heating device of fixed dimensions. In this case, it is designed for a center-to-center distance between collectors of 500 mm with a section depth of 100 mm. The absence of moving parts makes it reliable and cheap (retail cost is only 200 rubles).
Bracket K 11.33.
Here is an adjustable stand for panel radiators; The diagram makes it clear how to fix them with stops. The maximum mounting height is 640 millimeters (along the upper edge of the radiator); The retail price of the product is 350 rubles.
Bracket K 10.10.
Economy version of the mount for a panel steel radiator. There is no height adjustment; The simplest method of fastening the panel is used - standard eyes are put on the hooks of the racks. The cost predictably turns out to be very affordable: in batches of 100 pieces, K 10.10 can be purchased for 150 rubles.
Bracket K 12.3.
Unlike previous products designed for relatively lightweight aluminum and bimetallic heating devices, K12.3 is a floor mount for cast iron radiators.
Please note: cast iron appliances are not only heavy in themselves. They also have an impressive internal volume (up to 4 liters per section), which significantly increases the load on the mount after filling the battery with coolant.
The lower rack holder is rigidly fixed; This is where the main load falls. The top one is movable, which allows you to install a device with a height of both 500 and 350 mm.
Bracket K 11.3.
The difference from K 12.3 is only in the ability to adjust the height of the lower collector above the floor. Otherwise the products are completely identical.
Recommendations
We take the liberty of giving the reader some recommendations for floor installation of radiators.
- The racks must be secured as rigidly as possible - with anchors or, when installed on a wooden floor, with thick (at least 8 mm) self-tapping screws with hexagonal heads.
- On a wooden base, it is better to additionally secure the battery to the wall. Even to a light internal partition: this will significantly reduce the likelihood of the racks falling and breaking the tightness of the liner.
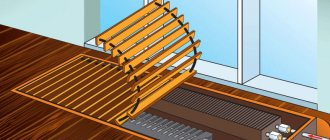
- As already mentioned, when installing the device in the middle of the room, it is better to lay the connections to it hidden, in the floor. The instructions are due to the fact that, for example, metal-plastic pipes are quite capable of deforming under the weight of an overweight person.
The photo clearly shows the eyeliners going into the floor.
Rules for floor mounting of the battery
Radiators are rarely installed using floor mounting, and if installed, it is for the following reasons:
- There is not enough space on the wall. For example, a window that is too large does not leave space for a radiator.
- Special requests and aesthetic considerations. Some designer batteries have a special design that requires only floor mounting, or the stylistic design of the room requires mounting the radiator on legs or on a pedestal.
This installation method has the following advantages:
- 100% reliability;
- high installation speed;
- simplicity;
- can be used with all types of batteries (including cast iron).
You need to make marks on the floor, depending on how the future structure will be placed. Using fasteners, each holder is firmly fixed to the floor. If the battery weighs little, then the kit should include small legs, and not large and heavy brackets. They are attached the same way.
The last step remains - attach the radiator to the already installed elements and connect it to the pipes.
Each threaded connection should be tightened sufficiently, but applying too much force is dangerous. It is recommended to use a torque wrench; the corresponding indicator should be indicated in the radiator installation instructions.
Replacing a heating device is not only about saving money. This process requires maximum care and attention. If you do not have confidence in your own abilities, it is better to turn to professionals.
Did you manage to solve your problem using the recommendations from the article?
Yes!
46.38%
No. More answers required. I'll ask in the comments now.
38.11%
Partially. There are still questions. I'll write in the comments now.
15.5%
Voted: 774
Results
The main factors when choosing a mounting option for heating radiators are reliability and long service life.
Therefore, if the walls do not meet strength standards or an unusual design project , floor brackets are the most reliable option.
Floor fastenings are indispensable if radiators are installed along plasterboard or MDF partitions, next to panoramic windows or far from the wall.
To ensure that the operation of heating radiators does not cause trouble, approach the issue of fastenings with all responsibility and attention. If you are in doubt about the correct choice, it is better to contact specialized services.
Source
Wall mounting systems
The main condition for wall mounting is that the material of the mounting system matches the material of the radiator. Since cast iron models are heavy, the fasteners must be quite strong and massive. The material for them is usually steel. Steel, and even more so aluminum radiators are much lighter, so fasteners can be taken less massive, from lighter alloys.
Installation on brick or concrete walls
A drill or bolt is used to make a hole whose diameter is larger than the diameter of the radiator bracket; a little cement mortar or gypsum putty is added to it. After the solution has hardened, the plastic dowel from the kit is inserted, and then the fasteners are screwed in. The mounting depth in the wall must be at least 12 cm.
Calculation of the number of fasteners and their installation locations
The distance from the battery to the wall depends both on the type of battery itself and on whether the pipes are laid inside the wall or on top of it. Wall mounts are placed in 2 rows to support the radiator by both pipes - upper and lower. Their number is calculated as follows: at least one bracket per 1 sq. m surface of the heating device.
There are at least 3 wall brackets for the battery - 1 at the bottom and 2 at the top. The holes for the top fastenings must be located strictly on a horizontal line.
Therefore, they must be marked using a building level. If there are several batteries in the room, then it is better to make a template out of plywood using the holes for the first one, this will speed up the process of installing all subsequent ones.
Installation process
Work on installing heating radiators in this way can be done with your own hands. There are practically no special differences when compared with traditional installation. The only difference is that the fasteners are fixed not to the wall, but to the lower plane.
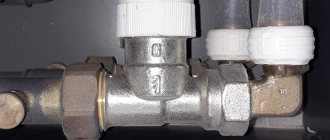
This is approximately how the fastening is carried out.
Required Tools
- A screwdriver is required to tighten the screws that secure the part.
- A simple pencil will be needed to mark the places where fasteners are installed.
- You will need a tape measure for measurements, because you will have to determine the distance between the brackets.
- An electric drill is required to drill holes if the installation is on a concrete floor.
- Using a hammer, you will hammer in the dowels that are used to hold the screws.
When installing on a concrete floor, dowels will be required.
Sequencing
When installing a floor mount for cast iron heating radiators or aluminum analogues, it is necessary to select the correct bracket.
In the first case, the devices will weigh much more, which means more durable parts will be required to hold them.
- At the initial stage, marking is carried out . Using a tape measure, the distance between elements is measured. The installation locations are marked with a simple pencil.
- Using an electric drill, the holes are prepared, after which the dowels are driven into them with a hammer . When installing, be careful not to break the auxiliary fasteners.
- Using a screwdriver, the holders are securely screwed on . Typically, each bracket is secured with two or three self-tapping screws. They need to be tightened well.
- Heating devices are hung on fixed parts . The nuts on the holders are tightened well. At the last stage, the pipes of the heating communication system are simply connected.
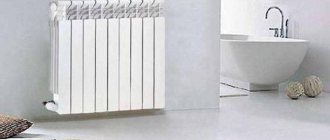
A long radiator looks very interesting in the interior.
Attention! If a model with a metal chain is used as the main holder, then when installing heating radiators, you only have to tighten the nut on one side.