Features of installation of warm greenhouses
Depending on the purpose of the greenhouse, the method of its heating, the level of illumination and other technical characteristics are selected. Winter greenhouse structures are buildings on a foundation that can withstand strong gusts of wind and snow loads.
First, you need to decide on the place where the winter greenhouse with heating will be installed with your own hands. It could be a hillock or a hill. If the terrain is flat, then it is advisable to create an earthen embankment. This method contributes to additional heating of the greenhouse building due to the sun.
It is advisable to allocate an area for a vestibule within the building area. It will create a transition zone and cold air will not penetrate to the planted plants.
Methods of heating a greenhouse
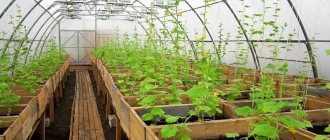
Heating of greenhouses can be divided into natural and artificial methods. Natural, as you might guess, is to create a greenhouse effect (and, accordingly, warming plants and soil) by solar energy penetrating through the greenhouse covering. This method is excellent for growing heat-loving crops from about mid-spring. To obtain the greatest efficiency from natural heating, it is better to arrange the greenhouse in an area where the sun shines from the very morning, which allows for maximum warming of the earth.
In addition, it is advisable to choose a place that is reliably protected from drafts that cause cooling of the greenhouse cover.
Natural heating of a greenhouse using sunlight
Of course, this heating method cannot be considered complete when it comes to year-round cultivation of crops. This will require additional heating, which can create a natural greenhouse effect during the cold season. Among the main methods of heating greenhouses, preference is most often given to electric, gas and solid fuel options.
Foundation
The greenhouse building has a heavy structure and requires laying a foundation for strength. There are 4 ways to base it:
- tape;
- brick;
- squared;
- stone foundation.
Practice shows that the most common is a strip foundation.
Work order:
- Construction site marking;
- digging a ditch about a meter deep;
- covering the bottom of the pit with waterproofing;
- production of reinforcement to strengthen the foundation;
- filling the ditch with cement mortar;
- coating of thermal insulation material on a completely hardened foundation.
Next, bolts are attached to the prepared foundation to construct the frame. When deciding how to build a winter greenhouse, some craftsmen lay one layer of brick on the foundation. With this method, the bolts must pass through the brickwork and penetrate the fabricated foundation.
Gas devices
Gas boilers for greenhouses are a good option. They ensure that the greenhouse operates smoothly and is heated at a level suitable for the vegetation. The automation of the boiler ensures its autonomous operation, while human participation in this case is limited.
Using gas heating, you can heat the greenhouse in one of the following ways: air, water, infrared.
Infrared gas heater for greenhouse
Most often, infrared gas heaters are installed on the roof. This is due to the fact that gas infrared heating of a greenhouse in winter has one important advantage: the soil is heated first, and only after it the air.
You can read more about electric infrared heaters for greenhouses here.
The disadvantage of such heating is the need to install ventilation to remove combustion products.
The second option is to heat the greenhouse with a gas boiler combined with a water system.
Gas boiler for greenhouse
To put this heating method into effect, it is necessary to install smooth pipes with a diameter of no more than 40 mm over the entire area. They need to be laid along each bed 20-30 cm above ground level. The following types of wiring are allowed:
- The supply line is along one wall, the return line is near the other. They are connected to each other by transverse pipes running between the beds.
- The supply and return lines are laid along one wall. Each heating pipe runs along one bed and returns past another.
- The pipe is laid in a snake pattern over the entire area of the greenhouse, forming a single heating circuit.
Shut-off valves must be installed on each branch so that it is possible to turn off the circuit in the event that there is no vegetation in the greenhouse.
In a greenhouse heating system using a gas boiler, the main advantages can be noted:
- autonomous operation of the device;
- ease and speed of boiler maintenance;
- high efficiency.
Minuses:
- It is difficult to supply gas to the greenhouse: you need to call a special service.
- High cost of gas tariffs, especially in the summer.
Frame
For the construction of the frame, pipes, angles and metal profiles are mainly used.
Stages of work:
- Fastening the bottom lining to the manufactured foundation with anchor bolts;
- installation of vertical supports on the lining using fasteners or a welding machine;
- joining vertical posts with a horizontal support at the top;
- installation of the frame under the roof.
To increase the strength of the created structure, the profiles are joined with stiffeners. Next, the finished frame is sheathed with polycarbonate.
The strength of the greenhouse structure as a whole depends on the proper design of the frame. Therefore, it is installed based on plans and calculations prepared in advance.
Price issue
The easiest way to find out the exact cost and required amount of heat for a structure is to ask the manufacturer. To calculate the required power, you need to multiply the values of the total area of its glass, the heat transfer coefficient and the temperature difference. By temperature difference we mean the difference between the maximum and minimum values that are possible in a particular building. The heat transfer coefficient can be found by studying the documentation for the light-conducting material.
You can determine the most effective ways to achieve energy savings when heating by considering information about the features and location of the heated structure on the site. For example, if the greenhouse is located next to a residential building and is well insulated, you can run a heating main from the house to it by inserting a water supply hose into its channel.
In other cases, in order to save money, it is desirable to organize autonomous heating of the greenhouse using one of the methods described above.
Types of winter greenhouses
Depending on the frame material, the shape of the greenhouse is selected. They can be arched, single-pitched or gable-shaped. Arched types are usually used for a metal frame.
This is due to the fact that it is problematic to make an arched greenhouse from a wooden frame. It will take a lot of effort and time. But for wooden structures, single-slope and gable types of greenhouses are acceptable.
How to make heating in a greenhouse with your own hands
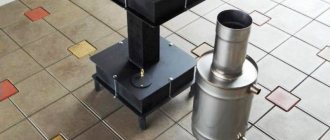
If a heating system was not provided during the construction of the greenhouse, you can use a simple ethyl alcohol stove-heater. Naturally, an alcohol lamp with a wick will not work here, since its burning time hardly reaches one hour, and the flame in this case is too large. In such situations, you should use a wickless alcohol stove. But here, too, the combustion process must be carefully controlled, otherwise the fire will go out very quickly.
To do this, you need to take a simple used iron or smaller tin can and select a tin lid for it that can close it as much as possible. Then, using an awl, holes are made at the top of the jar, similar to a gas burner. After this, all that remains is to pour in the alcohol, set it on fire and carefully cover with a lid. Such burners can burn for about 2 hours, maintaining the required temperature in the greenhouse throughout the entire time.
If such a burner will be used at night, then it is necessary to add a capacious tank of fuel, and then stabilize the fuel level in the burner.
A simple burner for a greenhouse that you can quickly make with your own hands
A simple polyethylene bottle with a hole about 5mm in diameter in the lid is ideal as a tank. To stabilize the fuel level in the burner, the fuel bottle should be placed with the neck down and then connected to the burner. Then they must be installed relative to each other so that the fuel in the burner is at the specified level. To do this, the fuel tank is installed slightly below the burner itself. At the same time, remember that the tank with alcohol and the burner should not be located next to each other, thereby avoiding heating of the fuel in the bottle itself.
Sheathing
The era of multilayer PVC film is becoming a thing of the past and has been replaced by polycarbonate, from which the best winter greenhouses are made. The material has many advantages:
- Aesthetic appearance;
- resistance to external damage;
- ease of processing and installation of sheets;
- a light weight;
- polycarbonate can withstand increased loads;
- does not deform under the influence of ultraviolet rays.
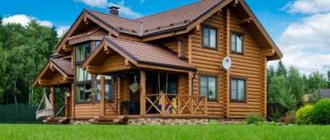
The listed characteristics make polycarbonate an excellent material when deciding how to make a winter greenhouse. It ideally protects plantings from precipitation in the form of rain and snow. Helps maintain the desired microclimate. The photo of a winter greenhouse shows a version of a polycarbonate greenhouse.
Glass also continues to be used as cladding. It is inferior to a winter greenhouse made of polycarbonate in terms of thermal conductivity, but with careful handling it wins in terms of long service life and light transmission.
In regions with cold climates, the best option is a greenhouse - a thermos. Its essence lies in double sheet cladding like a double-glazed window. The characteristics of the outer layer are 6 mm, and the inner layer is 4 mm.
The process of assembling or installing a heating system
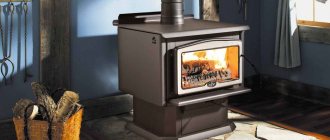
The stove - “potbelly stove” - is one of the oldest and well-known heating systems. It includes a firebox, chimney, and chimney in its design.
Installation of the furnace begins with the foundation. It makes its operation less fire hazardous and increases its service life.
Foundation
The construction of the foundation begins with the construction of a pit. Its depth should be at least half a meter. Its depth directly depends on the dimensions of the furnace. For pouring, a concrete mixture with sand, small crushed stone and brick fragments is used. Its thickness is from 15 to 20 centimeters. Afterwards the formwork is installed and cement is poured. The gaps are filled with sand and covered with roofing felt. This provides additional moisture resistance. The last stage of foundation construction is laying the bricks. It is laid in a double layer.
Installation of a "potbelly stove"
There are quite a lot of types of “bourgeois” stoves. The simplest design is a rectangular oven. For more convenient operation, the firebox should go to the surface.
- Make a drawing of the future furnace.
- Any heat-resistant metal is used to construct the firebox.
- Markings are applied to the metal sheets and the bottom, walls and roof are cut out.
- Three walls and a bottom are welded together.
- Metal corners are welded at a distance of about 15 centimeters from the bottom. A grille is installed on top of them. You can make it yourself from rods. The distance between them should be from 1 to 4 cm.
- Oven cover. A round hole with a radius of 6.5–7.5 cm is cut in it. Afterwards it is welded to the walls.
Important! In order to place the chimney under the soil, the hole for the chimney can be mounted not only in the roof, but in one of the walls and even in the bottom of the stove.
- A hole is made in the front of the stove for storing fuel and a hole for the vent. The doors are attached using hinges and welding. Also, don't forget about the handles.
- The facade of the furnace is welded to the rest of the structure.
- There is a round hole in the roof, to which a narrow metal ring is welded. A chimney pipe will be attached to it later.
- Attach the legs to the stove.
- If there is a need to line the stove with bricks.
Chimney
During installation, you can use both whole pipes and their pieces. If the greenhouse is small, it can be laid under the soil layer.
- All pieces of the chimney are fastened to each other.
- Then attached to the base.
- In the case of laying a chimney under a layer of soil, dig holes in the ground 0.25 - 0.4 meters high. Pipes are laid in them. The distance between them is at least 0.6 m. Cover everything with expanded clay. The end is brought out.
- When constructing a ground chimney, supports are installed. The end of the pipe should rise. The outside of the pipes is covered with lime.
Chimney
She is responsible for removing smoke from the room. It must be covered with thermal insulation material and attached to the chimney.
- A spark arrestor is placed on the end of this pipe.
- A damper is installed to adjust the draft, which is controlled by two wires brought out.
Heating
With a variety of methods and fuel used, there are several heating options:
Air - heated air moves through different level air ducts or is heated by a stove installed in the house. It is one of the most budget-friendly options for heating a winter greenhouse. A significant disadvantage of this option is manual control. Accordingly, according to safety regulations, it is impossible to leave such a greenhouse without control.
Contour - an electrothermal circuit is mounted along the edges, a radiator and pipes are used.
Subsoil - suitable for use in regions with warm climates. Water floor tubes or special electrical cables used for subsurface heating are laid directly in the ground.
Combined - a combination of infrared lamps for greenhouse conditions on top and polypropylene tubes filled with coolant located in the soil. The overall operation of the two elements of the system contributes to uniform heating of the air in the lower part of the greenhouse and in its upper part. This heating system is equipped with microclimate control sensors in a heated winter greenhouse.
Choosing the optimal boiler
It is necessary to select a boiler model taking into account the size of the installed greenhouse, as well as the crops being grown. If there is gas, then it is better to use gas models. For year-round models, solid fuel boilers are a good option. For small greenhouses with periodic use, installing a solid fuel boiler is not suitable. It is much more profitable to install a low-power electric one. It does not require space or the construction of a chimney, and electricity costs are minimal.
When using radiators, a number of calculations are required. To achieve a good result and maintain a constant microclimate, you should contact a specialist. In this case, the following are taken into account :
- dimensions of the building;
- thermal power ;
- number of radiators.
The sections must be distributed throughout the greenhouse in several rows. It is better to opt for low radiators for good soil heating.
Water heating using radiators Source th.decorexpro.com
Lighting and Humidity
For full development, plants require additional lighting. The level of lighting depends on the crops planted in the greenhouse. In particular, greens and young seedlings require less light, unlike berry crops.
For lighting, sodium lamps are installed that imitate the sun's rays. Lamps are mounted above beds or boxes with seedlings. You can also hang regular fluorescent lamps. But in terms of efficiency they are much inferior to sodium lamps.
It is important to equip electrical wiring with moisture protection.
Regular watering eliminates the need for additional air humidity. To avoid excessive humidity, create a forced exhaust or ventilate the greenhouse through the vents on the roof. Irrigation is organized using warm underground water supply or using storage tanks.
To build a winter greenhouse you will not need to spend a lot on building materials. As a result, it will last for many years and will be an excellent help in the garden, and fresh fruits and vegetables grown yourself will create a good mood.
Preparatory work
Preparing for the construction of a winter (year-round) greenhouse with your own hands includes planning, preparation of materials, preparation for heating installation and arrangement of the foundation.
Planning
There are many options for winter greenhouse designs. They can be a traditional, quadrangular shape in the top view, but they can also be hexagonal , they can be of different heights , ventilated differently, etc. The easiest way is to take as a basis the design of a quadrangular (sometimes they say four-walled) greenhouse , and here's why:
- personal plots and vegetable gardens usually have a quadrangular shape; by arranging the greenhouse according to the shape of the vegetable garden, you rationally use the space ;
- A four-wall greenhouse design for winter growing is simpler . Especially when glazing or stretching film;
- To service such a greenhouse, you can draw a single path in the middle, along which pipes for irrigation, etc. will be directed. That is, it is easier to operate .
Hexagonal (octagonal, decagonal) greenhouses usually have modest dimensions and the advantage that the hexagon has a more favorable ratio of area and perimeter, hence less heat loss , but the complexity of the design and the complexity of operation, the limitation in size makes such greenhouses more of a work of art than a means to earn money or grow plants for food. Therefore, we will consider a quadrangular greenhouse.
Fig.3 Hexagonal greenhouse
It should be oriented from north to south, it is best to make the roof gable , and install additional supports so that the structure does not collapse under the weight of snow. If the frame is factory-made and the cross-section of the greenhouse has the shape of an arch, this is even better - the snow will slide off on its own.
The place should be level, the soil should be sandy . If it is clayey, you need to make a cushion of sand, and on top - a layer of fertile black soil.
Ventilation must be carried out regularly during the warm season , otherwise the plants will die from the heat. This means that this function needs to be included in the design. Firstly , the greenhouse must have two doors at opposite ends to create a draft when they are opened simultaneously. Secondly , if the greenhouse is more than 10 meters in length, it is desirable that it also have opening windows . Windows can be in the side walls, the ceiling, next to or above the doors. The higher the windows, the better.
Materials
Here , the stronger, the better . A steel angle or pipe is best. A factory frame made of galvanized iron is suitable. Bolt together.
Worse - timber, board or poles. It is better to fasten wood with self-tapping screws; nails are often pulled out by the wind, especially when the wood begins to collapse.
It is advisable to paint non-galvanized iron so that it rusts less, and treat wood with an antiseptic to prevent fungi or insects from infesting it.
Foundation structure
This mandatory part of the winter greenhouse must reach such a depth where the ground no longer freezes . The foundation may consist of cinder block or concrete. It must be insulated on top with waterproof material (tar paper) so that moisture does not rise higher.
On the foundation there must be a plinth , which is built from the same cinder block or brick. In this case, the floor of the greenhouse can be lower than the level of the surrounding soil , i.e., year-round greenhouses made with your own hands are, as it were, dug into the ground for better heat retention.
Heating preparation
For large greenhouses, the best heating is water , like in a house. This will allow the heat to be evenly distributed. But this requires a lot of money, materials and labor, so it will be easier to make several ordinary potbelly stoves . For a potbelly stove to be more efficient, the pipe from it should not go vertically upward. Instead, make 5 meters of pipe at a slight angle (up to 10 degrees), and then connect it to a vertical pipe.
Be careful that there are no smoke leaks at the joints - it is harmful to plants because it contains sulfur oxides.
Fig. 4 Example of heating in a winter greenhouse
There are also infrared gas burners , which will serve as an additional source of heat. But they need to be screened from the ceiling and from plants. It is best to place such a burner inside a large pipe, open on both sides. The combustion products of natural gas are almost harmless to plants , unlike the combustion products of wood and coal.