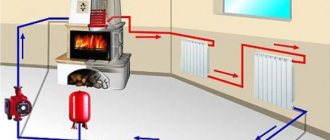
Most homeowners choose heated floors as an additional device to the radiator circuit. In this case, various installation diagrams for water heated floors are used in a private house. Such a heating system is effective in rooms where children live, as well as in the bathroom. Schemes are selected when individually designing a house or during renovation work.
Option for a project plan in a private house
Installation diagrams for water heated floors in a private house: features and varieties
Installation of underfloor heating is carried out using a cement screed. It is performed to protect the structure from various loads. Warm pipes should not be in contact with air, but with screed elements, transferring heat to the surface.
Underfloor heating system
Installation diagrams of water heated floors used in a private house are planned and designed in accordance with calculations of heat consumption and heat loss and have the following features:
- The required amount of heat is calculated taking into account the dimensions of wall structures and methods of insulation of different surfaces. The characteristics of a certain climatic zone are also taken into account.
- Floor elements are not installed under the entire surface of the floor covering. Space remains free for the installation of heavy furniture, as well as indentations from the walls.
- Premises with an area of more than 30 square meters are divided into sectors. Each individual area is heated using a separate circuit connected to the collector.
- The distance between the pipes must be the same.
- This design requires circulation pumps.
- Installation schemes for heated floors depend on the size of the room and heating methods. If the device is used as additional heating, then the loop pitch should be 0.2-0.3 meters, and if as the main one, then the spirals should be mounted at a distance of 0.1-015 m.
- The length of the lines and the placement pitch depend on the diameter of the selected pipe.
- The height of the structure is taken into account when designing window and door openings.
Article on the topic:
Calculation of the heat of a heated floor. Without a competent project, it is almost impossible to obtain a high-quality heating system. After studying this publication, you can easily calculate the required power, diameter and pitch of pipes. Good luck!
Design of an underfloor heating system
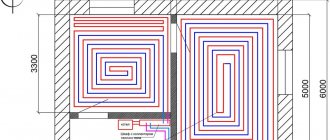
The main floor installation patterns include: spiral, snake and zigzag. The choice depends on the specifics of the room, types of pipes and other features. For example, for large rooms, using a simple snake is not entirely correct, since the water in the circuit cools down, “cold” zones will form. While in spiral laying the supply and return pipes alternate, which will ensure more uniform heating.
Basic contour laying options
Helpful information! The diameter of the pipe should be no more than 20 mm. If the cross-section is larger, the volume of water and heating costs increase.
Typical errors of combined systems
The desire to save money leads to various variations of the proposed schemes. In the process of simplification, sometimes important elements are excluded and the heating system ends up looking like this:
But it’s still wrong to do this because:
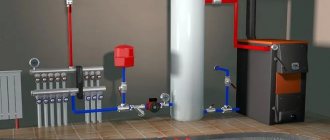
- In this scheme there is no decoupling (independence) of the two remaining pumps of boiler 1 and the heated floor circuit 3, because they are connected to the common points of the circuit A and B, between which there is a large hydraulic resistance. In contrast to the circuit with a hydraulic arrow, where there is very little resistance between points A and B (D and C) (that’s why it’s a hydraulic separator).
- In some situations (when all radiators are closed and the heated floor is running), the boiler pump and the underfloor heating pump work sequentially, interfering with each other. This leads to changes in the coolant flow through the boiler heat exchanger.
- In situations where both radiators and underfloor heating are operating, the underfloor heating pump 3, at certain positions of the mixing valve 2, reduces the pressure difference between points A and B and thereby reduces the coolant circulation through the radiator circuit.
- And if boiler 1 stops, underfloor heating pump 3 still drives coolant through the boiler and through the radiator circuit, creating parasitic circulation. And if parasitic circulation through the radiator circuit can be dealt with by installing a check valve (at point A towards the radiators), then parasitic circulation through the boiler cannot be dealt with.
- Because If you did not install the protective thermostat 6, then in emergency situations (for example, a mixing valve is jammed) if too hot coolant (over 55°C) gets into the heated floor pipes, destruction of the floor screed and floor covering may occur. And the pipes won’t say thank you if you apply 80 degrees into them.
- Due to the fact that there is no bypass valve in the heated floor circuit, when all the heated floor loops are closed (automatically or simply with playful hands), the coolant circulation in the circuit stops and pump 3, which, of course, no one turned off (well, they forgot, with whoever it is) works on a closed valve and heats up. Of course, a good circulation pump like Grundfos UPS 25-40(60) can probably work for a year in this mode, but sooner or later it will fail.
A protective (safety) thermostat is always needed.
But you don’t need to install a bypass valve when:
- at least one floor loop will always be open;
- or the circulation pump will be frequency controlled;
- or automatic control of heating circuits can also control the circulation pump, turning it off when all the loops of the heated floor are closed.
Based on the shortcomings of the modified circuit, we urge you not to use it when installing a mixed heating system at home.
Construction of a heated floor
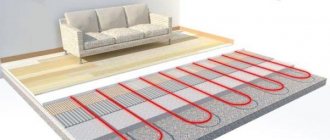
An underfloor heating system consists of laid pipes in which heated water circulates. They are installed on concrete or wooden surfaces, and covered with the selected finishing coating on top.
Warm floor in section
Hot water moves through pipes. The supply is carried out using the main heating. The air temperature under the floor rises, transferring heat to the outer surface of the floor covering. At the same time, the entire room warms up.
Design features depending on the finishing coating material
What is combined heating
Combined (mixed) is a heating system that contains both traditional high-temperature (conventional radiators, convectors) and low-temperature (warm floors, less often warm walls) heating devices.
Water floors in a combined system are connected in two ways:
- For existing heating boilers . The advantages of this solution are a reduction in the estimated cost of equipment and a reduction in installation time. Disadvantage - additional heating cannot function in autonomous mode. This causes an increase in thermal energy consumption, and the efficiency of using heated floors decreases.
- Install hotel boilers for floor heating . The disadvantage is a significant increase in cost. Advantages: complete autonomy; water floors can be used independently of radiators. This may be necessary for a small heating of the room when the batteries are already turned off, for example, in the autumn-spring period.
Important! In apartment buildings, connecting water floors to the existing heating system is prohibited!
1st floor - heated floor, 2nd floor - radiators
Nuances of installation
The technology of installation diagrams for water heated floors in a private house is determined by the characteristics of a particular heating circuit.
Construction installation options are influenced by many parameters
The installation work of the structure has the following distinctive features:
- The base for the equipment is selected taking into account the floor covering.
1 – floor beam; 2 – longitudinal beam; 3 – logs; 4 – mortgages for pipes; 5 – pipe; 6 – finishing coat
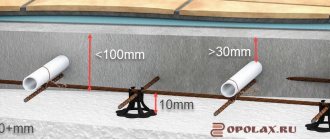
- A damper tape is installed around the perimeter of the room. The shock-absorbing element reduces heat loss at the junction of the floor and wall surfaces.
Features of laying damper tape
- The system itself is mounted on concrete slabs in a screed.
Screed installation for water heated floors
- Waterproofing, reinforcing mesh and a layer of insulation are laid on the base.
Laying waterproofing material on the base
- Pipes are mounted to the frame using clamps or steel wire.
Installation to a frame structure
For heated floors, special seamless pipes are used. The circuit is mounted from a solid line. The pipe material must be resistant to corrosion and resistant to high temperatures.
Special pipes for the water circuit
Helpful information! Profile mats made of extruded polystyrene foam can be used as a frame and insulation. Then the canvases are covered with a layer of waterproofing.
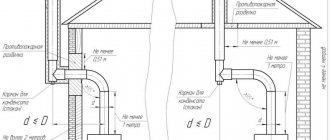
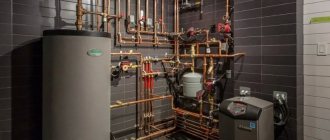
Features of connecting the structure to a heat source
In a floor circuit, most often the average coolant temperature is 35-40 degrees. Installation diagrams for water heated floors in a private house operate using forced mixing of flows. Part of the coolant from the return flow passes into the supply circuit.
Thermostat connection diagram
Gas boilers are equipped with special automation. Solid fuel units require a more complex device. They are equipped with circulation pumps and a special buffer tank. In this case, more complex combustion adjustment is used.
Location of the boiler in a separate room
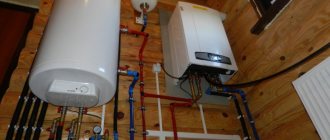
Electric boilers are considered the best option for underfloor heating systems. Special automation allows you to maintain the desired temperature without loss of thermal power.
Electric boiler in operation
Helpful information! To heat small houses, a direct connection to an electric boiler is used. In cottages with a large area, a special distribution comb is used.
Which heating devices to choose?
For gasified settlements, this issue is not relevant, since gas has been and remains the cheapest and most accessible fuel. Installing a high-quality condensing boiler solves the problem. But in areas where there is no highway nearby, the choice usually comes down to solid or liquid fuel.
Liquefied gas, as practice shows, is not a solution, because... heating is too expensive, no matter how economical the boiler is. But “to be on the safe side” you can purchase a gas model, which can be easily converted to heating with liquefied gas by simply changing the nozzle.
If the home owner has the opportunity to buy diesel fuel below the market price, then an oil-fuel boiler is a good option for heating a large house. If this is not possible, then it is best to opt for a long-burning solid fuel boiler.
When designing a heating scheme with heated floors and radiators, it must be taken into account that underfloor heating is more economical. But this does not mean that radiators are useless. Their task is to create a thermal curtain near the windows and prevent the house from cooling down. With the right choice of system elements and thoughtful control, heating will be as efficient as possible and at the same time relatively inexpensive.
A condensing boiler is the most profitable solution for a private home. The efficiency of the devices is significantly higher than conventional boilers, and fuel is consumed more economically. Condensation models are energy-dependent, because equipped with electronic ignition systems. Additionally, heating is equipped with pumps for forced circulation of coolant
Advantages and disadvantages of schemes
Installation diagrams for water heated floors in a private house have the following advantages compared to other heating options:
- In homes with large areas they help reduce energy costs.
- Provide uniform heating of the room.
- The device is characterized by increased safety, since there is no risk of burns or injury.
- Pipes do not spoil the interior of the room.
- Warm floors go well with many finishing materials.
- Possibility of different connection options.
Installation of heated floors in cottages is becoming increasingly popular.
The disadvantages include the large amount of time required to install the system. If leaks appear, you will have to remove most of the floor covering, including the screed.
Designing schemes for heated floors in an apartment
Designing installation diagrams for water heated floors in a private house differs from an apartment project. After installation, you cannot make changes to the radiator layout. Installation of floor structures powered by centralized heating is carried out during the construction stage by special organizations.
Installation of the structure in the apartment
In apartments, the coolant is supplied through pipes through a separate riser, and not from the radiator heating riser. The water is heated in a special heat exchanger. If the project initially does not contain data on the installation of underfloor heating, then the connection of a new circuit must be approved by the management company.
Connection to distribution manifold
Helpful information! After agreeing on the project and obtaining permission, a heat exchanger is installed, and an expansion tank, circulation pump and safety group are installed. For multiple circuits, a collector unit is used.
Prices for installation work of heated floors
Installation diagrams for water heated floors made in a private house may have different costs. It will include materials, preparatory and installation work, as well as connection and strength testing of circuits. The cost of work per square meter varies from 1,500 to 3,000 rubles. The price is also affected by the type of base and the quality of the equipment.
Installation of pipes on a wooden base
Helpful advice! It is recommended to purchase ready-made sets of equipment for underfloor heating. Many manufacturers offer a free calculation of the entire system.
Conclusion:
Calculating and installing a warm water floor system yourself is a solvable task. It is recommended to start work at the very beginning of spring in order to have time to carry out all the work, test the system and correct possible errors during the warm period. In addition, it is easier to carry out concrete floor screed.
To make the work easier, it is recommended to purchase profile mats. It is much easier to install floor heating pipes on them, and in this case there is no need for reinforcing mesh - the pipes are securely fixed in the mat.
The main condition for successful work is the selection of quality materials.
Useful tips
The density of the pipeline is determined by the required level of heating of the room. Near walls and entrance doors, denser installation is performed. In this case, the distance from the highway to the wall should be more than 12 cm. The length of one circuit should not be more than 100 meters. In addition, highway joints are made using metal sleeves. The manifold with gearboxes are placed in a special distribution cabinet, for which you need to select a location in advance.
Comfortable living conditions
The quality of installation diagrams determines the complete heating of the room and the creation of a favorable microclimate in the house. Good luck with the renovation!
Laying principles
Before you begin purchasing materials and then installation, you need to make calculations. Currently, there are many online services that offer calculators. It is enough to enter the requested data, the system will make the calculations itself.
If you leave the installation in the hands of professionals from a specialized company, they will independently perform all the calculations.
For calculations, standard numerical values proven by experience are usually taken, which will need to be adhered to regardless of the installation technology and specific conditions.
It will be necessary to understand in which room what thermal load is planned. If it is impossible to set these parameters, you should proceed from the maximum in each room. Possible thermal load will affect the pipe layout spacing. Usually it is at least 10-15 cm, since a closer location can lead to the formation of creases. If it is expected that the floors in a separate room will keep a low temperature, the step can be changed - up to 60 cm.
Helpful Tips:
- one circuit should not be distributed into two rooms;
- for a room whose area is 30-40 m2 it is necessary to install two circuits, one will not be enough;
- one side of the contour should not exceed 8 m in length;
- It is necessary to use a damper tape to reduce deformation due to thermal expansion.
For small rooms (no more than 5 m2), which are located in close proximity, it is possible to install one single circuit. For example, this is a bath and toilet. Often houses are equipped with huge bathrooms (more than 10 m2). In this case, it will not be possible to complete a single contour.