If a decision has been made to install a heated floor system in the house, then it is not enough to simply buy the required materials - you also need to know how much of them will be needed. And these calculations are not easy, considering that you want not to buy too much and at the same time make sure that the purchased materials will be enough to achieve the required temperature level in the rooms. How to calculate a heated floor? Let's try to figure it out.
How to calculate a heated floor
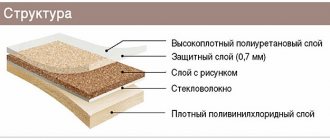
Classification of heated floors
What can affect heat transfer?
To begin with, I would like to dwell on what a correct and high-quality heated floor should be, regardless of what coolant - electricity or water - it will work on. So, such a heating system will work differently depending on the thickness of the base or the quality of the heat insulator , which means that all these points must be taken into account. It is believed that the thickness of the thermal insulation material should not be more than 3 cm, and it is better to purchase the material with a reflective layer - this will make it easier to retain heat indoors.
Advice! It is recommended to purchase polystyrene foam with a density of about 35 kg/m3 as a heat insulator.
Do-it-yourself warm floor
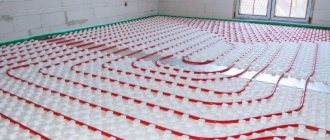
The thickness of the concrete screed should be about 4-10 cm, especially if we are talking about laying a cable or water floor. Inside, it is reinforced with a reinforcing mesh, onto which, by the way, coolants can be attached. Due to this, heat will be redistributed better. If you plan to install a water floor, it is recommended to purchase pipes made of metal-plastic or cross-linked polyethylene with a diameter of 16-20 mm - with them it is easiest to provide the system with optimal power sufficient to warm up the rooms.
Scheme of a heated floor under a screed
Pipe for heated floor
Common features
Typical violations.
It is wrong to make a thick screed over pipes and without a backing. The thickness of the screed for a water heated floor will affect the efficiency of the system, its efficiency, as well as the operating period. A thin layer will not allow the base of the floor to warm up evenly, and besides, such a screed will crack very quickly due to constant changes in temperature conditions. The selected floor covering on a very thin screed will also deteriorate very quickly.
But thick layers of fill will not bring a positive result. With this basis, heating costs will increase significantly, since you will have to spend a lot of energy to warm up the entire resulting “pie”. Therefore, it is necessary to choose the optimal level of concrete screed pouring for a water heated floor system. But even experts will not be able to give an answer about the universality of the thickness of the mortar. Many conditions can affect this parameter:
- Type of floor base, type of soil. To a greater extent, this applies specifically to private construction when arranging a room with a concrete floor from the very foundation.
- Parameters of the entire room where the screed is installed on top of the warm water floor, its configuration.
- The purpose of the future premises.
These points are among the main ones. Additionally, there may be a few more nuances that are worth paying special attention to. They can be called the marking of the cement used, the choice of a specific mixture for the job, the reinforcement and its characteristics, etc.
What factors should you consider?
In order to make all the necessary calculations that will help determine the amount of materials for a heated floor, you should consider the following:
- the total area of the room where floor heating will be installed . The number of circuits in the system will depend on this figure;
How to calculate the area of a room
Important! One heating circuit effectively heats a maximum of 40 m2. Moreover, its length should not be more than 100 m. And the step between laid pipes should not be more than 30 cm.
- number of collectors . It is important to remember that each heating circuit can only be connected to one manifold;
- layout of rooms where heating is installed;
Options for heating cable laying schemes
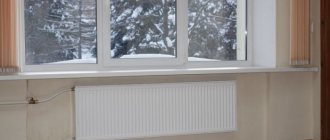
- the sizes of windows and other places where heat will be lost . Type of glazing. Types of doors;
- can also affect the power indicator ;
- indoor air humidity;
- arrangement of furniture and other interior items in the room . Under them, a heated floor is not installed if it is electric, since ventilation will be insufficient and the system may be damaged. And excessive heating can also have a negative effect on the safety of furniture and equipment;
- purpose of the room where installation will be carried out . Depending on this, the heating power is selected;
- other heat sources and their power.
When calculating a heated floor, many points need to be taken into account
The temperature regime in the region and the need to heat a specific room and regulate the temperature in it may be important. The type of floor finish can also have a significant impact on the power of the floor - some materials easily transmit thermal energy, others - worse.
Installation diagram of electric universal heating mats for heated floors
Advice! The easiest way to calculate underfloor heating is to use online calculators.
Laying tiles
A qualified craftsman can immediately begin laying tiles after installing the heated floor, having first checked the resistance of the thermomats. It is recommended for a beginner to first fill the laid system with tile adhesive. This must be done to avoid damage to the floor surface when laying tiles on mats. Choose an adhesive based on epoxy resin, as it tolerates high temperatures well.
Glue for pouring thin-cable thermomats is diluted to the consistency of sour cream and thickly applied to the laid fiberglass mesh. This is done in such a way as not to leave voids or air gaps. The thickness of the resulting adhesive coating for tiles should be less than 2.5-5 mm. After this, you just have to wait for the adhesive solution to dry, and then start laying the tiles. Thanks to these simple steps, your home will be warm in winter.
Determining the desired temperature in the rooms
The final floor temperature depends on the purpose for which the room is used. For example:
- +29-30 degrees – halls, hallways;
- +27-29 – offices, living rooms;
- +30-35 – floors near windows, on verandas;
- +32 – bathrooms, toilets;
- +17-19 – gyms.
Installation of water heated floor
In this case, the coolant temperature should not be less than +40 degrees or exceed +60. The heating system should be such that the difference between the temperature indicators of the forward and return pipes in the case of water floors does not exceed 15 degrees. Otherwise, the base will be heated completely unevenly.
The balance of thermal/hydraulic loads for a water floor must also be optimal and adjusted. Therefore, the heating circuits must have a certain length in accordance with the diameter. The optimal pipe option is 18 mm, since even with a small amount of water such a pipeline will work correctly and heat the base.
Correct temperature
To achieve maximum comfort levels, we recommend maintaining the following floor surface temperatures:
- Linoleum 26-28 °C
- Ceramic tiles/concrete floor 26-28 °C
- Laminate 23-27 °C
The maximum floor temperature can be limited by a thermostat.
If you do not know the maximum permissible surface temperature for your flooring material, please contact the manufacturer.
Important! Wood is a good thermal insulation material.
Calculation of heat losses
Typically, underfloor heating systems do not act as the only source of space heating, but some plan to heat the house this way. But before making this engineering decision, it is important to make sure whether a particular room can be heated only in this way.
Electric heated floor
If during the period of use of the system, heat loss does not exceed 100 W/m2, then the floor heating system will be quite sufficient to warm up the room. However, it is quite difficult to make calculations on your own to obtain the necessary data, since complex formulas are used. So it is recommended to use an online calculator for calculating the heat loss of a room. If heat loss exceeds 100 W/m2, then the thermal insulation of the room must be improved or an additional heating system must be installed.
Calculation for different types of premises
Each room, depending on its characteristics, requires different floor heating power. It should be greatest in cool rooms, as well as on a loggia or balcony. In such a room, the power cannot be less than 180 W/m2. In a bathroom or toilet - at least 140 W/m2 due to high humidity levels.
On a note! The power of the floor heating system cannot be low if there are unheated rooms under the room being equipped.
As for the electric floor, in this case the minimum power should be 120 W/m2.
Electric heated floor under tiles
Table. The power of the floor heating system when used as an additional heat source.
| Room | Power, W/m2 |
| Balcony and loggia | 180 |
| Bathroom, toilet | 140-150 |
| Living rooms and kitchen located on the 2nd and higher floors | 120-130 |
| Living rooms and kitchen located on the 1st floor | 140-150 |
Approximate calculation of the cost of materials
When calculating the approximate cost of a heated floor, you can proceed from the following prices:
- insulation per m2 - 600 rubles;
- temperature sensor - from 100 rub. and higher;
- non-programmed thermostat model - 600 rubles;
- software thermostat - 3200 rub.
If we take mats priced at 2,000 rubles as a basis, then the total cost of a floor with an area of 5 square meters will be approximately 14,000 rubles.
By choosing a “warm floor” heating system based on infrared or electric thin mats, you will solve several problems at once - effective heating of the floor covering, ensuring a comfortable atmosphere in your home and creating an individual interior.
How to calculate electric floor heating
In general, a floor heating system consists of several elements. This is a thermostat that helps control the level of heating of the floors, a temperature sensor that monitors how hot the floors are, a heating element, as well as a power cable for connecting all this equipment to the electrical network.
The thermostat is usually installed on the wall, all wires are connected to it. The heated floor itself, as well as the temperature sensor, are installed under the floor covering (in the screed or on its surface, depending on the type of system - heating mat, IR film or heating cable).
Touch programmable thermostat
On a note! The easiest way is to install infrared floors or heating mats. They can be laid simply under the floor covering. But the electrical cable will have to be covered with a screed. Yes, and the pitch between the wires in this case will have to be calculated independently.
To install cable heating, a single or two-core cable is used. The first is the simplest, but at the same time difficult to work with, although cheap. It will be quite difficult to calculate all the parameters for it, since both ends of the cable need to be brought out to one place. And an extensive electromagnetic field is formed from it.
Two-core cable for heated floors
It’s easier to buy a two-core cable, which, although it costs a little more, is still easy to install and operate due to the special arrangement of the wires.
Calculation formulas for electric floors
It is easy to determine the power of a warm electric floor system. To do this, it is enough to multiply the power of 1 m2 of the selected system by the area that it will heat. By the way, in the purchased kit the amount of cable used is already measured and marked. The distance between the turns of the wires should be 5-20 cm. It can be calculated accurately using the formula h = Sх100/L , where h is the desired value of the step width, L is the length of the cable, and S is the area of the room.
Calculating electric heated floors
Installation methods
The heating cable must ultimately be covered on all sides with mortar/tile adhesive; this can be achieved in three ways:
Fill
. The most correct way in my opinion. It consists of pouring a 1-2 cm mini-screed over the mounted cable. The resulting screed will be suitable for any floor covering. To implement this option, when pouring the main screed, you should provide a couple of centimeters of height in places where there will be a warm floor. For work, mixtures are used that allow such thin layers to be poured. If the screed is initially poured at one level and raising the floor level is unacceptable, then this method is not suitable.
Glue layer
. When the tiles are laid, and in addition to everything else, it is permissible to raise the level of the subfloor by 1-2 cm (do not forget, the tiles themselves will add at least 1 cm), the tiles are placed on top of the cable on a thick layer of glue. This option should be considered last, because there will be a significant difference at the border of the warm zone.
Grilling
. The most difficult and tedious method, however, when raising the screed level is unacceptable, is the most correct. First you need to mark the lines where the heating cable will go. You also need to take into account the groove for the corrugation with a temperature sensor and the coupling with the cold connecting cable. After marking, you need to attach some kind of thread/rope to the lines to check the length of the grooves. You need to be sure that the entire cable will fit into the future groove, otherwise you need to change the markings.
After gating, the dust is carefully removed and the surface is primed. The wire is laid in a groove; the depth of the groove should allow 3-5 mm of caulking solution to be applied over the cable.
The temperature sensor in the corrugation is also mounted in the groove; the corrugation must be plugged at the end (wrap it with electrical tape). The end of the corrugation should be placed between the heating conductors, not far from the edge of the heating zone (but not on the edge). The optimal distance of the temperature sensor is 30-50 cm from the edge, deep into the warm area.
When the wire is laid, the grooves are sealed with tile adhesive or a self-leveling floor mixture. If you plan to lay linoleum, it would be a good idea to apply a finishing layer of 1-2 mm of self-leveling floor.
Floors should be checked or used no earlier than a month after completion of all wet processes with the floor (pouring, laying tiles). Switching on earlier will not damage the cable itself, but may cause the solution/adhesive to crack.
Conclusion
- Heating cable is recommended for use with heated floors. The most preferred method of application is a direct heating system or "thin floor".
- Among all the variety of heating cables, it is best in terms of price-quality ratio to use a two-core resistive cable.
- The selection of the required cable with the required power density, its length and laying pitch are obtained as a result of calculations.
- Changing the length of a resistive cable section (except for a zonal cable) is unacceptable.
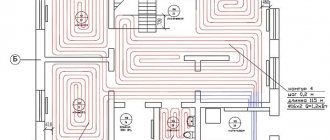
How to calculate a warm water floor
Let's see how many materials are needed to install a water heating system in the room. In this case, the calculation of the number of pipes per 1 m2 is done as follows: you need to find out how much heat loss in the room will be. The easiest way to determine them is with the help of an online calculator, which includes data about the building itself, as well as weather conditions outside. Let them be equal to 80 W/m2. Let’s take the area of the apartment where the heated floor system will be installed to be 80 m2. As a result, the total heat loss can be found by multiplying two values 80x80 = 6400 W. It is this value that will have to be compensated using all heating systems with a power reserve of up to 20%.
Water heated floor
Table. Pipe calculation depending on the loop pitch.
| Step, cm | Consumption, m./1 sq. m. |
| 10 | 10 |
| 15 | 6,7 |
| 20 | 5 |
| 25 | 4 |
| 30 | 3,4 |
Typically, the distance between water lines is maintained at about 15 cm with a pipe cross-section of 16 mm. Then the power of 1 m2 of floor will be about 100 W. Dividing the total area of the room by the step size, we get: 80/0.15 = 533 m. This is exactly how many meters of pipe will be required to install a water heating system in this apartment. The length of each contour is calculated in approximately the same way.
Attention! Near the walls of the room adjacent to the street, the step will be slightly smaller (10 cm). Taking this into account, the footage of the water pipeline is calculated.
In construction stores, pipes of a certain length are available for sale - from 50 to 240 m. They are wound into coils. And to connect the entire system to the collector, you will have to buy larger diameter water pipes.
Heated floor pipe circuit length calculator
Go to calculations
Link to source.
About film heaters
Calculating the amount of infrared film is much simpler and comes down to selecting a heating material based on size and specific heat transfer:
- Calculate the room's need for thermal energy (section one of this publication).
- Sketch the layout of a room with stationary furniture. Calculate the size and square footage of the free area.
- Film heated floors are laid out at a distance of 15-20 cm from the walls. Draw these stripes on the sketch and subtract their dimensions from the free area.
- The last task is to place an infrared film of the required total power on the remaining area. Select rolls of the desired width and heat transfer from the manufacturer’s catalog.
Keep in mind that thermal film can only be cut across, guided by special lines (interval - 250 mm). Adjacent canvases can be laid end to end or with a calculated interval, but not overlapping. For the bedroom from our example, the amount of film is calculated as follows:
- The required heat transfer of the floor circuit is 1.08 kW. If you take a product with a heat output of 130 W/m², you will need 1080 / 130 = 8.3 m² of film heater. Taking into account the reserve - 9 m².
- The roll width is 0.5 m. To collect 9 squares, you need to take a film 18 m long.
- Since there is 15 m² of free space in the bedroom, this type of heater is quite suitable.
Additional calculations
Let's consider how the hydraulic calculation occurs. It is necessary to determine the power of the purchased pump. Losses for a straight pipe with a length of 10 m, a diameter of 16 mm and a wall thickness of 2 mm will be 1600 Pa. Rotations of 180 degrees – 40 Pa each. Then, for a room with an area of 18 m2 with a length and width of walls of 5.6 and 3 m, respectively, when installing a water floor system with a snake, the hydraulic losses will be 18,680 Pa. The figure was obtained by the following calculations: the value of the width of the room 3 is divided by increments of 0.15 . This results in 20 straight sections of pipe. Losses of all straight sections: 20x5.6x160 = 17,920 Pa. At turns, the GP will be 19x40 = 760 Pa. Thus, adding 760 and 17,920 Pa, we get the value 18,680 Pa.
Manifold with installed pump
This means that for the system to work correctly, it will be necessary for at least 2.4 l/hour of coolant to pass through 1 m of its length. You can accurately calculate the performance as follows: coolant flow RTH = 0.86xMK/RT, where MK is the circuit power in kW, RT is the temperature difference in the supply and receiving sections of the pipe . Based on the above calculations, a pump that can pump 0.172 m3/hour (0.86x2/10) will be useful for that room.
Video - What calculations are needed for heated floors
Prices for heated floors Caleo
warm floor caleo
Example of approximate calculation
Let's look at a simple example of how to calculate the heated area and power of an electric floor in a kitchen, which is located on the ground floor. The floor will be used as an additional heat source. The area of the room is 10 m2. From it you need to subtract the area occupied by the refrigerator and furniture - 0.36 m2 and 2.4 m2. When laying the contour, you should step back from the walls by about 5-10 cm - this will be about 0.5 m2. Thus, we get 10 – 0.36 – 2.4 – 0.5 = 6.7 m2. This value is equal to the floor area under which electric heating will be installed. For a kitchen located on the ground floor (that is, there is a cold basement below the room), subject to additional heating, a floor power of 140 W/m2 will be sufficient. Now you need to multiply the heated floor area of 6.7 m2 by 140 W/m2. It turns out that the power of the heating system should be 930 W.
Do-it-yourself calculation of a heated floor
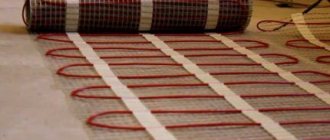
Thermomat
Today there are many “warm floors” on the construction market. However, thermomats are gaining immense popularity every day. Thermal mats are used in various fields:
Might be interesting
Thermal insulation
Insulating the ceiling in a bathhouse - methods, materials, useful...
Thermal insulation
Tables of comparative characteristics of thermal insulation…
Thermal insulation
Why polyurethane foam insulation is the best...
Thermal insulation
Self-adhesive thermal insulation: how to choose and apply?
- They are used to allow concrete to harden faster. This material is used in the production of reinforced concrete products.
- Thermal mats are used to warm the soil. This is done before carrying out land work.
- They heat the joints between the plates.