There are many opinions about where and when they first began to use the technology of heating homes by heating the floor or other building structures. Archaeologists continue to find more and more ancient artifacts pointing to it all over the world. For example, in northern China, a heating system called “kan” was common. It was a stove with chimneys located under a low bench. In Korea, they came up with a more advanced type of duct-stove heating - “ondol”, which distributed the heat completely under the entire floor surface of the room. Similar types of heated floors were discovered in Sweden (IV century BC), as well as in the settlement of Akarim (III century BC), located in the Chelyabinsk region. Later, a similar “Russian” heating system was used to heat the Faceted Chamber.
However, the most famous among contemporaries was the Roman thermal system - “hypocaust”. It consisted of a stove located outside the living quarters, from which a mixture of smoke and warm air entered the ducts inside the walls and into the underground space. It should be noted that all of the heating methods listed were quite expensive both in design and in operation. Therefore, for example, even among the wealthy citizens of Rome, only part of the living quarters was heated with hypocaust.
Warm floor, photo of the remains of a Roman villa with a partially exposed hypocaust structure
Types of electric heated floors
Electric heated floors can be divided into two types according to the heating principle:
- Cable;
- Infrared;
- Self-regulating.
In cable heated floors, the electric cable is heated, which gives off heat to the surrounding material or environment - air, screed, substrate. This type of system includes:
- Wire;
- Single-core;
- Twin-core;
- Cable mats.
Infrared heated floors produce heat in the form of infrared radiation. It heats up solid structures such as flooring and screed. They can be divided into two types:
- Film;
- Rod.
Wired systems
This type of underfloor heating is suitable for installation on an existing floor covering. There is no need to hide it in a screed. The cross-section of the wire is small, it does not produce as much heat as a single-core or double-core cable. But this is compensated by the installation method.
The wire is usually laid in a snake pattern, in increments of no more than 5 cm. Due to this, the thermal power is sufficient for efficient heating of the room. Since the distance between the wires is small, laminate can be laid on them. It will not sag or deform. Also, such warm floors are installed in a layer of tile adhesive.
Experts advise using a substrate when installing this type of heated electric floor. This way it will be possible to achieve more uniform heating. The wire itself will heat the air, which will distribute evenly in the space between the substrate and the floor covering. Accordingly, laminate, parquet or floorboards will heat up more evenly.
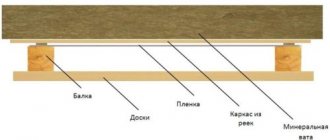
Thermal insulation
If you do not use a layer of thermal insulation, then the heat risks going not only to the apartment, but also to heating the powerful interfloor ceilings and walls of the house. Not only will it be colder in the apartment, but you will pay for heating the floors out of your own pocket.
Thermal insulation is strictly necessary:
- IR film requires reflective insulation;
- Mineral slabs or extruded foam are placed under the cable floor.
The thickness of the thermal insulation layer depends on the characteristics of the room. If there is a heated room below, then a layer of up to 20 mm is enough; if below there is a basement, or the insulation takes place on the balcony, then it is better to use a layer of 35-40 mm.
In order for heat from the floor to enter the apartment and not be spent on heating interfloor ceilings, thermal insulation of the heated floor is necessary
Single core cable
This is the most common type of heated electric floors. It is a regular cable wound on a drum. It is laid in a screed or a special substrate. The cable design is as follows:
- Conductor (heat source);
- Insulation;
- Reinforcing braid;
- Water-repellent screen;
- External protective coating.
For the cheapest cables, the reinforcing braid is also grounding. In more expensive options, the grounding conductor is separate from the braid.
The disadvantage of single-core cable heated floors is the installation method. It should start and end in the same place (see diagram below). In simple terms, one end of the cable needs to be connected to the positive, and the other to the negative.
Method of laying and connecting a single-core cable heated electric floor.
conclusions
When choosing a heated floor technology, it is necessary to take into account not only its cost, but also installation features:
- Often in apartment buildings it is undesirable to install heated floors in screeds due to low ceilings in the rooms. In such cases, it is most advisable to use film TCs, despite their higher cost.
- Most types of heating cables and mats based on them can be mounted not only on the floor, but also on the walls.
- For constant heating or use as the main source of heating, it is undoubtedly better to install a water heated floor, which is the most economical.
https://www.youtube.com/watch?v=RiBDhzF5arE
Twin cable
Like the previous single-core option, the two-core cable can be laid in a screed or underlay. This type of cable has two separate conductors that are insulated from each other. Its design is as follows:
- Conductive conductors;
- Insulation;
- Reinforcing braids (separate for each core);
- Water-repellent screen;
- External insulation;
- Grounding.
Twin-core cables can have one or two grounding connections. The illustration shows an option with one - it is located outside the reinforcing braids. In the case of two, they are usually located inside the braids of each core.
When laying a two-core cable, there is no need to connect the other end to a power source. At one end of the cable, you need to connect the current-carrying wires together, and on the other side, connect them to the controller, network, etc. Laying is carried out according to the following scheme:
Method of laying and connecting a two-core cable heated electric floor.
Cable mats
The easiest type of heated electric floor to install. Installs only in screed or tile adhesive. It is a plastic mesh to which a conductive cable is attached. In most cases, cable mats are single-core, but you can also find two-core ones.
Electric heating mats are made of thin cable and substrate no more than 10 mm thick. The distance between the cables does not exceed 12 cm. Due to this, they can be laid under tile adhesive. There are options with a self-adhesive backing.
The width of the mat is usually 0.5-0.6 meters. The length varies from 1.5 to 30 meters. Long mats can be cut as needed, and individual parts can be connected in series. Individual sections can be connected using:
- Perehodnikov;
- Detachable connections;
- Rations;
- Twisting veins.
Laying a cable mat for a warm electric floor.
TVP Installation Guide
Before laying the heated floor structure, you should carry out preparatory work: purchase components, mark the installation location of the cabinet, drill holes in the walls for communications. Then you can proceed to the first stage.
Step #1 - subfloor installation
If you plan to install a heated floor directly on the ground, it is recommended to choose one of two options:
- make a “rough” screed from cement pouring;
- instead of screed, pour, compact and level a layer of sand.
A layer of sand will be required in any case, since it also serves as the basis for the screed. A layer of waterproofing is placed on it, the most basic option is a thick polyethylene film.
Compaction and leveling of the sand layer is very important. Small depressions up to 5 cm deep are allowed, but for pipe installation it is better if it is perfectly smooth
When making calculations, it should be remembered that heat loss when installing the system on the ground is higher, therefore, the temperature of the coolant in the pipes should be higher than usual.
Step #2 - laying a heat-insulating layer
The insulation is laid on a clean, level floor. Before starting work, a strip is cut on the walls - the level of the clean floor; small depressions, if they were formed during the construction work, are filled with clean, dry sand.
Installation instructions:
- Spread the waterproofing - lay sheets of film with a density of 150-200 microns with an overlap of at least 10 cm and wrap them on the walls.
- Lay the slabs of extruded polystyrene foam with the markings facing up, joining the grooves together. It's better to start from the far corner.
- If necessary, cut out fragments with a construction knife.
- Secure the slabs with disc dowels at the corners, along the middle of the joints and in the center of the slabs.
- Seal the seams with construction tape.
If laying a second layer is required, then it is better to change the direction of the upper slabs, that is, lay them perpendicular to the lower ones.
When laying, avoid large gaps and cracks. If they do form, the voids can be blown out with foam or covered with scraps of polystyrene foam
To move on the slabs during installation, it is recommended to use thin boards or pieces of plywood - the structure of the slabs, despite their density, can be deformed.
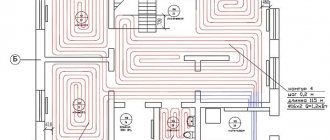
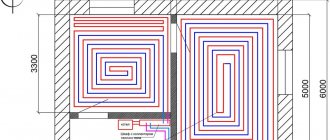
Step #3 - marking and placing pipes
Markings are applied to the surface of the slabs using a marker or paint cord. If profile mats are used instead of EPS, markings will not be required.
There is a risk of bending and twisting of the pipe when unwinding, so it is better to use a special device for unwinding the coil. It will take longer to unwind manually
Before starting pipe installation, it is also recommended to install collectors and prepare places for connections.
Installation instructions:
- Unwind 15-20 m from the pipe, put a heat-insulating sleeve and a fitting on the end for connection.
- Connect to the collector.
- Carefully lay the pipe according to the markings.
- Secure the outline with harpoon staples.
- Bring the pipe to the manifold and connect the other end.
The length of each loop must be recorded, and not just remembered, but written down near the fitting on the wall.
A damper tape or some substitute is placed along the edges - for example, pieces of foam plastic 1.5-2 cm thick. They hold up well on liquid nails
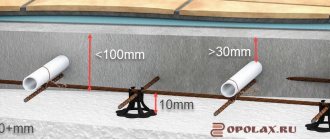
Transit pipes passing through walls or transition zones are insulated as much as possible with sleeves. Instead of expensive imported products, you can use ordinary insulation - foamed polyethylene.
Step #4 - installation of reinforcing mesh
Properly laid fittings should be located above the pipes, not under them or between them. An acceptable option is a metal mesh with a 10*10 cm cell made of 3 mm wire.
It is also incorrect to fix the contours to a metal mesh; in this case, it will serve as a stand, not reinforcement. Proper installation - when the mesh is above the pipes
Nowadays, many people use plastic mesh instead of wire mesh. This option is also suitable, since the polymer creates the necessary rigidity.
Step #5 - system testing
Until hydraulic tests have been carried out to check the tightness of the system, the screed cannot be poured. Usually the circuits are checked one by one.
First, a main line and a pump are connected to the pipe, and water is supplied. For drainage, use a hose connected to the drain pipe of the manifold.
A pressure test pump is the best tool for testing the system. It can be rented. You can also hire a specialist for testing, who usually has the necessary tools
During inspection, staples may fly off as the pipe tends to straighten under pressure. The harpoons that fly off are attached 5 cm from their original place; after pouring the screed, they will no longer fly off.
Step #6 - laying cement screed
The pipes are left under a pressure of 5 bar and the screed is laid. Usually the traditional beacon method is used. You can use a metal profile for drywall as beacons.
A regular screed solution is not suitable; plasticizers and fiber must be added to the cement, since the load will be not only mechanical, but also temperature
Laying is done in parts, starting from the far corner. Immediately after pouring, each fragment must be leveled, dips and sagging must be eliminated.
After 2 days, the surface is cleaned, the damper tape is cut, the screed is sprayed with water and covered with film (the last two steps are repeated for 10 days).
Infrared (film) heated floor
This type of underfloor heating is installed on top of the subfloor. They are rolls of film coated with heat-generating carbon elements. The film thickness does not exceed 0.5 mm. The elements themselves heat up and emit in the IR range.
The individual parts of the film floor are connected to each other by soldering or using detachable connections. Due to the large area of the heating elements, they provide uniform heating of the floor covering.
Design of infrared film heated floor:
- Protective polyethylene film;
- Copper strip;
- High temperature absorber;
- Silver stripe;
- Substrate (base);
- Carbon heating element.
Construction of infrared film floor.
The diagram shows an infrared film floor with carbon strips, copper and silver backing. There are also options with:
- Solid carbon heating element;
- Two copper strips;
- Two silver stripes.
Infrared mats with carbon rods
The design of this type of infrared floor consists of two longitudinal cables, between which carbon fiber heat-generating elements are laid. Such mats can be with or without a backing.
The rods and cables of infrared mats have a diameter of no more than 1 cm, so they can be laid in adhesive under the tiles. But due to the large distance between the elements, heating will not always be uniform. Therefore, it is better to install them in a screed.
The width of the rod mats is usually 0.6-0.9 meters, length – up to 30 meters. They can be cut if necessary, and individual parts can be connected by soldering, adapters or connectors.
Cove of infrared rod heated floor.
Self-regulating systems
This is a new technology that uses semiconductors and carbon fiber instead of conventional metal cables. Depending on the heating level, the properties of the heating element change, in particular electricity consumption. For example:
- At t=20°C, consumption is 170 W/sq.m.;
- At t=60°C, consumption is 125 W/sq.m.
The values are given as an example , because everything depends on the cable cross-section and laying pitch.
Now self-regulating heated floors are available in three versions:
- Rod mats;
- Single-core cables;
- Twin-core cables.
Types of heated floors for laminate, tile, linoleum
Each floor covering has its own type of warm electric floor. Let's look at their features.
It is best to lay infrared film under the laminate. This type of warm electric floor will allow you to evenly heat the entire coverage area. In this case, there will be no need to fill the screed or trench an existing one.
It is best to use mats or wired heated floors under the tiles. They have a small height, which allows them to work effectively with an adhesive layer of 15 mm or more. If you are just pouring a screed, you can lay a cable heated floor. In this case, the layer of tile adhesive will be small, and the heating efficiency will be high.
As for linoleum, any option will do. It all depends on how much you are willing to spend on installation. If the screed has already been laid and leveled, it makes sense to install film infrared heated floors. If not, choose any of the options depending on the thickness of the screed, the shape of the room, etc.
Selection principles
The choice of the type and characteristics of a heated floor is carried out in several stages:
- First of all, you need to determine whether the heated floor will be the main heating system, or used in addition to the existing one. In the first case, the calculation must be carried out based on heat loss in order to fully provide the room with heat to heat to the required temperature. The power of the heated floor in this case depends on the climatic characteristics of the region, but on average the system is selected based on the specific value of 120.0–140.0 W/m²; for an additional system, 80.0–100.0 W/m² is sufficient.
- Next, choose the type of heated floor. If installation is planned in a screed, then select the type that can be installed in this way. Most often this is a cable or mat. For installation in a bathroom or kitchen under tiles, it is advisable to use a heating mat. It is better to use infrared film directly under the decorative coating.
- When the type and power have been selected, it is necessary to purchase the heated floor itself and additional materials and carry out installation.
Important! To save money and materials, there is no need to install heated floors under massive furniture and household appliances, or a bathroom.
During installation, you must follow all manufacturer's recommendations and building codes.
Pros and cons of different types of underfloor heating
The underfloor heating system has a number of advantages compared to other types of heating (radiators, convectors, etc.):
- Low power consumption;
- Uniform heating of the entire area of the room;
- Uniform heating across the height of the room;
- High service life;
- They do not dry out the air.
But warm electric floors also have their disadvantages:
- Expensive installation;
- Heating with electricity is more expensive than central heating with gas or solid fuel;
- In most cases, underfloor heating cannot be easily removed.
Cable, film and rod mats
The main problem with these systems is the fixed width. They are inconvenient to install in rooms with complex geometry and furniture. It will take quite a long time to combine the position of the individual parts to ensure uniform heating. There may be a large number of connections.
The advantage of cable and rod mats is their low height. This allows them to be laid under tiles and stones in a layer of adhesive.
Infrared mats are ideal for laying under linoleum or laminate. At the same time, they can be easily dismantled, since they are not laid in a screed.
Wired and cable heated floors
The advantage of such systems is that they can be used to ensure uniform heating of the entire floor area. For rooms with a lot of furniture and complex geometry, they are perfect.
The disadvantage of these systems is longer installation. They are laid in screed or tile adhesive. Unlike mats, when installing, you must accurately measure and follow the laying step.
Water heated floor
A water heated floor is a pipeline through which heated coolant moves. The flooring is heated by hot water coming from the heating system or boiler. The coolant is regulated using a collector unit equipped with a pump. The temperature supplied to the pipes should not exceed 45 degrees.
The water system has many advantages:
- warms the room evenly;
- economical - operating costs are not significant;
- Laying over the entire area is permissible - there is no risk of overheating the surface under heavy furniture.
The disadvantages of this type include:
- complex installation process and time-consuming;
- the design reduces the height of the ceilings, because more often it is filled with concrete screed;
- the complexity of repair work in the event of a leak, since the entire “pie” will need to be dismantled.
It is important to know! In high-rise buildings, such devices are rarely installed, because permission to connect to a common heating system is required. In addition, there is a risk of flooding the neighbors below.
As for the material from which pipes for warm water floors are made, there are several varieties.
Copper
Copper is the most suitable option for underfloor heating pipes. It is not subject to corrosion and tolerates mechanical loads and pressure exerted on the material inside the pipe. Withstands temperatures from -100 to +250 degrees. If the coolant inside the circuit is frozen, the pipes do not crack.
For your information! When using a warm water floor with copper pipes, it is not recommended to drain water from the circuit.
There are a number of limitations when using a copper pipeline:
- It is not permissible to lay steel and copper pipes in the same circuit;
- It is not recommended to carry out installation yourself, since the work is complex and requires professional equipment;
- You cannot use coolant with an acidic or alkaline environment so that the line lasts longer.
The cost of copper pipes is high, but it will pay off due to its long service life - more than 50 years.
It is recommended to install warm water floors with copper pipes in houses with intermittent residents, where there is a danger that the main line may freeze.
Metal-plastic
Metal-plastic is a relatively new material, consisting of an outer and inner layer, as well as reinforcement with aluminum foil.
Pipes made of this material have high performance characteristics. They:
- durable - up to 50 years;
- resistant to corrosion;
- immune to mineral deposits;
- biologically inert - do not release harmful substances;
- resistant to chemicals - it is possible to fill with water with various additives or antifreeze;
- lightweight - so it’s easy to install it yourself, without special equipment;
- have good soundproofing properties.
For your information! Despite the ease of installation of metal-plastic pipes, it is advisable to have at least some experience in this work. Since incorrect installation can lead to loose fittings during operation. Therefore, it is better that the part of the contour filled with screed is solid. In addition, a pipeline made of such material has temperature restrictions, from -10 to +95 degrees.
Polypropylene
Polypropylene contours have a reasonable price, despite this, their performance characteristics are high, but they are not recommended for heated floors. The reason lies in the rigidity of the material, which complicates the process of bending the contour. Therefore, experts advise laying them in TP in exceptional cases, and in rooms not exposed to sub-zero temperatures.
Cross-linked polyethylene (REX)
This material is relatively new, but has already proven itself well. It has good properties:
- temperature range from 0 to +95 degrees, although it can withstand -50 and +150 for a short time;
- the presence of deformation memory, that is, when a crease occurs, it is enough to direct hot air to restore the shape;
- has pressure resistance;
- REX pipes are easy to bend;
- it is not afraid of corrosion;
- there is no release of toxic substances during operation.
Cross-linked polyethylene is sensitive to ultraviolet rays. This indicator is not important if there are pipes located in the “pie” of the heated floor, but this should be remembered when storing the product.